
By Bertil Muth
Configurable Dependency, also known as Dependency Injection, is a pattern that enables you to switch dependencies of your application. The term was coined by Alistair Cockburn.
Say your application has a GUI. But your administrator wants to use certain functions via the console. Or your production code calls an external service. But your tests shouldn’t call the service, since it doesn’t provide reliable results. Or the service isn’t always available.
Here’s where a Configurable Dependency is helpful. Depending on context, you use one dependency or the other.
A lot of articles attempt to explain the pattern. But they embed it in a broader context, like ports and adapters architecture. That makes understanding harder than necessary. I know, I’ve written such articles myself.
On top of that, many articles focus on greenfield applications. But most of us have to maintain applications that already exist.
Let’s start with a simple class that has a hard-wired dependency. Then we'll refactor it to a class that has a Configurable Dependency.
The example is trivial, but the refactoring steps are generally applicable to your own application if you’re in a similar situation.
I’ll refer to an example GitHub project in the article. It shows the steps to perform, in its commit history. At the end of the article, there are appendices for IntelliJ IDEA and Eclipse. They show how to do the refactoring steps in your IDE.
The Calculator Example
Say you have a class called Calculator. It’s the equivalent of “business logic”. At the end of each calculation, it prints the result to the screen. In a real world application, it might save something to a database instead.
Here’s the code:
package example;

public class Calculator {
    public Calculator(){
    }

    public long add(long one, long two) {
        long result = one + two;
        printResult(result);
        return result;
    }

    public long sub(long one, long two) {
        long result = one - two;
        printResult(result);
        return result;
    }

    private void printResult(long result) {
        System.out.println("The result is: " + result);
    }
}
Now if you want to test that class, your test code may look like this:
package example;

import static org.junit.jupiter.api.Assertions.*;
import org.junit.jupiter.api.*;

class CalculatorTest {
    private Calculator calculator;

    @BeforeEach
    void setup() {
        calculator = new Calculator();
    }

    @Test
    void addsToNumbers() {
        long result = calculator.add(1, 2);
        assertEquals(3, result);
    }

    @Test
    void subtractsToNumbers() {
        long result = calculator.sub(5, 1);
        assertEquals(4, result);
    }
}
Every time you run your test, it prints the results to the screen. That’s unnecessary. It slows your tests down.
With dependency injection, you can still assert the result in the test. But you avoid printing the result to the screen (or saving the result to the database, the file system, or somewhere else).
Step 1: Move Dependency Creation to the Constructor
Find out where an instance of the dependent class is created. Move creation to the constructor by assigning the instance to a field. Use the field throughout the class, so that only the constructor creates the dependency.
The example code is a bit different. The dependency is a static one, System.out. But as described above, the refactored code assigns it to the printer field in the constructor.
So the Calculator class now looks like this:
package example;

import java.io.PrintStream;

public class Calculator {
    private final PrintStream printer;

    public Calculator(){
        printer = System.out;
    }

    public long add(long one, long two) {
        long result = one + two;
        printResult(result);
        return result;
    }

    public long sub(long one, long two) {
        long result = one - two;
        printResult(result);
        return result;
    }

    private void printResult(long result) {
        printer.println("The result is: " + result);
    }
}
Run the test. It still needs to pass.
Step 2: Pass the Dependency as a Constructor Argument
Pass the instance as a constructor argument, instead of creating it in the constructor. Here’s the refactored example code:
package example;

import java.io.PrintStream;

public class Calculator {
    private final PrintStream printer;

    public Calculator(PrintStream printer){
        this.printer = printer;
    }

    public long add(long one, long two) {
        long result = one + two;
        printResult(result);
        return result;
    }

    public long sub(long one, long two) {
        long result = one - two;
        printResult(result);
        return result;
    }

    private void printResult(long result) {
        printer.println("The result is: " + result);
    }
}
For this class to work, you need to adapt each line of code that creates a Calculator object to pass in the dependency. So the line to create the Calculator in CalculatorTest now looks like this:
calculator = new Calculator(System.out);
Run the test. It still needs to pass.
Step 3: Create an Interface and Implementation
Create an interface with the exact same name as the class name of the dependency. Place it in the same package. Put the method in it that the business logic calls.
package example;

public interface PrintStream {
    void println(String text);
}
In the Calculator class, remove the import statement of the dependency, java.io.PrintStream, to use the new interface instead.
Here’s one implementation of the interface. ConsolePrinter contains the original functionality that prints to a screen.
package example;

public class ConsolePrinter implements PrintStream{
    @Override
    public void println(String text) {
        System.out.println(text);
    }
}
In the test class, pass in the ConsolePrinter. Run the test. It still needs to pass, and print the results to the screen:
package example;

import static org.junit.jupiter.api.Assertions.*;
import org.junit.jupiter.api.*;

class CalculatorTest {
    private Calculator calculator;

    @BeforeEach
    void setup() {
        calculator = new Calculator(new ConsolePrinter());
    }

    @Test
    void addsToNumbers() {
        long result = calculator.add(1, 2);
        assertEquals(3, result);
    }

    @Test
    void subtractsToNumbers() {
        long result = calculator.sub(5, 1);
        assertEquals(4, result);
    }
}
Step 4: Rename and Clean Up
This is an optional step. You can decide to rename the interface, to give it a more meaningful name. For example, rename PrintStream to Printer.
You can also decide to move the class to a different package and rename its method(s).
Run the test. It still needs to pass.
Step 5: Configure the Dependency
Create another implementation that ignores the text argument, for testing purposes:
package example;

public class IdlePrinter implements Printer{
    @Override
    public void println(String text) {
        // This is empty, because we don't want to print in tests.
    }
}
Now, you can change a single line of the CalculatorTest to turn off printing:
calculator = new Calculator(new IdlePrinter());
Since Java 8, you don’t even need IdlePrinter. Pass in a Lambda function instead:
calculator = new Calculator(text -> {});
Congratulations!
You have refactored to a Configurable Dependency.
Have a look at the GitHub project commit history to see the changes in code that I performed.
If you have any questions, leave a comment or contact me.
Twitter: https://twitter.com/BertilMuth
LinkedIn: https://www.linkedin.com/in/bertilmuth/
The following appendices explain the concrete refactoring steps in IntelliJ IDEA and Eclipse.
Appendix A — How to refactor in IntelliJ IDEA
IntelliJ Step 1: Move Dependency Creation to the Constructor
Open the Calculator class. Locate System.out. Right click, select Refactor > Introduce Field. Select initialize in: constructor. Name the field printer. Hit Return.
IntelliJ Step 2: Pass the Dependency as a Constructor Argument
Set the cursor into the constructor, Calculator(). Mark the access to the dependency, System.out. Right click, select Refactor > Introduce Parameter. Name the field printer. Hit Return.
IntelliJ Step 3: Create an interface and Implementation
Create the interface and implementation in the same package:
package example;

public interface PrintStream {
    void println(String text);
}
package example;

public class ConsolePrinter implements PrintStream{
    @Override
    public void println(String text) {
        System.out.println(text);
    }
}
Go to the business logic class Calculator and remove the import statement import java.io.PrintStream;. Save the file.
In the test class CalculatorTest, use the new implementation class.
Change this:
calculator = new Calculator(System.out);
to this:
calculator = new Calculator(new ConsolePrinter());
Save the file. Run the test and check if it still passes.
IntelliJ Step 4: Rename and Clean Up
Go to the interface PrintStream. Right click on PrintStream and select Refactor > Rename. Enter Printer and press Return. Run the test and check if it still passes.
IntelliJ Step 5: Configure the Dependency
Create another implementation that ignores the text argument, for testing purposes:
package example;

public class IdlePrinter implements Printer{
    @Override
    public void println(String text) {
        // This is empty, because we don't want to print in tests.
    }
}
Go to CalculatorTest and change this:
calculator = new Calculator(new ConsolePrinter());
to this:
calculator = new Calculator(new IdlePrinter());
Save the file. Run the test and check if it still passes.
The text output should now be off. Well done.
Appendix B — How to Refactor in Eclipse
Eclipse Step 1: Move Dependency Creation to the Constructor
Open the Calculator class. Locate System.out. Right click, select Refactor > Extract Local Variable. Click OK.
Mark the newly created local variable out. Right click, select Refactor > Convert Local Variable to Field. Name the variable printer. Choose Initialize in Class Constructors. Check Declare field as ‘final’. Hit OK.
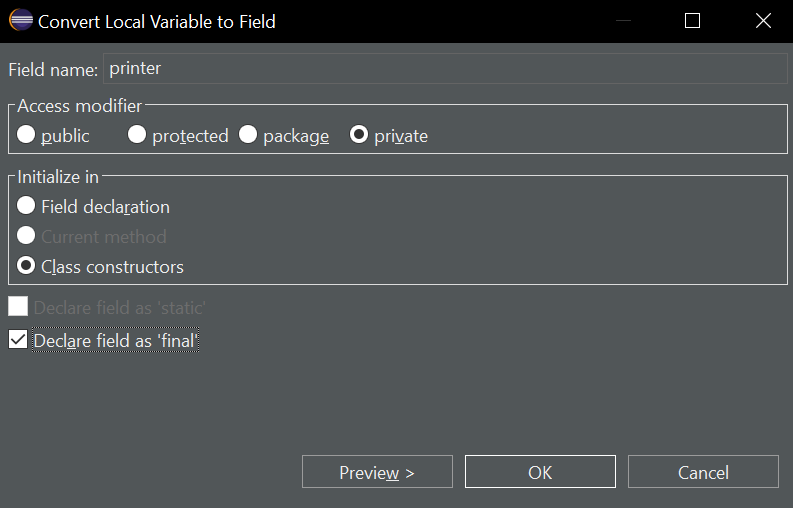
Run the test and check if it still passes.
Eclipse Step 2: Pass the Dependency as a Constructor Argument
Set the cursor into the constructor, Calculator(). Mark the access to the dependency, System.out, and copy it to the clipboard (CTRL-C).
Right click, select Refactor > Change Method Signature. Click Add. Type PrintStream under Type, printer under Name, and paste System.out under Default value. Click OK and Continue.
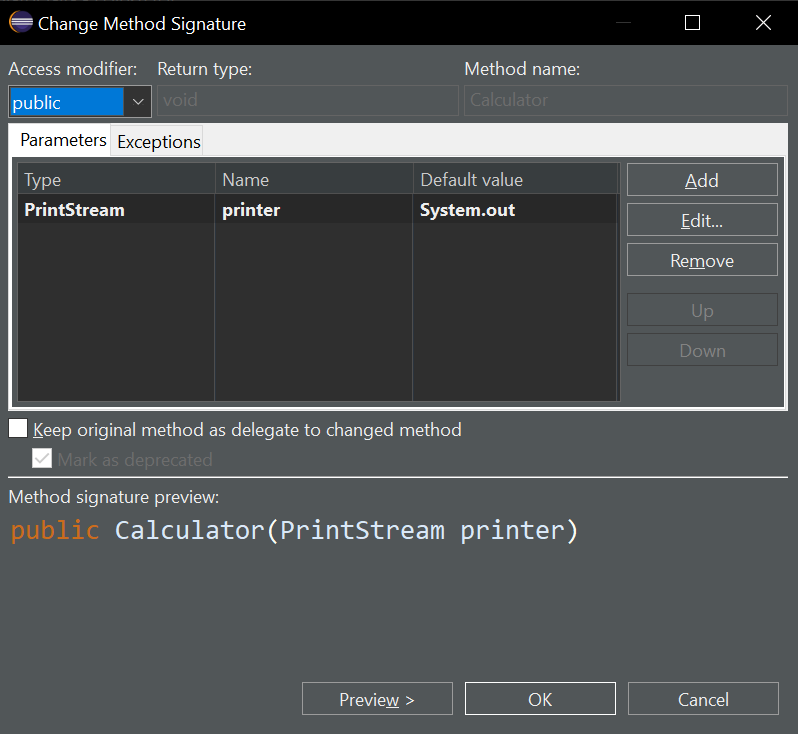
Change the constructor to look like this:
public Calculator(PrintStream printer){
this.printer = printer;
}
Save the file. Run the test and check if it still passes.
Eclipse Step 3: Create an Interface and Implementation
Create the interface and implementation in the same package:
package example;

public interface PrintStream {
    void println(String text);
}
package example;

public class ConsolePrinter implements PrintStream{
    @Override
    public void println(String text) {
        System.out.println(text);
    }
}
Go to the business logic class Calculator and remove the import statement import java.io.PrintStream;. Save the file.
In the test class CalculatorTest, use the new implementation class.
Change this:
calculator = new Calculator(System.out);
to this:
calculator = new Calculator(new ConsolePrinter());
Save the file. Run the test and check if it still passes.
Eclipse Step 4: Rename and Clean Up
Go to the interface PrintStream. Right click on PrintStream and select Refactor > Rename. Enter Printer and press Return. Run the test and check if it still passes.
Eclipse Step 5: Configure the Dependency
Create another implementation that ignores the text argument, for testing purposes:
package example;

public class IdlePrinter implements Printer{
    @Override
    public void println(String text) {
        // This is empty, because we don't want to print in tests.
    }
}
Go to CalculatorTest and change this:
calculator = new Calculator(new ConsolePrinter());
to this:
calculator = new Calculator(new IdlePrinter());
Save the file. Run the test and check if it still passes.
The text output should now be off. Well done.