

A REST API documentation is a guide that explains how clients can make use of the REST APIs in an application. It details the available endpoints, how to send requests and what responses to expect. It may also contain explanations of concepts that are specific to the scope of the application.
Without API documentation, application development is considered incomplete because developers cannot build software to interact with it, rendering the application effectively useless.
In this article, you will learn how to create beautiful REST API documentation that also allows you to test the APIs for free using an OpenAPI specification and Scalar in Node.js projects. You will use asteasolutions/zod-to-openapi to generate OpenAPI specification and use Scalar to create a web page from the specification.
To get the most out of this article, you should have experience developing REST APIs with Express or NestJS. You should also have experience with documenting REST APIs and using zod.
Table of Contents
Benefits of Using zod-to-openapi and Scalar to Create REST API Documentation
How to Resolve Content Security Policy (CSP) Errors When Used with Helmet
REST API Documentation Tools for Node.js
A variety of tools already exist for documenting REST APIs and they have different strengths and weaknesses depending on their use case. While some of them are completely free to use, others operate a freemium model, and while some have an interface for testing APIs, others have a presentation-only user interface (UI).
Some of the most popular tools for documenting REST APIs in Node.js projects are listed below:
Swagger
Postman
Redoc
Swagger
In order to document REST APIs in Express with Swagger, you need swagger-jsdoc and swagger-express-ui. swagger-jsdoc collates and parses JSDoc-annotated documentation comments in the codebase and generates an OpenAPI specification document. swagger-ui-express uses the generated document to created a web page that renders the API documentation and test the APIs.
One of Swagger’s strengths lies in its support for the OpenAPI specification which is an industry standard. Swagger is free to use, has a vibrant open source community and strong support for many programming languages and frameworks. It supports only REST APIs.
Its major drawback is the poor developer experience in manually writing JSDoc comments or YAML for the documentation. The process can be clumsy and developers can forget to include some annotations. Another drawback is that the JSDoc comments can interfere with reading functional code. Lastly, some developers have complained about its boring UI.
Postman
Postman is a cloud-based desktop API client application that allows developers and technical writers to write, test, collaborate on and publish API documentation. Unlike Swagger, it does not require deep programming experience to use most of its features. It is also not limited to REST API documentation — it can document APIs for GraphQL, websockets and gRPC.
Postman does not use OpenAPI specification but it provides a UI to fill in details of an API documentation. The documentation process is manual and sometimes, its content can differ from the functionality of deployed applications. It is not free to use for teams and collaboration and hides the real behaviour of browser interaction with the APIs like CORS and streaming.
ReDoc
ReDoc is an open-source tool used to generate API documentation from an OpenAPI (Swagger) specification. It supports GraphQL, AsyncAPI and the OpenAPI specification and it renders a more beautiful documentation than Swagger. redoc-express is used to document Express REST APIs with Redoc.
Redoc’s major drawback is that its free community edition is presentation-only. It does not support testing the APIs. Similar to Swagger, a drawback it has is manually updating the application's OpenAPI document via a YAML specification file or JSDoc comments.
zod-to-openapi and Scalar for REST API Documentation
asteasolutions/zod-to-openapi is a TypeScript library that generates OpenAPI specification from zod schemas. It provides typed methods which serve as guardrails for documenting API components instead of using code comments so that:
The library methods serve as guardrails for what to document and how to document it
The documentation is consistent across the codebase
The documentation doesn't negatively affect code readability
A sample snippet used to document a POST request for creating a user with zod-to-openapi is shown below:
// CreateUser and User are zod schema

registry.registerPath({
  method: "post",
  path: "/api/users",
  summary: "Create user",
  tags: ["users"],
  request: {
    body: {
      content: {
        "application/json": {
          schema: schema.CreateUser,
        },
      },
      description: "Create user payload",
      required: true,
    },
  },
  responses: {
    201: {
      description: "User created",
      content: {
        "application/json": {
          schema: z.object({
            message: z.string(),
            data: schema.User,
          }),
        },
      },
    },
  },
});
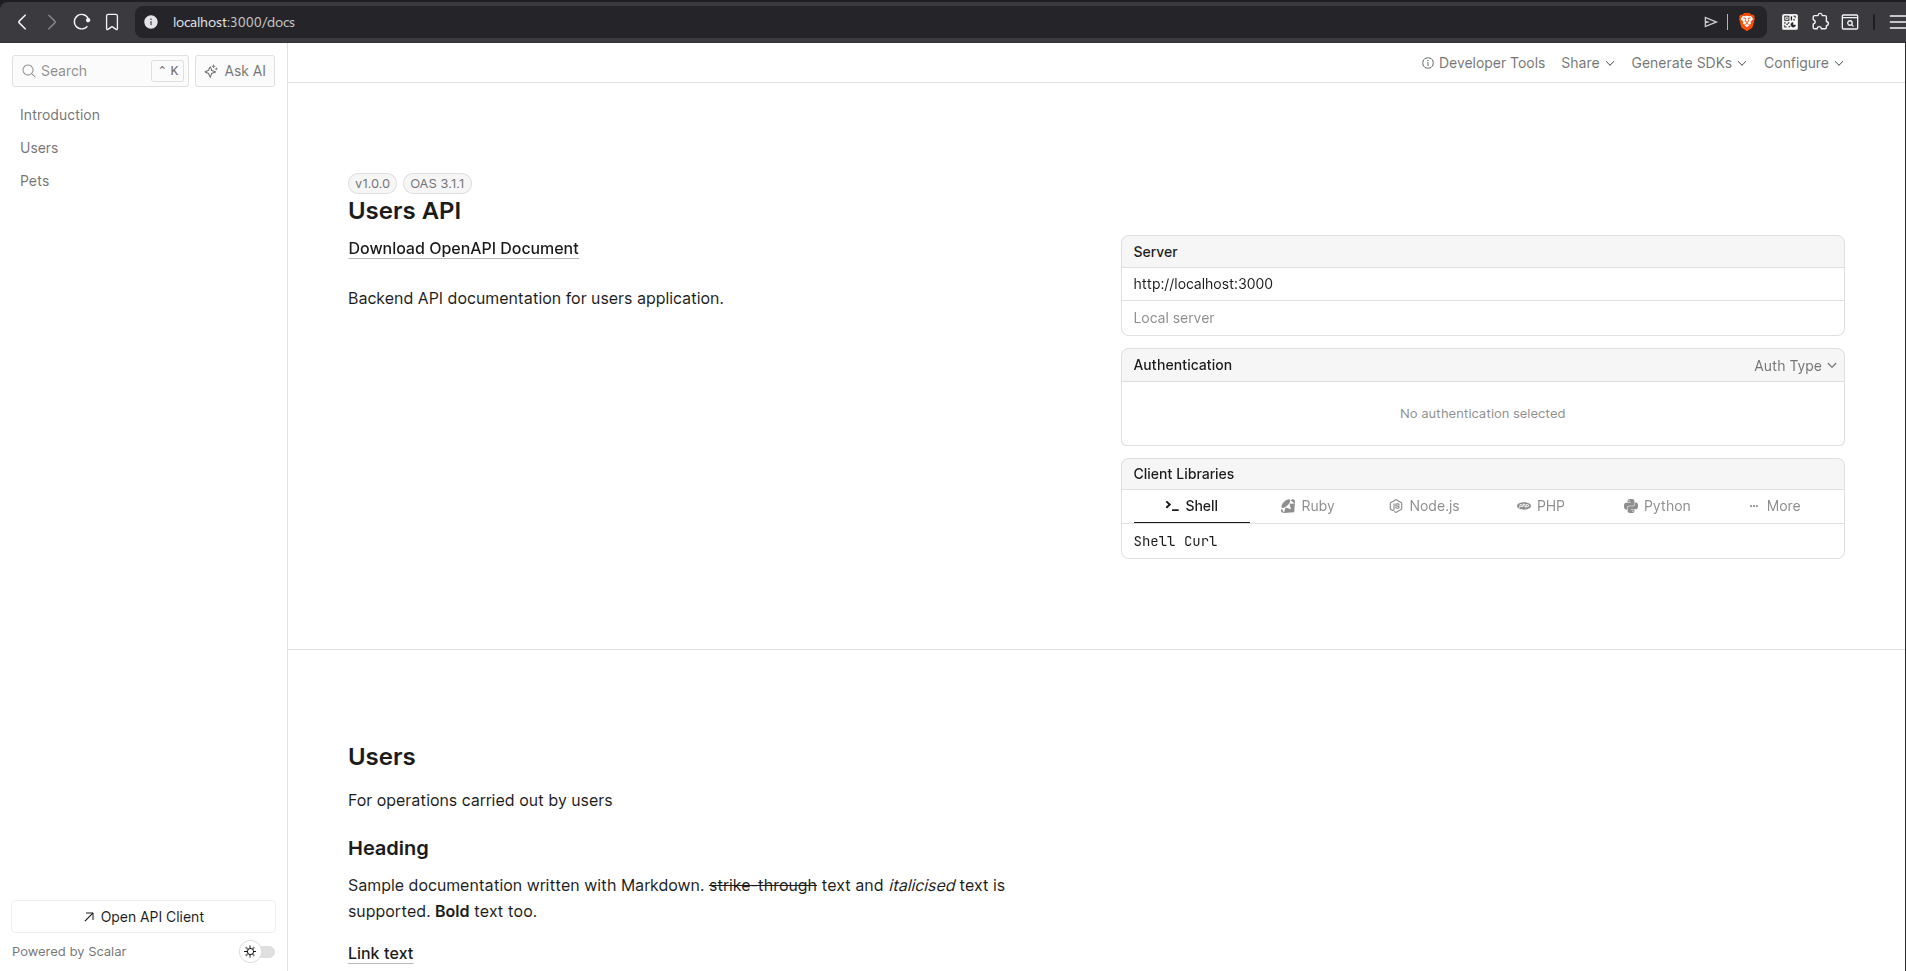
Scalar is a tool that generates beautiful, organized and searchable API documentation from OpenAPI documents. The documentation generated also supports testing the APIs and this makes Scalar effectively function as an API documentation generator and a lightweight API client. The image below shows a sample documentation generated by Scalar:

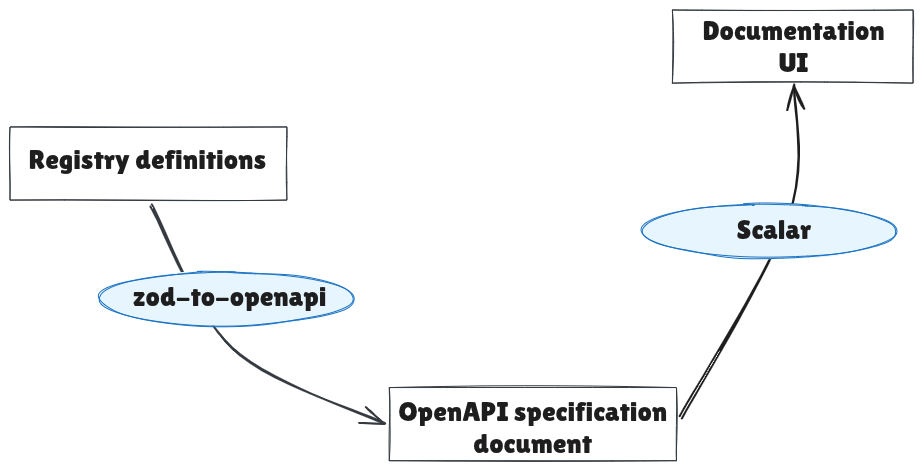
How zod-to-openapi Works with Scalar
zod-to-openapi provides the functionality to generate an OpenAPI specification from code. Scalar uses the document generated to create a documentation web page that presents the information in the document in an organized and beautiful way that also allows for testing the APIs.
Benefits of Using zod-to-openapi and Scalar to Create REST API Documentation
When you combine zod-to-openapi and Scalar to create REST API documentation for your Express applications, you get a myriad of benefits. Some of the benefits are explained below:
OpenAPI Specification Support
The OpenAPI specification is a format for describing REST APIs. It takes takes into consideration the important components of an API necessary for clients to use it effectively. These components include:
Request paths, methods, headers, path parameters and query parameters,
Schemas of request and response payloads,
Authentication requirements,
Descriptions for information not accommodated by other components
zod-to-openapi provides methods for all of these to be included in the documentation and it generates an OpenAPI specification-compliant document that Scalar uses to generate the documentation web page.
Open Source and Free to Use
zod-to-openapi is open source and free to use. It has no plans to be unsupported or sunsetted soon because like Ruby on Rails and Laravel, the creators of the project use it in their day-to-day work.
Scalar is open source too. It has paid plans but the features in the paid plans are only really useful for enterprise applications. The free version supports the necessary features needed to create useful REST API documentation.
Better Documentation Experience
In terms of user experience, the union of zod-to-openapi and Scalar provides the following benefits when writing documentation with both tools:
Guardrails with zod-to-openapi Methods
The methods provided by zod-to-openapi serve as guardrails to ensure that developers don't omit or forget the documentation of important components of APIs. The methods also ensure that these components are documented in an OpenAPI specification-compliant manner through the typed nature of the methods' parameters.
Avoid the Clumsiness of Comments and YAML Files
With zod-to-openapi, you don't document the APIs using comments or a YAML file. You document APIs using methods from zod-to-openapi. This removes the cluttering of code with comments and the clumsiness around manually updating large YAML files of OpenAPI specification.
Accuracy and Auto-generation of Documentation
When you use zod-to-openapi and Scalar, your API documentation is generated automatically when the application runs. zod-to-openapi does the collation and compilation of the documented APIs, and Scalar creates a web page for it that can be hosted on an API route of the same application. You don't need to manually run CLI commands to generate the documentation.
Another benefit of accuracy and auto-generation is that the job of API documentation is not split between technical writer and backend developer. The documentation is in the code and this makes development faster and more seamless in terms of API documentation.
Developer-friendly UI
While Swagger’s UI is functional, some developers consider its presentation somewhat minimal, particularly when displaying detailed endpoint descriptions. ReDoc improves on visual design but does not offer API testing features. Scalar, on the other hand, delivers a more refined and intuitive interface with greater customization options than ReDoc.
Beyond its design advantages, Scalar provides auto-generated code samples in multiple programming languages. This enables developers to integrate APIs more efficiently using examples tailored to their specific tech stack.
Scalar's UI provides a search feature that allows developers to quickly locate specific sections of the API documentation. It also includes an AI chat interface that enables users to understand how different API endpoints can help address their specific use cases. This approach is more efficient than manually reviewing the entire documentation.
Lastly, you can test the API endpoints from the UI. When you make authenticated API requests, the UI caches authentication tokens so that you don't have to type or paste them for subsequent requests.
Markdown Support
zod-to-openapi and Scalar have Markdown support. With Markdown, you can include conceptual documentation and more information about API endpoints that are not supported by the default documentation components like headers and the request body.
You can embed images, include tables and format text in the documentation. You can use Markdown to include notes that explain concepts related to the API.
How to Create the API Documentation
In this section, you will create an Express CRUD API project that uses zod-to-openapi and Scalar to document its APIs. To practice along, clone the Express starter project from GitHub at orimdominic/freeCodeCamp-zod-to-openapi-scalar.
Set up the Project
After cloning the project:
install its dependencies using your preferred Node.js package manager
start the server using the
servescript
# Install dependencies
npm run install

# Start the application
npm run serve
You should see the following output on the terminal if the application runs successfully:
> freecodecamp-zod-to-openapi-scalar@1.0.0 serve
> node --experimental-strip-types --watch src/index.ts

Listening on :3000
The project has two modules - Users and Pets.
The router configuration for each module is defined in the router.ts file, while the route controllers are located in the controllers.ts file within each module's folder under src/modules. The controllers do not contain business logic, they simply respond with JSON values generated by the Faker library.
How to Set Up zod-to-openapi
Install asteasolutions/zod-to-openapi using your preferred Node.js package manager. If you use npm, run the code snippet below in your terminal:
npm install @asteasolutions/zod-to-openapi
After the installation, create a folder called lib (library) in the src folder. In the lib folder, create a file called openapi.ts. The file will house the code that sets up zod-to-openapi for collating the API documentation and generating the OpenAPI specification.
Copy and paste the code snippet below into src/lib/openapi.ts:
import z from "zod";
import {
  extendZodWithOpenApi,
  OpenApiGeneratorV3,
  OpenAPIRegistry,
} from "@asteasolutions/zod-to-openapi";

extendZodWithOpenApi(z);

export const registry = new OpenAPIRegistry();

export const bearerAuth = registry.registerComponent("securitySchemes", "bearerAuth", {
  type: "http",
  scheme: "bearer",
  bearerFormat: "JWT",
});

export function generateOpenAPIDocument() {
  const generator = new OpenApiGeneratorV3(registry.definitions);

  return generator.generateDocument({
    openapi: "3.1.1",
    info: {
      title: "Users API",
      version: "1.0.0",
      description: `Backend API documentation for users application.`,
    },
    tags: [
      {
        name: "users",
        description: "For operations carried out by admin users",
      },
    ],
    servers: [
      {
        url: "http://localhost:3000",
        description: "Local server",
      },
    ],
  });
}
zod-to-openapi v8 requires zod v4. If you use zod v3, you should use v7.3.4 of zod-to-openapi.
extendZodWithOpenApi is a method provided by zod-to-openapi that enhances Zod schemas by adding an openapi method. The openapi method allows you to attach additional documentation to request payloads, responses, parameters, and their properties, which are then displayed in the API documentation rendered by Scalar.
It is important to call extendZodWithOpenApi before loading any files that use the openapi method, otherwise accessing openapi on Zod objects will result in errors.
An alternative is to use the meta method on zod v4 schemas for the additional documentation. For example, schemaOne and schemaTwo in the code snippet below are the same:
const schemaOne = z
  .string()
  .openapi({ description: 'Name of the user', example: 'Test' });

const schemaTwo = z
  .string()
  .meta({description: 'Name of the user', example: 'Test' });
Unlike the typed openapi method, the meta method is untyped. As a result, it does not provide autocomplete, suggestions, or guidance for documentation components.
The OpenAPIRegistry is a utility that is used to collate API documentation which would later be passed to an OpenAPI specification generator. registry is created from OpenAPIRegistry, exported, and used to document API endpoints and components in modules where it is imported.
export const registry = new OpenAPIRegistry();
bearerAuth is a component created by the registry to represent JWT authentication. When bearerAuth is included in the documentation of an endpoint, the UI renders an input for submitting an authentication token for authenticated requests as shown in the image below.

In the registerComponent method, "securitySchemes" registers a security scheme component. "bearerAuth" , the first argument of registerComponent, is the name given to the component and it can be changed to a name that you prefer. It appears in the top right of the authentication token input, shown in the image above. The third input to registerComponent is an object that defines the component.
When generateOpenAPIDocument function is executed, it collates all the registry API definitions in the project, generates the OpenAPI specification through generator.generateDocument, and returns the specification as JSON.
The tags property in generator.generateDocument organizes API endpoints into sections on the documentation UI. For example, all API endpoints with the Users tag in their registry definition will be placed under the Users section of the UI. description can be written in Markdown within template literals.
The servers property is a collection of the servers connected to the application. If you have multiple servers, you have the option of selecting what server to use for the base URL in the documentation UI for making API requests from it.
With this setup in place, when endpoints are documented with the registry, generateOpenAPIDocument will have an OpenAPI specification to return.
How to Generate the Documentation UI with Scalar
In this section, you will set up Scalar and connect it to the return value of generateOpenAPIDocument. You will also connect Scalar with an Express route, allowing the application to serve the documentation UI at that route.
Scalar has an Express API reference library that makes it easier for you to connect it with the OpenAPI specification and Express. Install scalar/express-api-reference using your preferred Node.js package manager. If you use npm, use the snippet below:
npm install @scalar/express-api-reference
Copy and paste the code snippet below into src/app.js:
import express from "express";
import router from "./router.ts";
import { generateOpenAPIDocument } from "./lib/openapi.ts";
import { apiReference } from "@scalar/express-api-reference";

const app = express();
app.use(express.json(), express.urlencoded({ extended: true }));

app.get("/", function (req, res) {
  return res.send("OK");
});

app.use("/api", router);

const apiDocJsonContent = generateOpenAPIDocument();

app.use(
  "/docs", // documentation route
  apiReference({
    content: apiDocJsonContent,
    title: "Users API",
    pageTitle: "Users API",
  }),
);

export default app;
In the code snippet above, generateOpenAPIDocument is imported from src/lib/openapi.ts, and apiReference is imported from @scalar/express-api-reference. When executed, generateOpenAPIDocument returns the OpenAPI specification, which is stored in apiDocJsonContent for caching to improve perfoemance.
A GET /docs route is then created, with the Scalar apiReference function acting as the controller. It accepts apiDocJsonContent and returns a web page whenever the GET /docs route is accessed.
With this setup in place, run the application using npm run serve and visit the documentation page at http://localhost:3000/docs in your browser. You should see a user interface similar to the image below:
To view the codebase at this point, run git checkout set-up-openapi-scalar .
Document the Endpoints
You have set up zod-to-openapi and connected it with Scalar. You have also hooked it up with a route in the backend application. In this section, you will write code to document the endpoints in the application for generating the OpenAPI specification and rendering it on the documentation UI.
To document the route for creating users ( POST /api/users ), in src/modules/users/router.ts , import registry, the schemas and zod using the snippet below:
import z from "zod";
import { registry } from "../../lib/openapi.ts";
import {
    UserSchema,
    UserListItemSchema,
    UpdateUserSchema,
    CreateUserSchema,
} from "./types.ts";
Copy and paste the code below above the create user route to document the create user endpoint:
registry.registerPath({
  method: "post",
  path: "/api/users",
  summary: "Create user",
  tags: ["users"],
  request: {
    body: {
      content: {
        "application/json": {
          schema: CreateUserSchema,
        },
      },
      description: "Create user payload",
      required: true,
    },
  },
  responses: {
    201: {
      description: "User created",
      content: {
        "application/json": {
          schema: z.object({
            message: z.string().openapi({ example: "User created" }),
            data: UserSchema,
          }),
        },
      },
    },
  },
});
Visit the documentation page and you will find see a web page similar to the image below:
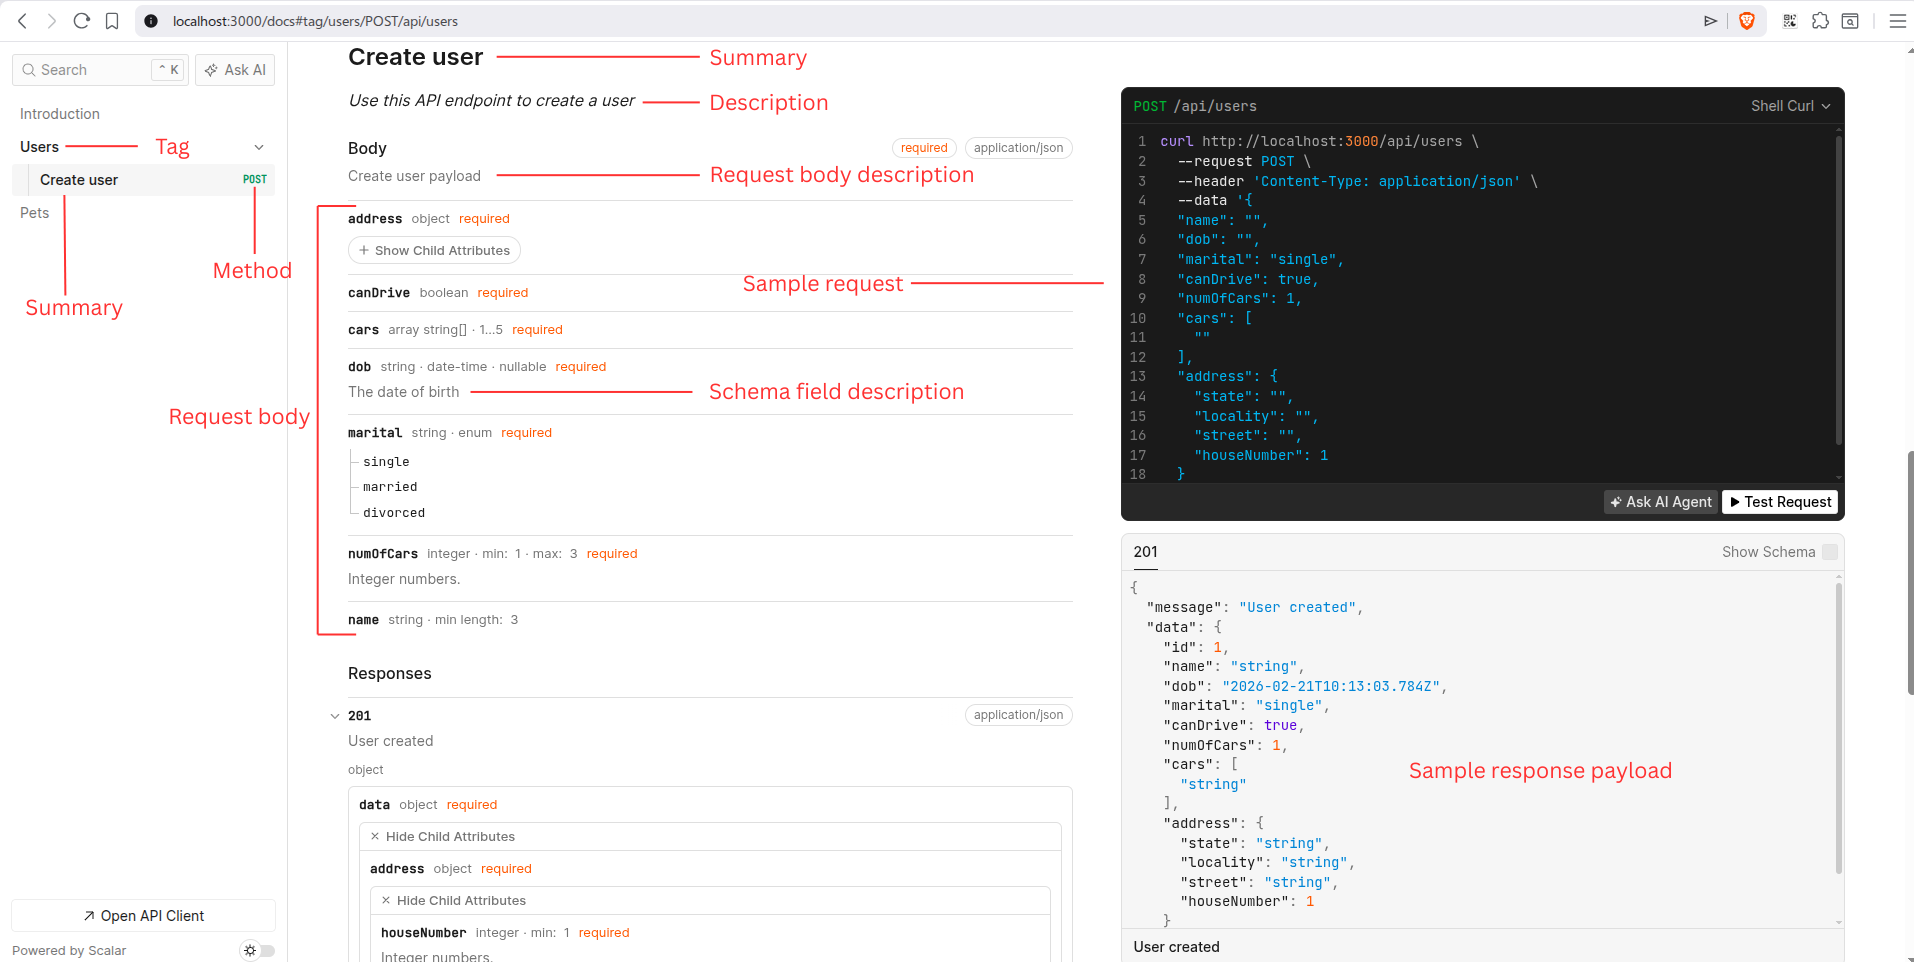
The UI result of some of the input fields of registry.registerPath have been labelled in the image above. The description in the API endpoint is italicised because its value is Markdown in a template string.
By registering the route path for creating users with registry.registerPath and filling its values, you added the documentation of the route to the registry definitions and that makes it included in the OpenAPI specification.
To test the endpoint from the documentation UI:
click the Test Request button
fill in the payload in the dialog that appears and
click the Send button
To document the get user by id route (GET /api/users/:id ), import bearerAuth from src/lib/openapi.ts, copy the code snippet below and paste it above the get user by id route definition.
registry.registerPath({
  method: "get",
  path: "/api/users/{userId}",
  summary: "Get user details by id",
  tags: ["Users"],
  security: [{ [bearerAuth.name]: [] }],
  request: {
    params: z.object({ userId: z.int() }),
  },
  responses: {
    200: {
      description: "User retrieved",
      content: { "application/json": { schema: UserSchema } },
    },
  },
});
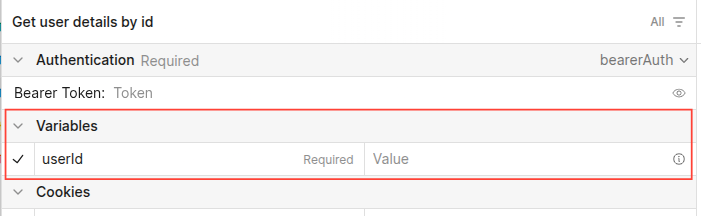
When the request.params field is defined using a Zod object, it generates an input UI on the documentation web page that enables users to provide values for path parameters such as userId, highlighted in the image below:
The complete code for the documentation of all endpoints in this section can be accessed when you check out the complete-project branch by running git checkout complete-project in your terminal. It contains documentation for the endpoint for uploading user photo, which demonstrates how to document endpoints that accept file uploads.
How to Use Scalar with NestJS
Scalar has a library that integrates with NestJS. You can use supply the Swagger document created by swagger/nestjs to the Scalar NestJS integration library to generate the Scalar documentation UI.
In root folder of your NestJS project, install the Scalar NestJS integration library:
npm install @scalar/nestjs-api-reference
Update the main.ts file of your NestJS project with the code snippet below:
import { NestFactory } from '@nestjs/core';
import { apiReference } from '@scalar/nestjs-api-reference';
import { DocumentBuilder, SwaggerModule } from '@nestjs/swagger';
import { AppModule } from './app.module';

async function bootstrap() {
  const app = await NestFactory.create(AppModule);

  const options = new DocumentBuilder()
    .setTitle('Cats example')
    .setDescription('The cats API description')
    .setVersion('1.0')
    .addTag('cats')
    .addBearerAuth()
    .build();

  const openApiSpecification = SwaggerModule.createDocument(app, options);

  // integrate the documentation with NestJS
  app.use(
    '/api/docs', // documentation route
    apiReference({
      content: openApiSpecification,
    }),
  )

  await app.listen(3000);
  console.log(`Application is running on: ${await app.getUrl()}`);
}

bootstrap();
With this setup in place, you can visit the /api/docs route in your browser to view the Scalar documentation for your NestJS application.
How to Resolve Content Security Policy (CSP) Errors When Used with Helmet
If you use Helmet in your Express or NestJS project, you will encounter CSP errors when you try to render the Scalar documentation UI. To resolve the errors, update the Helmet CSP configuration in your code to have the value of the object in the code snippet below:
{
    directives: {
      defaultSrc: [`'self'`],
      styleSrc: [`'self'`, `'unsafe-inline'`],
      imgSrc: [`'self'`, 'data:', 'validator.swagger.io'],
      scriptSrc: [`'self'`, `https: 'unsafe-inline'`],
    },
  }
Absence of AsyncAPI Documentation Feature
At the time of writing, Scalar does not fully support rendering AsyncAPI specifications for event-driven architecture APIs, although it is currently under development. You can track the progress of its development through the GitHub issue linked in the documentation to stay informed about its release.
Conclusion
You have learned about zod-to-openapi and how it makes it easier for you to generate an OpenAPI specification for your REST APIs than writing comments or large YAML files. You also learned how to use the specification document generated to render a beautiful API documentation UI which also functions as a lightweight API client. Endeavour to implement it in your projects that need a documentation uplift.
Feel free to connect with me on LinkedIn for questions or clarifications. Thank you for reading this far and I hope this helps you achieve what you intended to achieve. Don’t hesitate to share this article if you feel that it would help someone else out there. Cheers!