By Ramesh Lingappa
Let’s jump right in. We all know it’s a bad idea to store application secrets within our code. So why we are storing there it still? Let’s take an example.
We could store those secrets in a file and add it to the gitignore so it’s not added to version control. But there are a couple of hurdles:
- How do we manage those secrets?
- What happens when the local copy is deleted?
- How do we share it with other developers?
- How do we manage versioning of those secrets during changes and an audit log of who changed what?
A lot of questions! So we end up storing it within the code, since it’s too much complexity to deal with.
For a big application or application which needs a higher level of security, we can use Production grade secret management services like Hashicorp Vault.
In this article, we will look at a decent approach in dealing with secrets while still achieving better security. We are going to achieve this using Google KMS + Git + IAM+ automation.
The idea is not new. This is what we are going to do:
- We are going to store the encrypted version of plaintext in version control using Google KMS
- We will use KMS IAM to allow appropriate users to manage secrets for each environment by granting encrypt/decrypt roles
- We’ll deploy the application with encrypted secret files
- We will allow permission for the server to decrypt secrets for each environment
- At runtime, we’ll load encrypted files, decrypt using KMS APIs and use it.
Cloud KMS is a cloud-hosted key management service that lets you manage cryptographic keys for your cloud services. You can generate, use, rotate, and destroy cryptographic keys. Cloud KMS is integrated with Cloud IAM and Cloud Audit Logging so that you can manage permissions on individual keys and monitor how these are used.
So Cloud KMS will encrypt and decrypt our secrets so we don’t have to store the keys. Only an authorised user or a service account can perform encrypt or decrypt operations.
Let’s get started!
Step1: Preparing Secrets
For our use-case, we are going to have application secrets for each environment, prod stag and dev . We do so by creating a new folder called credentials under the root project folder and then create one folder for each environment.
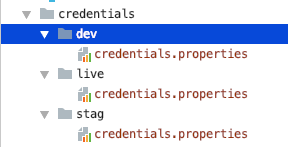 credentials per each environment
Make sure this folder is not tracked under version control by adding the following line in the .gitignore file:
/credentials/
Here I am using a properties file, but it could be anything like JSON, YAML etc. Now you can add any sensitive information in these files. I have added the following:
# dev credentialsoauth_client_id=1234oauth_client_secret=abcdapi_key=api_123# ...
Okay, our secrets are ready for hiding.
Step2: Creating KMS Secret Keys
We need to create encryption keys for each environment in order to use this service. For us, each environment will be a different google cloud project (recommended). It’s better this way since it gives isolation and access control (more on this later).
So go ahead and create a key for each environment using this link Creating Symmetric Keys(recommended). It has step by step instructions (different ways) to create those keys. We are creating those keys using the command line like below:
// create key-ring (think of this as grouping)gcloud kms keyrings create [KEYRING_NAME] \--location [LOCATION] \--project live-project-id
// create the encryption keygcloud kms keys create [KEY_NAME] \--location [LOCATION] \--keyring [KEYRING_NAME] \--purpose encryption \--project live-project-id
Here I am creating a key for production using the production project id. Repeat this process for each environment by replacing the Project ID for stag and other environments.
Note: You need to have four pieces of information for each key: location keyring cryptokey and project. This information is not sensitive so you can store it in your code or build scripts
Step3: Assigning Permission to use these keys
Here comes the beauty of the KMS IAM system: in order to use each key, we need to explicitly grant access for an individual user or a service account. This makes it very powerful since now we can define who can manage secrets, who can view those secrets, and more.
Check out Using IAM with Cloud KMS for more information. With this, we can achieve the following:
Production Environment:
No one should be able to see the secrets except the few people who can make changes to secrets. We can do so by granting them the role:
cloudkms.cryptoKeyEncrypterDecrypter
So in this way, even though the encrypted credentials are stored in version control, other developers won't be able to use them. Note, even those developers can make live deployments without ever needing to know the secrets (more on this later).
Staging Environment:
Every developer can see the secrets and use them in development, but only a few people can make changes to secrets. We can do so by granting them the role:
// for read onlycloudkms.cryptoKeyDecrypter
// for managingcloudkms.cryptoKeyEncrypterDecrypter
Likewise, you can grant key roles for different environments depending on the need. For the exact commands, refer to Granting Permission in the docs.
Step4: Encrypting Secrets
We are done with prep work, and now it’s time to hide some secrets. Assuming you have the encrypter role, with that you can encrypt a file using the following command:
gcloud kms encrypt --location global \ --keyring secrets-key-ring --key quickstart \ --plaintext-file credentials/stag/credentials.properties \ --ciphertext-file credentials-encrypted/stag/credentials.properties.encrypted
Since it’s a shell gcloud command, you can easily integrate it with any build system to encrypt all files under the credentials folder. For example, I am using gradle for this:
Basically, there are two helper functions:
- kmsEncryptSecrets takes the src folder to encrypt each file within it and write it to the target folder with .enc (encrypted) extension, and
- kmsDecryptSecrets which does the reverse process.
So each time we modify secrets, you can call the encrypt helper method with a simple task:
Now the encrypted folder will look like below:
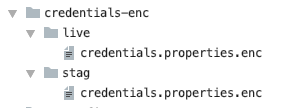 encrypted credential files
This folder can be added to version control so each time an authorised user changes secrets, a new encrypted file is generated and logs the history in version control.
Similarly, there is a Decrypt Task for the reverse process.
Step4: Using Encrypted Secrets in deployment
Now that we are done encrypting secrets and properly managing them in version control, let's look at how it can be used at runtime, meaning when the app is actually running in staging or production. We can do that in two ways:
1. Decrypting secrets and passing during deployment:
So during deployment, an authorised user can simply decrypt those encrypted secrets and add it to the deployment (eg: build directory), thus making it available for the code at runtime. We are not going to cover this deeply.
This approach is good when deployer needed to be very restrictive or process is automated using CD pipeline.
2. Passing encrypted secrets during deployment and decrypting at runtime:
Here we are not going to decrypt and send raw secrets during deployment. Instead, we are simply passing encrypted secrets. And during runtime we will decrypt those secrets and use them.
Note: this works best within the Google Cloud Platform. Otherwise you need to generate a service account so you can use this approach with external providers.
This approach is even more secure since we are not relying on any intermediate user action or a pipeline, but instead only on authorised servers that can decrypt content at runtime.
For example, we can allow the staging server (service account) the ability to decrypt staging secrets and not the ability to decrypt production secrets.
With this approach, even any developer who doesn’t have access to decrypt production secrets can able to perform production deployment and everything still works fine.
Step 5: Using secrets at runtime
We are going to use the second approach (passing encrypted secrets).
For the demo, assume we are going to deploy to AppEngine since it has a default service account generated already. We will grant it the access to decrypt secrets like below:
gcloud kms keys add-iam-policy-binding secrets-enc-key \ --project kms-demo \--location global \--keyring secrets-key-ring \--member serviceAccount:kms-demo@appspot.gserviceaccount.com \--project kms-demo \--role roles/cloudkms.cryptoKeyDecrypter
Thus when the server starts, we could simply load the encrypted file and use the KMS client libraries to decrypt its content.
Step6: KMS Audit Logs
Finally, you can see audit logs for operations on each key by enabling KMS audit logging (not enabled by default). Thus we can now keep track of all operations performed for future auditing.
You can enable the audit log using gcloud, but we have seen enough of the command line way. Alternatively, we can enable this configuration using the Cloud Console UI. From the left menu, choose IAM & admin -> Audit Logs.
Click Cloud Key Management Service and enable Data Read and Data Write and hit Save.
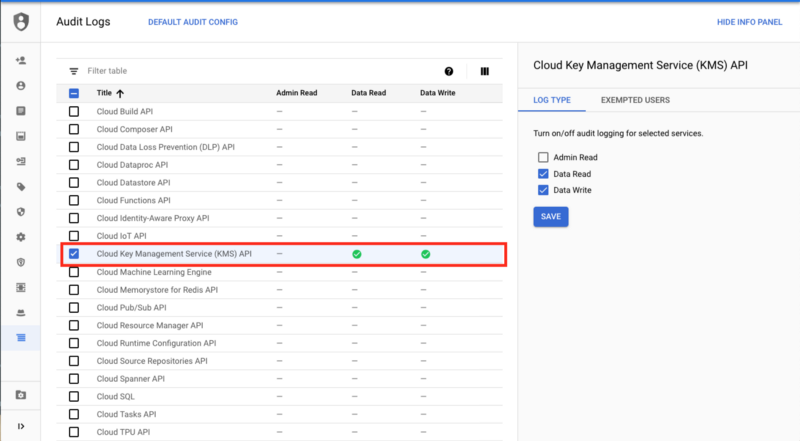 Google IAM Audit Log Console
That's it! Now if any encrypt, decrypt or any other sorts of operations are performed, an audit log is generated and you can check those in the Logging section under Cloud KMS CryptoKey.
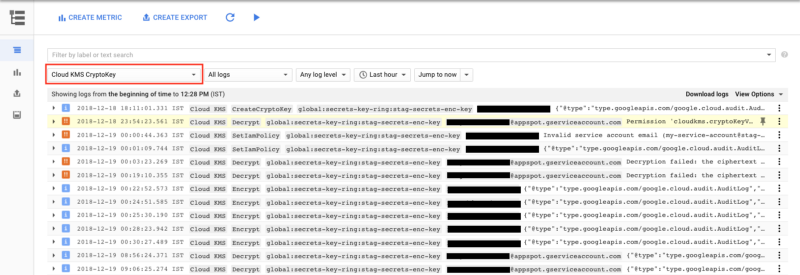 Audit Logs for IAM operations
As you can see, it has audit logs for all sorts of operations including failures like Invalid permissions, or requests etc. It shows which user performed what operation using which key (or if it was done under a service account). That's a pretty neat solution. For more info, read Using Cloud Audit Logging with Cloud KMS.
Conclusion
With this approach, we can store, manage and use application secrets or any sensitive information securely and also track changes using version control. The techniques discussed in this article can be used with any language, and it can use used fully or partially in other platforms as well like iOS, Android, external servers etc.
For a list of kms commands, refer to KMS Commands. Also, check out the sample application for the complete code:
ramesh-dev/gae-dynamic-config-demo
_AppEngine Dynamic Configuration Demo. Contribute to ramesh-dev/gae-dynamic-config-demo development by creating an…_github.com
Here are some reference links:
