

Building a LAMP server and getting it all nicely configured with reliable data handling, a domain, and a TLS certificate is only half the battle. You’ll also need to make sure your infrastructure is protected from the internet’s many frightening threats.
In this article — which was excerpted from chapter 9 of my Manning book, Linux in Action — I’ll explore website security through the proper use of system groups, process isolation, and regular audits of your system resources. It’s not the whole story (my Linux in Action book covers additional tools like installing TLS certificates and working with SELinux), but it’s a great start.
System groups and the principle of least privilege
The developers you support have (finally) come to realize that they need to restrict public access to the data and configuration files living on the application server while still allowing access to various dev and IT teams.
The first part of the solution is groups. A group is a system object — much the same as a user — except that no one will ever log in to the system as a group. The power of groups is in how they, like users, can be “assigned” to files or directories, allowing any group members to share the group powers. This is illustrated in the figure.
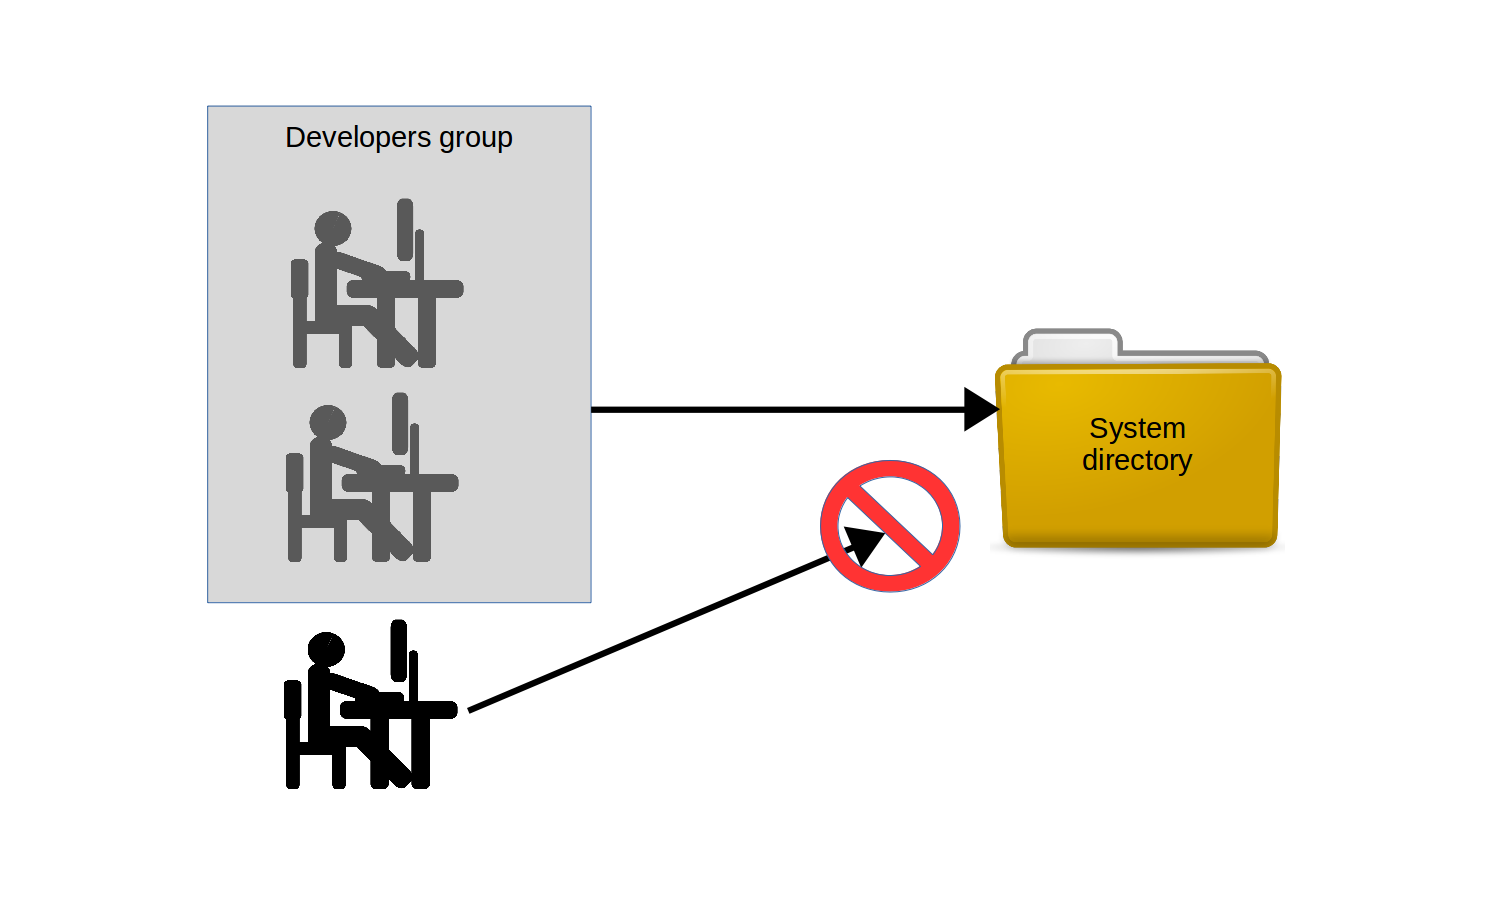 Developers who are members of the Developers group can be given access to a particular directory, as opposed to those individuals who are not part of the group
Try this yourself: use a text editor to create a new file. Add some “Hello world” text so you’ll be able to easily tell when you can successfully access it. Now edit its permissions using chmod 770 so that the file’s owner and group have full rights over the file, but others can’t even read it.
nano datafile.txt
chmod 770 datafile.txt
If your system doesn’t already have an extra user besides your account, create one using either adduser — the Debian/Ubuntu way — or useradd if you’re on CentOS. useradd will also work on Ubuntu.
The useradd command (as opposed to the Debian adduser) requires you to
generate a user password separately:
# useradd otheruser
# passwd otheruser
Enter new UNIX password:
Retype new UNIX password:
passwd: password updated successfully
Use su to switch to your new user. Once you enter the user’s password, all the commands you execute will be run as that user. You’ll be working with only that user’s authority: no more and no less. If you try reading the datafile.txt file (using cat), you’ll have no luck since, as you remember, others were denied read permission. When you’re done, type exit to leave the new user shell and return to your original shell.
$ su otheruser
Password:
$ cat /home/ubuntu/datafile.txt
cat: /home/ubuntu/datafile.txt: Permission denied
$ exit
All this is expected and easy to understand. And, as you’ve seen, not being able to read the file belonging to a different reader can sometimes be a problem. Let’s see what we can do about it by associating the file with a group and then properly configuring the file’s permissions.
Create a new group you can use to manage your application data and then edit the properties of your data file using chown . The ubuntu:app-data-group argument leaves the file ownership in the hands of the ubuntu user, but changes its group to your new app-data-group.
groupadd app-data-group
chown ubuntu:app-data-group datafile.txt
Run ls with “long” output against the file to view its new permissions and status. Note that, as expected, ubuntu is the file’s owner and app-data-group is its group.
$ ls -l | grep datafile.txt
-rwxrwx — — 1 ubuntu app-data-group 6 Aug 9 22:43 datafile.txt
You can use usermod to add your user to the app-data-group group and then, once again, su to switch to a shell deploying the other user’s account. This time, even though the file’s permissions lock others out — and you’re definitely acting as an “other” user right now — you should be able to read it thanks to your group membership.
# usermod -aG app-data-group otheruser
$ su otheruser
$ cat datafile.txt
Hello World
Use su to switch between user accounts. These happened to be the contents of my datafile.txt file. This kind of organization is the correct and effective way to deal with many of the complicated permissions issues that will arise on a multi-user system.
In fact, not only is it used to give individual users the access they need, but many system processes couldn’t do their jobs without special group memberships. Take a quick look through the /etc/group file and note how many system processes have their own groups.
A partial listing of the contents of the /etc/group file:
$ cat /etc/group
root:x:0:
daemon:x:1:
bin:x:2:
sys:x:3:
adm:x:4:syslog
tty:x:5:
disk:x:6:
lp:x:7:
mail:x:8:
news:x:9:
uucp:x:10:
man:x:12:
proxy:x:13:
[…]
Isolating processes within containers
Worried that the multiple services you’ve got running on a single server will, should one service be breached, all be at risk? One way to limit the damage that careless or malicious users can cause is by isolating system resources and processes. This way, even if someone might want to expand their reach beyond a set limit, they won’t have physical access.
The old approach to the problem was provisioning a separate physical machine for each service. But virtualization can make it a lot easier -and more affordable - to build a “siloed” infrastructure.
This architecture is often referred to as microservices and would have you launch multiple containers with one, perhaps, running only a database, another Apache, and a third containing media files that might be embedded in your web pages. Besides the many performance and efficiency benefits associated with microservice architectures, this can greatly reduce each individual component’s risk exposure.
By “containers” I don’t necessarily mean those of the LXC persuasion.
These days, for this kind of deployment, Docker containers are far more
popular. If you’re interested in learning more about Docker, check out my Pluralsight courses that touch on the topic.
Scanning for dangerous User ID values
While any admin user will be able to temporarily assume root authority using sudo, only root is actually root . As you’ve seen already, it isn’t safe to perform regular functions as root. But it can happen — whether by innocent accident or malicious tampering — that a regular user can effectively get admin rights full-time.
The good news is that it’s easy to spot imposters: their user and/or group ID numbers will, like root, be zero (0). Take a look at the passwd file in /etc/. This file contains a record for each regular and system user account that currently exists. The first field contains the account name (root and ubuntu in this case) and the second field might contain an x in place of a password (which, if it exists, will appear encrypted in the /etc/shadow file). But the next two fields contain the user and group IDs. In the case of ubuntu in this example, both IDs are 1000 . And, as you can see, root has zeroes.
$ cat /etc/passwd
root:x:0:0:root:/root:/bin/bash
[…]
ubuntu:x:1000:1000::/home/ubuntu:/bin/bash
If you ever see a regular user with a user or group ID of 0, however, then you know there’s something nasty going on and you should get to work fixing it.The quick and easy way to spot a problem is to run this awk command against the passwd file, which will print out any line whose third field contains only a 0. In this case, to my great relief, the only result was root . You can run it a second time substituting $4 for $3 to pick up the group ID field.
$ awk -F: ‘($3 == “0”) {print}’ /etc/passwd
root:x:0:0:root:/root:/bin/bash
Auditing system resources
The more things you’ve got running, the greater the odds of something breaking. So it makes sense that you’ll want to keep track of what’s running. This will apply to network ports (if they’re “open” then, by definition, there must be a way in), services (if they’re active, then people can run them), and installed software (if it’s installed, it can be executed).
For audits to be useful you’ll have to remember to run them once in a while. Since you just know you’re going to forget, you’ll be much better off incorporating your auditing tools into a script that not only executes regularly but, ideally, also parses the results to make them more readable.
Here, however, I’ll focus on introducing you to three key audit tools to help you scan for open ports, active services, and unnecessary software packages. Getting it automated will be your job.
Scanning for open ports
A port is considered “open” if there’s some process running on the host that’s listening on that port for requests. Keeping an eye on your open ports can keep you plugged into what’s really going on with your server.
You already know that a regular web server is probably going to have HTTP (80) and SSH (22) open, so it shouldn’t come as a surprise to come across those. But you’ll really want to focus on other unexpected results. netstat will display open ports along with a wealth of information about how they’re being used.
In this example run against a fairly typical multi-purpose server, -n tells netstat to include the numeric ports and addresses. -l includes only listening sockets, and -p adds the process ID of the listening program. Naturally, if you see something, do something.
# netstat -npl
Active Internet connections (only servers)
Proto Local Address Foreign Address State PID/Program name
tcp 127.0.0.1:3306 0.0.0.0:* LISTEN 403/mysqld
tcp 0.0.0.0:139 0.0.0.0:* LISTEN 270/smbd
tcp 0.0.0.0:22 0.0.0.0:* LISTEN 333/sshd
tcp 0.0.0.0:445 0.0.0.0:* LISTEN 270/smbd
tcp6 :::80 :::* LISTEN 417/apache2
[…]
In recent years, ss has begun to replace netstat for many uses. Just in case you find yourself at a party one day and someone asks you about ss , this example (which lists all established SSH connections) should give you enough information to save you from deep embarrassment:
$ ss -o state established ‘( dport = :ssh or sport = :ssh )’
Netid Recv-Q Send-Q Local Address:Port Peer Address:Port
tcp 0 0 10.0.3.1:39874 10.0.3.96:ssh
timer:(keepalive,18min,0)
Scanning for active services
Getting a quick snapshot of the systemd-managed services currently enabled on your machine can help you spot activity that doesn’t belong. systemctl can list all existing services, which can then be narrowed down to only those results whose descriptions include enabled. This will return only active services.
# systemctl list-unit-files — type=service — state=enabled
autovt@.service                       enabled
bind9.service                         enabled
cron.service                          enabled
dbus-org.freedesktop.thermald.service enabled
docker.service                        enabled
getty@.service                        enabled
haveged.service                       enabled
mysql.service                         enabled
networking.service                    enabled
resolvconf.service                    enabled
rsyslog.service                       enabled
ssh.service                           enabled
sshd.service                          enabled
syslog.service                        enabled
systemd-timesyncd.service             enabled
thermald.service                      enabled
unattended-upgrades.service           enabled
ureadahead.service                    enabled
If you do find something that shouldn’t be there, you can use systemctl to both stop the service and make sure it doesn’t start up again with the next boot.
systemctl stop haveged
systemctl disable haveged
There’s actually nothing dark and sinister about the haveged service I’m
stopping in this example: it’s a very small tool I often install to generate
random background system activity when I’m creating encryption keys.
Searching for installed software
Could someone or something have installed software on your system without you knowing? Well, how would you know if you don’t look? yum list installed or, on Debian/Ubuntu, dpkg — list will give you the whole briefing, while remove should delete any packages that don’t belong.
yum list installed
yum remove packageName
Here’s how it goes on Ubuntu:
dpkg --list
apt-get remove packageName
It’s also a good idea to be aware of changes to your system configuration files - which is something I cover in chapter 11.
This article is excerpted from my Manning “Linux in Action” book. There’s lots more fun where this came from, including a hybrid course called Linux in Motionthat’s made up of more than two hours of video and around 40% of the text of Linux in Action. Who knows... You might also enjoy my recently published Learn Amazon Web Services in a Month of Lunches.