
In this article, you'll learn the basic key concepts that'll help you grasp how authentication and authorization work.
You'll start by learning what authentication and authorization are, and then learn how to implement authentication in your applications using Supabase auth.
Table of Contents
- Prerequisites
- What Is Authentication and Authorization?
- How Does Authentication Work?
- Session Management with Tokens, Secrets, and Cookies
- Types of Authentication Factors
- Common Authentication Strategies
- Authentication and Security
- Supabase and Supabase Authentication Service
-
How to use Supabase Auth
- Summary
- Resources
Prerequisites
You'll need the following to make the most out of this article:
- Basic programming knowledge.
- A Supabase project to follow along.
- And a text editor to try out the example code snippets.
What Is Authentication and Authorization?
In simple terms, authentication is the process of a user identifying themselves to a system and the system confirming that the user is who they claim to be.
On the other hand, authorization is the process of the system determining which parts of the application the user is allowed to view or interact with, and which parts the user is not allowed to access.
How Does Authentication Work?
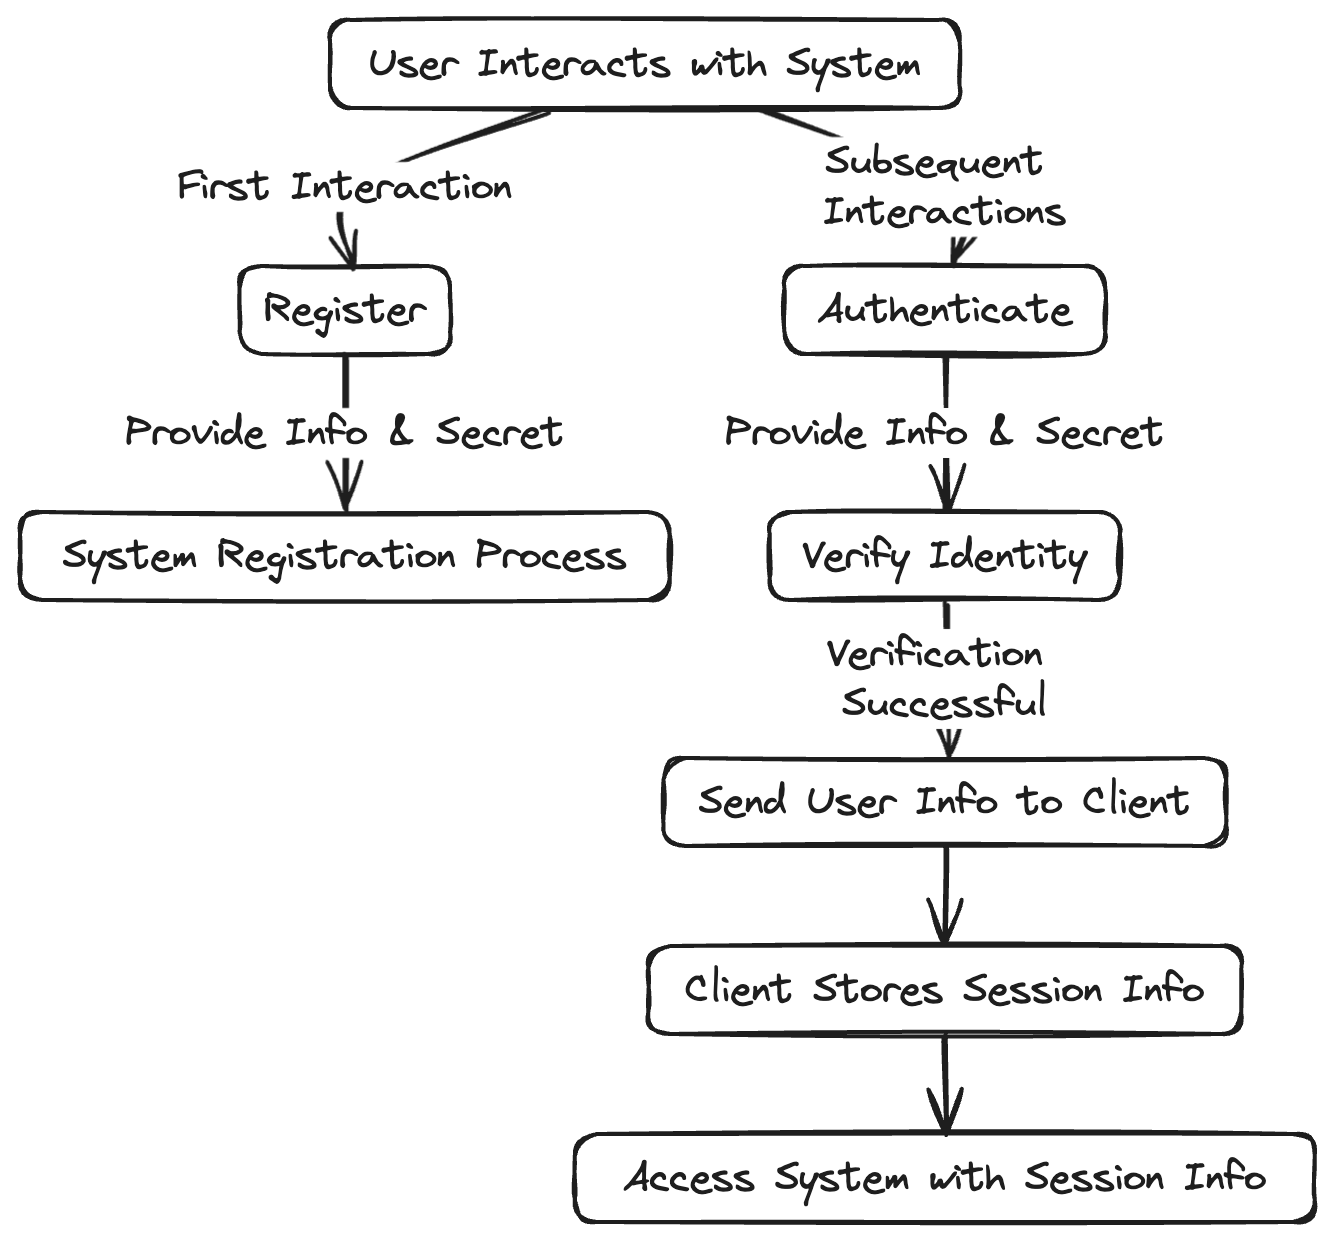 A flowchart depicting the user authentication process
The first time a user interacts with a system, they will be requested to register. Typically, the user will provide a piece of information and a secret that is meant to be known only by them and the system. This is the registration part of the authentication process.
The next time the user interacts with the same system, they will be required to provide the identifying information along with the previously defined secret in order to verify their identity.
The device the user initiates the interaction from is the client and the system is the server. Once the system verifies the user, it sends over some information to the client about the user.
Because this process takes time and requires some action from the user, the client will store this information and send it back to the system whenever the user needs to access the system. This reduces friction by not requiring the user to actively re-authenticate every single time. This creates a user session.
Session Management with Tokens, Secrets, and Cookies
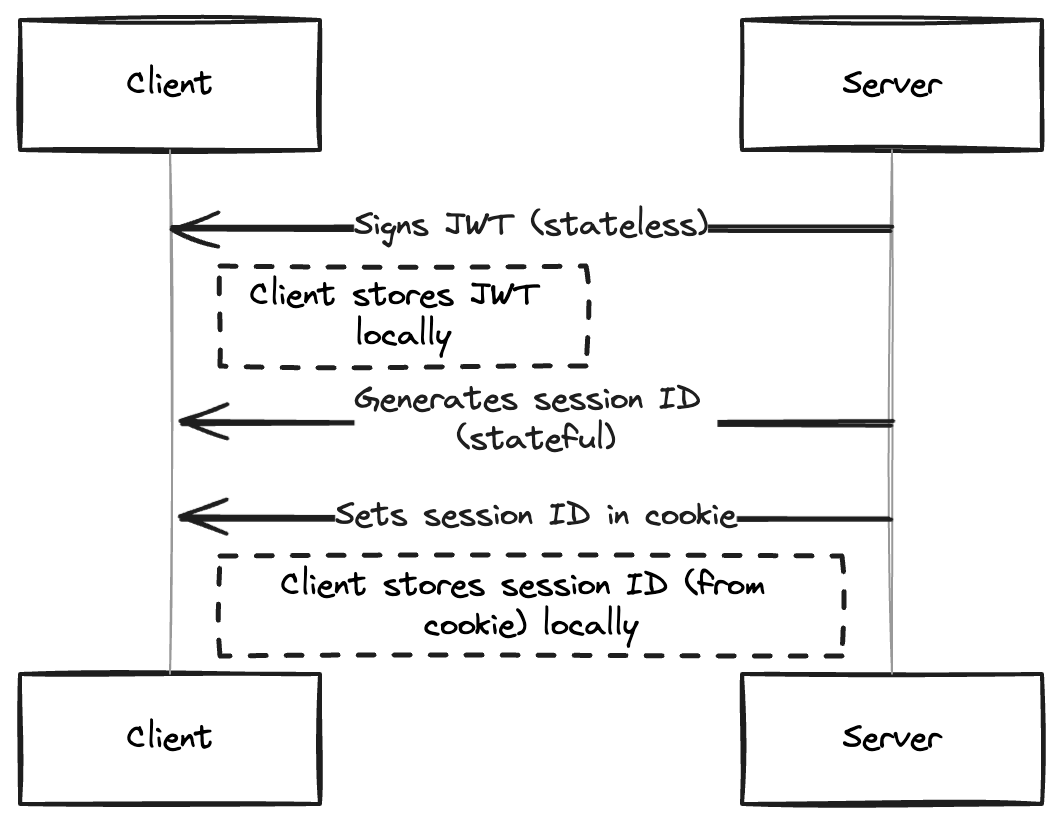 A sequence diagram showing session management in a client-server architecture
The server can pass the user's information to the client in two ways – through tokens or session ids.
In the case of tokens, the server generates a signed token and passes it to the client. This token is typically a JWT and may contain information regarding the user. The client will store this token and send it back to the server every time the user makes a request.
The server is able to verify the integrity of the token because it signed it. This is referred to as stateless authentication because the token is self contained and the server does not need to store session data in a database or cache.
In the case of cookies, the server creates a record of the user session in a database or a cache that will include a session ID. The server send this session ID to the client.
The client stores this session ID in a cookie and sends it back to the server whenever the user makes a request. The session ID is a random string that acts as pointer to the actual user record in the database.
When the server receives this cookie, it matches the session ID it contains to its session records, and then matches that record to the user data in the database. This is referred to as stateful authentication because a database look-up is needed.
Types of Authentication Factors
An authentication factor refers to a type of credential that can be used to verify a user's identity. There are 3 factors typically used in the authentication process, and they are:
- Something you know: an examples is a password.
- Something you have: an example is a token sent to your phone.
- Something you are: an example is your fingerprint.
Common Authentication Strategies
Authentication strategies refer to the processes used to verify a user. Different types of authentication strategies include:
Password-based Authentication
This refers to the traditional way of users identifying themselves by providing a text-based secret that is user defined. Typically, the system handles the entire process on its servers and is responsible for security and reliability.
Password-less Authentication
In this approach, the system verifies the user’s identity without requiring user defined passwords. The system will, instead, generate a one time password (OTP) and send to the user. This OTP is then used in place of a password to gain access to the system. Examples include magic links, where the system sends a code to the user’s email.
Two-Factor Authentication (2FA)
The system attempts to verify the user is who they claim to be by requiring an extra piece of information after the primary authentication has checked out.
This can be an OTP sent to the user via email or SMS, or it can be by requiring the users' biometric information before the system grants access.
Multi-Factor Authentication (MFA)
This is similar to 2FA, except that the system will use more than one extra method to verify the user’s identity. The extra methods or factors used in both MFA and 2FA are usually external to the system, such as an SMS requiring a phone.
OAuth 2.0 and Social Authentication
OAuth is an authorization framework that allows clients to access information from an external server on the user's behalf. The external server prompts the user for permission to share the requested resources with the client.
After user permits the action, the external server issues an access token to the client.
The client then gives this access token to the original server, which verifies the token's validity and manages access to the requested resources. OAuth 2.0 is the latest version of OAuth and is the more widely used framework.
OAuth 2.0 extends support for non-browser based systems. Social Authentication is based on OAuth 2.0 but in this case, the external server that the client redirects the user to is typically a social media platform. This is the type of authentication process carried out whenever you see a "Continue with Twitter/X" button on an authentication page.
SSO and SAML
SAML stands for Security Assertion Markup Language. It is a standard for passing authentication and authorization information between systems. One system acts as the requesting system or the service provider (SP) and the other system holds the requested information or acts as the Identity Provider (IdP).
On receiving this request, the identity provider will generate some statements in SAML form that contains some user information. The service provider then uses this information to decide how to handle the user in relation with its protected resources.
SSO refers to Single Sign On. This is an authentication strategy that lets users sign in through one system/application that then lets them access multiple applications within the same network.
This improves the user experience by not requiring the user to log in to different related applications. An example of this is Google workspace. You don't need to log into Docs separately if you are already logged into your Gmail account. SSO is facilitated by SAML as SAML provides a standard authentication mechanism and allows different systems to trust each other.
Authentication and Security
Authentication involves handling, moving, and storing sensitive user information in relation to protected server resources. This makes security and best practices an important aspect of an authentication system.
There are some basic steps you can take to greatly increase the security of your authentication systems. These include:
- Enforcing stronger passwords.
- Requiring the user to register an extra factor to enable 2FA.
- Encrypting sensitive data as it is being transferred via HTTPS.
- Storing passwords in an encrypted manner.
- Using standard authentication frameworks like OAuth 2.0.
There are certain compliances that your system should consider when handling sensitive user data beyond specific authentication information. This is even more so if operating in certain countries or handling enterprise applications. These compliances include:
- GDPR: This compliance enforces standards around data handling including confidentiality and integrity.
- HIPAA: This compliance applies to medical data. It expects high levels of integrity.
- SOC: This is a framework more generally required of cloud technologies. It is based on the American Institute of CPAs and covers aspects of privacy, security, availability, integrity and confidentiality.
Keeping all this in mind, you will find that it is often easier to use dedicated authentication services for your applications instead of rolling out your own auth.
There are lots of options for this, including dedicated authentication services such as Clerk and Auth0, and Backend-as-a-Service such as Supabase and Firebase. In this case, let's take a look at the Supabase authentication offering.
Supabase and Supabase Authentication Service
Supabase is an open source Backend as a Service (BaaS) platform that makes developing a backend for your applications very easy and fast. It is based on open source technologies and actively supports the open source ecosystem.
Supabase offers common services that most backend applications will require. These services are:
- Database: This is a fully featured Postgres database.
- Authentication: This is an enterprise ready authentication service that is based on a fork of the goTrue server.
- Realtime: This is an API that adds the ability to use real-time capabilities in your applications.
- Storage: This is a storage service which is an s3 wrapper.
- Edge Functions: These are serverless functions that run on the edge. Powered by the Deno runtime.
- Vector: This is a vector database that makes it easier to work with embeddings in your AI applications.
Supabase is SOC2, HIPAA and GDPR compliant, self-host-able and open source. Furthermore, their authentication service exposes many strategies, giving you full control over your data and can be used independently of their other offerings. This and their auto documenting API makes it a very good choice for your applications.
How to use Supabase Auth
The first step is to set up your Supabase project's auth settings. You can enable the exact authentication methods you want to use via the settings. There are three ways you can start using Supabase auth in your project:
The API
You can directly use the authentication service in your applications by calling the auth endpoint and passing the user information to it. You can also get, update and delete your users.
The API is automatically available when you create a project via the Supabase console and can be called like so:
//This will return an object containing an access token, the newly created user data and other metadata
const res = await fetch("https://<your-project-ref>/auth/v1/signup", {
  method: "POST",
  headers: {
    authorization: "Bearer YOUR_SUPABASE_KEY",
    "content-type": "application/json",
  },
  body: JSON.stringify({
    email: "user-email",
    password: "user-password",
  }),
});
SDKs
Supabase offers a few SDKs (software development kits) in different programming languages meant to make interacting with your Supabase project straightforward. Languages officially supported include Dart and JavaScript, with Python and others having strong community support.
The procedure for getting started involves adding the SDK as a dependency, then connecting your application to your Supabase project.
In the case of the JavaScript SDK, this would look something like this:
//Install via npm:
npm install @supabase/supabase-js

// or add cdn links:
<script src="https://cdn.jsdelivr.net/npm/@supabase/supabase-js@2"></script>
//Then initialize
Supabaseimport { createClient } from '@supabase/supabase-js'

const supabaseUrl = 'https://<your-project-ref>.supabase.co'
const supabaseKey = process.env.SUPABASE_ANON_KEY
const supabase = createClient(supabaseUrl, supabaseKey)
Then you can access the authentication methods under the auth namespace like so:
const { data, error } = await supabase.auth.signUp({
  email: 'user email',
  password: 'user password',
})
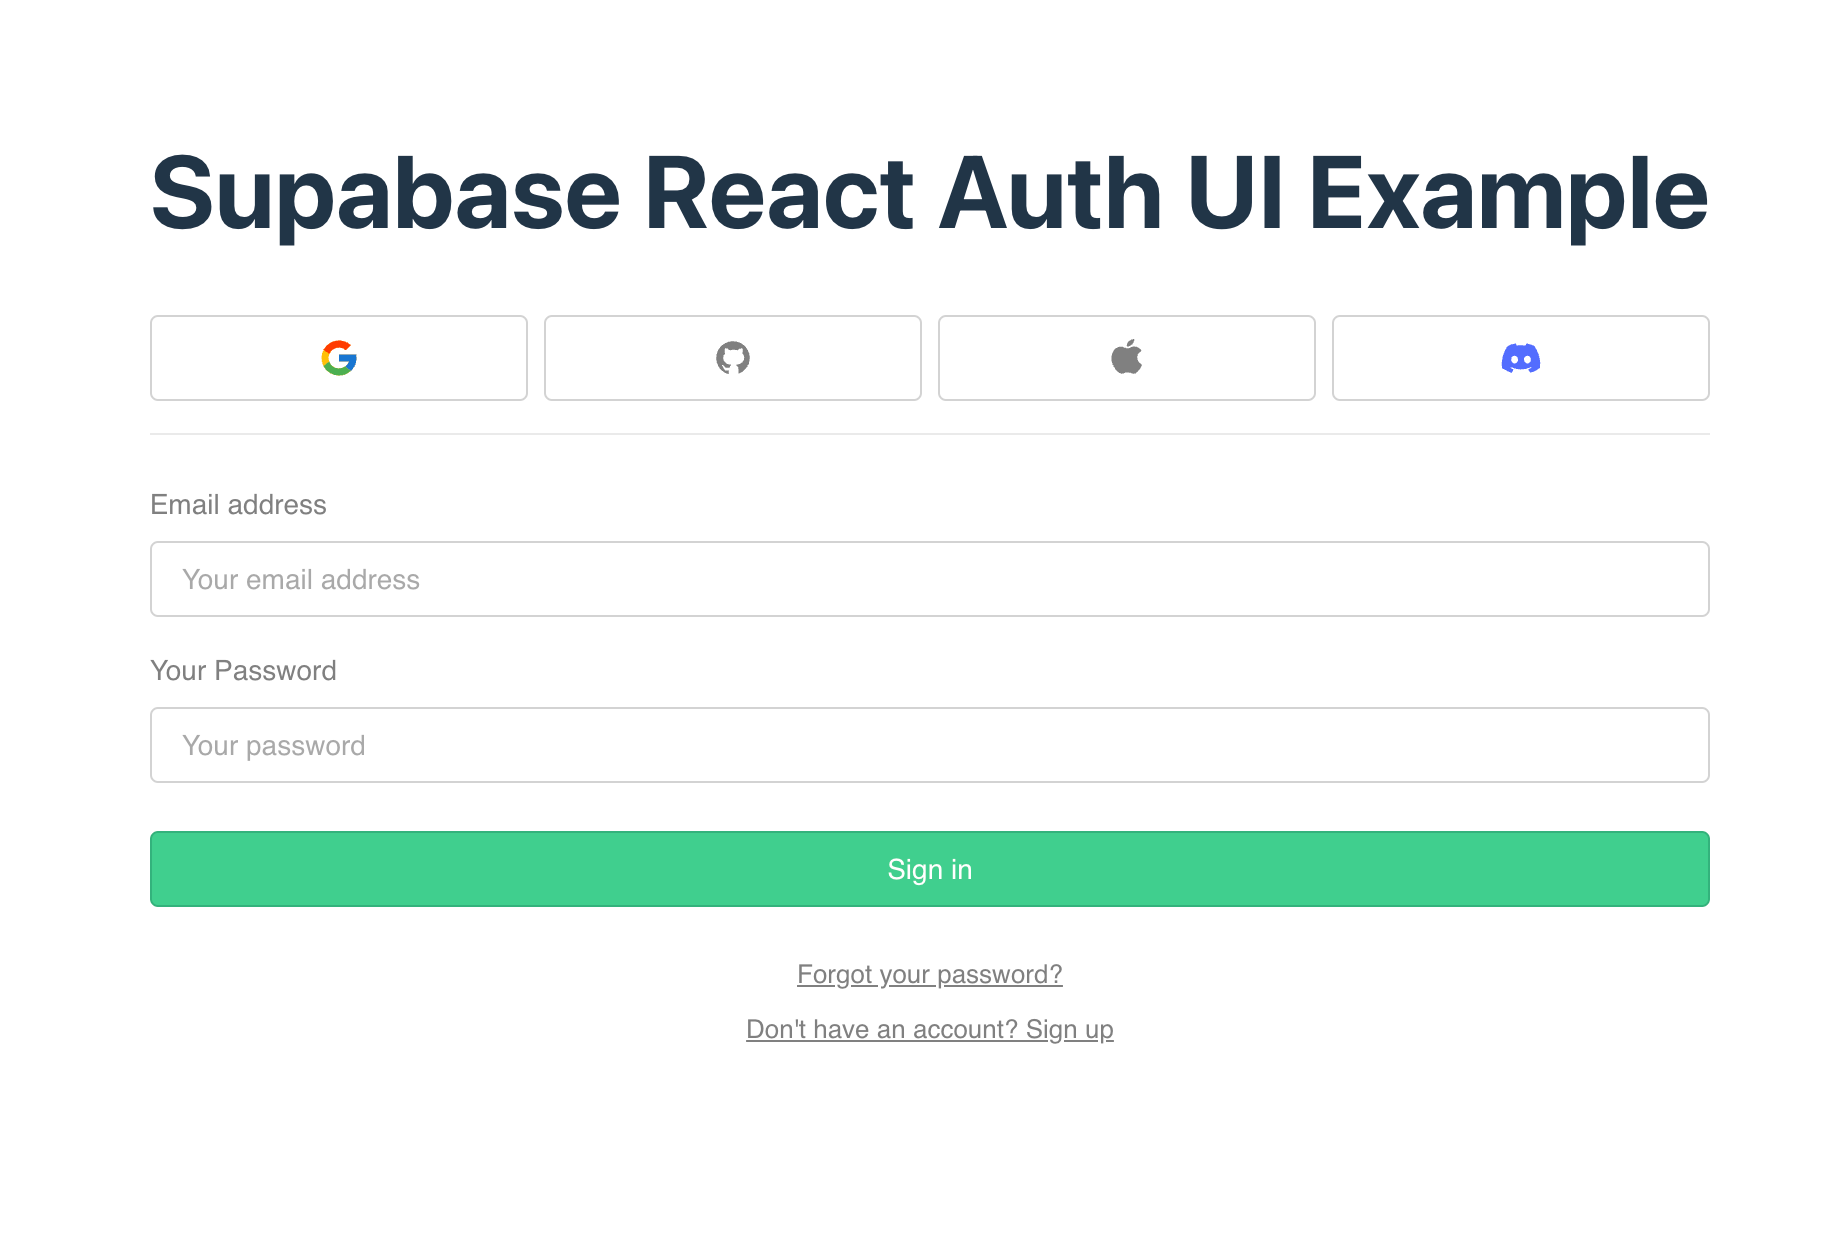
Auth UI Helpers
Supabase provides helper libraries to make authentication using their service even easier. These libraries provide customizable login screens that support magic links, password based and social login strategies.
Currently, the libraries are available for JavaScript and Flutter. Supabase also provides a separate SSR (Server Side Rendering) package for applications that use server side frameworks and require a Supabase access token to be available to them.
To start using React Auth UI, as an example, first you need to install the dependencies as shown below:
npm install @supabase/supabase-js @supabase/auth-ui-react
@supabase/auth-ui-shared
Then you can start using the library after initializing Supabase as in the SDK example above. Here is some sample code that shows how to use the auth UI library in a React application:
import { useEffect } from "react";
import { useNavigate } from "react-router-dom";
import { Auth } from "@supabase/auth-ui-react";
import { ThemeSupa } from "@supabase/auth-ui-shared";
import { supa } from "../constants";

const AuthUi = () => {
  const navigate = useNavigate();

  useEffect(() => {
    const {
      data: { subscription },
    } = supa.auth.onAuthStateChange((event) => {
      if (event === "SIGNED_IN") {
        navigate("/authenticated");
      }
    });

    return () => subscription.unsubscribe();
  }, [navigate]);

  return (
    <Auth
      supabaseClient={supa}
      providers={["google", "github", "apple", "discord"]}
      // controls whether to display only social providers
      // onlyThirdPartyProviders
      redirectTo="http://localhost:3000/authenticated"
      // comes with preconfigured themes, can add custom themes
      appearance={{ theme: ThemeSupa }}
      // controls how to display the social provider icons
      socialLayout="horizontal"
    />
  );
};

export default AuthUi;
This would display the following form on screen:
Summary
Authentication is the process of the user identifying themselves and the server verifying this identity while authorization is the system determining what access the user should have to the resources and limiting the user accordingly.
After the server authenticates the user, it will pass the user information in the form of either a token or session ID within a cookie.
The information will be passed back and forth between the client and server whenever the user needs certain access until they expire or the user terminates the cycle by logging out or deleting their account.
This process of user verification occurs by employing certain factors of authentication. For example, one system may only require a password while another requires a password and a code sent to the users phone number.
Your authentication system can allow multiple strategies of authentication using any of the three auth factors.
Supabase is an excellent option if you opt not to handle your own auth.
Supabase auth can be accessed via the API, the SDKs and the Auth libraries. Supabase maintains an SSR package for server side frameworks.
Resources
The following resources are helpful further reading. They offer more explanations on authentication and authorization, as well as Supabase specific documentation.