By Austin Tackaberry
This post will use react-intl to help you go from create-react-app to setting up the framework to a completed, translated web app!
I committed code as I wrote this post, so you will be able to look at my commit history to easily see how my code evolved from start to finish.
 _Photo by [Unsplash](https://unsplash.com/photos/v6kii3H5CcU?utm_source=unsplash&utm_medium=referral&utm_content=creditCopyText" rel="noopener" target="_blank" title="">Artem Bali on <a href="https://unsplash.com/search/photos/globe?utm_source=unsplash&utm_medium=referral&utm_content=creditCopyText" rel="noopener" target="blank" title=")
What is Internationalization?
Given that you decided to click on the link to this post, chances are you at least have some idea what internationalization (i18n) is. Taken right off of the W3 website:
“Internationalization is the design and development of a product, application or document content that enables easy localization for target audiences that vary in culture, region, or language.”
As a developer, you want your content to be easily readable and usable by all kinds of people across the globe. I think everyone agrees with that. But I know what you’re thinking:
“Developing a web app for people of my own culture/region/language is already difficult enough! I don’t have the time or effort for i18n!”
You already have the lingo down, I see. Hopefully, this post will help you realize that setting up i18n for your project is not as difficult or time-consuming as it seems.
What react-intl does and does not do
If you are new to i18n, you might have some thoughts about what you think a library such as react-intl should and should not be able to do.
It does:
- Help you aggregate all your scattered content, so that it can be easily translated later
- Help you deal with translating text in addition to dates, numbers, and so on
- Provide an easy way for translations to be imported into your app
It does NOT:
- Translate your content for you
- Tell you how to find out what locale the user wants
- Fix that unrelated bug you’ve been dealing with for the last couple hours (bummer, right?)
Ok, so let’s get right to it!
Setting up the example project
$ npx create-react-app i18n-example
I’m going to add react router to show how react-intl works with multiple pages.
$ cd i18n-example && npm install react-router-dom
My example app will have three React components: one main page, one subpage, and one component that is imported into the subpage. See the file structure and pages below:
/src
  /components
    Weather.js
  /pages
    Home.js
    Day.js
The state of the project up until this point can be found here.
Setting up react-intl
Now, the fun begins. We will install react-intl and get to work!
$ npm install react-intl
The main goal behind react-intl is to allow support for i18n while minimizing the impact to your normal coding flow. Certainly, you have content in many places all over your web app. You have text, numbers, and dates in paragraphs, tables, and headers.
What would you do if you had to build an i18n library? Well, you have these bits and pieces of content all over your web app. And you want it all to be easily translated. If you were going to give your content to a translator, you wouldn’t give them your code and say “good luck, get to work.”
You would want to find a way to put all your content in one file, and then give them that one file. They would translate it into another language, say from English to Spanish, and give you one file with all the Spanish content.
Ok, great. So you did that, but now you have to take the Spanish content in that one file and re-distribute it back into its original location. How would you do that programmatically? Perhaps you would assign ids to each bit of content, so that you don’t lose track of the original location of each bit of content.
And that’s pretty much it!
The first step is to wrap your application in the <IntlProvider> component:
<IntlProvider>
  <App />
</IntlProvider>
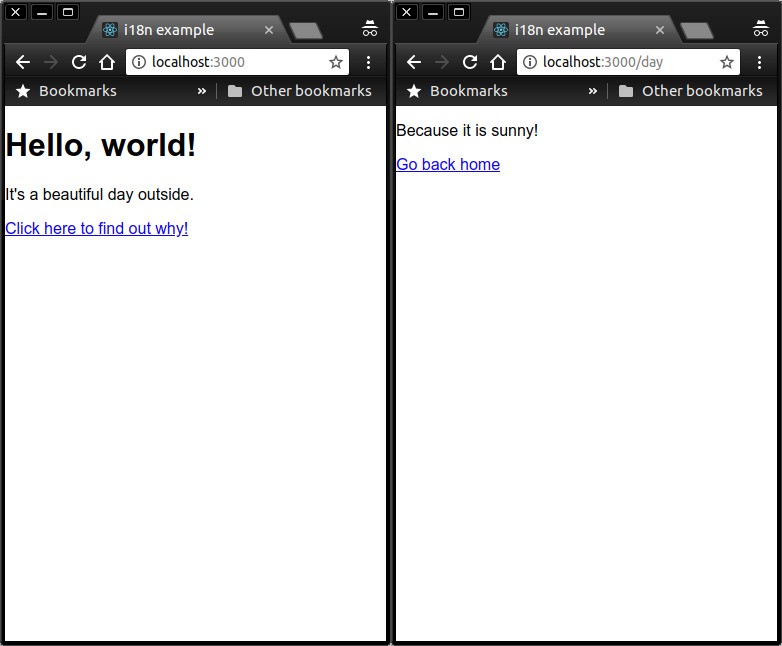
Now, you need to identify the content for react-intl that will eventually be translated. On the home page of my app, I have the following paragraph:
<p>It is a beautiful day outside.</p>
I need to tell react-intl that this is content that I want to translate and give it an id, so that it can keep track of this content and its original location:
<FormattedMessage
  id="Home.dayMessage"
  defaultMessage="It's a beautiful day outside."
/>
By default, the text will be outputted in a <span> , so we will need to wrap this in the original <p> if we want it to remain a paragraph.
<p>
  <FormattedMessage
    id="Home.dayMessage"
    defaultMessage="It's a beautiful day outside."
  />
</p>
I will now do this for all the content in my web app.
The state of the project up until now can be found here.
Adding babel-plugin-react-intl
Now that we have everything set up, you might be wondering how we can easily aggregate all of that content into one file. However, for debugging purposes, it could be helpful to have individual JSON files for each React component. Guess what, there’s a babel plugin for that!
$ npm install babel-plugin-react-intl
This plugin will make a copy of your src directory, but instead of having your React component files, it will have json files with the message content and id. One for each component file in your src directory. It will do this when you run npm run build .
Now we need to eject from create-react-app, so that we can add our new plugin into our babel configuration. Make sure to commit any changes and then execute:
$ npm run eject
Now, we will need to add a .babelrc file in our project root with the following contents:
{
  "presets":["react-app"],
  "plugins": [
    ["react-intl", {
      "messagesDir": "./public/messages/"
    }]
  ]
}
Now that babel can use our fancy new plugin that we just added, we can move onto our next step: generating those JSON files.
$ npm run build
Once you run this, you should notice that you have a public/messages/src directory that appears to be a clone of your original src directory, except all your component files are actually JSON files.
/messages
  /src
    /components
      Weather.json
    /pages
      Home.json
      Day.json
Now, let’s see the contents of one of them, Home.json:
[
  {
    "id": "Home.header",
    "defaultMessage": "Hello, world!"
  },
  {
    "id": "Home.dayMessage",
    "defaultMessage": "It's a beautiful day outside."
  },
  {
    "id": "Home.dayLink",
    "defaultMessage": "Click here to find out why!"
  }
]
The state of the project up until now can be found here.
Combining the JSON files
It did just what we thought it would. It can be helpful to have our content organized in this structure, but ultimately we will want it to be in one file, and we need it to include any translations that we will make.
Now we need to make a script that does this for us. Thankfully, the folks at react-intl gave us a good starting point with this script.
import * as fs from "fs";
import { sync as globSync } from "glob";
import { sync as mkdirpSync } from "mkdirp";
import last from "lodash/last";

const MESSAGES_PATTERN = "./public/messages/**/*.json";
const LANG_DIR = "./public/locales/";
const LANG_PATTERN = "./public/locales/*.json";

// Try to delete current json files from public/locales
try {
  fs.unlinkSync("./public/locales/data.json");
} catch (error) {
  console.log(error);
}

// Merge translated json files (es.json, fr.json, etc) into one object
// so that they can be merged with the eggregated "en" object below

const mergedTranslations = globSync(LANG_PATTERN)
  .map(filename => {
    const locale = last(filename.split("/")).split(".json")[0];
    return { [locale]: JSON.parse(fs.readFileSync(filename, "utf8")) };
  })
  .reduce((acc, localeObj) => {
    return { ...acc, ...localeObj };
  }, {});

// Aggregates the default messages that were extracted from the example app's
// React components via the React Intl Babel plugin. An error will be thrown if
// there are messages in different components that use the same `id`. The result
// is a flat collection of `id: message` pairs for the app's default locale.

const defaultMessages = globSync(MESSAGES_PATTERN)
  .map(filename => fs.readFileSync(filename, "utf8"))
  .map(file => JSON.parse(file))
  .reduce((collection, descriptors) => {
    descriptors.forEach(({ id, defaultMessage }) => {
      if (collection.hasOwnProperty(id)) {
        throw new Error(`Duplicate message id: ${id}`);
      }
      collection[id] = defaultMessage;
    });

    return collection;
  }, {});

// Create a new directory that we want to write the aggregate messages to
mkdirpSync(LANG_DIR);

// Merge aggregated default messages with the translated json files and
// write the messages to this directory
fs.writeFileSync(
  `${LANG_DIR}data.json`,
  JSON.stringify({ en: defaultMessages, ...mergedTranslations }, null, 2)
);
We will need to modify it a little bit because, as it stands, that script will generate a fake translation. We don’t want this because it is not practical.
We are better than that! We want it to read a real translation!
The script we will use to do this is below:
We will need to save this file in our scripts directory and then edit package.json so that it actually runs the script.
Before we do that, we will need to do a couple things, so that our ESNext code can be understood. First we will need to add babel-cli to make sure that the script gets transpiled.
$ npm install --save-dev babel-cli
Next, we need to add the env preset to our .babelrc so that it looks like this:
{
  "presets":["react-app", "env"],
  "plugins": [
    ["react-intl", {
      "messagesDir": "./public/messages/"
    }]
  ]
}
Lastly, we need to edit our package.json so that it runs our script:
{...
  "scripts": {
    "build:langs": "NODE_ENV='production' babel-node
      scripts/mergeMessages.js",
    "build": "npm run build:langs && node scripts/build.js",
    ...
  },
  ...
}
Note that we are running the mergeMessages script before npm run build . This is because we want to generate our final data.json file in the /public directory before our build script copies it over to /build .
Alright, now when we run npm run build we should see build/locales/data.json which combines all of our JSON files into one.
The state of the project up until now can be found here.
Time to start translating
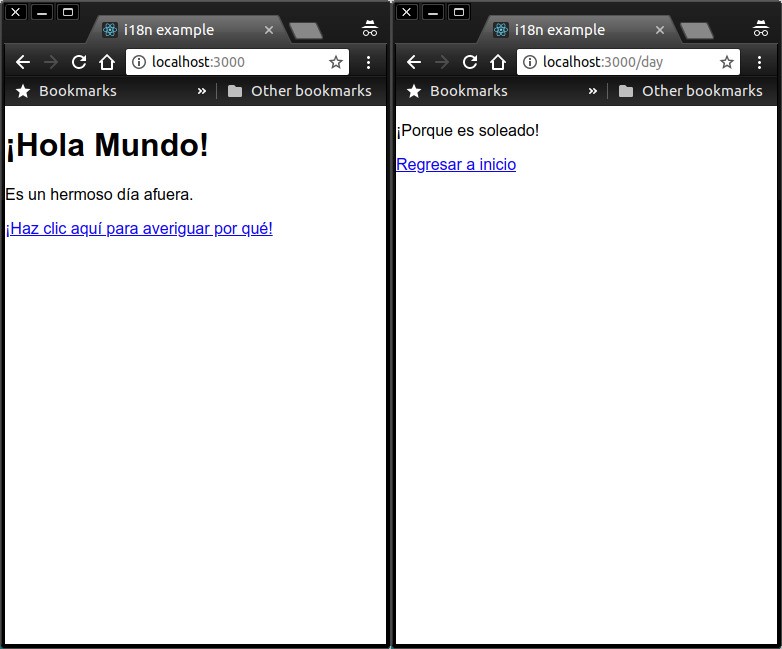
Now that we have made a script that will aggregate our default messages and our translations into one file, let’s make some translations! For this example, we will translate to Spanish. Our script that we just created will read all *.json files from /public/locales so we will need to name our new translation file /public/locales/es.json and add the content below:
{
  "Weather.message": "¡Porque es soleado!",
  "Day.homeLink": "Regresar a inicio",
  "Home.header": "¡Hola Mundo!",
  "Home.dayMessage": "Es un hermoso día afuera.",
  "Home.dayLink": "¡Haz clic aquí para averiguar por qué!"
}
Now when we run npm run build, our mergeMessages script will create a data.json file in /public/locales , and then it will be copied over to /build/locales. Our final data.json file will look like this:
{
  "en": {
    "Weather.message": "Because it is sunny!",
    "Day.homeLink": "Go back home",
    "Home.header": "Hello, world!",
    "Home.dayMessage": "It's a beautiful day outside.",
    "Home.dayLink": "Click here to find out why!"
  },
  "es": {
    "Weather.message": "¡Porque es soleado!",
    "Day.homeLink": "Regresar a inicio",
    "Home.header": "¡Hola Mundo!",
    "Home.dayMessage": "Es un hermoso día afuera.",
    "Home.dayLink": "¡Haz clic aquí para averiguar por qué!"
  }
}
We’re almost there! The last step is to dynamically load the Spanish version of the text if the user’s browser settings are Spanish. We need to edit index.js to read the browser language settings and then give that information along with the correct translations to <IntlProvider /> and ultimately our app.
Our final index.js looks like this:
import React from "react";
import ReactDOM from "react-dom";
import "./index.css";
import App from "./App";
import registerServiceWorker from "./registerServiceWorker";
import { BrowserRouter } from "react-router-dom";
import { IntlProvider, addLocaleData } from "react-intl";
import en from "react-intl/locale-data/en";
import es from "react-intl/locale-data/es";

import localeData from "./../build/locales/data.json";

addLocaleData([...en, ...es]);

// Define user's language. Different browsers have the user locale defined
// on different fields on the `navigator` object, so we make sure to account
// for these different by checking all of them
const language =
  (navigator.languages && navigator.languages[0]) ||
  navigator.language ||
  navigator.userLanguage;

// Split locales with a region code
const languageWithoutRegionCode = language.toLowerCase().split(/[_-]+/)[0];

// Try full locale, try locale without region code, fallback to 'en'
const messages =
  localeData[languageWithoutRegionCode] ||
  localeData[language] ||
  localeData.en;

ReactDOM.render(
  <IntlProvider locale={language} messages={messages}>
    <BrowserRouter>
      <App />
    </BrowserRouter>
  </IntlProvider>,
  document.getElementById("root")
);
registerServiceWorker();
(Heavily copied code from Preethi Kasireddy’s gist here)
One other small thing we need to do is edit our webpack configs to allow imports outside of src and node_modules .
Now, if we change our browser settings to Spanish, we should see our content translated into Spanish!
The final state of the project can be found here.