By Alvin Okoro
Node.js is one of the most popular back-end technologies out there right now. It is friendly, robust, and well-maintained and it's not going anywhere anytime soon.
To help you learn how to use it effectively, in this article we will create a simple server using Node with Babel configured in our code.
But before we take a deep dive into building out our server, let's learn more about what Babel is.
What is Babel?
Babel is a JavaScript compiler. It's a popular tool that helps you use the newest features of the JavaScript programming language.
Why use Babel in Node.js?
Have you ever opened a back end repo built with Node.js/Express – and the very first thing you saw was the ES6 import and export statements along with some other cool ES6 syntax features?
Well, Babel made all that possible. Remember that Babel is a popular tool that lets you use the newest features of JavaScript. And many frameworks today use Babel under the hood to compile their code.
For example, Node can't use ES6 import and export statements and some other cool features of ES6 syntax without the help of a compiler like Babel.
So in this tutorial, I'll show you how to quickly setup your Node app to be compatible with most ES6 syntax.
Awesome right? Let's dive in.
Prerequisites
This tutorial assumes that that you have the following:
- Basic knowledge of Node.js
- Node installed on your machine
- Any code or text editor of your choice
Getting Started
Let's setup a basic Node app which we will use for this tutorial.
Create a new folder. For this tutorial, I'll call mine node-babel. Now add the folder to the workspace, and open your terminal.
Let's initialize and create a package.json file for our app:
npm init
This command will show some setup steps which we want to leave as it is. So hitting the enter or return key throughout the setup will work fine.
Now once you're done, create a new file called "index.js" which will serve as our entry point.
How to Set Up And Install Babel
Now, we will install three packages from the Babel family which are:
@babel/cli, @babel/core and @babel/preset-env
To install, we use the command below to install the package:
npm install --save-dev @babel/cli @babel/core @babel/preset-env
We want to use the --save-dev to install them as dependencies for the development of your module.
So once you're done with the installation, create a new file called .babelrc for configuring babel.
touch .babelrc
This file will host all of the options we want to add to Babel. So for now, let's use the setup which I normally use for development in my app. You can copy it and add to yours:
{
  "presets": [
    ["@babel/env", {
      "targets": {
        "node": "current"
      }
    }]
  ],
  "plugins": [
    "@babel/plugin-proposal-class-properties",
    "@babel/plugin-proposal-object-rest-spread"
  ]
}
The configuration above is what I use to tell Babel that yes, I want to use not only my import and export statements but also the class feature as well as the rest and spread operators from ES6.
Awesome yeah? Let's move on.
How to Set Up A Simple Server
Now open up the "index.js" file we created earlier, and add this code to generate a simple server:
import http from 'http';

const server = http.createServer((req, res) => {
  res.end('Hello from the server');
}).listen(4001);

console.log('Server is up and running');

export default server;
With the sample code above our server will listen on port 4001 and then send a "Hello from the server" response to us whenever we visit the port.
Package.json Script Configurations.
We now have a simple server. To run this, we have to transpile our code before running with Node. To do this, open the "package.json" file and add this build and start script:
  "scripts": {
+   "build": "babel index.js -d dist",
    "start": "npm run build && node dist/index.js"
  }
Nice – so let's start our server with this command:
npm start
You should get this response once you visit localhost:4001

How to Use Nodemon to Watch and Restart Your Server
To prevent restarting the server yourself whenever you make changes to your app, we need to install nodemon. You can install nodemon to your application using this command to install it as a dev dependency:
npm install --save-dev nodemon
And then we reconfigure our package.json scripts:
  "scripts": {
    "build": "babel index.js -d dist",
    "start": "npm run build && nodemon dist/index.js"
  }
Awesome, now this is the final code of our Node app and what you should get when you run "npm start" to start up your server.
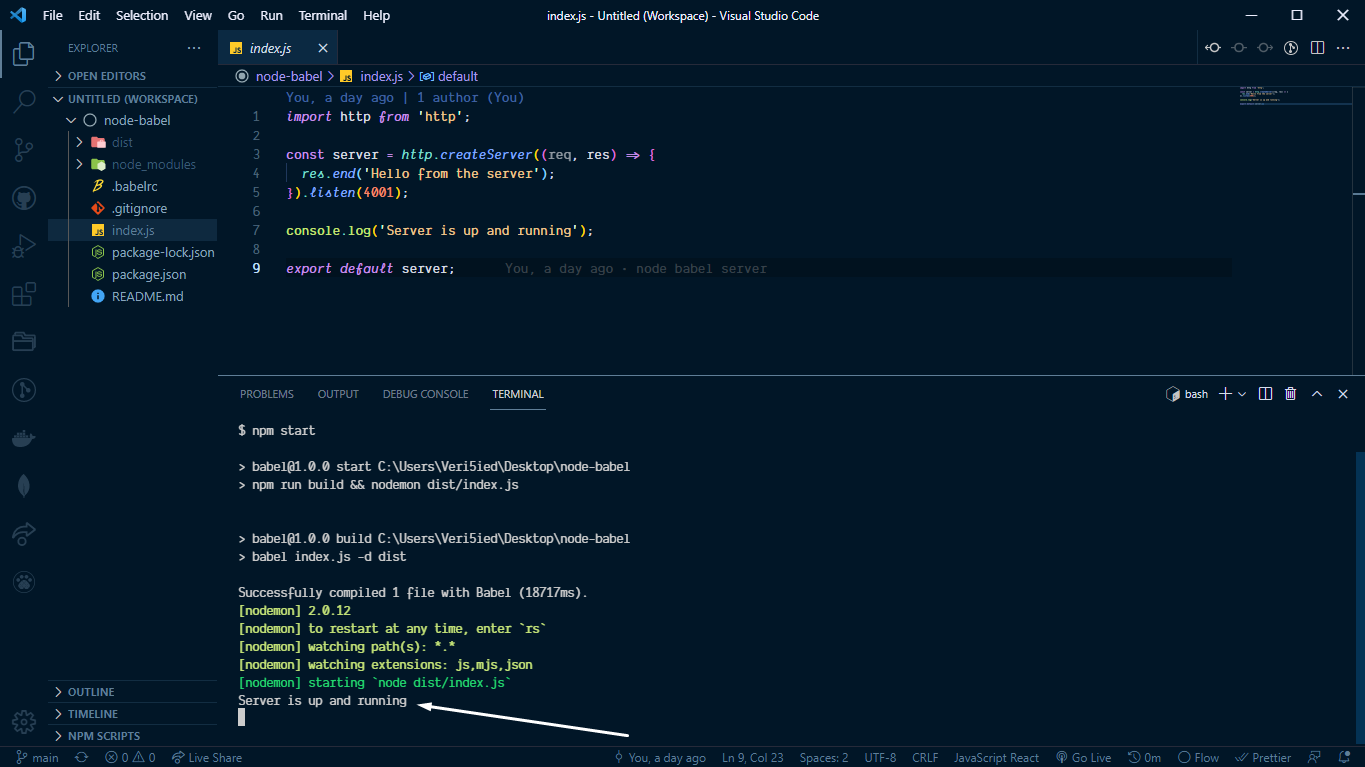
As you can see from the image above, our server is up and running. You can now make use of the import and export statement from the es6 syntax and other awesome features es6 provides like the rest and spread operators in your Node application.
Conclusion
In this tutorial, we've learned how to use the awesome ES6 syntax in our Node app using Babel.
Note that you can add more configurations in your .babelrc file. It is not limited to what we have in this tutorial – so feel free to tweak or change it.
You can find the sample code here: https://github.com/Veri5ied/node-babel
Happy Hacking!