By Rishav Agarwal
Use basic computer vision and Python’s Numpy library
I have always been fascinated by computer vision, and especially by its power to manipulate images.
An image is basically an array of numbers to Python. So we can perform a variety of matrix manipulations to get some very interesting results. In this post, I talk about how to reduce an image into a ‘pencil’ outline.
The Steps
The process is pretty simple:
- Grayscale the image
- Invert it
- Blur the inverted image
- Dodge blend the blurred and grayscale image.
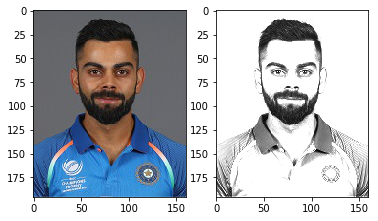
We can pick any image from the Internet. I will go with this image of Indian cricketer Virat Kohli:
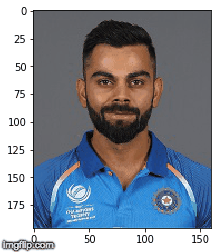
1. Load image
import imageioimg="http://static.cricinfo.com/db/PICTURES/CMS/263600/263697.20.jpg"start_img = imageio.imread(img)
 Initial image
You can see how Python sees this image with the shape attribute:
start_img.shape(196, 160, 30)
So this is a three channel image of size 196x160.
2. Greyscale
We then make the image black and white.
Numpy doesn’t have any in-built function for grayscaling, but we can easily convert the image using the formula. You can learn why this formula works right here.
Y= 0.299 R + 0.587 G + 0.114 B
So our function will look like:
import numpy as npdef grayscale(rgb): return np.dot(rgb[...,:3], [0.299, 0.587, 0.114])
Applying grayscale:
gray_img = grayscale(start_img)
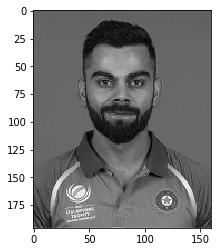 Grayscaled Image
3. Invert image
We can invert images simply by subtracting from 255, as grayscale images are 8 bit images or have a maximum of 256 tones.
inverted_img = 255-gray_img
 Inverted Image
4. Blur Image
We now blur the inverted image. Blurring is done by applying a Gaussian filter to the inverted image. The key here is the variance of the Gaussian function or sigma.
As sigma increases, the image becomes more blurred. Sigma controls the extent of the variance and thus, the degree of blurring.
import scipy.ndimageblur_img = scipy.ndimage.filters.gaussian_filter(inverted_img,sigma=5)
 More blurring on increasing sigma
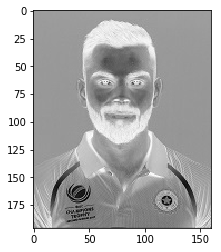
5. Dodge and Merge
The Colour Dodge blend mode divides the bottom layer by the inverted top layer. This lightens the bottom layer depending on the value of the top layer. We have the blurred image, which highlights the boldest edges.
As all our images are read using Numpy, all the matrix calculations are super fast.
def dodge(front,back): result=front*255/(255-back) result[result>255]=255 result[back==255]=255 return result.astype(‘uint8’)
final_img= dodge(blur_img,gray_img)
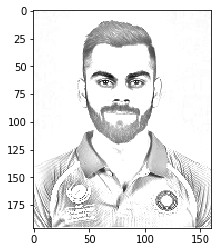 Final image
And that’s it!
6. Plot and save
We can plot our final image using plt.imgshow. Note that we need to keep the cmap argument equal to “gray”.
import matplotlib.pyplot as pltplt.imshow(final_img, cmap=”gray”)
We can save the image using:
plt.imsave(‘img2.png’, final_img, cmap=’gray’, vmin=0, vmax=255)
Final result
Entire code in action
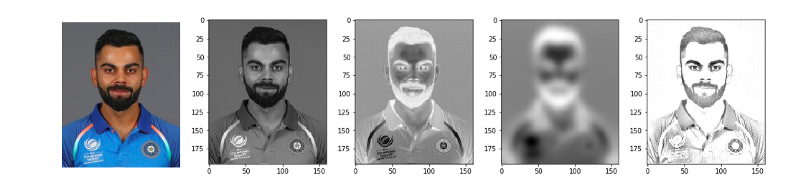 Each stage of the algorithm
Here we don’t have much room to play with, except with the sigma parameter while blurring.
As sigma increases, the pic becomes clearer but run time also increases. So a sigma of 5 works well for us.
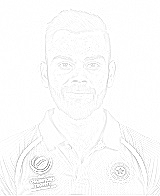 effect of increasing sigma
Condensed code:
I promised 10 lines or less, so here you go:
As always, you can find the entire detailed code on my GitHub.
PS this is how I created my Medium DP. If you like this blog, show some ❤️ :)
Also I don’t own this image of Virat. I hope he doesn’t mind!