

The Java programming language is a favourite among solo devs and large teams alike. It’s popular for many reasons and use cases, including its mature ecosystem, stable support, efficiency, and reliability.
If you’re learning Java with the end goal of building applications, you’ll need to be able to choose a suitable Java framework (a collection of necessary pre-built tools and libraries) to make development easier once you know the fundamentals.
There are many Java frameworks out there that help you complete different tasks, such as Jakarta EE (formerly Java EE, an enterprise-level framework, used for large-scale applications), JSF (or JavaServer Faces, a UI framework for developing Java web interfaces), Spring, Spring Boot, and others.
You may have heard of Spring and Spring Boot by now, as they are very popular and commonly used by Java devs. In this article, you will learn:
What the Spring and Spring Boot frameworks are.
Their real-world use cases and how to get started building with them.
The key differences between Spring and Spring Boot.
Prerequisites
To fully understand the content of this article, you should have a good working knowledge of the Java programming language, be familiar with the concept of APIs (Application Programming Interfaces), and know how to use Java project build tools – especially Maven, as it’s the build tool we’ll use for this article’s code examples.
Table of Contents
What is the Spring Framework?
Spring is a framework used for building modern enterprise-grade applications. It’s primarily used for Java, but it’s also compatible with the Kotlin and Groovy programming languages, too. This means that you can use Kotlin and Groovy to develop applications in Spring.
Spring provides a clear paradigm you can follow for building and configuring applications for easy deployment on any platform you choose.
At the core of the Spring framework is its robust infrastructure support. It internally handles implementing key components that are required for the safety and overall functionality of enterprise applications. It does this using modules such as:
Spring JDBC
Spring MVC
Spring Security
Spring AOP
Spring ORM and
Spring Test
These let developers focus on the business logic of the application instead of worrying about implementing or writing the code for the components/modules from scratch. This saves significant development time.
Why use Spring?
Spring does a lot of heavy lifting in terms of reducing excessive infrastructure code through its modules compared to legacy Java frameworks. This is one of the reasons it’s so popular.
For instance, when it comes to handling dependencies in Spring, you just have to define the dependency using the @Bean annotation in a configuration class, replacing the older approach of adding the dependency in an XML file.
Spring then adds the bean to an IoC (Inversion of Control) container, and makes the bean available to be utilised during runtime, also handling the lifecycle and wiring automatically.
Here is a simple code illustration of the configuration class below:
@Configuration

public class AppConfig{

@Bean

public DataSource dataSource() {

    DriverManagerDataSource ds = new DriverManagerDataSource();

    ds.setUrl("jdbc:mysql://localhost:3306/mydb");

    ds.setUsername("user");

    ds.setPassword("pass");

    return ds;

  }


}
Here’s the class where the resource/dependency is utilised:
@Component

public class UserRepository {

private DataSource dataSource;

public UserRepository(DataSource dataSource){

      this.dataSource = dataSource;

}

    public void connectToDb() throws SQLException {

        Connection conn = dataSource.getConnection();

        System.out.println("Connected to DB via Spring!");

        conn.close();

    }

}
These code snippets demonstrate how dependency injection is implemented using Spring’s @Bean and @Component annotations. In the code is a configuration class and a second class where the DataSource is injected and used. This shows a simplistic approach to dependency management in Spring.
Key Components of the Spring Framework
Spring is made up of several components, each serving distinct roles (as shown in the image below):
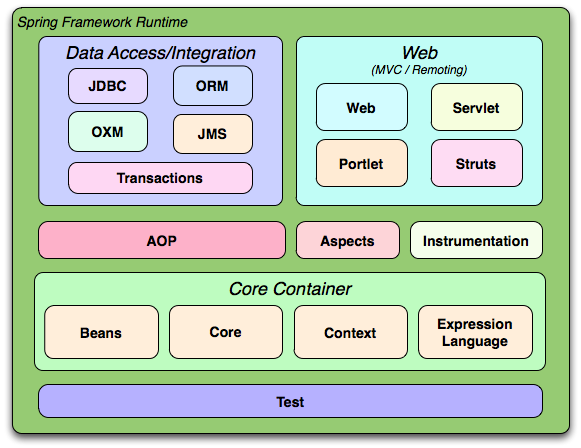
Image source | Overview of the Spring Framework
These components collectively provide useful functionalities that make Spring a robust framework. Think of them as parts that make up a whole. Let me briefly explain each of the components and their various roles for easy understanding.
Data Access/Integration:
This component enables easy interaction with databases and other data sources. It contains several modules (JDBC, ORM, OXM, JMS and Transaction Management), each performing unique functions.
These modules provide fine-grained abstraction for tasks like executing SQL queries, integrating with ORM frameworks (for example, Hibernate), handling XML data binding, messaging, and managing transactions, while working in a Spring-based application.
Web:
The Web component makes interaction between the client side (through HTTP request) and the core business logic possible in a Spring application. It consists of four modules (Web, Web-Servlet, Web-Struts, and Web-Portlet), each serving a specific function:
The Web module enables multipart file upload functionality and initialization of the IoC container.
Web-Servlet module provides an MVC (Model View Controller) Implementation for web applications.
The Web-Struts module integrates Struts into Spring by using support classes.
The Web-Portlet module supports MVC implementation for use in a portlet environment.
AOP and Instrumentation:
AOP provides the implementation that makes it possible to ensure the separation of “cross-cutting concerns” in your application from the business logic, leading to cleaner and more organized code that’s free from clutter and repetition.
Instead of writing these concerns everywhere in your classes, you just define them in aspects and they are injected for you by Spring when the program needs them. These concerns could be logging, security, or transactions.
Instrumentation:
This enables class instrumentation support, which ensures class bytecode modification.
Core Container:
Core Container as the name implies, is a crucial part of Spring. It is responsible for some of the unique features that make the Spring Framework desired and popular: IoC (Inversion of Control) and dependency injection.
Core Container is made of Beans, Core, Context and Expression Language modules. These modules all have unique, yet complementary properties.
Test:
The Test component provides a suitable approach to testing Spring applications, and it integrates smoothly with JUnit or TestNG. It goes as far as providing mock objects that can be used to test different components of your application in either an isolated or Spring-managed environment, helping you achieve a robust and reliable software application.
What is the Spring Boot Framework?
Spring Boot is an open-source framework built on top of Spring for developing robust stand-alone applications that you can “easily run”. The major purpose for which Spring Boot was created was to further simplify the process of configuring and running Spring applications.
Spring Boot enforces an opinionated approach to development and provides extra useful features not contained in Spring. Let’s learn a bit more about how it works.
Key Features of the Spring Boot Framework
Spring Boot, being part of the Spring ecosystem, inherits most Spring functionalities, but contains additional features not included in Spring. Let me explain these unique features briefly:
Auto-configuration
Spring Boot automatically configures dependencies present in the classpath (location where the Java runtime looks for classes/resources during compilation) through the @SpringBootApplication annotation. This is a combination of @EnableAutoConfiguration, @Configuration, and @ComponentScan. This auto-configuration saves effort in writing boilerplate code for configuring dependencies/beans (as you have to do with Spring).
Here’s how you can use the @SpringBootApplication annotation for auto-configuration in Spring Boot applications:
      @SpringBootApplication

public class MyApp {

    public static void main(String[] args) {

        SpringApplication.run(MyApp.class, args);

    }

}
Starter dependencies
Starter dependencies provide a cleaner and less verbose way of managing dependencies in Spring Boot. Essentially, it bundles a set of complementary dependencies that perform a common task into one, meaning you don’t need to manually declare every single dependency that is part of the starter bundle.
Starter dependencies in Spring Boot follow the naming convention spring-boot-starter-*, where the asterisk represents the name of the particular dependency.
Some common starter dependencies in Spring Boot are:
spring-boot-starter-web
spring-boot-starter-aop
spring-boot-starter-data-jdbc
spring-boot-starter-data-jpa
spring-boot-starter-data-rest
Actuator
Actuator is a module in the Spring Boot framework that lets you monitor Spring Boot applications after/during development. It provides both inbuilt and customizable endpoints you can use for application health checks, metrics, and diagnostics.
These are some of the commonly used endpoints:
/actuator/health: Provides health status.
/actuator/metrics: Displays various application metrics.
/actuator/info: Shows general application information.
/actuator/env: Exposes environment properties.
/actuator/beans: Lists all Spring beans.
/actuator/threaddump: Performs a thread dump.
/actuator/shutdown: Allows graceful shutdown (disabled by default).
Command line tool
The Spring Boot command line tool is an interface that helps you rapidly develop and test your Spring Boot applications. It contains commands you can use to:
Run Spring Boot applications from the terminal directly (spring run).
Manage application dependencies and versions
Initialize a new Spring Boot project
Compile and test Java/Groovy scripts.
Additional configuration (through application.properties and application.yml files)
application.properties and application.yml files are two formats you can use to configure your Spring Boot application settings. They are in key-value and YAML formats, respectively. They let you configure ports, data source, logging, caching, and so on.
 server.port=8081
 spring.datasource.url=jdbc:mysql://localhost:3306/mydb

spring.datasource.username=root

spring.datasource.password=secret

logging.level.org.springframework=DEBUG
This is an example of an application.properties file for a Spring Boot project. You can see that the port, datasource and logging credentials have been configured.
Embedded Web Server
Spring Boot comes with embedded web servers (Tomcat, Jetty, and Undertow) that are used to easily serve compiled Spring Boot applications in the form of jar files without needing to deploy them to an external, dedicated web server. This simplifies deployment, especially in a microservice architecture and containerised environments, as applications can be easily run using the command:
java -jar my-springboot-app.jar
Note that Spring Boot cannot exist without Spring (but Spring can exist without Jakarta EE and other Java legacy frameworks created before it). Spring Boot is part of the Spring platform. It is like the extra icing on top of the cake that makes it sweeter.
Of course, you can still have your cake without the icing. Technically, you can say Spring Boot is an additional layer that still needs Spring to run as its underlying infrastructure.
Core Differences Between Spring and Spring Boot
You should now be familiar with the fundamentals of the Spring and Spring Boot frameworks. So let’s talk a bit more about how they differ, x-raying their strengths and areas of weakness.
Configuration
Configuration in Spring is more tedious when compared to Spring Boot, since you’ll need to manually add the configurations for your project in Spring. This requires more code for setting up the various components you need for a project.
Meanwhile, configuration in Spring Boot is easier as you can use the Spring Initializr website. There, you just have to select the dependencies for the project, add a little more setup, and then download the zip file that contains the configuration for the project. It requires minimal steps to do this, which improves your productivity and makes the learning curve easier.
External Server and Deployment
Spring requires that you deploy your applications to an external server like Tomcat in the form of a WAR (Web Application Archive or Web Application Resource) file.
Spring Boot, on the other hand, comes with an embedded server like Tomcat, which you can use for running/deploying stand-alone executable applications as JAR (or Java ARchive) files. This is why Spring Boot is highly preferred for developing microservices since it is relatively easy to build applications and run them.
Level of Control
Both Spring and Spring Boot utilise the Inversion of Control (or IoC) paradigm for managing dependencies. Spring gives you more control over the application because you have the flexibility to initiate configurations as needed. But Spring Boot handles more of the application management internally, giving you little room for control over the application configuration, as it auto-generates configurations that may not be needed for a particular project. This can lead to redundant code.
Suitability for Development
Spring, like Java EE, is preferred for large-scale enterprise applications due to its fine-grained configuration control that is invaluable, especially for complex and critical performance applications like banking, healthcare, and e-commerce. It provides great flexibility, which makes it suitable for integrating with Java EE components and other enterprise-grade technologies and legacy systems.
Spring Boot is not a common choice for large-scale monolithic applications, even though it can be used in these cases. It is more suitable for developing stand-alone applications or microservices where rapid development with embedded server support is prioritized over granular configuration and control.
Production-ready features
In Spring, extra effort is needed to manually set up health checks, metrics and monitoring of your application. Whereas, Spring Boot comes with the actuator, which is a built-in tool that is useful for metrics, application monitoring, and for carrying out health checks. You just need to add this dependency to your pom.xml file
<dependency>

            <groupId>org.springframework.boot</groupId>

            <artifactId>spring-boot-starter-actuator</artifactId>

</dependency>
After that, you can monitor your application by visiting the desired actuator endpoint that exposes the needed information. Find a list of the common actuator endpoints you can visit under the Actuator subsection of the What is Spring Boot section above.
Real World Example
Let’s look at an example of how to build a simple REST API endpoint in both Spring and Spring Boot frameworks:
Building with the Spring Framework
In this API example, the technologies/dependencies we’ll use are:
Java (Programming Language)
Maven (the build tool for the project)
Tomcat (servlet container)
Operating System (Mac/Linux/Windows)
Core Spring framework with the Spring MVC module
Jackson Databind: for JSON serialisation
Note that we’ll be using Maven here as our build tool (and for the Spring Boot example that follows, too) because of its simplicity and beginner friendliness.
Step 1: Create AppConfig.java file
This is the configuration class that sets on Spring MVC properties through the @EnableWebMvc annotation, scans for the controllers in their packages through the @ComponentScan annotation, and configures other needed defaults automatically.
@Configuration

@EnableWebMvc

@ComponentScan(basePackages = "com.example.controller")

public class AppConfig implements WebMvcConfigurer {

}
Step 2: Create WebAppInitializer.java
This is the class that replaces web.xml (That was used in older versions.) It creates the Spring application context and connects to the AppConfig file for configuration.
public class WebAppInitializer implements WebApplicationInitializer {
  @Override
  public void onStartup(ServletContext servletContext) {

    // Create annotation-based web context

    AnnotationConfigWebApplicationContext context =

      new AnnotationConfigWebApplicationContext();

    context.register(AppConfig.class);

    // Register DispatcherServlet

    DispatcherServlet servlet = new DispatcherServlet(context);

    ServletRegistration.Dynamic registration =

      servletContext.addServlet("dispatcher", servlet);

    registration.setLoadOnStartup(1);

    registration.addMapping("/");

  }

}
Step 3: Add the controller logic
Create a HelloController.java file and add the controller logic. It receives a GET request and returns “Hello from Spring Framework!”
@RestController // Combines @Controller + @ResponseBody

public class HelloController {

  @GetMapping("/hello")

  public String hello() {

    return "Hello from Spring Framework!";

  }

}
Step 4: Add Dependencies
Include all the dependencies for the project in a pom.xml file, since we’re using Maven as the build tool.
<dependency>

  <groupId>org.springframework</groupId>

  <artifactId>spring-webmvc</artifactId>

  <version>6.1.6</version> <!-- Latest Spring 6.x -->

</dependency>

<dependency>

  <groupId>com.fasterxml.jackson.core</groupId>

  <artifactId>jackson-databind</artifactId>

  <version>2.17.0</version> <!-- For JSON support -->

</dependency>
Step 5: Build and Deploy the API
Lastly, you have to build the application into a WAR (Web Archive) file and deploy it to a servlet container (like Tomcat, Jetty, or whichever is suitable) before the application can be made accessible.
Follow the steps given below to deploy to a Tomcat server:
Package the app as a WAR file
If Maven is your build tool for the project, add this configuration code to your Pom.xml file:
<packaging>war</packaging>
Then, build using the command:
./mvnw clean package
After this, your WAR file will be created and stored in target/yourapp.war
Deploy your WAR file to a servlet container (in this case, Tomcat)
At this point, you can choose to either deploy your WAR file to a remote or local servlet container on your machine. Let’s deploy to a local servlet container since you can easily practice this on your own.
Download and install Apache Tomcat from the official website https://tomcat.apache.org/
Enter the webapps directory by entering the command cd path-to-tomcat/webapps/
Copy your WAR file into the folder
cp /path-to-your/target/yourapp.war
- Start the Tomcat web server.
On Linux/Mac OS, run:
./bin/startup.sh
On Windows, do:
startup.bat.
You should see a link similar to this on your terminal window:
http://localhost:8080/yourapp
Go ahead and click on it. And there you go!
Building with the Spring Boot Framework
The different technologies from the Spring example that I will use are simply the Embedded Tomcat server over the Tomcat servlet container. And here, of course, we’ll be using Spring Boot as the development framework instead of Spring.
In Spring Boot, you can either go straight into your IDE and start creating the needed files and configurations for your project, or you can choose to use the Spring initializr to select dependencies and generate the base files and configurations for your project. The second option is preferred since it is less tedious.
Step 1: Choose Necessary Dependencies for Your Project and Download the Zip File
Open the Spring initializr website, choose the project as Maven, language as Java, and fill in the project metadata. For this project, fill in the Artifact as Hello.
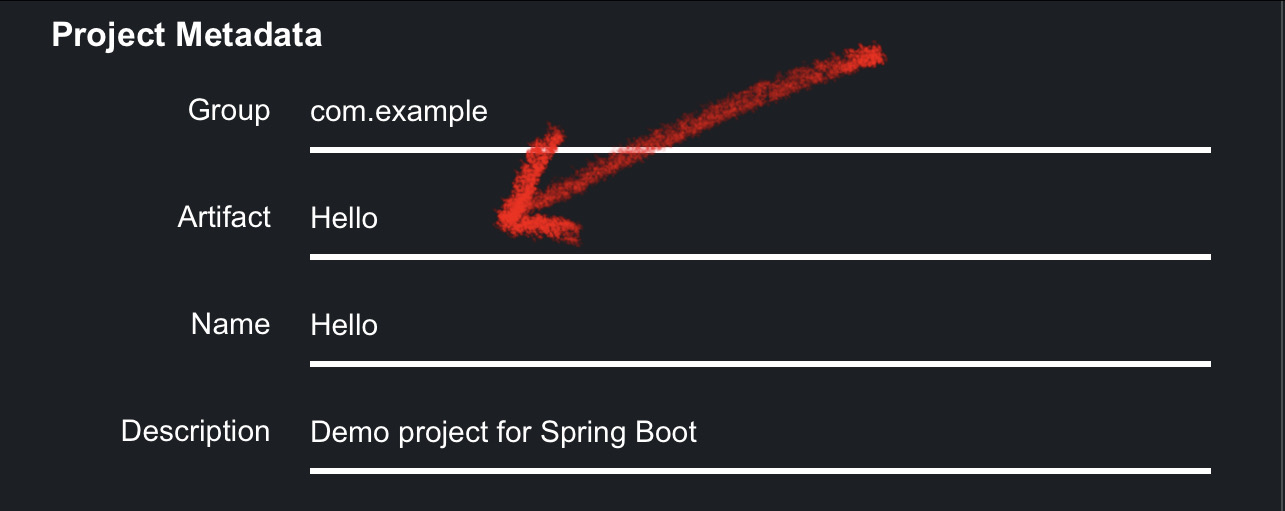
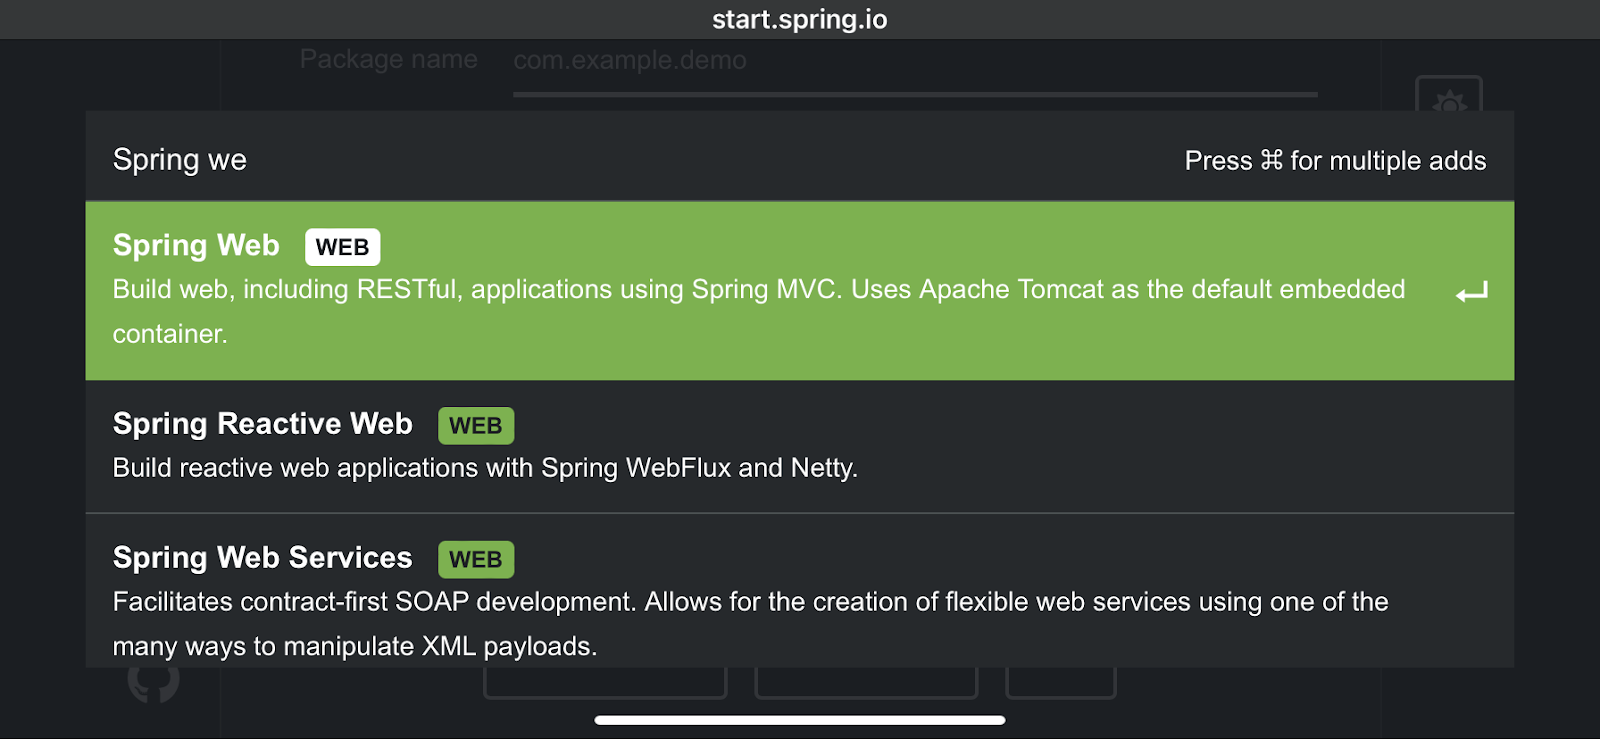
Choose jar for packaging, and then select the dependencies for the project. For this article, we will use only the Spring Web. Then click on the generate button.
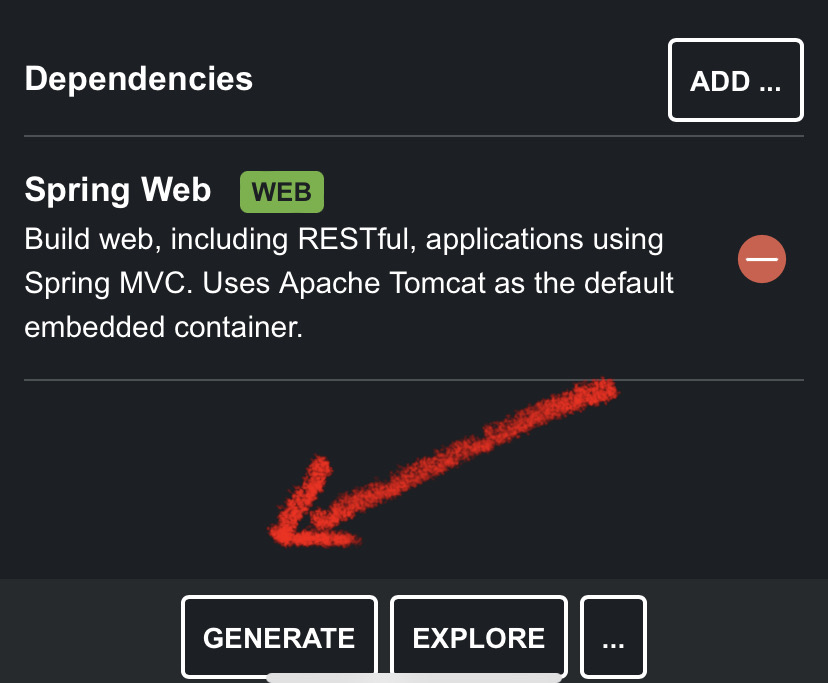
This downloads a zip file to your machine containing the boilerplate code with which you can build your application.
Step 2: Create the Controller (HelloController.java)
Unzip the downloaded file from step 1, and open it in your preferred IDE (or Integrated Development Environment). Navigate to the Hello/src/main/java/com/example/Hello directory, where you should already have the HelloApplication.java file, and add the HelloController.java file:
@RestController

public class HelloController {

  @GetMapping("/hello")

  public String hello() {

    return "Hello from Spring Boot!";

  }

}
Step 3: Build and run the application
On your terminal, run the following commands: mvn clean package && java -jar target/your-app.jar. You can then access the endpoint on http://localhost:8080/hello. When you click on the link, you should see Hello from Spring Boot! on your screen.
How to Choose Between Spring and Spring Boot
Spring and Spring Boot are both popular Java frameworks for building robust software solutions. And as you have learned from the earlier part of this tutorial, they have many common features (since Spring Boot is built atop Spring).
But there are a few key areas where they differ. First is the format of their packaged files: Spring is packaged to WAR, and Spring Boot to JAR. Also, Spring Boot comes with an embedded web server while Spring requires an external servlet container.
The embedded web server that comes with Spring Boot makes it easy to run Spring Boot applications during development and in production without needing an external servlet container. Meanwhile, traditional Spring requires developers to deploy to an external servlet container. This makes Spring Boot suitable for rapid development and deployment of stand-alone applications or microservices, as it not only saves time but also reduces setup complexity and infrastructure requirements.
Furthermore, Spring’s fine-grained configuration and ease of integration with legacy systems and tools make it the desired choice for developing highly customizable enterprise-grade applications. This is unlike Spring Boot, which relies on the convention-over-configuration philosophy, providing auto-configuration for reduced development time.
Conclusion
Building enterprise-grade and microservices applications with Java is much easier using the Spring and Spring Boot frameworks.
In this article, you’ve learned how these two frameworks work, along with their areas of strength and drawbacks.
This article doesn’t intend to favour one framework over the other, but rather to show in detail how they differ and their unique characteristics.
But to summarize:
Use Spring when building highly customized legacy-integrated enterprise systems.
Use Spring Boot for REST APIs, microservices, or cloud-native apps.
The next time you are faced with a project requiring you to choose a similar framework, it is imperative to carefully weigh your choices and select the framework that closely fits your task. Happy coding!