
By Luke Konior
Intro
This article is about improving visuals of Raft Challenge by applying GPU’s shaders to the still scenery. It explains the algorithms and potential pitfalls when using GLSL in SpriteKit.
The reader should have basic experience in writing fragment shaders. We discussed these in part 1 and part 2 of this series.
The problem
After the game entered beta stage, we received feedback from various people. We frequently heard that the graphics were good, but also static, which in the long run led to boredom.
My instant reaction was like: “They said it’s static? So we’ll add some wind to move the whole thing!” After that, we thought more about the problem.
Such huge objects as the trees cannot animate frame-by-frame, because it would lead to memory problems. We were considering adding small animated objects like animals. But it would complicate the scene graph even more. And it would have unknown performance impact.
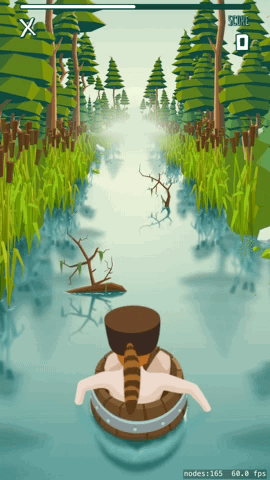
The solution I came up with was to animate the whole forest using the fragment shaders. I wanted to create the wind effect.
The idea was to apply a horizontal distortion to the sprite’s texture with strength proportional to the distance from the trunks’ base. That strength has also been changing in time and influenced by the scene’s “depth”.
Other pros of this solution:
- easy integration
It’s as simple as filling an existing object’s properties - performance
- huge flexibility
Here’s the source (GLSL):
void main( void ){ float horizonAbsoluteOffset = 0.64; // 1 float distanceFromTrunksBase = abs(v_tex_coord[1] - horizonAbsoluteOffset); // 2 float maxDivergence = mix(0.0,1.0,distanceFromTrunksBase)*0.038; // 3 float factor = sin(u_time*2+(attrDepth * 1.3)); // 4 vec2 deltaUV = vec2(maxDivergence * factor, 0); // 5 gl_FragColor = texture2D(u_texture, v_tex_coord + deltaUV); //6}
- This
floatholds the vertical position of all trunks’ bases
— This value is specific to our texture - We calculate the distance between the current sampling point and the above value
— This value is less than 1.0 and can be negative - We calculate max divergence
— The magic number at the end was tweaked through trial and error - We calculate the changing strength and the wind’s direction
— The sin function is a good foundation since it returns predictable values (-1 to 1)
— It’s also a continuous function
— The latter means that we can put any garbage as the argument and it will still work
— In this case “the garbage” is the current time plus the “depth” of the current sprite
— Magic numbers are added to shape the animation - The delta vector is created
— Max divergence multiplied by the factor goes into the X position while Y is left with 0. - This line takes the color from a specific point in the texture and outputs it to the screen
— By adding delta to our current position withvtexcoord, we alter the point from which the sampler is extracting color value
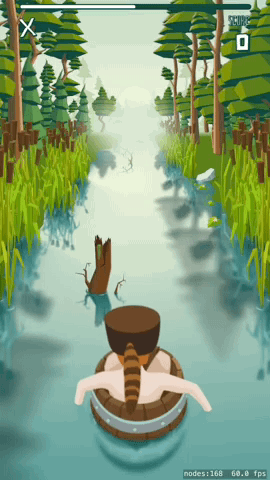
Result:
Note that reflections on the water are also moving. That is because the trees and reflections are a part of the same sprite and texture. No sorcery here.
Improving fog
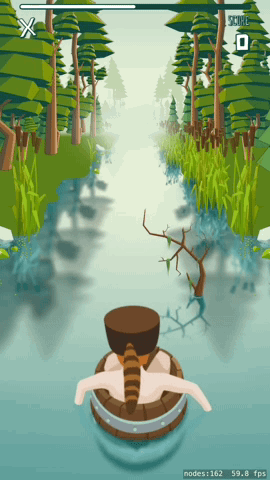
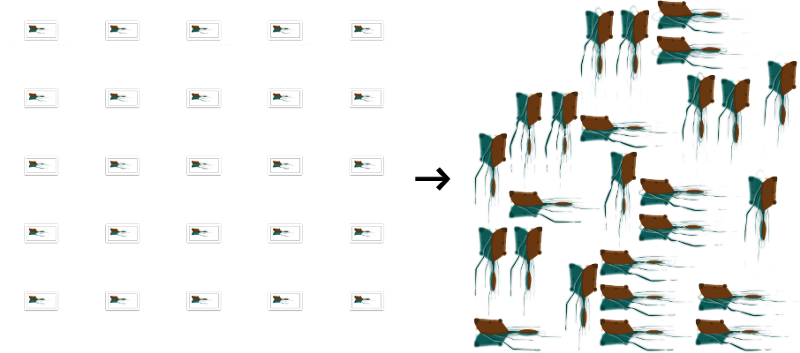
Is there anything else that we can do? Well, if we can’t invent anything new, we can always improve something that exists. Our designer said once ago that trees further away should have solid color to merge better with the fog.
The above image is almost self-explanatory. Earlier, I’ve mentioned about the “depth”. Every layer of the forest has an attribute attrDepth. It represents the distance between the mountains (0.0) and the viewer (6.0).
Let’s tweak this fog!
__constant vec3 colorLightMountains = vec3(0.847, 0.91, 0.8);__constant vec3 colorDarkMountains = vec3(0.729, 0.808, 0.643);
void main( void ){ //get color vec4 color = texture2D(u_texture, v_tex_coord); float alpha = color.a; // 1
//fog vec3 outputColor = vec3(color.rgb); if (attrDepth < 1.0) { // 2 outputColor = colorLightMountains; alpha = min(attrDepth,alpha); } else if (attrDepth < 2.0) { // 3 outputColor = mix(colorLightMountains, colorDarkMountains, attrDepth - 1.0); } else if (attrDepth <= 3.0) { // 4 outputColor = mix(colorDarkMountains, color.rgb, attrDepth - 2.0); } gl_FragColor = vec4(outputColor, 1.0) * alpha; // 5}
The code above is pretty straightforward so I’ll focus only on the most important things:
- Extract
alphafrom the texture. - The far stage
When the forest is the furthest possible, it has theLight Mountainscolor and0 alpha
As it’s moving closer, it emerges by increasingalphaup todepth == 1.0 - The medium distance
The color shifts towardsDark Mountainsas the sprite’s get closer to the viewer. - The close distance
The color is a mix between theDark Mountainsand the native texture color
Naturally, the closer it is, the more normal it looks - Pass the final color to the output using the alpha extracted at the beginning
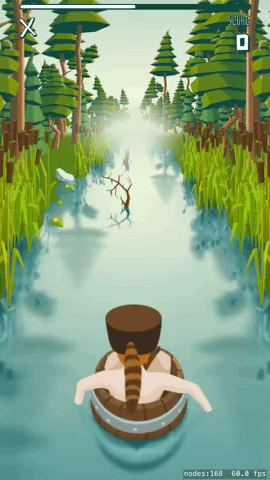
Again, the result:
Combining both effects
The best thing that I like about shaders is their flexibility. It’s not only possible to merge both effects without sacrificing anything. It’s even recommended to do so.
Merging shaders decrease the draw calls and that increases the frame rate.
__constant vec3 colorLightMountains = vec3(0.847, 0.91, 0.8);__constant vec3 colorDarkMountains = vec3(0.729, 0.808, 0.643);
void main( void ){ //wind float horizonAbsoluteOffset = 0.64; float distanceFromTrunksBase = abs(v_tex_coord[1] - horizonAbsoluteOffset); float maxDivergence = mix(0.0,1.0,distanceFromTrunksBase)*0.038; float factor = sin(u_time*2+(attrDepth * 1.3)); vec2 deltaUV = vec2(maxDivergence * factor, 0); //get color vec4 color = texture2D(u_texture, v_tex_coord + deltaUV); float alpha = color.a;
//fog vec3 outputColor = vec3(color.rgb); if (attrDepth < 1.0) { outputColor = colorLightMountains; alpha = min(attrDepth,alpha); } else if (attrDepth < 2.0) { outputColor = mix(colorLightMountains, colorDarkMountains, attrDepth - 1.0); } else if (attrDepth <= 3.0) { outputColor = mix(colorDarkMountains, color.rgb, attrDepth - 2.0); } //output gl_FragColor = vec4(outputColor, 1.0) * alpha;}
The final result:
Pitfalls
There’s no rose without a thorn.
- Using shaders on multiple big sprites with
alphachannel may cause visible frame rate drop. - Same GPU may give 60fps on the iPhone but only 20fps on iPad with more pixels
Test your code frequently on different devices, especially the iPads with retina displays - There is no reliable way to estimate the performance of the device from the code
Run your game on multiple physical devices and white list those that are capable of running shaders with decent performance
To distinguish devices, you can use UIDevice-Hardware.m - Your partially transparent texture loses color and becomes gray? Google premultiplied alpha!
- Beware of using
SKTextureAtlasesif you’re altering the coordinates like in the wind example
During the atlas generation, XCode may rotate and move some textures.
It’s impossible to detect such anomaly from the code, or at least I don’t know how - For some sprites, you may receive a texture with swapped X and Y coordinates!
- You may accidentally warp to a completely different sub-texture!
Summary
We’ve learned how to use fragment shaders to create wind and fog. When writing Your own GLSL code, you’ll surely produce many display artifacts. Some of them are annoying, and some are hilarious. Keep in mind that some of them may have potential to become a feature!
About the author: Kamil Ziętek is an iOS Developer at www.allinmobile.co