
A table is a group of data stored in a database.
To create a table in a database you use the CREATE TABLE statement. You give a name to the table and a list of columns with its datatypes.
CREATE TABLE TABLENAME(Attribute1 Datatype, Attribute2 Datatype,........);
Here’s an example creating a table named Person:
CREATE TABLE Person(
  Id int not null,
  Name varchar not null,
  DateOfBirth date not null,
  Gender bit not null,
  PRIMARY KEY( Id )
);
In the example above, each Person has a Name, a Date of Birth and a Gender. The Id column is the key that identifies one person in the table. You use the keyword PRIMARY KEY to configure one or more columns as a primary key.
A column can be not null or null indicating whether it is mandatory or not.
A More In-Depth Guide to the SQL Guide to the CREATE TABLE command
This guide is an overview to the basics of the SQL CREATE TABLE functions.
We will be using MySQL for all examples throughout these freeCodeCamp SQL guides. MySQL is a used frequently on websites for the backend database, 2) it’s free, and is fun and easy to use.
Covered in this Guide
- Creating a schema, the container for all our database objects.
- Create a table so we have something to alter.
- Creating a table by importing a CSV file and altering that table
- Creating a table using the MySQL workbench tool
We do most of this work with SQL statements in the MySQL workbench scripting tool. We will also see how to Create a table using the workbench interface instead of with SQL statements.
High level structure of a Relational Database
- Highest level; The Database; the database system installation. In this case, it’s MySQL. Called “Local instance MySQL Router” in the screen shots above.
- Next is a Schema; a container for the objects needed to managed data in a relational database system.
- Objects we create (tables, indexes, stored procedures, functions) to manage the system and its data
Creating a MySQL schema
The schema is a container for a the objects required to manage the data for a given subject or process. We show examples as we progress in this guide.
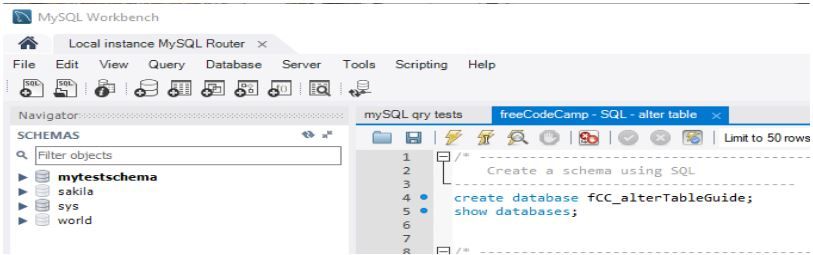
We’ll create the schema for our learning and testing using the SQL command;
create database fCC_alterTableGuide;
This instances schema structure prior to running this command
Creating a table, add test data with “insert”, rename the table (alter)
We’ll create a Student Table.
The steps will be:
- make sure we don’t have the table already
- create the table
- insert the test data.
- Data Types: the student name is a character field limited to 90 characters
- The student ID is a number (integer) (range of -2147483648 to 2147483647). This will be the primary key for the table and will auto increment when a record is added.
- There will also be two “time-stamp” fields to play with as well
Create statement and display of results from execution.
Using a Select statement we’ll see that the table is there but now records have been added.

Now to insert some data and see what our new table looks like with records in it (and understand create and update timestamps);
The first time stamp is the creation data and time and the 2nd is the update date and time. Changing a record should update ts2 but not ts1. Let’s take a look.

Create a table with the MySql Workbench
Right click on the “Tables” under the schema you want the new file placed in. Select Create Table. Then, complete the form as desired and click Apply
Create Table as Select (CTAS)
A quick way to create a copy of a table, including data is to create table as select.
CREATE TABLE my table as (SELECT * FROM orig tbl);
Create and populate a table by importing a CSV file
Right click on the “Tables” under the schema you want the new file placed in. Select Table Data Import.
Select the CSV file to import and click NEXT Usually you create a new table from the data, select the options desired and click NEXT

Adjust the data types as needed and click NEXT.
Click NEXT (on this screen and the next one that is displayed) to import the data into the table You’ll see completion status, review and click FINISH

Other Material
There lots more detail to cover this topic so install MySQL and have fun!