
By Anchal Nigam
Today I am going to highlight the basics of the world of React. If you have just started your journey in ReactJS, then I would say you have landed in the right place. In this article, I have tried to cover the basics of React in a very simple manner. I hope at the end of article you will know the fundamental concepts of React.
Let’s start.
ReactJS — A powerful library
As you might have already read in many places, React is a library for making web and mobile UI. It was developed by Facebook.
ReactJS is component driven. Everything is a component which is responsible for some functionality. You write small, small components and then combine them together to form big components. This makes the code more readable and understandable. The features that make React powerful and beautiful are:
- It uses the virtual DOM concept instead of the real DOM.
- Code readability because of JSX. The use of JSX makes you feel like you’re writing web apps (gives a look to JavaScript like HTML).
- It also uses SSR (SSR helps in SEO).
These are the things which you might have read about but you will get to understand and feel when you go through this tutorial. So, let’s dive into the concept of the virtual DOM (I would say this is the main feature which makes React more beautiful).
ReactJS Virtual DOM
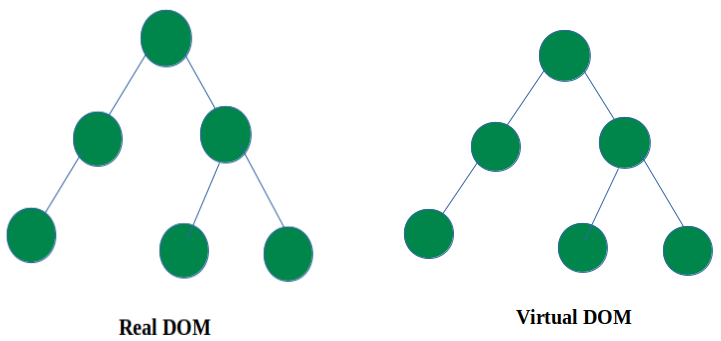
The virtual DOM is a copy of the real DOM. Unlike the real DOM, the virtual DOM does the minimum amount of DOM manipulation to keep components up-to-date. It only updates the part which has been updated.
DOM manipulation is very easy. Here is a visual demonstration of how the virtual DOM works:
- The virtual DOM is a copy of the real DOM.
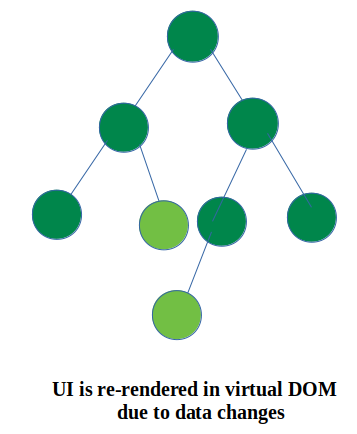
- When data changes in a component, the entire UI is re-rendered in the virtual DOM.
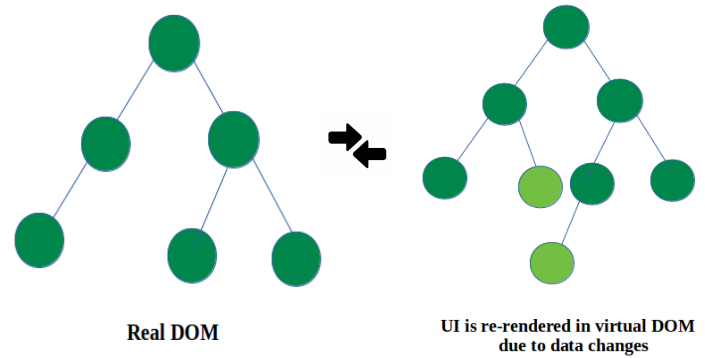
- Then the comparison between the real DOM and the virtual DOM takes place.
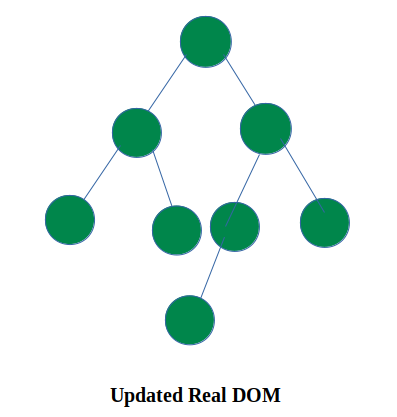
- Once the calculation is done, the real DOM is updated with the things that are changed.
We’ve been talking about one of the great features of React — that is the virtual DOM but wait! What was the JSX in the second feature (above points on feature)? You might have wondered what it was, what was its relation to React, and how it gives us the feel of writing web apps...
Now this time let’s dive into the JSX pool.
JSX
Before moving ahead, let’s have a look at the below code:
class FirstComponent extends React.Component {
     render() {
         return (
             <span className='customSize'>My First Component</span>
          );
      }
}
class FirstComponent extends React.Component {
     render() {
         return (
            React.createElement('span',{className: 'customSize'},                            'My First Component')
         );
      }
}
In the first example, the render function looks like it’s returning HTML code but this is JSX. The first example is a JSX version of the second one. JSX is a JavaScript extension that gives your JS code an HTML look.
If you look at the second example, React.createElement is used for creating a react element to represent the react component. The second argument can be null or empty if no props or attributes are needed for the element. The third argument defines what should be inside of it (like any other React element, say , with attribute ‘src’).
If you look at the above two blocks of code, you will find the first one more familiar as it gives an HTML feel. JSX also increases code readability. Let’s have a look at another example, without JSX and with JSX to get a feel for the code readability.
ReactJS without JSX:
React.createElement("div", null,
      React.createElement("img", {src: "image.jpg", alt: "Random photo"}),
      React.createElement("h3", null, "Hello React"));
ReactJS with JSX version:
<div>
<img src="image.jpg" alt="Random photo" />
<h3>Hello React</h3>
</div>
By looking at the above example, you can understand what I was saying regarding code readability. How easy it is to read code with JSX, right? I think this is enough on JSX and I hope now you are able to better understand the power of JSX in the React world.
Note — Browsers are not able to read JSX. So, we have to transpile it to JavaScript using JSX transformers (say babel) so that the browser can understand.
Now we know what JSX is. But I would like you to go to the previous picture where I wrote that React is all about components. It is component driven. As components are the building blocks of React, let’s explore them.
ReactJS Heart - Components
Well, you might have come across the below code of how to create components during your research on React:
class MyStatefulComponent extends React.Component {
     state = {
         title: ''
     }

componentDidMount() {
    console.log('Component mounted')
}

render() {
    return <div>{this.props.name}</div>;
    }
}
If you write your component in the above way, it is called a Class/ Stateful/Container component. If you think that this is the only way of creating components, think again. Yes, there is another way of creating your component which results in functional / stateless/presentational components. Before moving ahead, let’s see how functional components are written:
const MyStatelessComponent = props => <div>{props.name}</div>;
Now, you might wonder what’s the difference between the two and how you should choose which type to create. So, let’s dive into the Stateful and Stateless component pool.
Stateless (or presentational or functional) components are those components that don’t have any state (don’t know about state? No worries, I explain it in a later part). They are used for presentation like how you want your component to look.
A component is a plain JavaScript function which takes a prop as an argument and returns a React element (see above example). Its name is self explanatory — it has no state. It has no lifecycle methods (like componentDidMount method etc. which you might have read during your research on React tutorials).
Stateful (or container or class) components are those components which have state — a source of data (you can call this.setState inside it), lifecycle methods (can use to make an API call). It is a JavaScript class that extends your React component which means React creates instances of it. React initialize the component class in order to use lifecycle methods, for initializing the state and more.
Wait… now you might wonder which one is better, and what to choose? You can answer this question if you have this question in your mind on how to separate the logical part from the presentational one. Yes, it is strange that one question answers another question, but you will soon get why I said this.
As you might have seen in other React tutorials, they use class for creating their components. They put the logical as well as presentational parts in the same component which makes that component more complicated and bulky.
So, if you want to separate your logical from presentational components, then the component class is best suited for logical stuff like fetching data from the API or data changes. On the other hand, if your component is focused on presentational/functional things, the component should look good.
In short, I would say use both. Use the component class when you need one of the things (lifecycle methods, state) and for presentation, use a functional component.
That’s all about components.
Now, we have a picture of how we can write components, but I have not told you how we can manage data in them. I think without data, components would be useless. So, we will have a look at how we can manage a component’s data (like fetching data from an API, React ‘state’ story, setting the state and so on).
Let’s start.
Props
‘Prop’ is shorthand for properties, and this is the one source of data in our component. It can be used to pass data to different components. Wait! I would like you to go back where I told you about presentational and class components. I told you to use presentational components to manage how your component should look, and container components for handling data and all that. Correct!
So the ‘prop’ is the one which we can use to make the connection between these two types of components. Yes, you can use props for passing data from a container component to a presentational component, where the presentational component will render the view with your dynamic data. Please have a look at the below code to better understand:
import {ButtonView} from './button.presentation';
class MyContainerComponent extends React.Component {
    state={
       text : 'Submit'
    }
render() {
    return (
        <ButtonView btnText={this.state.text}/>
        )
    }
}
export const ButtonView=({btnText})=>(
     <div>
         <button className="btn btn-info btn-lg">{btnText}</button>              </div>
)
Like the above way (using props — ‘btnText’), you can separate the logical part from the presentational part. The other feature of props is that they are read only, i.e. they are immutable. They are not going to modify inside the component in which they are passed. The data flow is also unidirectional — which gives us one way data binding (unlike Angular).
But, there might be cases where we want to change the data (like in some event by the user and so on). Hence, for this case, ‘State’ comes into the React market. Let’s dive into it.
State
As I told you, props are immutable whereas state is for mutable data — that is data that will change in response to certain events. So, if you want to change your data value, then store it in the state. State are objects that store your component’s data. To give a better picture of how state is defined and how to use it, here is an example:
class LoginContainer extends React.Component {
      constructor(props) {
          super(props);
              this.state = {
                 userName: "",
               };
      }
onFilluserName = event => {
     this.setState({
          userName: event.target.value,
     });
}
render() {
    return (
       <div>
          <input value={this.state.userName} onChange=          {this.onFilluserName}
       </div>
     );
   }
}
You can see from the above example that state represents objects where your component’s data are stored. They are initialized inside a constructor. You can access the state using ‘this.state’. This is the way of using state for rendering your data in your component.
But, I told you that the thing which makes state the heart of your components is its mutable behaviour. Yes, now the point comes as to how we can change the state’s property. The answer is using ‘this.setState’ (please have a look at the above example). Using this.setState, we have changed our data value when the user types.
In short, props and state are both sources of data, but their usage and behaviour is different. Whenever there is a case where your data may change, use ‘state’ for that — else ‘prop’ is good choice.
That’s all about the basics of the React world. I hope you have a better understanding of the basics.
There is a very important part of a class component that I haven’t discussed: lifecycle methods. Yes, lifecycle methods are another critical part of ReactJS, but what they are and why they’re important will be in my next article!
Thanks for reading.