
By Moshe Binieli
So let’s talk about TDD — what is it?
TDD stands for Test Driven Development, and it’s a design process in software development. It relies on the repetition of a very short development cycle, and the requirements are turned into very specific test cases.
There are a couple of steps in the TDD process:
- Write a unit test that fails.
- Write enough code to make the test pass — at this step we don’t care about good code.
- Refactor your code from the previous step.

What are the benefits of this approach?
First of all, you get a better understanding of the actual code before you write it. This is one of the greatest benefits of TDD. When you write the test cases first, you think more clearly about the system requirements and more critically about the corner cases.
Also, when talking about dependencies, it’s important to mention that working with TDD lets you focus on the logic of your classes. This way you keep all the dependencies outside of your classes. It’s also important to mention that your code will run more safely since the logic will not have to handle difference dependencies such as database connections, file systems, and so on.
It’s also a safer way to refactor the code. When writing TDD there are tests for a certain piece of logic. When you refactor the code you might break something, but with this approach you know the tests will have your back.
When you use TDD, you also have a faster way to understand what the code does. When you start working on a piece of code that you are unfamiliar with, you can read the test cases of that piece of code and understand its purpose. Those tests are also the documentation for your code.
And finally, you can focus on building the smaller components in the best way and avoid the headache of the big picture. So how does this help? You’ll write one failing test, and focus solely on that to get it passing. It forces you to think about smaller chunks of functionality at a time rather than the application as a whole. Then you can incrementally build on a passing test, rather than trying to tackle the bigger picture from the get-go, which will probably result in more bugs.
Before we start to write TDD…
To be honest, there are more articles in which you can read even more deeply on TDD. Therefore, I avoided writing the whole theory of TDD here because it would take a very long time to read everything.
Therefore I just explained the general idea and the advantages of the TDD design process.
It’s time to write some tests, so let’s do it
Description and requirements

We will use C# to write a Stack implementation. Why C#? Well, because I love C#, so why not? ?
So our requirements are pretty simple: we want to implement a Stack class, so the requirements are:
- Limit the size of the stack.
- Add element. (push)
- Remove element. (pop)
- Check what was the last element. (peek)
- Get the current size of the stack.
- Have a class that can accept any data type.
- When the customer exceeds the size of the Stack, we need to throw an appropriate exception.
After we know what the requirements of the system are, we can start to define how we will solve this. We’ll implement it using an array.
Stack implementation in TDD — Building infrastructure
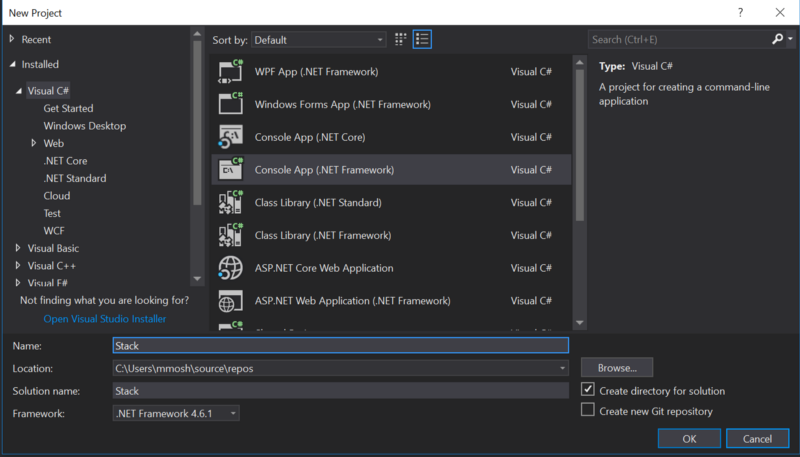
I use visual studio 2017. In it, I’ll open a new project:
File -> New -> Project, Choose Console App (.NET Framework).
Choose a project name — like “Stack”.
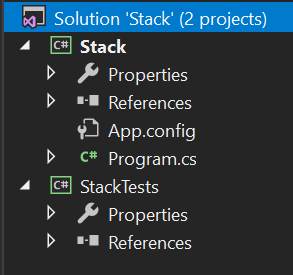
Now we will open another project for the tests only and we will call it “StackTests”.
Open the solution explorer. We have one project over there called “Stack”. Now right click on Solution and choose Add -> New Project and choose Class Library (.NET Framework).
Let’s install our unit tests: right-click on the StackTests project, choose Manage NuGet Packages, navigate to “Browse” and install the following packages:
- NUnit
- NUnit3TestAdapter
Add a new class to the StackTests project and call it StackTest. Now the solution should look like this:

The packages.config should look like this:

Stack implementation in TDD — Write code
We will start writing out test units in the StackTests project under StackTest class.
Before we can start writing the code we need to learn 3 important things: TestFixture, Test, and Assert.
TestFixture is the attribute that marks a class that contains tests and, optionally, setup or teardown methods.
The Test attribute is one way of marking a method inside a TestFixture class as a test.
The Assert class is a collection of helper classes to test various conditions within unit tests. If the condition being tested is not met, an exception is thrown.
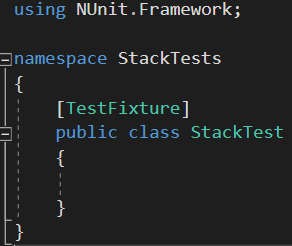
Import “NUnit.Framework” and put the [TestFixture] attribute above your class definition.
Creation test
Okay, it’s time to write our first function. We will write a creation test, which will create a new object of our Stack, and it will check that the size of the Stack is 0 at the beginning.

Now we’ve written our first test, so let’s run it.
In your toolbar click Test -> Run -> All Tests.
If your Test Explorer is not opened, click Test -> Windows -> Test Explorer, and this will expand the test explorer.
As you can see, we don’t even have our Stack class defined, so we’re getting a compilation error. Now let’s write enough code to make the test pass.
Let’s make our first test work:
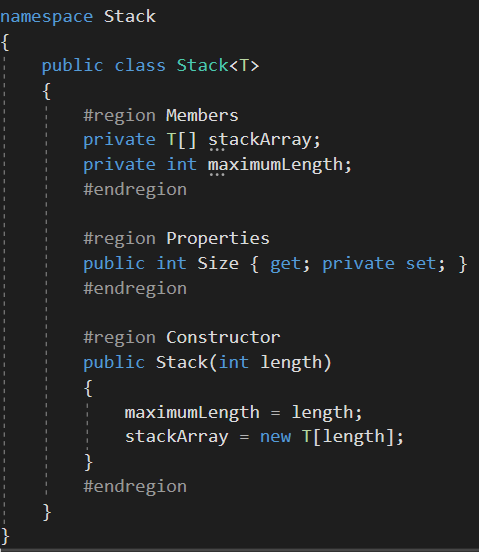
- Create a new class in Stack project, and call this class “Stack”. Make this class a generic type class (T type).
- We defined this class (Stack) to be implemented as an array, therefore we will define the member field as an array of type T.
- We require to pass the maximum length of the stack at the constructor, therefore we will create a constructor that takes a size argument.
- And since we require that we receive the current size of the stack at any point, we’ll define a property of “Size”. Of course, none will be able to change the size, therefore it will be a private set.
Now let’s run the tests again (check above how to run tests) and see the results.
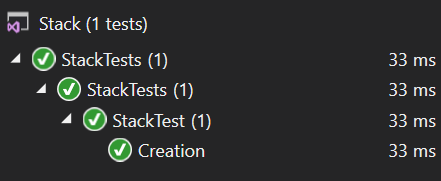
And there we go, we’ve done our first iteration with TTD design! Now we should refactor our code — but at this point, we don’t really have anything to refactor, so we will move forward.
Push & Pop test
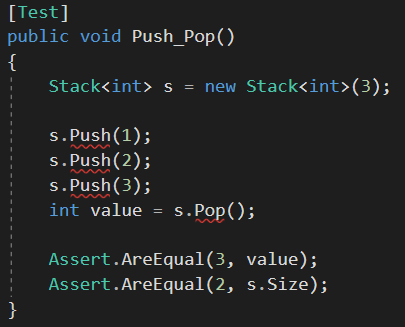
Now we want to test push and pop functionality, so let’s create the test case.
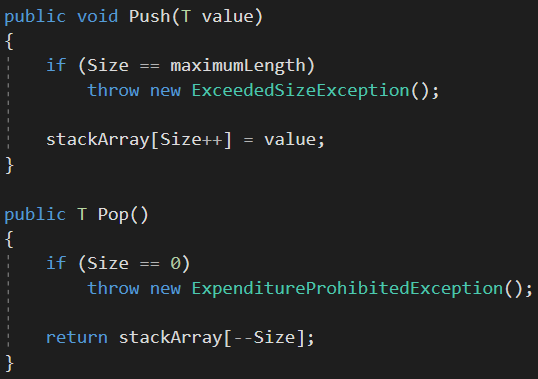
- Push will take an argument and add it to the top of the stack.
- Pop will remove the element from the stack and return it.
We’ll add 3 elements to the stack, then we will take the last element out. At this point we will check that the last element is the exact one we expect to get and that the stack size decreased.
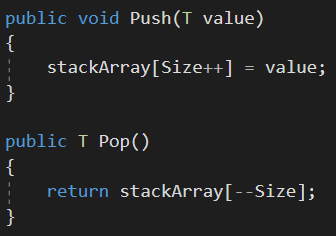
As you can see, push and pop functions do not even exist, so when we run tests we get a failure in our test results. Let’s go to Stack class and implement them.
Let’s run our tests again, and boom, everything works perfectly! All the tests passed successfully ?
Error exceeding the allowed size
We want to throw custom exceptions when we:
- Push new element when the stack is full.
- Pop element when there are no elements in the stack.
So as you already know…what should we be doing now?
Correct! We define test cases, and then we make the code work.
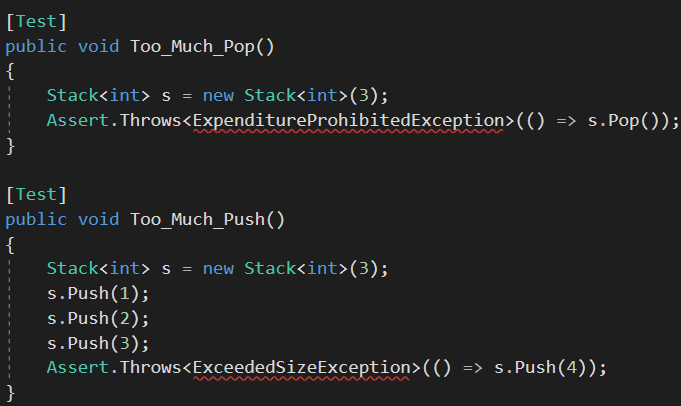
As you can see, we need to create two new custom exceptions.
- ExpenditureProhibitedException — This exception will occur when the stack is empty and the client attempts to pop a new element out.
- ExceededSizeException — This exception will occur when the stack is full and the client attempts to add a new element to the stack.
Go to Stack Project and create a new class called CustomExceptions. In this class we will define our new exceptions and they will inherit from the Exception class.

Modify our current push and pop functionality to throw an exception when needed.
So now, as part of the TDD lifecycle, we’re running the tests… and Hooray! All tests have passed successfully.
Peek the last element
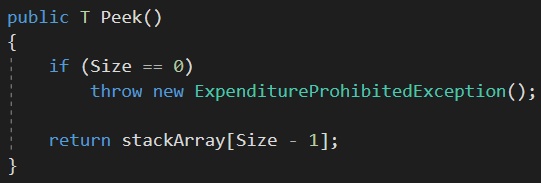
We’re about to finish with the last tests. We want to peek the last element in the stack. If the stack is empty, we will throw an ExpenditureProhibitedException exception, otherwise, we will return the last element.
Let’s create our test cases.
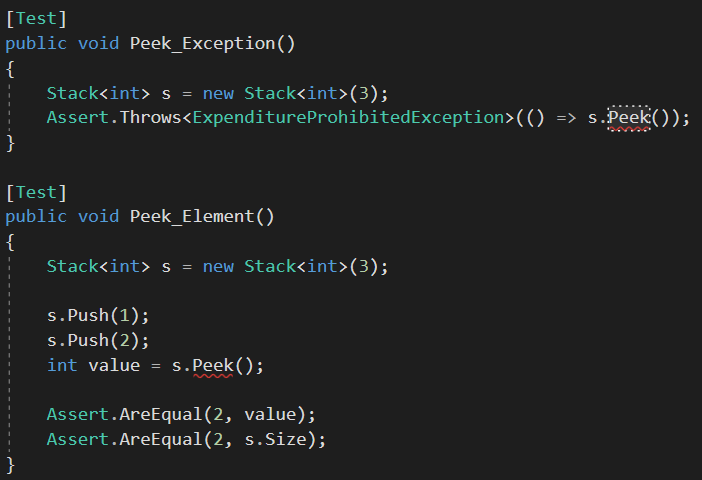
- Attempt to peek the element when the stack is empty. In this test we will throw a custom exception.
- Insert some elements in the stack, then peek an element, make sure this is the correct element, and check that the array size hasn’t changed.
When we run the tests, they will fail — the peek method doesn’t even exist and there is no functionality.
We’ll create the function Peek at Stack class.
Now when we run the tests again, we can see that all of them pass successfully.
In conclusion
As you can see, the idea is not complicated and there are many tools that help implement the TDD principles.
You can view the whole code at Pastebin.
Stack class — This class contains all the implementations of stack.
StackTests class — Contains all the test cases.
CustomExceptions classes — Contains the exceptions the system required for TDD design.
Every comment and all feedback is welcome — if it’s necessary, I will fix the article.
Feel free to contact me directly at LinkedIn — Click Here.