By Lukas Lukac
When you think about developing a decentralized application, a blockchain like Ethereum probably comes to mind.
Blockchain is fantastic for managing state, automating processes via Smart Contracts, and exchanging economic value.
You can follow this tutorial to learn blockchain by building one from scratch yourself if you want to learn more.
But where do you store your application's content? Images? Videos? The application's website front-end composed of all the HTML, CSS, and JS files? Are your application and your users' content loaded from a centralized AWS server?
Storing the content on the blockchain would be expensive and inefficient.
Your blockchain application needs decentralized storage!
In this tutorial, I will introduce you to the InterPlanetary File System, or IPFS. You will learn:
- How to store and retrieve content from a decentralized storage
- How to run your IPFS node
- All about the low-level internals of the IPFS protocol
- And we'll read a Wikipedia website stored on IPFS
Ready? Let's go.
Table of Contents
- What is the IPFS?
- How to setup an IPFS node
- How to store and retrieve IPFS content using the CLI and HTTP
- What is CID – the IPFS content-based identifier
- How to reverse engineer the IPFS datastore
- How to connect an IPFS node to a decentralized network
- How to exchange data using the peer-to-peer Bitswap protocol
- How to persist content from the peer-to-peer network
What is the IPFS?
The InterPlanetary File System, or IPFS for short, is a peer-to-peer hypermedia protocol designed to make the web faster, safer, and more open.
IPFS is a protocol for storing and sharing content. As in the blockchain world, every user is running its node (server). The nodes can communicate between each other and exchange files.
What is unique about IPFS?
First of all, the IPFS is decentralized because it loads the content from thousands of peers instead of one centralized server. Every piece of data is cryptographically hashed, resulting in a safe, unique content identifier: CID.
Store your website in IPFS to avoid censorship and a single point of failure. Your personal IPFS node goes offline? Don't worry, the website will still load from other nodes across the globe serving it.
For example, suppose your government bans Wikipedia. In that case, you can still access a decentralized version of Wikipedia indexed on April 17th by loading it from the IPFS peer-to-peer network persisted under CID:
"QmT5NvUtoM5nWFfrQdVrFtvGfKFmG7AHE8P34isapyhCxX"
Second, the integrity of IPFS content can be cryptographically verified.
And finally, the IPFS content is de-duplicated. If you tried storing two identical 1MB files in the same IPFS node, they would be stored only once, eliminating the duplication, because their hash would produce an identical CID.
How to Setup an IPFS Node
Install IPFS
Open the official IPFS docs installation page and follow the instructions depending on your operating system (Windows, macOS, Linux). I will be documenting the Ubuntu installation process below.
I prefer compiling the ipfs/go-ipfs repository from scratch to debug the code when needed, and let's be honest: GoLang rocks.
Compile the codebase in Go
Clone the repository and run the install script in the Makefile.
git clone https://github.com/ipfs/go-ipfs.git
cd go-ipfs
git checkout v0.8.0-rc2
make install
Or download pre-compiled IPFS:
sudo snap install ipfs
Validate the installation
Let's be honest. Go is amazing and compiling the codebase yourself is bad-ass and decentralized. The resulted binary will be created in your $GOPATH.
which ipfs
> /home/web3coach/go/bin/ipfs

ipfs version
> ipfs version 0.8.0-rc2
Initialize a new node
Run ipfs init to create your new node. By default, it will create a folder and store all the data in ~/.ipfs You can tweak this by configuring the IPFS_PATH ENV variable.
IPFS_PATH=/home/web3coach/.ipfs_tutorial ipfs init

> generating ED25519 keypair...done
> peer identity: 12D3Koo...dNs
> initializing IPFS node at /home/web3coach/.ipfs_tutorial
Your node is now fully initialized, awaiting your content.
How to Use IPFS
Add content
IPFS can handle all kinds of different data types – from simple strings to images, videos, and websites.
Start by storing a short message hello IPFS world by Web3Coach:
echo "hello IPFS world by Web3Coach. BTW: Ethereum FTW" | ipfs add
The content is now stored and indexed by a cryptographic hash function returning its unique content identifier (CID):
> added QmRBkKi1PnthqaBaiZnXML6fH6PNqCFdpcBxGYXoUQfp6z
> 49 B / 49 B [========] 100%
Your IPFS node will generate the same CID on your local file system as in this tutorial. That's because IPFS hashes the content and returns its unique fingerprint, and as we know, a secure hash function will always return the same output given the same input.
Pin content
When you add content, you add it ONLY to your local node. The content does NOT automatically replicate across the entire network – this is a common confusion between IPFS users and developers.
When you store content via the add command, IPFS will also execute the pin command by default:
ipfs pin add QmRBkKi1PnthqaBaiZnXML6fH6PNqCFdpcBxGYXoUQfp6z
To replicate content, you must take your node online, join the p2p network, and pin the specific CID from another node. You will learn how to do this further in the tutorial and find out what happens in the background.
Read content
Copy-paste the CID to IPFS cat command to read it from disk:
ipfs cat QmRBkKi1PnthqaBaiZnXML6fH6PNqCFdpcBxGYXoUQfp6z
> hello IPFS world by Web3Coach. BTW: Ethereum FTW
The add , pin and cat commands are the most significant IPFS functions, and you just learned them. Congrats, well done!
How IPFS Content Addressing Works
What is QmRBkKi1PnthqaBaiZnXML6fH6PNqCFdpcBxGYXoUQfp6z?
It’s a self-describing content-based identifier.
What does "self-describing" actually mean? It means that by splitting the string following the IPFS specification, you will know everything you need to know about the data it indexes.
- what CID version it is
- how to read the CID string (base32? base58? hex?)
- how data is encoded
- what hash function fingerprinted the data
- the hash function's length
The IPFS team built a convenient website for analyzing a CID:
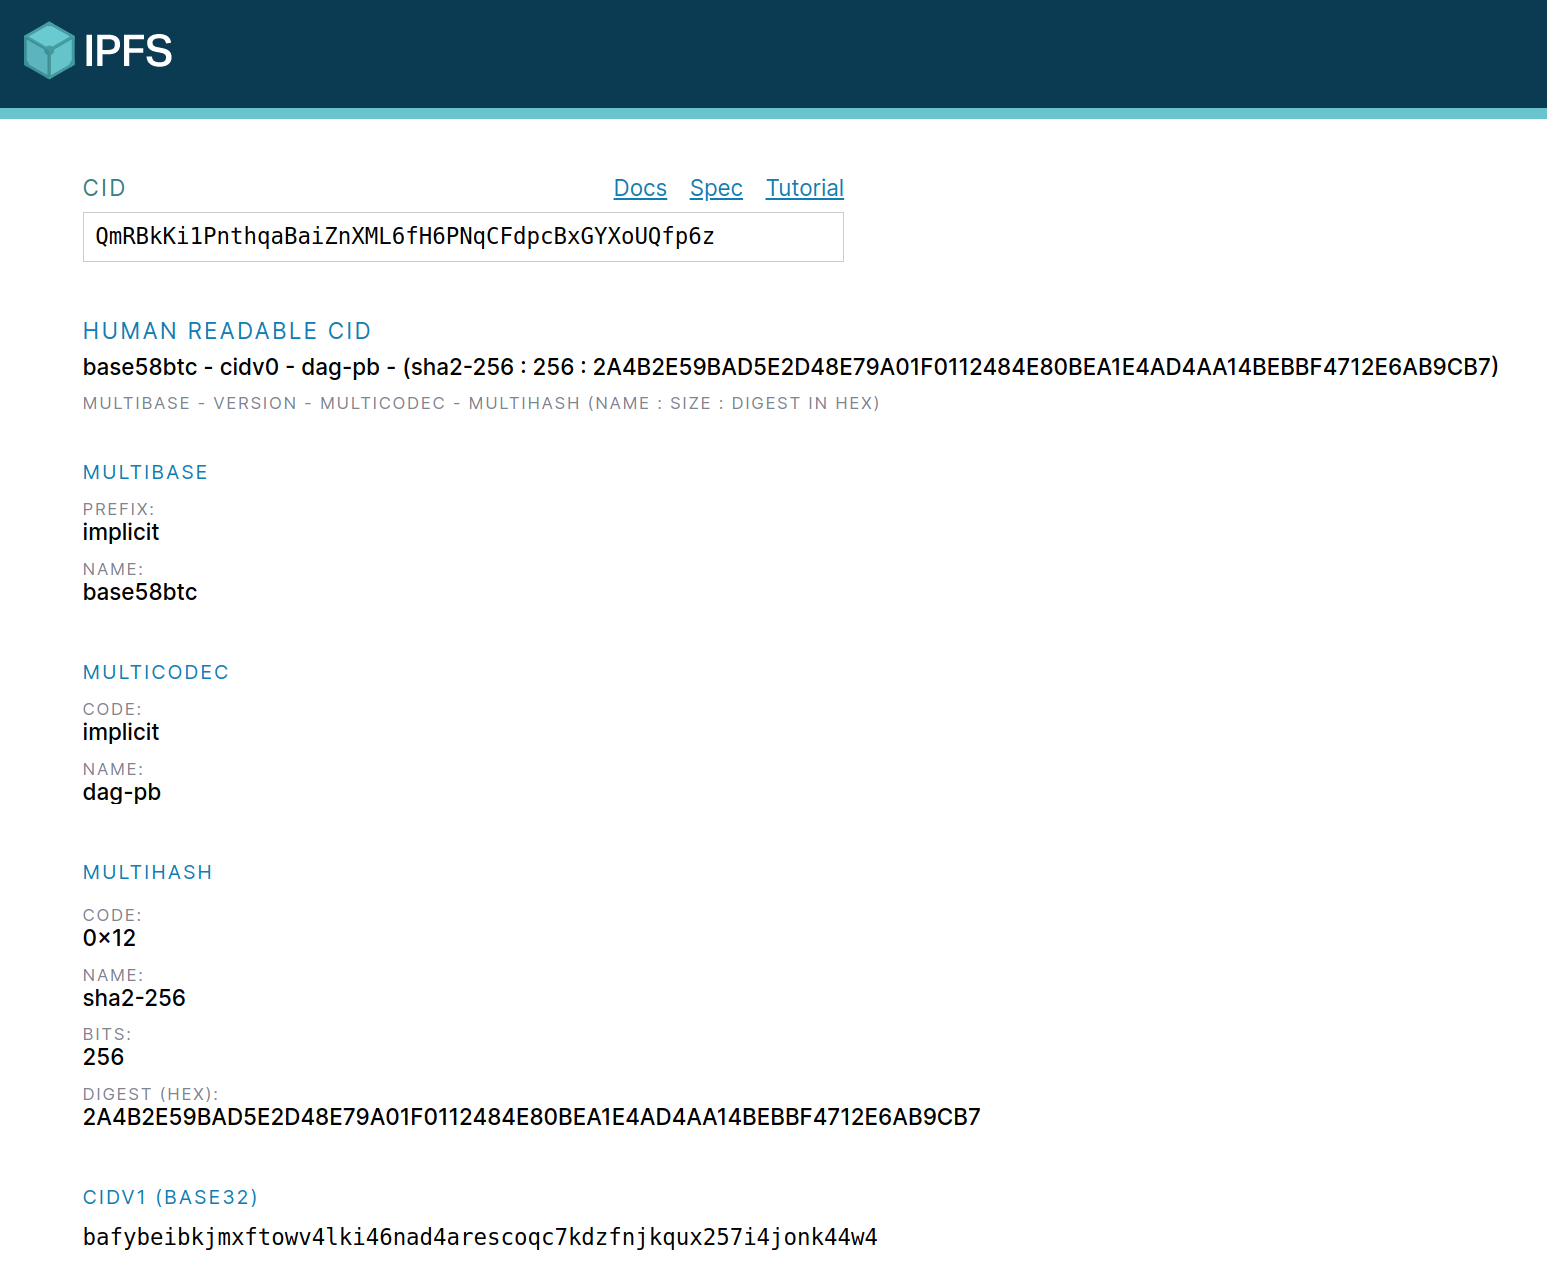
By parsing the QmRBkKi1P…p6z CID, you discover:
- the CID follows version 0 spec because it starts with Qm
- the QmRBkKi1P…p6z string is encoded using
base58btc - the data "hello IPFS world by Web3Coach. BTW: Ethereum FTW" were encoded as DAG Protobuf under a codec 0x70 before being stored on disk
- the hash code 0x12 signals the data fingerprint obtained using the
sha256hash function, producing a unique 32 byte long digest
"Slightly more complicated" than a simple auto-increment INT in a MySQL table... but extraordinarily potent and future proof. Let me explain.
CID Versions
There are currently two CID versions: v0 and v1.
The CID v0 is not flexible and limited to:
- start with characters "Qm"
- where the CID string is encoded using base58btc
- the data is encoded with dag-pb by default
- can be converted to CID version 1, but not the other way around
The CID v1 leverages several prefixes for maximum interoperability:
CID v1 = Multibase + Multicodec + Multihash
In another words, parsing the binary into a CID v1 string follows this spec:
<base><codec><hash-function><hash-length><hash-digest>
Multihash
To be future-proof and enable different hashing algorithms, IPFS created the following standard:
CODE : SIZE : DIGEST
type DecodedMultihash struct {
   Code   uint64 // 0x12
   Name   string // sha2-256
   Length int    // 32 bytes
   Digest []byte // Digest holds the raw multihash bytes
}
Multihash has many advantages. When computers are more powerful in 5 years, you could use a stronger hash function like sha3-512 as long as you configure the corresponding 0x13 code as the Multihash in the CID prefix – the protocol will be ready to handle it.
Multicodec
The Code attribute tells you how data is encoded before being stored on disk, so you know how to decode it back when the user wants to read it. It could be anything CBOR, Protobuf, JSON…
IPFS maintains a public list of all possible codecs. The most common codecs are:
raw       | ipld      | 0x55 | raw binary
dag-pb    | ipld      | 0x70 | MerkleDAG protobuf
dag-cbor  | ipld      | 0x71 | MerkleDAG cbor

// but you could also encode Ethereum blocks on IPFS!
eth-block | ipld      | 0x90 | Ethereum Block (RLP)
Multibase
The problem with CID v0 and the base58btc encoding is the lack of interoperability between environments. A multibase prefix adds support for different encodings like base32 to achieve DNS-friendly names.
A table with all Multibase encodings:
encoding  | code
base32    | b
base58btc | z
base64    | m
You spot a Multibase encoding based on the first character:
QmRBkKi1PnthqaBaiZnXML6fH6PNqCFdpcBxGYXoUQfp6z
- is CID
v0 - the CID string is encoded with
base58btc
bafybeibkjmxftowv4lki46nad4arescoqc7kdzfnjkqux257i4jonk44w4
- CID
v1 - the CID string is encoded with
base32
Both CID versions can retrieve the same content because after you strip the encoding, it's the Multihash that indexes the blocks on the datastore level. In contrast, Multibase is only used to pass the CID correctly in different environments (CLI, URL, DNS).
ipfs cat QmRBkKi1PnthqaBaiZnXML6fH6PNqCFdpcBxGYXoUQfp6z
> hello IPFS world by Web3Coach. BTW: Ethereum FTW

// equivalent to
ipfs cat bafybeibkjmxftowv4lki46nad4arescoqc7kdzfnjkqux257i4jonk44w4
> hello IPFS world by Web3Coach. BTW: Ethereum FTW
Phew. Things got "slightly complex" very quickly.
Speaking of complicated topics, IPFS is powerful because it doesn't treat content as just "data" but as data structures – specifically InterPlanetary Linked Data structure: IPLD. In short, you can implement any file-system, database, or structure on top of IPLD.
For example, you can store all Ethereum blocks on IPFS as long as you set eth-block and eth-tx codecs and register an appropriate Decoder when working with the IPLD graph.
Let's dig into it and explore the default IPLD structure with the DAG Protobuf codec.
How IPFS Stores Content on the File-system
“The ipfs add command will create a Merkle DAG out of the data following the UnixFS data format. Your content is broken down into blocks using a Chunker, and then arranged in a tree-like structure using 'link nodes' to tie them together. The returned CID is the hash of the root node in the DAG.”
Confused?
Rolling back to basics.
Let's explore the node’s data directory
At the beginning of this tutorial, when you initialized your IPFS node with the ipfs init command, you generated the following directory:
export IPFS_PATH=/home/web3coach/.ipfs_tutorial
cd $IPFS_PATH
~/.ipfs_tutorial  tree

.
├── blocks
│   ├── 6Y
│   │   └── CIQA4XCGRCRTCCHV7XSGAZPZJOAOHLPOI6IQR3H6YQ.data
├── config
├── datastore
│   ├── 000002.ldb
│   ├── 000003.log
│   ├── CURRENT
│   ├── CURRENT.bak
│   ├── LOCK
│   ├── LOG
│   └── MANIFEST-000004
├── datastore_spec
├── keystore
└── version
From a very high-level point of view:
blocks— IPFS stores all the chunked data here, although thego-ipfsflexible interfaces allow you to swap the storage implementation for a different databaseconfig— Node’s settings (file-system, identity, specs, networking)datastore— Indexing and other logic
Don't take my word for it. Create a new file with the following content on your local file system and then add it to IPFS:
hello IPFS world by Web3Coach. Testing DAGs
hello IPFS world by Web3Coach. Testing DAGs
hello IPFS world by Web3Coach. Testing DAGs

ls -la hello_world.txt
> 131 bytes hello_world.txt

ipfs add hello_world.txt
> added QmNtQtxeavDXTjCiWAAaxnhKK3LBYfFfpXUXjdMDYXwKtH
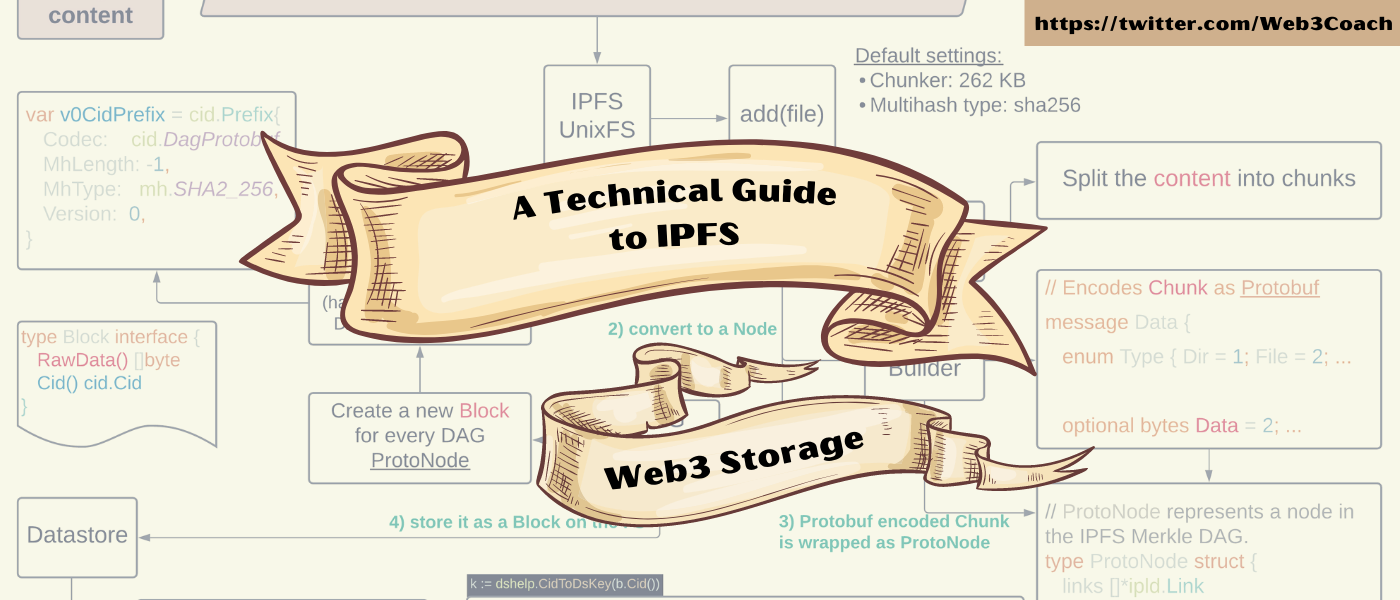
Reverse engineering the go-ipfs codebase, this is what is happening behind the scenes:
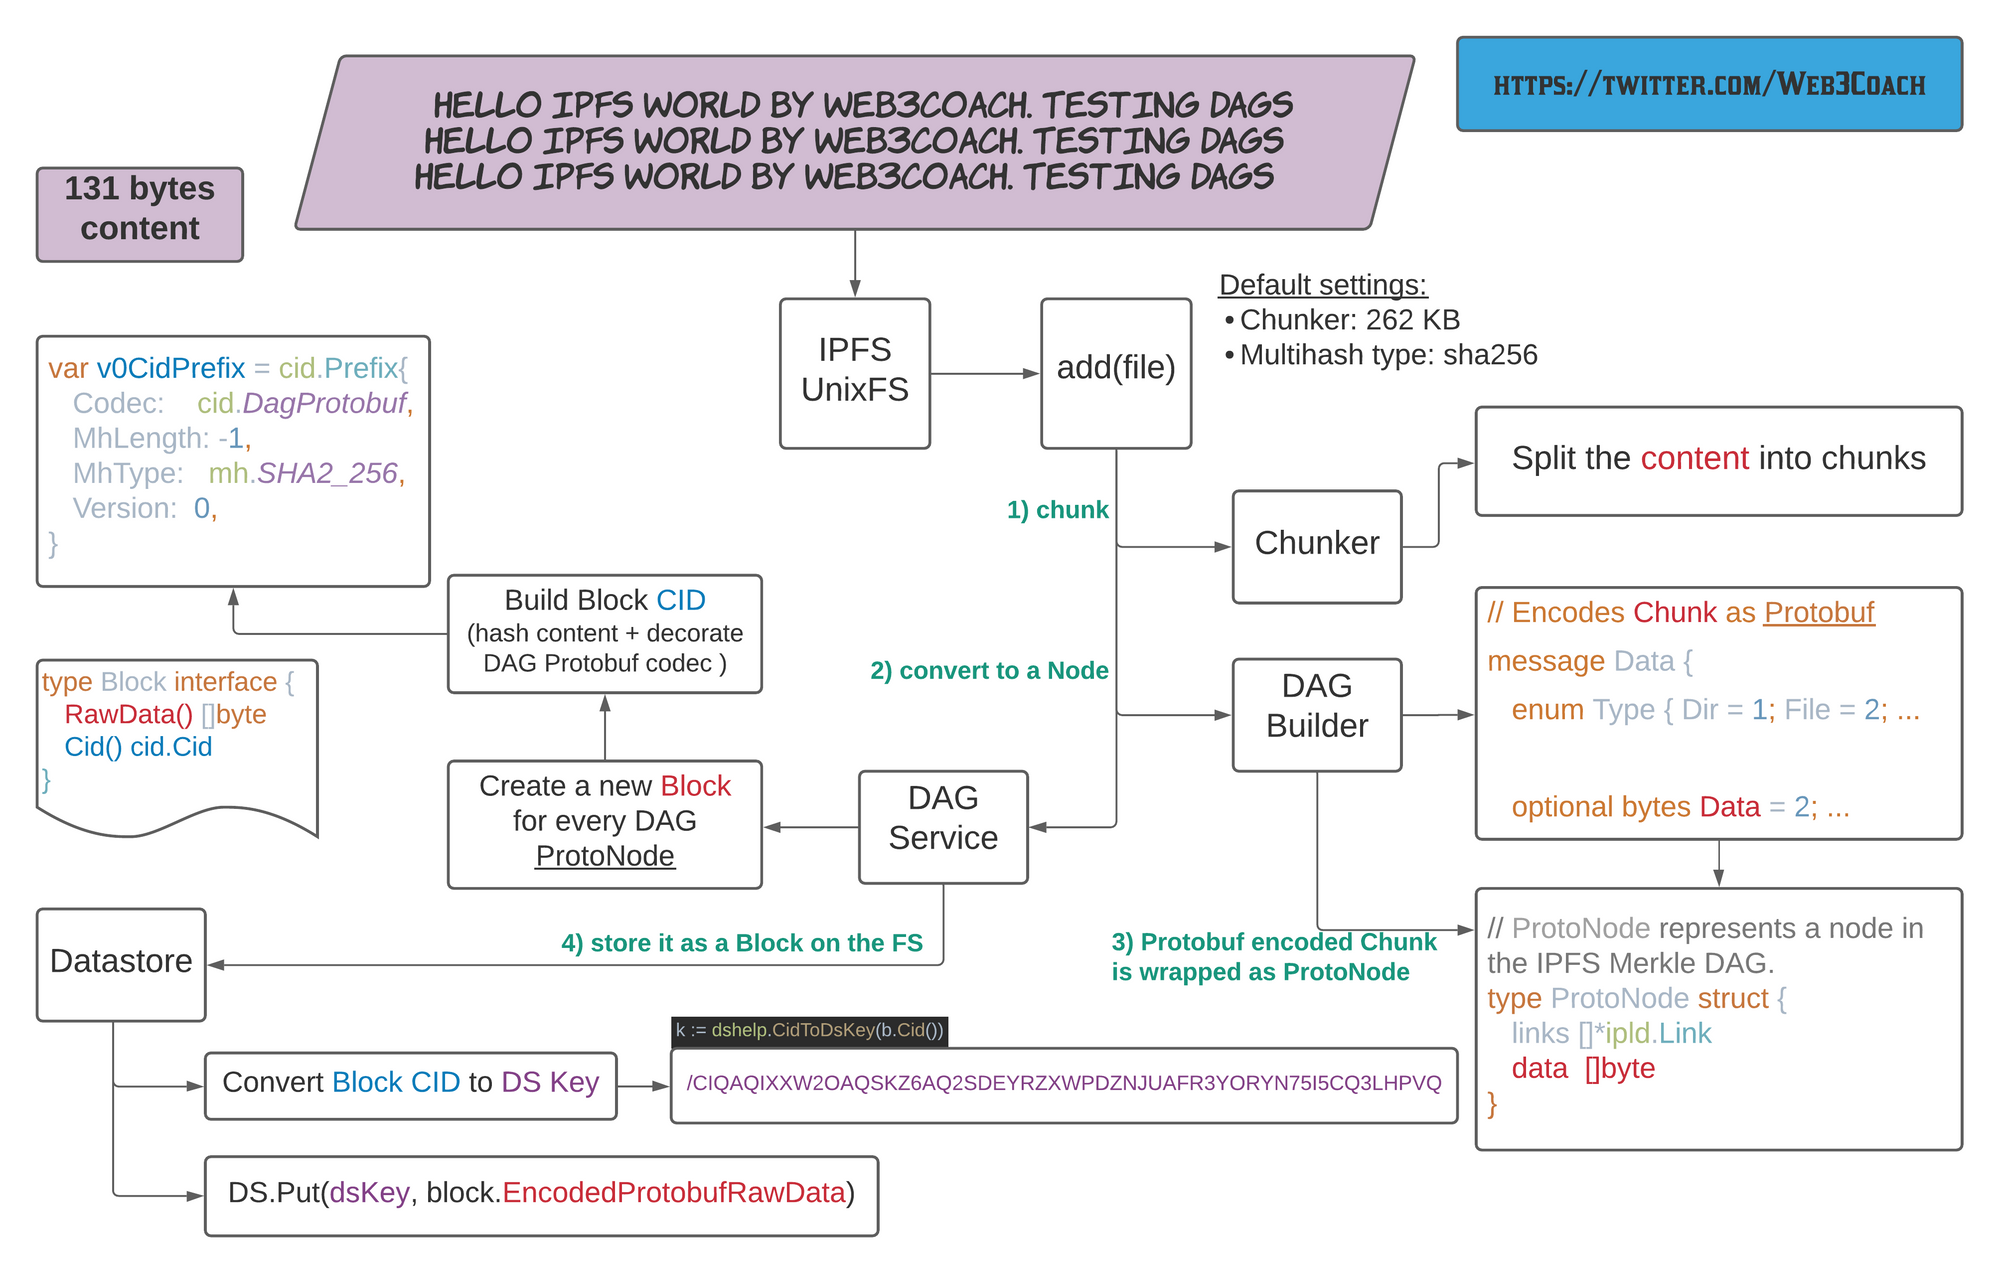 IPFS UnixFS adding a new file and converting it to a block
Validate the persistence process by inspecting the blocks directory. You will find the content was written under the Multihash Datastore Key using DAG Protobuf encoding (131 bytes + Protobuf extra encoding).
ls -la blocks/PV/
> 142 CIQAQIXXW2OAQSKZ6AQ2SDEYRZXWPDZNJUAFR3YORYN75I5CQ3LHPVQ.data

vim blocks/PV/CIQA...
<8b>^A^H^B^R<83>^Ahello IPFS world by Web3Coach. Testing DAGs
hello IPFS world by Web3Coach. Testing DAGs
hello IPFS world by Web3Coach. Testing DAGs^X<83>^A
To interact with your raw content, use the ipfs object command.
ipfs object get QmNtQtxeavDXTjCiWAAaxnhKK3LBYfFfpXUXjdMDYXwKtH | jq
{
  "Links": [],
  "Data": "\b\u0002\u0012�\u0001hello IPFS world by Web3Coach. Testing DAGs\nhello IPFS world by Web3Coach. Testing DAGs\nhello IPFS world by Web3Coach. Testing DAGs\u0018�\u0001"
}
- Because the content is only 131 bytes, it fits to one DAG Node
- The Dag Node is persisted as one Block on disk
- The DAG Node has zero links to other Nodes
Time to experiment.
Add the same file again, but configure the Chunker to 64 bytes (or use a bigger file, but a smaller Chunker will demonstrate the concept better).
ipfs add --chunker=size-64 hello_world.txt

> 131 bytes QmTwtTQgrTaait2qWXYjTsEZiF4sT7CD4U87VqQ27Wnsn8
You get a new CID!
IPFS split the content into 4 DAG Nodes and wrote 4 Blocks with data encoded in DAG Protobuf format to disk.
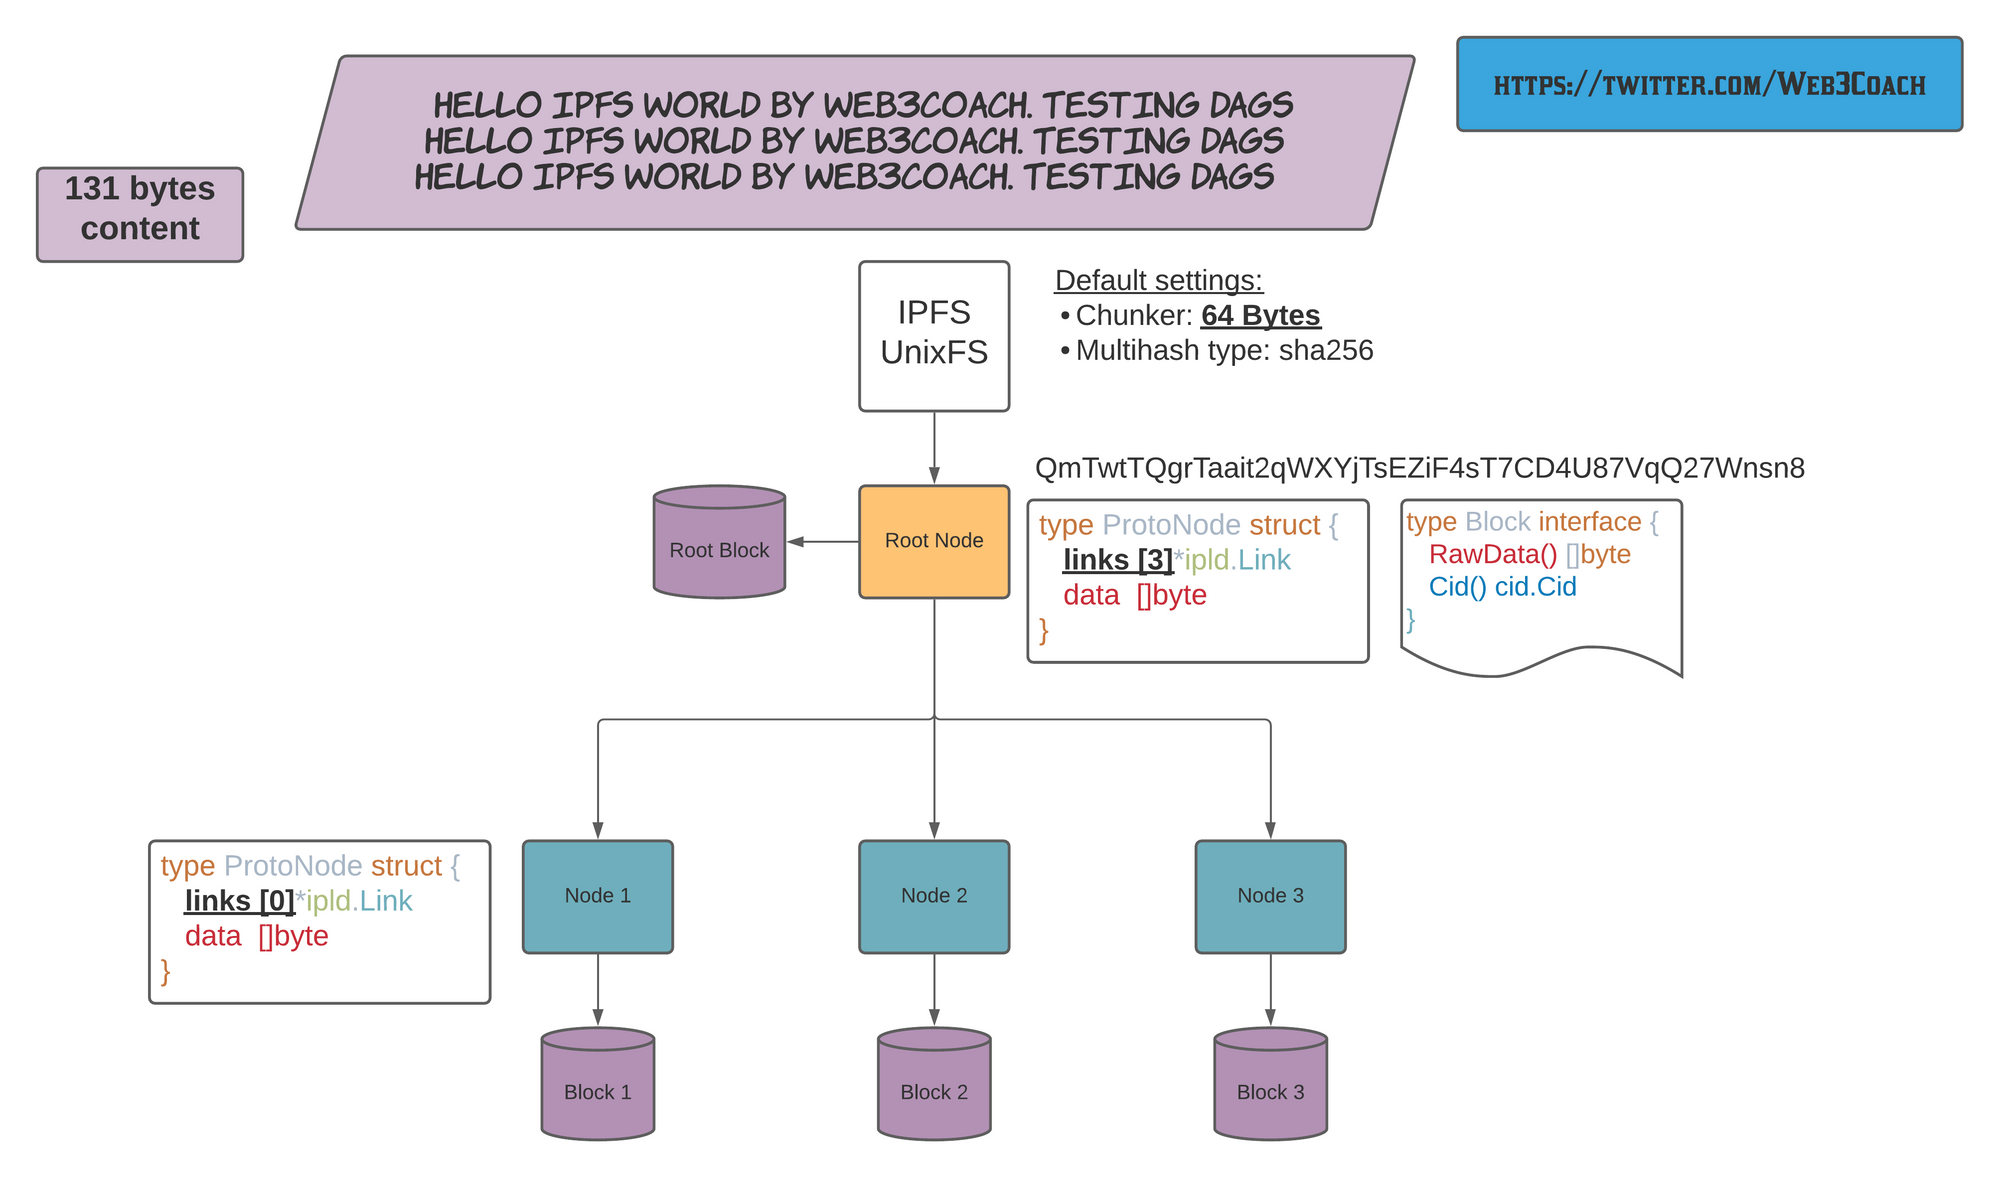 IPFS splits a file into multiple chunks (DAG Nodes + Blocks)
ipfs object get QmTwtTQgrTaait2qWXYjTsEZiF4sT7CD4U87VqQ27Wnsn8 | jq
{
  "Links": [
    {
      "Name": "",
      "Hash": "QmTbsuUYzy3nT6NApb5t7VUq3iQKZXrJJJY2j1miMVgaJU",
      "Size": 72
    },
    {
      "Name": "",
      "Hash": "QmNy9iFF8uU1Cn7trxpSgqxMsjmi4zQ7xgyEgsWff5rnfH",
      "Size": 72
    },
    {
      "Name": "",
      "Hash": "QmdEitCfYgBNxLhxTNvdLaDmTypSAWkGErjw33VZxUbWK3",
      "Size": 11
    }
  ],
  "Data": "\b\u0002\u0018�\u0001 @ @ \u0003"
}
The ultimate test is to retrieve each DAG Node's data and verify the text is split into three chunks:
DAG Protobuf Node 1:
ipfs object get QmTbsuUYzy3nT6NApb5t7VUq3iQKZXrJJJY2j1miMVgaJU | jq
{
  "Links": [],
  "Data": "\b\u0002\u0012@hello IPFS world by Web3Coach. Testing DAGs\nhello IPFS world by \u0018@"
}
DAG Protobuf Node 2:
ipfs object get QmNy9iFF8uU1Cn7trxpSgqxMsjmi4zQ7xgyEgsWff5rnfH | jq
{
  "Links": [],
  "Data": "\b\u0002\u0012@Web3Coach. Testing DAGs\nhello IPFS world by Web3Coach. Testing D\u0018@"
}
DAG Protobuf Node 3:
ipfs object get QmdEitCfYgBNxLhxTNvdLaDmTypSAWkGErjw33VZxUbWK3 | jq
{
  "Links": [],
  "Data": "\b\u0002\u0012\u0003AGs\u0018\u0003"
}
What’s the benefit of splitting the content into multiple chunks and use content-addressing and CIDs?
- Data deduplication
- Decentralization
Next time you want to store a file that would share part of the content with another file, IPFS wouldn't store a duplicate block! It would instead link to an already existing DAG Node and only store the new, unique chunks.
Converting content to a directed acyclic graph with many nodes also helps to load the content in parallel. For example, a blog post, image, entire Wikipedia website can load from multiple IPFS peer nodes. Your node then verifies the integrity of received blocks by re-hashing all the data content and asserting the constructed CID.
You've now learned the bread and butter of IPFS – excellent progress!
One more critical component left: Networking.
How to Connect an IPFS Node to the p2p Network
Every node has its config file generated during the ipfs init execution.
Open it.
vim $IPFS_PATH/config
Other settings aside, you find your node’s Identity (PeerID + Private Key):
"Identity": {
    "PeerID": "12D3KooWCBmDtsvFwDHEr...",
    "PrivKey": "CAESQCj..."
  },
And a list of Bootstrap addresses:
"Bootstrap": [
    "/dnsaddr/bootstrap.libp2p.io/p2p/QmcZf59b...gU1ZjYZcYW3dwt",
    "/ip4/104.131.131.82/tcp/4001/p2p/QmaCpDMG...UtfsmvsqQLuvuJ",
    "/ip4/104.131.131.82/udp/4001/quic/p2p/Qma...UtfsmvsqQLuvuJ",
    "/dnsaddr/bootstrap.libp2p.io/p2p/QmNnooD5...BMjTezGAJN",
    "/dnsaddr/bootstrap.libp2p.io/p2p/QmQCU2Ec...J16u19uLTa",
    "/dnsaddr/bootstrap.libp2p.io/p2p/QmbLHAnM...Ucqanj75Nb"
  ],
You connect to other peers in the IPFS network by running the ipfs daemon command. Your node will first establish a p2p connection with Protocol Labs (company behind IPFS) bootstrap nodes, and through these bootstrap nodes, you will further find hundreds of other peers.
ipfs daemon

> Initializing daemon...

Swarm listening on /ip4/127.0.0.1/tcp/4001
Swarm listening on /ip4/127.0.0.1/udp/4001/quic
Swarm listening on /ip4/172.17.0.1/tcp/4001
Swarm listening on /ip4/172.17.0.1/udp/4001/quic
Swarm listening on /ip4/192.168.0.142/tcp/4001
Swarm listening on /ip4/192.168.0.142/udp/4001/quic
Swarm listening on /ip6/::1/tcp/4001
Swarm listening on /ip6/::1/udp/4001/quic
Swarm listening on /p2p-circuit
Swarm announcing /ip4/127.0.0.1/tcp/4001
Swarm announcing /ip4/127.0.0.1/udp/4001/quic
Swarm announcing /ip4/192.168.0.142/tcp/4001
Swarm announcing /ip4/192.168.0.142/udp/4001/quic
Swarm announcing /ip4/88.212.40.160/udp/4001/quic
Swarm announcing /ip6/::1/tcp/4001
Swarm announcing /ip6/::1/udp/4001/quic

API server listening on /ip4/127.0.0.1/tcp/5001
WebUI: http://127.0.0.1:5001/webui

Gateway (readonly) server listening on /ip4/127.0.0.1/tcp/8080
Daemon is ready!
Keep in mind, that by running the IPFS Daemon:
- Your node connects to the p2p net and can exchange blocks with other nodes
- Other peers can access the content on your node – as long they know the CIDs
- Peers will talk to you through TCP, UDP on port: 4001
- If you have an application, start storing and consuming your node's content via the HTTP API listening on port: 5001.
For application development, I recommend the official ipfs-http-client library in JS exposing all the core commands – add, cat, object and others. It will speed up your coding progress.
I will use curl to interact with the API to keep this tutorial "short."
How to use the IPFS HTTP API:
Add content: :5001/api/v0/add
curl -X POST -F file=@/home/web3coach/go/src/github.com/ipfs/go-ipfs/hello_world.txt "http://127.0.0.1:5001/api/v0/add"
{"Name":"hello_world.txt","Hash":"QmNtQtxeavDXTjCiWAAaxnhKK3LBYfFfpXUXjdMDYXwKtH","Size":"142"}
Read content: :5001/api/v0/cat
curl -X POST "http://127.0.0.1:5001/api/v0/cat?arg=QmNtQtxeavDXTjCiWAAaxnhKK3LBYfFfpXUXjdMDYXwKtH"

hello IPFS world by Web3Coach. Testing DAGs
hello IPFS world by Web3Coach. Testing DAGs
hello IPFS world by Web3Coach. Testing DAGs
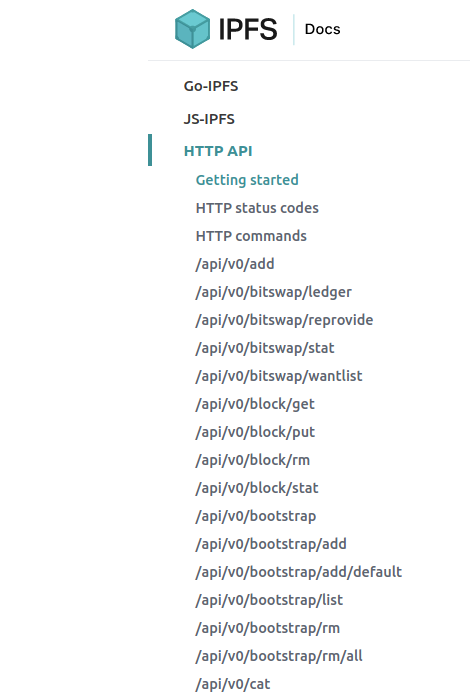
See the official HTTP API docs for the complete list of available commands.
How to peer with other IPFS nodes
Fun experiment. Use the ipfs swarm command and check how many nodes you already discovered:
ipfs swarm peers

>
/ip4/85.70.151.37/tcp/4001/p2p/QmSuCtR...aPq6h4AczBPZaoej
/ip4/91.121.168.96/udp/54001/quic/p2p/QmeC7H...8j2TQ99esS
...
...
...

ipfs swarm peers | wc -l
> 186
Bravo! You are connected to 186 peers forming an unstoppable peer-to-peer web.
What about privacy?
Other peers can access all the content you add to your IPFS node. There is no built-in privacy mechanism, so never add unencrypted, sensitive/personal content to IPFS!
How Nodes Exchange Data Using the Bitswap Protocol
So far, you only interacted with your local content. Imagine you live in a place where the local government decided to block access to Wikipedia. No bueno.
Fortunately, because someone added all the Wikipedia content to IPFS, you can run your node and access its knowledge by requesting the content from peers across the globe.
http://localhost:8080/ipfs/QmT5NvUtoM5nWFfrQdVrFtvGfKFmG7AHE8P34isapyhCxX/wiki/Anasayfa.html
The DAG Service will check the blocks in your datastore, but it won’t find any for QmT5NvUtoM5nWFfrQdVrFtvGfKFmG7AHE8P34isapyhCxX.
The node will therefore create a network request to its peers using the Bitswap protocol via exchange component:
func getBlock(ctx context.Context, c cid.Cid, bs blockstore.Blockstore, fget func() exchange.Fetcher) (blocks.Block, error) {
   err := verifcid.ValidateCid(c) // hash security
   if err != nil {
      return nil, err
   }

   block, err := bs.Get(c)
   if err == nil {
      return block, nil
   }

   if err == blockstore.ErrNotFound && fget != nil {
      f := fget() // Don't load the exchange until we have to

      log.Debug("Blockservice: Searching bitswap")
      blk, err := f.GetBlock(ctx, c)
Internally, the CID is added to a Wantlist :
// Wantlist is a raw list of wanted blocks and their priorities
type Wantlist struct {
   set map[cid.Cid]Entry
}

// Entry is an entry in a want list, consisting of a cid and its priority
type Entry struct {
   Cid      cid.Cid
   Priority int32
   WantType pb.Message_Wantlist_WantType
}
And the PeerManager will iterate over known peers and their peers until it finds an online node capable of providing the wanted Block:
// PeerManager manages a pool of peers and sends messages to peers in the pool.
type PeerManager struct {
   pqLk sync.RWMutex

   peerQueues map[peer.ID]PeerQueue
   pwm        *peerWantManager

   createPeerQueue PeerQueueFactory
   ctx             context.Context

   psLk         sync.RWMutex
   sessions     map[uint64]Session
   peerSessions map[peer.ID]map[uint64]struct{}

   self peer.ID
}
The result?
You can consume the forbidden fruits from Wikipedia directly from localhost:8080:
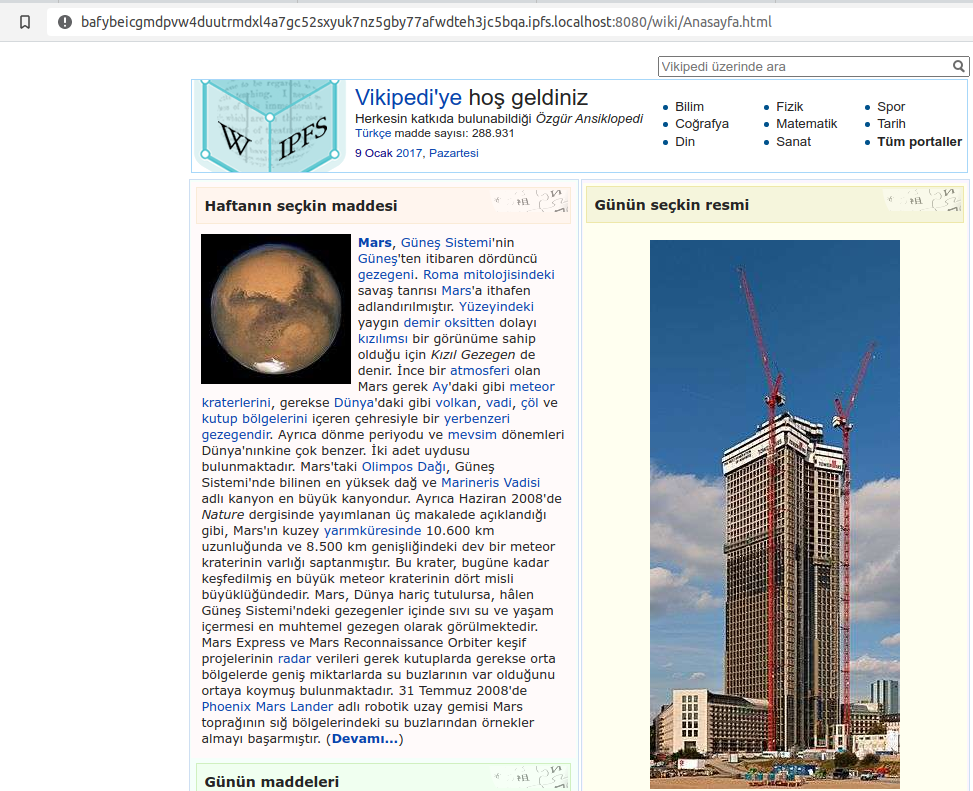 IPFS loading Wikipedia on your local node
Uncensorable, decentralized storage :)
How to Persist Content from the p2p Network
You must know a crucial thing about IPFS: the content you access from the network will be garbage collected unless you pin it.
Pinning and Garbage Collection
At the beginning of the article you learned that content added to your node via the ipfs add command or its HTTP equivalent is pinned by default.
ipfs pin ls | grep QmNtQtxeavDXTjCiWAAaxnhKK3LBYfFfpXUXjdMDYXwKtH
> QmNtQtxeavDXTjCiWAAaxnhKK3LBYfFfpXUXjdMDYXwKtH recursive
Pinned blocks are marked as NOT TO BE DELETED when the Garbage Collection runs.
Why would the Garbage Collection delete some blocks? To keep your node healthy by controlling its storage size.
By reading Wikipedia or by accessing any other content from the p2p network, IPFS downloads its blocks. As the node's datastore grows in size, a periodic garbage collection process will prune unpinned blocks, so you don't run out of disk space.
If you want your content to be accessible 24/7 on the IPFS network, I recommend that you use a reliable remote provider to pin it: Infura - is the easiest way to get started, and you get 5GB free of decentralized storage.
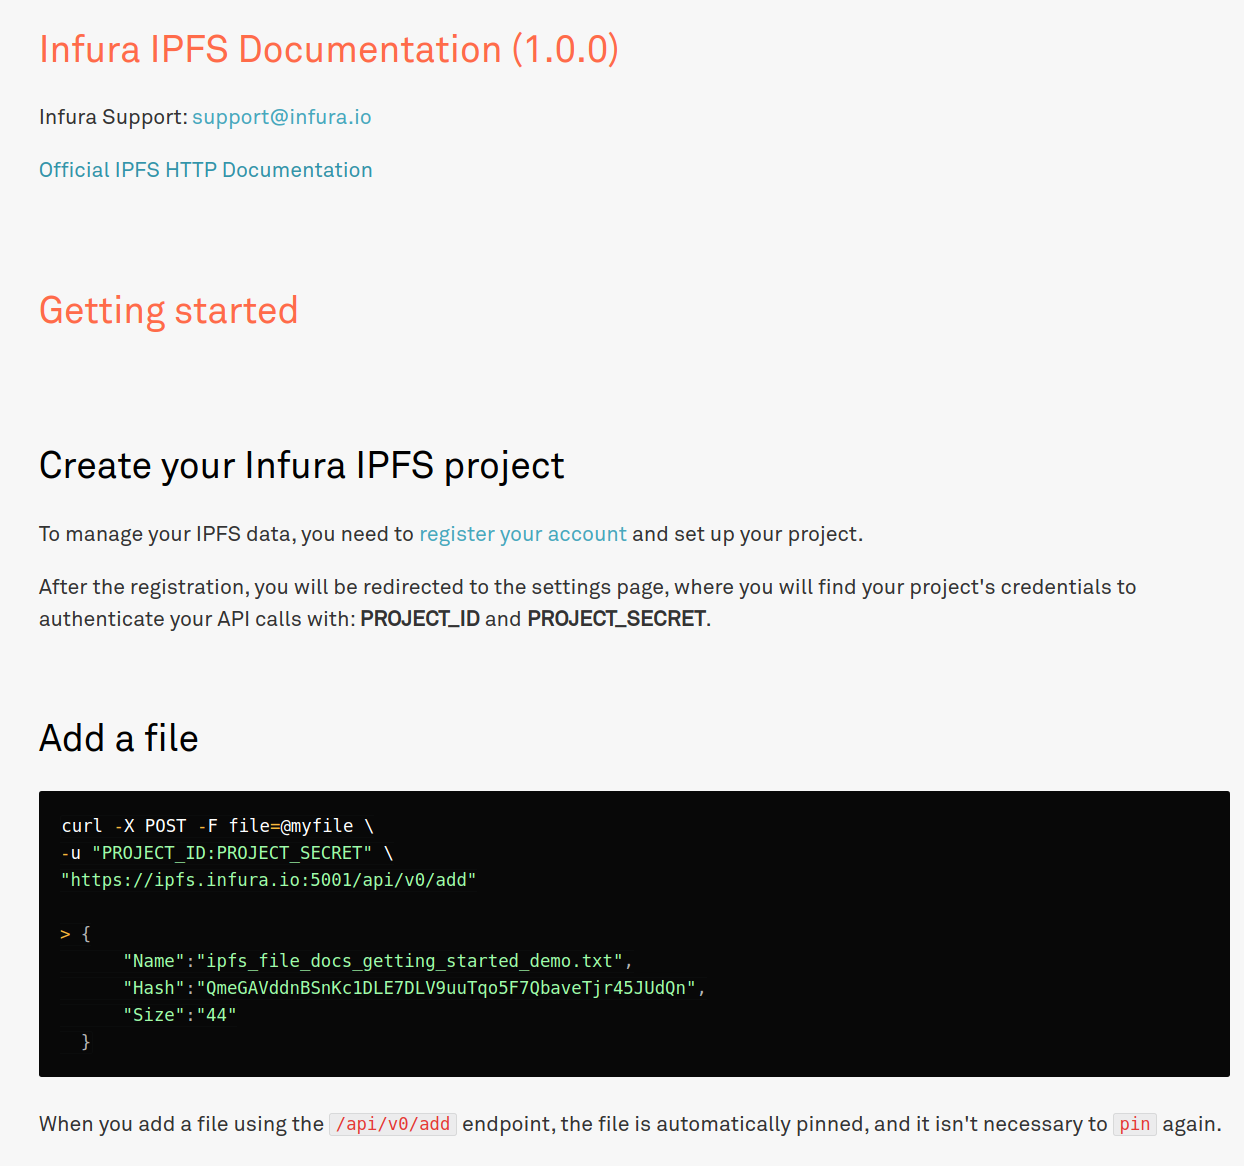
Follow the getting started docs.
How to pin Wikipedia locally
Verify that the Wikipedia root-level CID (highest DAG node) isn't yet pinned on your node:
ipfs pin ls | grep QmT5NvUtoM5nWFfrQdVrFtvGfKFmG7AHE8P34isapyhCxX
> no output, not pinned
IPFS stores specific versions of Wikipedia in the form of a DAG. I recommend inspecting its graph before pinning:
ipfs object get QmT5NvUtoM5nWFfrQdVrFtvGfKFmG7AHE8P34isapyhCxX | jq
{
  "Links": [
    {
      "Name": "0C-",
      "Hash": "QmSEwJo8Z5bqVX3AhocyimJzPWetr7HgbWbwCg6zbp43AP",
      "Size": 1248085
    },
    {
      "Name": "43I",
      "Hash": "QmPW3kRjncDj145bP9DVNc791FowLPwYHnqbTzfe3whdyZ",
      "Size": 2611324931
    },
    {
      "Name": "58wiki",
      "Hash": "QmRNXpMRzsTHdRrKvwmWisgaojGKLPqHxzQfrXdfNkettC",
      "Size": 12295304394
    },
    {
      "Name": "92M",
      "Hash": "Qmbcvk7jpBTUKdgex139Nvv7BrKocE3pQVKhNJtTU77Qv5",
      "Size": 793
    },
    {
      "Name": "A0index.html",
      "Hash": "QmNqbYogAxH4mmt5WhuKN7NFEUDZ9V3Scxh7QbLwTKBJDk",
      "Size": 191
    }
  ],
  "Data": "\b\u0005\u0012\u0015\u0001\u0000\u0004\u0000\u0000\u0000\u0000\u0000\u0000\u0001\u0000\u0000\b\u0000\u0000\u0000\u0000\u0000\u0000\u0010\u0000(\"0�\u0002"
}
The root DAG object has five links. Four links are relatively small, but one link points to a DAG node with a total size of 12GB. If you inspect this DAG node, you will see 256 more links and a total cumulative (recursive) size of 12GB.
ipfs object stat QmRNXpMRzsTHdRrKvwmWisgaojGKLPqHxzQfrXdfNkettC

NumLinks:       256
BlockSize:      12075
LinksSize:      12034
DataSize:       41
CumulativeSize: 12295304394
Every node with an important pinned article, video, documentary, or a cat meme makes the web more accessible, antifragile, decentralized, and robust.
ipfs pin add QmT5NvUtoM5nWFfrQdVrFtvGfKFmG7AHE8P34isapyhCxX
The pinning process will recursively traverse the entire DAG node, fetch all its links from the Bitswap protocol and then pin every single Block to your local datastore.
Congratulations! In this article, you learned how decentralized storage works behind the scenes.