
By Nitish Phanse
Why would you want to write test cases for your applications, anyway? Well, it’s a question a number of developers try to dodge, purely because it takes effort and time, and because manual testing is so much more satisfying. Click… click… fill out a form…Click… Presto. My app works, my APIs are good, all is hunky dory.
Fast forward to almost 30 pull requests a day being merged into your master branch. Now how do you feel about testing 30 features manually or refactoring a block of code and unknowingly breaking someone else’s code?
At this point you’d normally say, “I wish I’d written a few test cases to start with.” So take some inspiration from Facebook: they shared a pretty cool article here, explaining how the team developed React 16 with test driven development.
Node applications by themselves are pretty easy to build. There’s a lot of community support involved, and you’ll usually get what you need by asking around. Node apps can be a great proxy server to a number of API servers, thereby making their endpoint testing more crucial.
In this article I’ve covered how to setup and write basic unit test cases with coverage reports for Node.js applications. So let’s jump in.
Hello Ava
Ava is a JavaScript test runner. It utilizes the async I/O nature of Node and runs concurrent tests, thereby vastly decreasing your test times.
Let’s get started
In your working directory, create a package.json file and add the following packages:
yarn add ava babel-register
Create a tests folder. It’s helpful to keep your tests in one place. You can keep test modules/controllers there, too.
Your updated package.json should now look like this:
{ "name": "ava-test", "version": "1.0.0", "description": "", "main": "index.js", "scripts": { "start" : "node server.js", "test": "node_modules/.bin/ava tests/**/*.test.js --verbose", "test:watch": "node_modules/.bin/ava --verbose --watch" }, "dependencies": { "ava": "^0.23.0", "babel-register": "^6.26.0" }, "ava": { "require": [ "babel-register" ] }}
The babel-register transpiles ES6 code at runtime in case some machines are running on an old Node version which doesn’t support ES6. The verbose flag will give us some neat output depending on whether our tests fail or pass. This flag is pretty useful while debugging your tests, but if you write hundreds of test cases, you may want to turn it off.
In your tests/index.test.js, you can add your first test case:
The handy thing about Ava is that it allows you to run async tests, via async await functions. The syntax is also fairly straightforward. The plan method allows us to explicitly mention the number of assertions we’d like to have per test.
Running yarn test from you console gives you the following output:
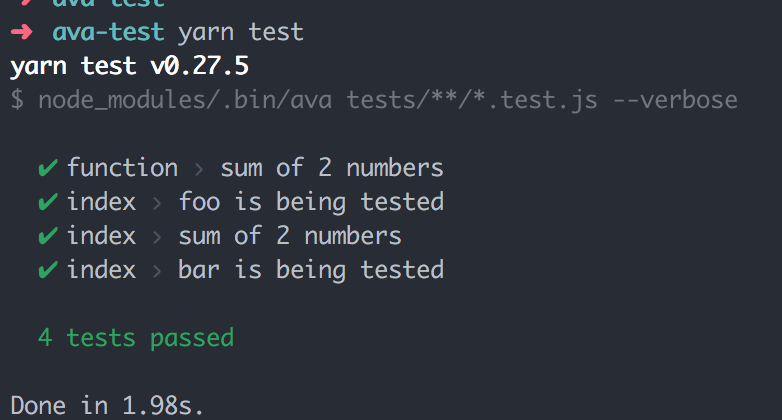
In case one of our tests fails, we’d get:
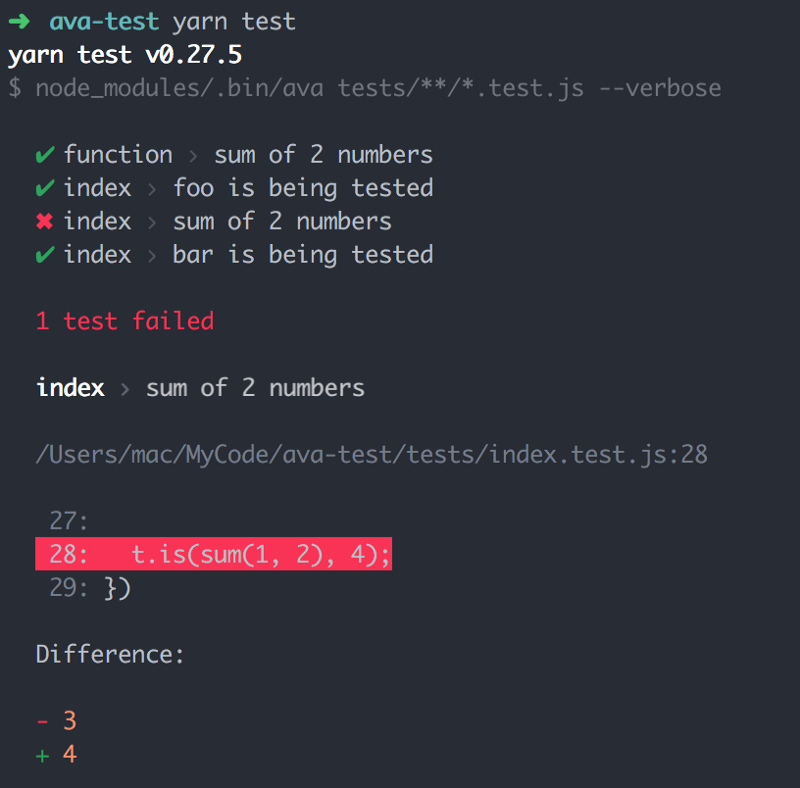
That’s the beauty of verbose mode. It gives you the a clean error stack and none of the stack trace junk. In case you run into a runtime error, you’ll see some nice syntax highlighting, too.
You can really exploit the Ava API and use its powerful assertion tool to write flexible test cases.
Setting up your Node server
Until now, we’ve only talked about a basic setup for writing tests — and let’s be frank, it’s pretty straight forward. So in this section, I’ll explain how a simple Node server can be spun off and its endpoints tested with Ava.
yarn add express body-parser
In your working directory, create an app.js and add the following snippet:
The reason I’ve exported the app module is so that it can be used with the mock API server that Ava will need to run your tests.
Make a new file server.js and import the app module to start the server.
Running npm start should start your server, and navigating to the http://localhost/status end point should give you a 200OK response.
Great, so our server is working.
A quick glance of the code shows that we’ve created 3 endpoints: a status endpoint, a greet endpoint, and a register endpoint. There is some validation on the register end point, which throws a 400(Bad request) in case post body params are missing. The above validation method is pretty naïve, but it serves our purpose of endpoint testing — so I’m going to stick with it.
Pro tip : You can always assign error handling to a middleware and use next to invoke the error handler.
Let’s write some more tests around the endpoint. I will use the supertest module. It’s very similar to superagent: it uses the same APIs, and has a similar syntax. So, win-win.
We have imported the previously exported app module and passed it into supertest. Supertest creates a proxy server, which will then hit all the endpoint URLs mentioned in the test. You can use the **deepEqual** method to test the entire object or the **is** method to manually test each field.
Running the yarn test will yield the following:
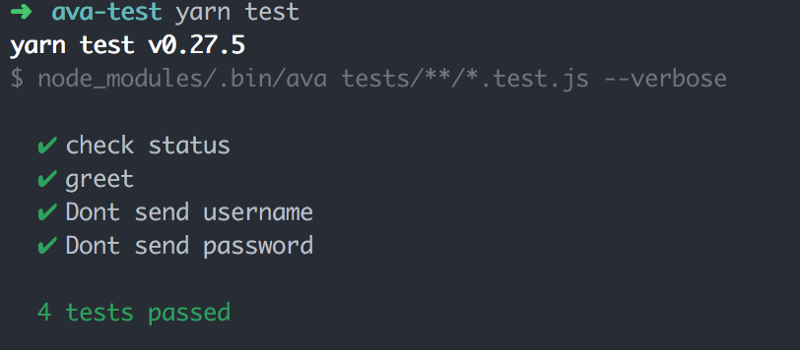
Great. We’ve written four tests and they all pass as expected. But what about code coverage?
Hello nyc
For creating those lovely coverage reports, we’ll use nyc which is Istanbul.js’ command line interface. It’s very easy to use and has a lot of configurable options. For the sake of simplicity, we’ll use a very simple configuration.
yarn add nyc --save
The nyc command wraps nicely over your test command and will create a coverage folder (this should be in your gitignore) in your working directory.
Update your package.json as shown below:
{ "name": "ava-test", "version": "1.0.0", "description": "", "main": "index.js", "scripts": { "test": "node_modules/.bin/ava tests/**/*.test.js --verbose", "test:watch": "node_modules/.bin/ava --verbose --watch", "cover": "node_modules/.bin/nyc yarn test", }, ... other dependencies "nyc": { "reporter": [ "lcov", "text", "html" ] }}
The types of reporter you want can be configured in the nyc section of your package.json file.
Let’s run yarn cover:
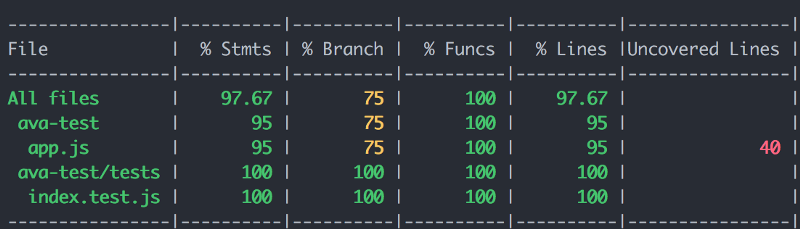
Okay so we don’t have 100% coverage yet. Let’s fix that. First you’d want to go into the coverage folder of your working directory and see which part of your code hasn’t been covered.
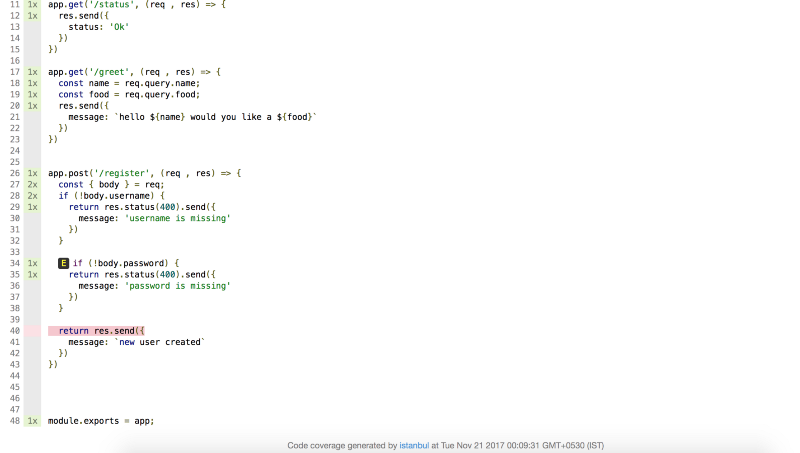
Clearly we missed a spot. Let’s add our final test case in the tests/index.tests.js file, which will cover the entire app.js file.
test('Create a new user', async t => { let username = 'some-hase' const password = 'some-hase' const response = await request(app) .post('/register') .send({username, password});
t.is(response.status, 200); t.is(response.body.message, `new user created`);});
And now….
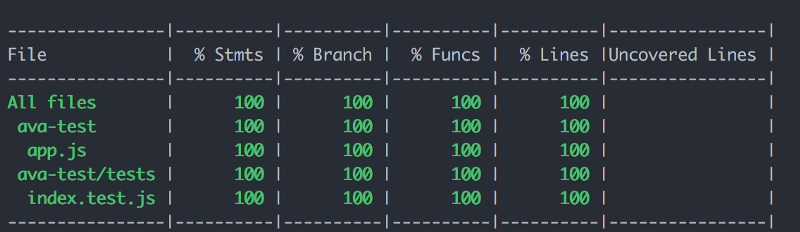
Presto.
Pro tip: If you want to add a threshold for test cases you can add a script in your package.json file.
"check-coverage": "node_modules/.bin/nyc check-coverage --lines 100 --functions 100 --branches 100 --statements 100"
This command can be run as part of your travis / gitlab pipeline build systems.
Conclusion
We’ve covered a basic setup with Ava for unit test cases of your Node APIs. The documentation is really extensive and can be referred to in case of doubt.
PS: Hope you like the article, correct me if I am wrong anywhere. Always welcome a discussion.