

A young Russian developer named Igor Sysoev was frustrated by older web servers' inability to handle more than 10 thousand concurrent requests. This is a problem referred to as the C10k problem. As an answer to this, he started working on a new web server back in 2002.
NGINX was first released to the public in 2004 under the terms of the 2-clause BSD license. According to the March 2021 Web Server Survey, NGINX holds 35.3% of the market with a total of 419.6 million sites.
Thanks to tools like NGINXConfig by DigitalOcean and an abundance of pre-written configuration files on the internet, people tend to do a lot of copy-pasting instead of trying to understand when it comes to configuring NGINX.
 Trust me, it's not that hard...
I'm not saying that copying code is bad, but copying code without understanding is a big "no no".
Also NGINX is the kind of software that should be configured exactly according to the requirements of the application to be served and available resources on the host.
That's why instead of copying blindly, you should understand and then fine tune what you're copying – and that's where this handbook comes in.
After going through the entire book, you should be able to:
- Understand configuration files generated by popular tools as well as those found in various documentation.
- Configure NGINX as a web server, a reverse proxy server, and a load balancer from scratch.
- Optimize NGINX to get maximum performance out of your server.
Prerequisites
- Familiarity with the Linux terminal and common Unix programs such as
ls,cat,ps,grep,find,nproc,ulimitandnano. - A computer powerful enough to run a virtual machine or a $5 virtual private server.
- Understanding of web applications and a programming language such as JavaScript or PHP.
Table of Contents
- Introduction to NGINX
- How to Install NGINX
- Introduction to NGINX's Configuration Files
- How to Configure a Basic Web Server
- Dynamic Routing in NGINX
- Logging in NGINX
- How to Use NGINX as a Reverse Proxy
- How to Use NGINX as a Load Balancer
- How To Optimize NGINX for Maximum Performance
- How to Understand the Main Configuration File
- How To Configure SSL and HTTP/2
- Conclusion
Project Code
You can find the code for the example projects in the following repository:
Introduction to NGINX
NGINX is a high performance web server developed to facilitate the increasing needs of the modern web. It focuses on high performance, high concurrency, and low resource usage. Although it's mostly known as a web server, NGINX at its core is a reverse proxy server.
NGINX is not the only web server on the market, though. One of its biggest competitors is Apache HTTP Server (httpd), first released back on 1995. In spite of the fact that Apache HTTP Server is more flexible, server admins often prefer NGINX for two main reasons:
- It can handle a higher number of concurrent requests.
- It has faster static content delivery with low resource usage.
I won't go further into the whole Apache vs NGINX debate. But if you wish to learn more about the differences between them in detail, this excellent article from Justin Ellingwood may help.
In fact, to explain NGINX's request handling technique, I would like to quote two paragraphs from Justin's article here:
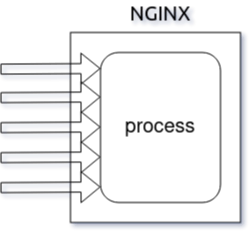
Nginx came onto the scene after Apache, with more awareness of the concurrency problems that would face sites at scale. Leveraging this knowledge, Nginx was designed from the ground up to use an asynchronous, non-blocking, event-driven connection handling algorithm.
Nginx spawns worker processes, each of which can handle thousands of connections. The worker processes accomplish this by implementing a fast looping mechanism that continuously checks for and processes events. Decoupling actual work from connections allows each worker to concern itself with a connection only when a new event has been triggered.
If that seems a bit complicated to understand, don't worry. Having a basic understanding of the inner workings will suffice for now.
NGINX is faster in static content delivery while staying relatively lighter on resources because it doesn't embed a dynamic programming language processor. When a request for static content comes, NGINX simply responds with the file without running any additional processes.
That doesn't mean that NGINX can't handle requests that require a dynamic programming language processor. In such cases, NGINX simply delegates the tasks to separate processes such as PHP-FPM, Node.js or Python. Then, once that process finishes its work, NGINX reverse proxies the response back to the client.

NGINX is also a lot easier to configure thanks to a configuration file syntax inspired from various scripting languages that results in compact, easily maintainable configuration files.
How to Install NGINX
Installing NGINX on a Linux-based system is pretty straightforward. You can either use a virtual private server running Ubuntu as your playground, or you can provision a virtual machine on your local system using Vagrant.
For the most part, provisioning a local virtual machine will suffice and that's the way I'll be using in this article.
How to Provision a Local Virtual Machine
For those who doesn't know, Vagrant is an open-source tool by Hashicorp that allows you to provision virtual machines using simple configuration files.
For this approach to work, you'll need VirtualBox and Vagrant, so go ahead and install them first. If you need a little warm up on the topic, this tutorial may help.
Create a working directory somewhere in your system with a sensible name. Mine is ~/vagrant/nginx-handbook directory.
Inside the working directory create a file named Vagrantfile and put following content in there:
Vagrant.configure("2") do |config|

    config.vm.hostname = "nginx-handbook-box"

    config.vm.box = "ubuntu/focal64"

    config.vm.define "nginx-handbook-box"

    config.vm.network "private_network", ip: "192.168.20.20"

    config.vm.provider "virtualbox" do |vb|
      vb.cpus = 1
      vb.memory = "1024"
      vb.name = "nginx-handbook"
    end

  end
This Vagrantfile is the configuration file I talked about earlier. It contains information like name of the virtual machine, number of CPUs, size of RAM, the IP address, and more.
To start a virtual machine using this configuration, open your terminal inside the working directory and execute the following command:
vagrant up

# Bringing machine 'nginx-handbook-box' up with 'virtualbox' provider...
# ==> nginx-handbook-box: Importing base box 'ubuntu/focal64'...
# ==> nginx-handbook-box: Matching MAC address for NAT networking...
# ==> nginx-handbook-box: Checking if box 'ubuntu/focal64' version '20210415.0.0' is up to date...
# ==> nginx-handbook-box: Setting the name of the VM: nginx-handbook
# ==> nginx-handbook-box: Clearing any previously set network interfaces...
# ==> nginx-handbook-box: Preparing network interfaces based on configuration...
#     nginx-handbook-box: Adapter 1: nat
#     nginx-handbook-box: Adapter 2: hostonly
# ==> nginx-handbook-box: Forwarding ports...
#     nginx-handbook-box: 22 (guest) => 2222 (host) (adapter 1)
# ==> nginx-handbook-box: Running 'pre-boot' VM customizations...
# ==> nginx-handbook-box: Booting VM...
# ==> nginx-handbook-box: Waiting for machine to boot. This may take a few minutes...
#     nginx-handbook-box: SSH address: 127.0.0.1:2222
#     nginx-handbook-box: SSH username: vagrant
#     nginx-handbook-box: SSH auth method: private key
#     nginx-handbook-box: Warning: Remote connection disconnect. Retrying...
#     nginx-handbook-box: Warning: Connection reset. Retrying...
#     nginx-handbook-box:
#     nginx-handbook-box: Vagrant insecure key detected. Vagrant will automatically replace
#     nginx-handbook-box: this with a newly generated keypair for better security.
#     nginx-handbook-box:
#     nginx-handbook-box: Inserting generated public key within guest...
#     nginx-handbook-box: Removing insecure key from the guest if it's present...
#     nginx-handbook-box: Key inserted! Disconnecting and reconnecting using new SSH key...
# ==> nginx-handbook-box: Machine booted and ready!
# ==> nginx-handbook-box: Checking for guest additions in VM...
# ==> nginx-handbook-box: Setting hostname...
# ==> nginx-handbook-box: Configuring and enabling network interfaces...
# ==> nginx-handbook-box: Mounting shared folders...
#     nginx-handbook-box: /vagrant => /home/fhsinchy/vagrant/nginx-handbook

vagrant status

# Current machine states:

# nginx-handbook-box           running (virtualbox)
The output of the vagrant up command may differ on your system, but as long as vagrant status says the machine is running, you're good to go.
Given that the virtual machine is now running, you should be able to SSH into it. To do so, execute the following command:
vagrant ssh nginx-handbook-box

# Welcome to Ubuntu 20.04.2 LTS (GNU/Linux 5.4.0-72-generic x86_64)
# vagrant@nginx-handbook-box:~$
If everything's done correctly you should be logged into your virtual machine, which will be evident by the vagrant@nginx-handbook-box line on your terminal.
This virtual machine will be accessible on http://192.168.20.20 on your local machine. You can even assign a custom domain like http://nginx-handbook.test to the virtual machine by adding an entry to your hosts file:
# on mac and linux terminal
sudo nano /etc/hosts

# on windows command prompt as administrator
notepad c:\windows\system32\drivers\etc\hosts
Now append the following line at the end of the file:
192.168.20.20 nginx-handbook.test
Now you should be able to access the virtual machine on http://nginx-handbook.test URI in your browser.
You can stop or destroy the virtual machine by executing the following commands inside the working directory:
# to stop the virtual machine
vagrant halt

# to destroy the virtual machine
vagrant destroy
If you want to learn about more Vagrant commands, this cheat sheet may come in handy.
Now that you have a functioning Ubuntu virtual machine on your system, all that is left to do is install NGINX.
How to Provision a Virtual Private Server
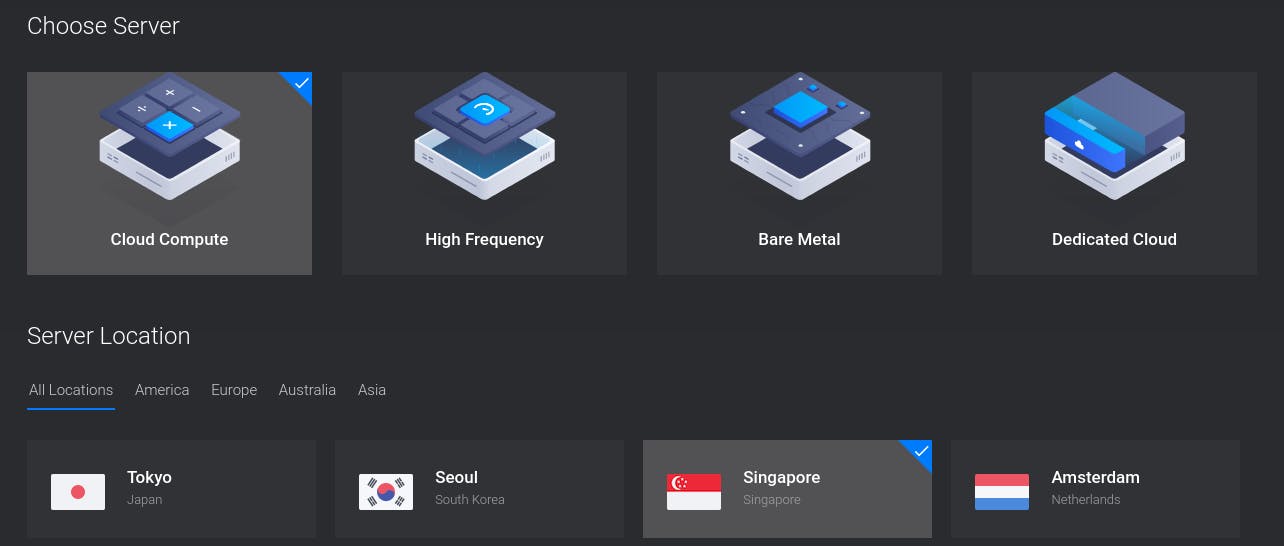
For this demonstration, I'll use Vultr as my provider but you may use DigitalOcean or whatever provider you like.
Assuming you already have an account with your provider, log into the account and deploy a new server:

On DigitalOcean, it's usually called a droplet. On the next screen, choose a location close to you. I live in Bangladesh which is why I've chosen Singapore:
On the next step, you'll have to choose the operating system and server size. Choose Ubuntu 20.04 and the smallest possible server size:
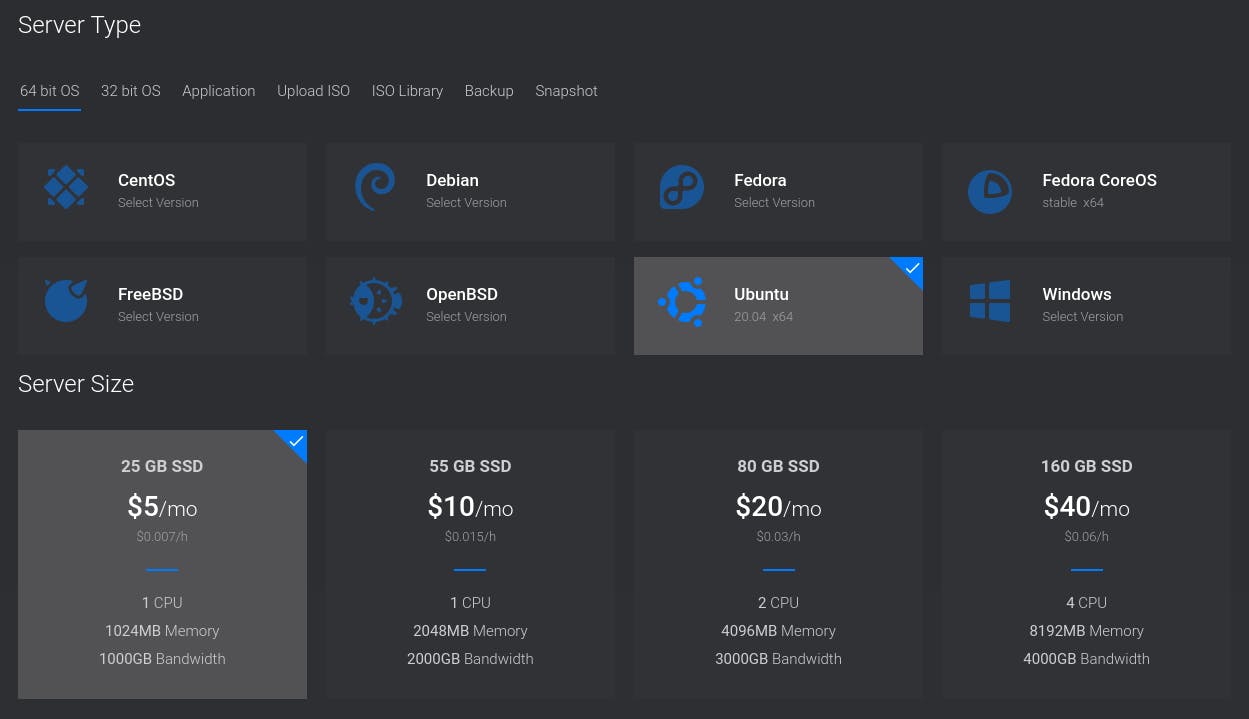
Although production servers tend to be much bigger and more powerful than this, a tiny server will be more than enough for this article.
Finally, for the last step, put something fitting like nginx-hadnbook-demo-server as the server host and label. You can even leave them empty if you want.
Once you're happy with your choices, go ahead and press the Deploy Now button.
The deployment process may take some time to finish, but once it's done, you'll see the newly created server on your dashboard:
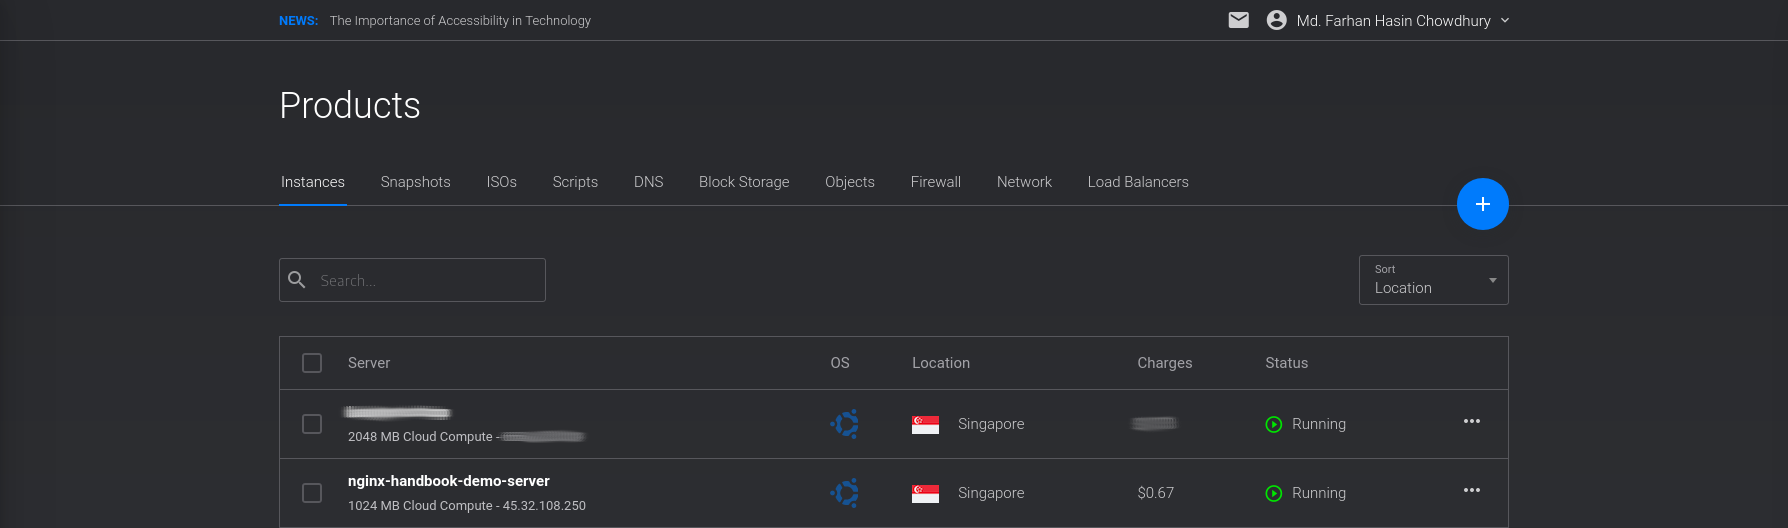
Also pay attention to the Status – it should say Running and not Preparing or Stopped. To connect to the server, you'll need a username and password.
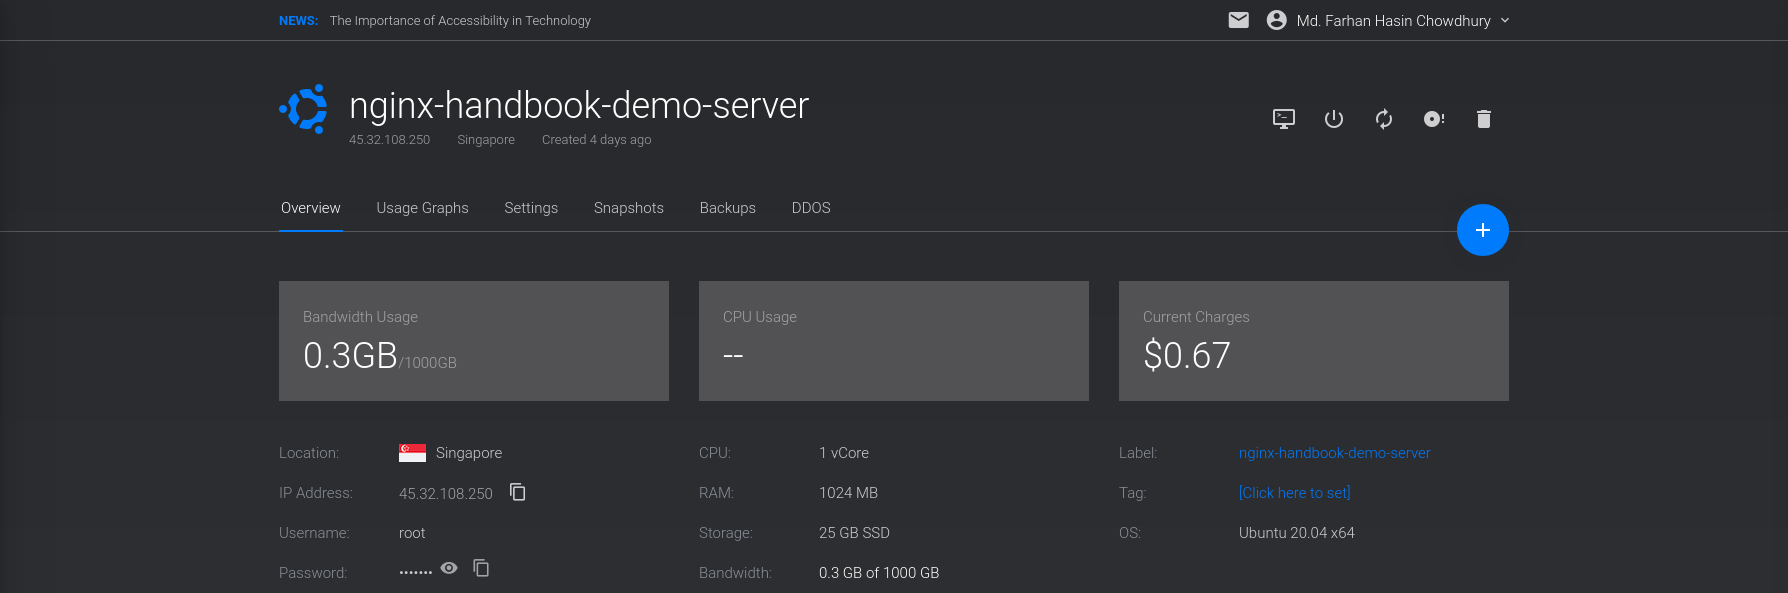
Go into the overview page for your server and there you should see the server's IP address, username, and password:
The generic command for logging into a server using SSH is as follows:
ssh <username>@<ip address>
So in the case of my server, it'll be:
ssh root@45.77.251.108

# Are you sure you want to continue connecting (yes/no/[fingerprint])? yes
# Warning: Permanently added '45.77.251.108' (ECDSA) to the list of known hosts.

# root@45.77.251.108's password:
# Welcome to Ubuntu 20.04.2 LTS (GNU/Linux 5.4.0-65-generic x86_64)

# root@localhost:~#
You'll be asked if you want to continue connecting to this server or not. Answer with yes and then you'll be asked for the password. Copy the password from the server overview page and paste that into your terminal.
If you do everything correctly you should be logged into your server – you'll see the root@localhost line on your terminal. Here localhost is the server host name, and may differ in your case.
You can access this server directly by its IP address. Or if you own any custom domain, you can use that also.
Throughout the article you'll see me adding test domains to my operating system's hosts file. In case of a real server, you'll have to configure those servers using your DNS provider.
Remember that you'll be charged as long as this server is being used. Although the charge should be very small, I'm warning you anyways. You can destroy the server anytime you want by hitting the trash icon on the server overview page:

If you own a custom domain name, you may assign a sub-domain to this server. Now that you're inside the server, all that is left to is install NGINX.
How to Install NGINX on a Provisioned Server or Virtual Machine
Assuming you're logged into your server or virtual machine, the first thing you should do is performing an update. Execute the following command to do so:
sudo apt update && sudo apt upgrade -y
After the update, install NGINX by executing the following command:
sudo apt install nginx -y
Once the installation is done, NGINX should be automatically registered as a systemd service and should be running. To check, execute the following command:
sudo systemctl status nginx

# ● nginx.service - A high performance web server and a reverse proxy server
#      Loaded: loaded (/lib/systemd/system/nginx.service; enabled; vendor preset: enabled)
#      Active: active (running)
If the status says running, then you're good to go. Otherwise you may start the service by executing this command:
sudo systemctl start nginx
Finally for a visual verification that everything is working properly, visit your server/virtual machine with your favorite browser and you should see NGINX's default welcome page:

NGINX is usually installed on the /etc/nginx directory and the majority of our work in the upcoming sections will be done in here.
Congratulations! Bow you have NGINX up and running on your server/virtual machine. Now it's time to jump head first into NGINX.
Introduction to NGINX's Configuration Files
As a web server, NGINX's job is to serve static or dynamic contents to the clients. But how that content are going to be served is usually controlled by configuration files.
NGINX's configuration files end with the .conf extension and usually live inside the /etc/nginx/ directory. Let's begin by cding into this directory and getting a list of all the files:
cd /etc/nginx

ls -lh

# drwxr-xr-x 2 root root 4.0K Apr 21  2020 conf.d
# -rw-r--r-- 1 root root 1.1K Feb  4  2019 fastcgi.conf
# -rw-r--r-- 1 root root 1007 Feb  4  2019 fastcgi_params
# -rw-r--r-- 1 root root 2.8K Feb  4  2019 koi-utf
# -rw-r--r-- 1 root root 2.2K Feb  4  2019 koi-win
# -rw-r--r-- 1 root root 3.9K Feb  4  2019 mime.types
# drwxr-xr-x 2 root root 4.0K Apr 21  2020 modules-available
# drwxr-xr-x 2 root root 4.0K Apr 17 14:42 modules-enabled
# -rw-r--r-- 1 root root 1.5K Feb  4  2019 nginx.conf
# -rw-r--r-- 1 root root  180 Feb  4  2019 proxy_params
# -rw-r--r-- 1 root root  636 Feb  4  2019 scgi_params
# drwxr-xr-x 2 root root 4.0K Apr 17 14:42 sites-available
# drwxr-xr-x 2 root root 4.0K Apr 17 14:42 sites-enabled
# drwxr-xr-x 2 root root 4.0K Apr 17 14:42 snippets
# -rw-r--r-- 1 root root  664 Feb  4  2019 uwsgi_params
# -rw-r--r-- 1 root root 3.0K Feb  4  2019 win-utf
Among these files, there should be one named nginx.conf. This is the the main configuration file for NGINX. You can have a look at the content of this file using the cat program:
cat nginx.conf

# user www-data;
# worker_processes auto;
# pid /run/nginx.pid;
# include /etc/nginx/modules-enabled/*.conf;

# events {
#     worker_connections 768;
#     # multi_accept on;
# }

# http {

#     ##
#     # Basic Settings
#     ##

#     sendfile on;
#     tcp_nopush on;
#     tcp_nodelay on;
#     keepalive_timeout 65;
#     types_hash_max_size 2048;
#     # server_tokens off;

#     # server_names_hash_bucket_size 64;
#     # server_name_in_redirect off;

#     include /etc/nginx/mime.types;
#     default_type application/octet-stream;

#     ##
#     # SSL Settings
#     ##

#     ssl_protocols TLSv1 TLSv1.1 TLSv1.2 TLSv1.3; # Dropping SSLv3, ref: POODLE
#     ssl_prefer_server_ciphers on;

#     ##
#     # Logging Settings
#     ##

#     access_log /var/log/nginx/access.log;
#     error_log /var/log/nginx/error.log;

#     ##
#     # Gzip Settings
#     ##

#     gzip on;

#     # gzip_vary on;
#     # gzip_proxied any;
#     # gzip_comp_level 6;
#     # gzip_buffers 16 8k;
#     # gzip_http_version 1.1;
#     # gzip_types text/plain text/css application/json application/javascript text/xml application/xml application/xml+rss text/javascript;

#     ##
#     # Virtual Host Configs
#     ##

#     include /etc/nginx/conf.d/*.conf;
#     include /etc/nginx/sites-enabled/*;
# }


# #mail {
# #    # See sample authentication script at:
# #    # http://wiki.nginx.org/ImapAuthenticateWithApachePhpScript
# #
# #    # auth_http localhost/auth.php;
# #    # pop3_capabilities "TOP" "USER";
# #    # imap_capabilities "IMAP4rev1" "UIDPLUS";
# #
# #    server {
# #        listen     localhost:110;
# #        protocol   pop3;
# #        proxy      on;
# #    }
# #
# #    server {
# #        listen     localhost:143;
# #        protocol   imap;
# #        proxy      on;
# #    }
# #}
Whoa! That's a lot of stuff. Trying to understand this file at its current state will be a nightmare. So let's rename the file and create a new empty one:
# renames the file
sudo mv nginx.conf nginx.conf.backup

# creates a new file
sudo touch nginx.conf
I highly discourage you from editing the original nginx.conf file unless you absolutely know what you're doing. For learning purposes, you may rename it, but later on, I'll show you how you should go about configuring a server in a real life scenario.
How to Configure a Basic Web Server
In this section of the book, you'll finally get your hands dirty by configuring a basic static web server from the ground up. The goal of this section is to introduce you to the syntax and fundamental concepts of NGINX configuration files.
How to Write Your First Configuration File
Start by opening the newly created nginx.conf file using the nano text editor:
sudo nano /etc/nginx/nginx.conf
Throughout the book, I'll be using nano as my text editor. You may use something more modern if you want to, but in a real life scenario, you're most likely to work using nano or vim on servers instead of anything else. So use this book as an opportunity to sharpen your nano skills. Also the official cheat sheet is there for you to consult whenever you need.
After opening the file, update its content to look like this:
events {

}

http {

    server {

        listen 80;
        server_name nginx-handbook.test;

        return 200 "Bonjour, mon ami!\n";
    }

}
If you have experience building REST APIs then you may guess from the return 200 "Bonjour, mon ami!\n"; line that the server has been configured to respond with a status code of 200 and the message "Bonjour, mon ami!".
Don't worry if you don't understand anything more than that at the moment. I'll explain this file line by line, but first let's see this configuration in action.
How to Validate and Reload Configuration Files
After writing a new configuration file or updating an old one, the first thing to do is check the file for any syntax mistakes. The nginx binary includes an option -t to do just that.
sudo nginx -t

# nginx: the configuration file /etc/nginx/nginx.conf syntax is ok
# nginx: configuration file /etc/nginx/nginx.conf test is successful
If you have any syntax errors, this command will let you know about them, including the line number.
Although the configuration file is fine, NGINX will not use it. The way NGINX works is it reads the configuration file once and keeps working based on that.
If you update the configuration file, then you'll have to instruct NGINX explicitly to reload the configuration file. There are two ways to do that.
- You can restart the NGINX service by executing the
sudo systemctl restart nginxcommand. - You can dispatch a
reloadsignal to NGINX by executing thesudo nginx -s reloadcommand.
The -s option is used for dispatching various signals to NGINX. The available signals are stop, quit, reload and reopen. Among the two ways I just mentioned, I prefer the second one simply because it's less typing.
Once you've reloaded the configuration file by executing the nginx -s reload command, you can see it in action by sending a simple get request to the server:
curl -i http://nginx-handbook.test

# HTTP/1.1 200 OK
# Server: nginx/1.18.0 (Ubuntu)
# Date: Wed, 21 Apr 2021 10:03:33 GMT
# Content-Type: text/plain
# Content-Length: 18
# Connection: keep-alive

# Bonjour, mon ami!
The server is responding with a status code of 200 and the expected message. Congratulations on getting this far! Now it's time for some explanation.
How to Understand Directives and Contexts in NGINX
The few lines of code you've written here, although seemingly simple, introduce two of the most important terminologies of NGINX configuration files. They are directives and contexts.
Technically, everything inside a NGINX configuration file is a directive. Directives are of two types:
- Simple Directives
- Block Directives
A simple directive consists of the directive name and the space delimited parameters, like listen, return and others. Simple directives are terminated by semicolons.
Block directives are similar to simple directives, except that instead of ending with semicolons, they end with a pair of curly braces { } enclosing additional instructions.
A block directive capable of containing other directives inside it is called a context, that is events, http and so on. There are four core contexts in NGINX:
events { }– Theeventscontext is used for setting global configuration regarding how NGINX is going to handle requests on a general level. There can be only oneeventscontext in a valid configuration file.http { }– Evident by the name,httpcontext is used for defining configuration regarding how the server is going to handle HTTP and HTTPS requests, specifically. There can be only onehttpcontext in a valid configuration file.server { }– Theservercontext is nested inside thehttpcontext and used for configuring specific virtual servers within a single host. There can be multipleservercontexts in a valid configuration file nested inside thehttpcontext. Eachservercontext is considered a virtual host.main– Themaincontext is the configuration file itself. Anything written outside of the three previously mentioned contexts is on themaincontext.
You can treat contexts in NGINX like scopes in other programming languages. There is also a sense of inheritance among them. You can find an alphabetical index of directives on the official NGINX docs.
I've already mentioned that there can be multiple server contexts within a configuration file. But when a request reaches the server, how does NGINX know which one of those contexts should handle the request?
The listen directive is one of the ways to identify the correct server context within a configuration. Consider the following scenario:
http {
    server {
        listen 80;
        server_name nginx-handbook.test;

        return 200 "hello from port 80!\n";
    }


    server {
        listen 8080;
        server_name nginx-handbook.test;

        return 200 "hello from port 8080!\n";
    }
}
Now if you send a request to http://nginx-handbook.test:80 then you'll receive "hello from port 80!" as a response. And if you send a request to http://nginx-handbook.test:8080, you'll receive "hello from port 8080!" as a response:
curl nginx-handbook.test:80

# hello from port 80!

curl nginx-handbook.test:8080

# hello from port 8080!
These two server blocks are like two people holding telephone receivers, waiting to respond when a request reaches one of their numbers. Their numbers are indicated by the listen directives.
Apart from the listen directive, there is also the server_name directive. Consider the following scenario of an imaginary library management application:
http {
    server {
        listen 80;
        server_name library.test;

        return 200 "your local library!\n";
    }


    server {
        listen 80;
        server_name librarian.library.test;

        return 200 "welcome dear librarian!\n";
    }
}
This is a basic example of the idea of virtual hosts. You're running two separate applications under different server names in the same server.
If you send a request to http://library.test then you'll get "your local library!" as a response. If you send a request to http://librarian.library.test, you'll get "welcome dear librarian!" as a response.
curl http://library.test

# your local library!

curl http://librarian.library.test

# welcome dear librarian!
To make this demo work on your system, you'll have to update your hosts file to include these two domain names as well:
192.168.20.20   library.test
192.168.20.20   librarian.library.test
Finally, the return directive is responsible for returning a valid response to the user. This directive takes two parameters: the status code and the string message to be returned.
How to Serve Static Content Using NGINX
Now that you have a good understanding of how to write a basic configuration file for NGINX, let's upgrade the configuration to serve static files instead of plain text responses.
In order to serve static content, you first have to store them somewhere on your server. If you list the files and directory on the root of your server using ls, you'll find a directory called /srv in there:
ls -lh /

# lrwxrwxrwx   1 root    root       7 Apr 16 02:10 bin -> usr/bin
# drwxr-xr-x   3 root    root    4.0K Apr 16 02:13 boot
# drwxr-xr-x  16 root    root    3.8K Apr 21 09:23 dev
# drwxr-xr-x  92 root    root    4.0K Apr 21 09:24 etc
# drwxr-xr-x   4 root    root    4.0K Apr 21 08:04 home
# lrwxrwxrwx   1 root    root       7 Apr 16 02:10 lib -> usr/lib
# lrwxrwxrwx   1 root    root       9 Apr 16 02:10 lib32 -> usr/lib32
# lrwxrwxrwx   1 root    root       9 Apr 16 02:10 lib64 -> usr/lib64
# lrwxrwxrwx   1 root    root      10 Apr 16 02:10 libx32 -> usr/libx32
# drwx------   2 root    root     16K Apr 16 02:15 lost+found
# drwxr-xr-x   2 root    root    4.0K Apr 16 02:10 media
# drwxr-xr-x   2 root    root    4.0K Apr 16 02:10 mnt
# drwxr-xr-x   2 root    root    4.0K Apr 16 02:10 opt
# dr-xr-xr-x 152 root    root       0 Apr 21 09:23 proc
# drwx------   5 root    root    4.0K Apr 21 09:59 root
# drwxr-xr-x  26 root    root     820 Apr 21 09:47 run
# lrwxrwxrwx   1 root    root       8 Apr 16 02:10 sbin -> usr/sbin
# drwxr-xr-x   6 root    root    4.0K Apr 16 02:14 snap
# drwxr-xr-x   2 root    root    4.0K Apr 16 02:10 srv
# dr-xr-xr-x  13 root    root       0 Apr 21 09:23 sys
# drwxrwxrwt  11 root    root    4.0K Apr 21 09:24 tmp
# drwxr-xr-x  15 root    root    4.0K Apr 16 02:12 usr
# drwxr-xr-x   1 vagrant vagrant   38 Apr 21 09:23 vagrant
# drwxr-xr-x  14 root    root    4.0K Apr 21 08:34 var
This /srv directory is meant to contain site-specific data which is served by this system. Now cd into this directory and clone the code repository that comes with this book:
cd /srv

sudo git clone https://github.com/fhsinchy/nginx-handbook-projects.git
Inside the nginx-handbook-projects directory there should a directory called static-demo containing four files in total:
ls -lh /srv/nginx-handbook-projects/static-demo

# -rw-r--r-- 1 root root 960 Apr 21 11:27 about.html
# -rw-r--r-- 1 root root 960 Apr 21 11:27 index.html
# -rw-r--r-- 1 root root 46K Apr 21 11:27 mini.min.css
# -rw-r--r-- 1 root root 19K Apr 21 11:27 the-nginx-handbook.jpg
Now that you have the static content to be served, update your configuration as follows:
events {

}

http {

    server {

        listen 80;
        server_name nginx-handbook.test;

        root /srv/nginx-handbook-projects/static-demo;
    }

}
The code is almost the same, except the return directive has now been replaced by a root directive. This directive is used for declaring the root directory for a site.
By writing root /srv/nginx-handbook-projects/static-demo you're telling NGINX to look for files to serve inside the /srv/nginx-handbook-projects/static-demo directory if any request comes to this server. Since NGINX is a web server, it is smart enough to serve the index.html file by default.
Let's see if this works or not. Test and reload the updated configuration file and visit the server. You should be greeted with a somewhat broken HTML site:

Although NGINX has served the index.html file correctly, judging by the look of the three navigation links, it seems like the CSS code is not working.
You may think that there is something wrong in the CSS file. But in reality, the problem is in the configuration file.
Static File Type Handling in NGINX
To debug the issue you're facing right now, send a request for the CSS file to the server:
curl -I http://nginx-handbook/mini.min.css

# HTTP/1.1 200 OK
# Server: nginx/1.18.0 (Ubuntu)
# Date: Wed, 21 Apr 2021 12:17:16 GMT
# Content-Type: text/plain
# Content-Length: 46887
# Last-Modified: Wed, 21 Apr 2021 11:27:06 GMT
# Connection: keep-alive
# ETag: "60800c0a-b727"
# Accept-Ranges: bytes
Pay attention to the Content-Type and see how it says text/plain and not text/css. This means that NGINX is serving this file as plain text instead of as a stylesheet.
Although NGINX is smart enough to find the index.html file by default, it's pretty dumb when it comes to interpreting file types. To solve this problem update your configuration once again:
events {

}

http {

    types {
        text/html html;
        text/css css;
    }

    server {

        listen 80;
        server_name nginx-handbook.test;

        root /srv/nginx-handbook-projects/static-demo;
    }
}
The only change we've made to the code is a new types context nested inside the http block. As you may have already guessed from the name, this context is used for configuring file types.
By writing text/html html in this context you're telling NGINX to parse any file as text/html that ends with the html extension.
You may think that configuring the CSS file type should suffice as the HTML is being parsed just fine – but no.
If you introduce a types context in the configuration, NGINX becomes even dumber and only parses the files configured by you. So if you only define the text/css css in this context then NGINX will start parsing the HTML file as plain text.
Validate and reload the newly updated config file and visit the server once again. Send a request for the CSS file once again, and this time the file should be parsed as a text/css file:
curl -I http://nginx-handbook.test/mini.min.css

# HTTP/1.1 200 OK
# Server: nginx/1.18.0 (Ubuntu)
# Date: Wed, 21 Apr 2021 12:29:35 GMT
# Content-Type: text/css
# Content-Length: 46887
# Last-Modified: Wed, 21 Apr 2021 11:27:06 GMT
# Connection: keep-alive
# ETag: "60800c0a-b727"
# Accept-Ranges: bytes
Visit the server for a visual verification, and the site should look better this time:

If you've updated and reloaded the configuration file correctly and you're still seeing the old site, perform a hard refresh.
How to Include Partial Config Files
Mapping file types within the types context may work for small projects, but for bigger projects it can be cumbersome and error-prone.
NGINX provides a solution for this problem. If you list the files inside the /etc/nginx directory once again, you'll see a file named mime.types.
ls -lh /etc/nginx

# drwxr-xr-x 2 root root 4.0K Apr 21  2020 conf.d
# -rw-r--r-- 1 root root 1.1K Feb  4  2019 fastcgi.conf
# -rw-r--r-- 1 root root 1007 Feb  4  2019 fastcgi_params
# -rw-r--r-- 1 root root 2.8K Feb  4  2019 koi-utf
# -rw-r--r-- 1 root root 2.2K Feb  4  2019 koi-win
# -rw-r--r-- 1 root root 3.9K Feb  4  2019 mime.types
# drwxr-xr-x 2 root root 4.0K Apr 21  2020 modules-available
# drwxr-xr-x 2 root root 4.0K Apr 17 14:42 modules-enabled
# -rw-r--r-- 1 root root 1.5K Feb  4  2019 nginx.conf
# -rw-r--r-- 1 root root  180 Feb  4  2019 proxy_params
# -rw-r--r-- 1 root root  636 Feb  4  2019 scgi_params
# drwxr-xr-x 2 root root 4.0K Apr 17 14:42 sites-available
# drwxr-xr-x 2 root root 4.0K Apr 17 14:42 sites-enabled
# drwxr-xr-x 2 root root 4.0K Apr 17 14:42 snippets
# -rw-r--r-- 1 root root  664 Feb  4  2019 uwsgi_params
# -rw-r--r-- 1 root root 3.0K Feb  4  2019 win-utf
Let's have a look at the content of this file:
cat /etc/mime.types

# types {
#     text/html                             html htm shtml;
#     text/css                              css;
#     text/xml                              xml;
#     image/gif                             gif;
#     image/jpeg                            jpeg jpg;
#     application/javascript                js;
#     application/atom+xml                  atom;
#     application/rss+xml                   rss;

#     text/mathml                           mml;
#     text/plain                            txt;
#     text/vnd.sun.j2me.app-descriptor      jad;
#     text/vnd.wap.wml                      wml;
#     text/x-component                      htc;

#     image/png                             png;
#     image/tiff                            tif tiff;
#     image/vnd.wap.wbmp                    wbmp;
#     image/x-icon                          ico;
#     image/x-jng                           jng;
#     image/x-ms-bmp                        bmp;
#     image/svg+xml                         svg svgz;
#     image/webp                            webp;

#     application/font-woff                 woff;
#     application/java-archive              jar war ear;
#     application/json                      json;
#     application/mac-binhex40              hqx;
#     application/msword                    doc;
#     application/pdf                       pdf;
#     application/postscript                ps eps ai;
#     application/rtf                       rtf;
#     application/vnd.apple.mpegurl         m3u8;
#     application/vnd.ms-excel              xls;
#     application/vnd.ms-fontobject         eot;
#     application/vnd.ms-powerpoint         ppt;
#     application/vnd.wap.wmlc              wmlc;
#     application/vnd.google-earth.kml+xml  kml;
#     application/vnd.google-earth.kmz      kmz;
#     application/x-7z-compressed           7z;
#     application/x-cocoa                   cco;
#     application/x-java-archive-diff       jardiff;
#     application/x-java-jnlp-file          jnlp;
#     application/x-makeself                run;
#     application/x-perl                    pl pm;
#     application/x-pilot                   prc pdb;
#     application/x-rar-compressed          rar;
#     application/x-redhat-package-manager  rpm;
#     application/x-sea                     sea;
#     application/x-shockwave-flash         swf;
#     application/x-stuffit                 sit;
#     application/x-tcl                     tcl tk;
#     application/x-x509-ca-cert            der pem crt;
#     application/x-xpinstall               xpi;
#     application/xhtml+xml                 xhtml;
#     application/xspf+xml                  xspf;
#     application/zip                       zip;

#     application/octet-stream              bin exe dll;
#     application/octet-stream              deb;
#     application/octet-stream              dmg;
#     application/octet-stream              iso img;
#     application/octet-stream              msi msp msm;

#     application/vnd.openxmlformats-officedocument.wordprocessingml.document    docx;
#     application/vnd.openxmlformats-officedocument.spreadsheetml.sheet          xlsx;
#     application/vnd.openxmlformats-officedocument.presentationml.presentation  pptx;

#     audio/midi                            mid midi kar;
#     audio/mpeg                            mp3;
#     audio/ogg                             ogg;
#     audio/x-m4a                           m4a;
#     audio/x-realaudio                     ra;

#     video/3gpp                            3gpp 3gp;
#     video/mp2t                            ts;
#     video/mp4                             mp4;
#     video/mpeg                            mpeg mpg;
#     video/quicktime                       mov;
#     video/webm                            webm;
#     video/x-flv                           flv;
#     video/x-m4v                           m4v;
#     video/x-mng                           mng;
#     video/x-ms-asf                        asx asf;
#     video/x-ms-wmv                        wmv;
#     video/x-msvideo                       avi;
# }
The file contains a long list of file types and their extensions. To use this file inside your configuration file, update your configuration to look as follows:
events {

}

http {

    include /etc/nginx/mime.types;

    server {

        listen 80;
        server_name nginx-handbook.test;

        root /srv/nginx-handbook-projects/static-demo;
    }

}
The old types context has now been replaced with a new include directive. Like the name suggests, this directive allows you to include content from other configuration files.
Validate and reload the configuration file and send a request for the mini.min.css file once again:
curl -I http://nginx-handbook.test/mini.min.css

# HTTP/1.1 200 OK
# Server: nginx/1.18.0 (Ubuntu)
# Date: Wed, 21 Apr 2021 12:29:35 GMT
# Content-Type: text/css
# Content-Length: 46887
# Last-Modified: Wed, 21 Apr 2021 11:27:06 GMT
# Connection: keep-alive
# ETag: "60800c0a-b727"
# Accept-Ranges: bytes
In the section below on how to understand the main configuration file, I'll demonstrate how include can be used to modularize your virtual server configurations.
Dynamic Routing in NGINX
The configuration you wrote in the previous section was a very simple static content server configuration. All it did was match a file from the site root corresponding to the URI the client visits and respond back.
So if the client requests files existing on the root such as index.html, about.html or mini.min.css NGINX will return the file. But if you visit a route such as http://nginx-handbook.test/nothing, it'll respond with the default 404 page:

In this section of the book, you'll learn about the location context, variables, redirects, rewrites and the try_files directive. There will be no new projects in this section but the concepts you learn here will be necessary in the upcoming sections.
Also the configuration will change very frequently in this section, so do not forget to validate and reload the configuration file after every update.
Location Matches
The first concept we'll discuss in this section is the location context. Update the configuration as follows:
events {

}

http {

    server {

        listen 80;
        server_name nginx-handbook.test;

        location /agatha {
            return 200 "Miss Marple.\nHercule Poirot.\n";
        }
    }
}
We've replaced the root directive with a new location context. This context is usually nested inside server blocks. There can be multiple location contexts within a server context.
If you send a request to http://nginx-handbook.test/agatha, you'll get a 200 response code and list of characters created by Agatha Christie.
curl -i http://nginx-handbook.test/agatha

# HTTP/1.1 200 OK
# Server: nginx/1.18.0 (Ubuntu)
# Date: Wed, 21 Apr 2021 15:59:07 GMT
# Content-Type: text/plain
# Content-Length: 29
# Connection: keep-alive

# Miss Marple.
# Hercule Poirot.
Now if you send a request to http://nginx-handbook.test/agatha-christie, you'll get the same response:
curl -i http://nginx-handbook.test/agatha-christie

# HTTP/1.1 200 OK
# Server: nginx/1.18.0 (Ubuntu)
# Date: Wed, 21 Apr 2021 15:59:07 GMT
# Content-Type: text/plain
# Content-Length: 29
# Connection: keep-alive

# Miss Marple.
# Hercule Poirot.
This happens because, by writing location /agatha, you're telling NGINX to match any URI starting with "agatha". This kind of match is called a prefix match.
To perform an exact match, you'll have to update the code as follows:
events {

}

http {

    server {

        listen 80;
        server_name nginx-handbook.test;

        location = /agatha {
            return 200 "Miss Marple.\nHercule Poirot.\n";
        }
    }

}
Adding an = sign before the location URI will instruct NGINX to respond only if the URL matches exactly. Now if you send a request to anything but /agatha, you'll get a 404 response.
curl -I http://nginx-handbook.test/agatha-christie

# HTTP/1.1 404 Not Found
# Server: nginx/1.18.0 (Ubuntu)
# Date: Wed, 21 Apr 2021 16:14:29 GMT
# Content-Type: text/html
# Content-Length: 162
# Connection: keep-alive

curl -I http://nginx-handbook.test/agatha

# HTTP/1.1 200 OK
# Server: nginx/1.18.0 (Ubuntu)
# Date: Wed, 21 Apr 2021 16:15:04 GMT
# Content-Type: text/plain
# Content-Length: 29
# Connection: keep-alive
Another kind of match in NGINX is the regex match. Using this match you can check location URLs against complex regular expressions.
events {

}

http {

    server {

        listen 80;
        server_name nginx-handbook.test;

        location ~ /agatha[0-9] {
            return 200 "Miss Marple.\nHercule Poirot.\n";
        }
    }

}
By replacing the previously used = sign with a ~ sign, you're telling NGINX to perform a regular expression match. Setting the location to ~ /agatha[0-9] means NIGINX will only respond if there is a number after the word "agatha":
curl -I http://nginx-handbook.test/agatha

# HTTP/1.1 404 Not Found
# Server: nginx/1.18.0 (Ubuntu)
# Date: Wed, 21 Apr 2021 16:14:29 GMT
# Content-Type: text/html
# Content-Length: 162
# Connection: keep-alive

curl -I http://nginx-handbook.test/agatha8

# HTTP/1.1 200 OK
# Server: nginx/1.18.0 (Ubuntu)
# Date: Wed, 21 Apr 2021 16:15:04 GMT
# Content-Type: text/plain
# Content-Length: 29
# Connection: keep-alive
A regex match is by default case sensitive, which means that if you capitalize any of the letters, the location won't work:
curl -I http://nginx-handbook.test/Agatha8

# HTTP/1.1 404 Not Found
# Server: nginx/1.18.0 (Ubuntu)
# Date: Wed, 21 Apr 2021 16:14:29 GMT
# Content-Type: text/html
# Content-Length: 162
# Connection: keep-alive
To turn this into case insensitive, you'll have to add a * after the ~ sign.
events {

}

http {

    server {

        listen 80;
        server_name nginx-handbook.test;

        location ~* /agatha[0-9] {
            return 200 "Miss Marple.\nHercule Poirot.\n";
        }
    }

}
That will tell NGINX to let go of type sensitivity and match the location anyways.
curl -I http://nginx-handbook.test/agatha8

# HTTP/1.1 200 OK
# Server: nginx/1.18.0 (Ubuntu)
# Date: Wed, 21 Apr 2021 16:15:04 GMT
# Content-Type: text/plain
# Content-Length: 29
# Connection: keep-alive

curl -I http://nginx-handbook.test/Agatha8

# HTTP/1.1 200 OK
# Server: nginx/1.18.0 (Ubuntu)
# Date: Wed, 21 Apr 2021 16:15:04 GMT
# Content-Type: text/plain
# Content-Length: 29
# Connection: keep-alive
NGINX assigns priority values to these matches, and a regex match has more priority than a prefix match.
events {

}

http {

    server {

        listen 80;
        server_name nginx-handbook.test;

        location /Agatha8 {
            return 200 "prefix matched.\n";
        }

        location ~* /agatha[0-9] {
            return 200 "regex matched.\n";
        }
    }

}
Now if you send a request to http://nginx-handbook.test/Agatha8, you'll get the following response:
curl -i http://nginx-handbook.test/Agatha8

# HTTP/1.1 200 OK
# Server: nginx/1.18.0 (Ubuntu)
# Date: Thu, 22 Apr 2021 08:08:18 GMT
# Content-Type: text/plain
# Content-Length: 15
# Connection: keep-alive

# regex matched.
But this priority can be changed a little. The final type of match in NGINX is a preferential prefix match. To turn a prefix match into a preferential one, you need to include the ^~ modifier before the location URI:
events {

}

http {

    server {

        listen 80;
        server_name nginx-handbook.test;

        location ^~ /Agatha8 {
            return 200 "prefix matched.\n";
        }

        location ~* /agatha[0-9] {
            return 200 "regex matched.\n";
        }
    }

}
Now if you send a request to http://nginx-handbook.test/Agatha8, you'll get the following response:
curl -i http://nginx-handbook.test/Agatha8

# HTTP/1.1 200 OK
# Server: nginx/1.18.0 (Ubuntu)
# Date: Thu, 22 Apr 2021 08:13:24 GMT
# Content-Type: text/plain
# Content-Length: 16
# Connection: keep-alive

# prefix matched.
This time, the prefix match wins. So the list of all the matches in descending order of priority is as follows:
| Match | Modifier |
| Exact | = |
| Preferential Prefix | ^~ |
| REGEX | ~ or ~* |
| Prefix | None |
Variables in NGINX
Variables in NGINX are similar to variables in other programming languages. The set directive can be used to declare new variables anywhere within the configuration file:
set $<variable_name> <variable_value>;

# set name "Farhan"
# set age 25
# set is_working true
Variables can be of three types
- String
- Integer
- Boolean
Apart from the variables you declare, there are embedded variables within NGINX modules. An alphabetical index of variables is available in the official documentation.
To see some of the variables in action, update the configuration as follows:
events {

}

http {

    server {

        listen 80;
        server_name nginx-handbook.test;

        return 200 "Host - $host\nURI - $uri\nArgs - $args\n";
    }

}
Now upon sending a request to the server, you should get a response as follows:
# curl http://nginx-handbook.test/user?name=Farhan

# Host - nginx-handbook.test
# URI - /user
# Args - name=Farhan
As you can see, the $host and $uri variables hold the root address and the requested URI relative to the root, respectively. The $args variable, as you can see, contains all the query strings.
Instead of printing the literal string form of the query strings, you can access the individual values using the $arg variable.
events {

}

http {

    server {

        listen 80;
        server_name nginx-handbook.test;

        set $name $arg_name; # $arg_<query string name>

        return 200 "Name - $name\n";
    }

}
Now the response from the server should look like as follows:
curl http://nginx-handbook.test?name=Farhan

# Name - Farhan
The variables I demonstrated here are embedded in the ngx_http_core_module. For a variable to be accessible in the configuration, NGINX has to be built with the module embedding the variable. Building NGINX from source and usage of dynamic modules is slightly out of scope for this article. But I'll surely write about that in my blog.
Redirects and Rewrites
A redirect in NGINX is same as redirects in any other platform. To demonstrate how redirects work, update your configuration to look like this:
events {

}

http {

    include /etc/nginx/mime.types;

    server {

        listen 80;
        server_name nginx-handbook.test;

        root /srv/nginx-handbook-projects/static-demo;

        location = /index_page {
                return 307 /index.html;
        }

        location = /about_page {
                return 307 /about.html;
        }
    }
}
Now if you send a request to http://nginx-handbook.test/about_page, you'll be redirected to http://nginx-handbook.test/about.html:
curl -I http://nginx-handbook.test/about_page

# HTTP/1.1 307 Temporary Redirect
# Server: nginx/1.18.0 (Ubuntu)
# Date: Thu, 22 Apr 2021 18:02:04 GMT
# Content-Type: text/html
# Content-Length: 180
# Location: http://nginx-handbook.test/about.html
# Connection: keep-alive
As you can see, the server responded with a status code of 307 and the location indicates http://nginx-handbook.test/about.html. If you visit http://nginx-handbook.test/about_page from a browser, you'll see that the URL will automatically change to http://nginx-handbook.test/about.html.
A rewrite directive, however, works a little differently. It changes the URI internally, without letting the user know. To see it in action, update your configuration as follows:
events {

}

http {

    include /etc/nginx/mime.types;

    server {

        listen 80;
        server_name nginx-handbook.test;

        root /srv/nginx-handbook-projects/static-demo;

        rewrite /index_page /index.html;

        rewrite /about_page /about.html;
    }
}
Now if you send a request to http://nginx-handbook/about_page URI, you'll get a 200 response code and the HTML code for about.html file in response:
curl -i http://nginx-handbook.test/about_page

# HTTP/1.1 200 OK
# Server: nginx/1.18.0 (Ubuntu)
# Date: Thu, 22 Apr 2021 18:09:31 GMT
# Content-Type: text/html
# Content-Length: 960
# Last-Modified: Wed, 21 Apr 2021 11:27:06 GMT
# Connection: keep-alive
# ETag: "60800c0a-3c0"
# Accept-Ranges: bytes

# <!DOCTYPE html>
# <html lang="en">
# <head>
#     <meta charset="UTF-8">
#     <meta http-equiv="X-UA-Compatible" content="IE=edge">
#     <meta name="viewport" content="width=device-width, initial-scale=1.0">
#     <title>NGINX Handbook Static Demo</title>
#     <link rel="stylesheet" href="mini.min.css">
#     <style>
#         .container {
#             max-width: 1024px;
#             margin-left: auto;
#             margin-right: auto;
#         }
#
#         h1 {
#             text-align: center;
#         }
#     </style>
# </head>
# <body class="container">
#     <header>
#         <a class="button" href="index.html">Index</a>
#         <a class="button" href="about.html">About</a>
#         <a class="button" href="nothing">Nothing</a>
#     </header>
#     <div class="card fluid">
#         <img src="./the-nginx-handbook.jpg" alt="The NGINX Handbook Cover Image">
#     </div>
#     <div class="card fluid">
#         <h1>this is the <strong>about.html</strong> file</h1>
#     </div>
# </body>
# </html>
And if you visit the URI using a browser, you'll see the about.html page while the URL remains unchanged:

Apart from the way the URI change is handled, there is another difference between a redirect and rewrite. When a rewrite happens, the server context gets re-evaluated by NGINX. So, a rewrite is a more expensive operation than a redirect.
How to Try for Multiple Files
The final concept I'll be showing in this section is the try_files directive. Instead of responding with a single file, the try_files directive lets you check for the existence of multiple files.
events {

}

http {

    include /etc/nginx/mime.types;

    server {

        listen 80;
        server_name nginx-handbook.test;

        root /srv/nginx-handbook-projects/static-demo;

        try_files /the-nginx-handbook.jpg /not_found;

        location /not_found {
                return 404 "sadly, you've hit a brick wall buddy!\n";
        }
    }
}
As you can see, a new try_files directive has been added. By writing try_files /the-nginx-handbook.jpg /not_found; you're instructing NGINX to look for a file named the-nginx-handbook.jpg on the root whenever a request is received. If it doesn't exist, go to the /not_found location.
So now if you visit the server, you'll see the image:

But if you update the configuration to try for a non-existent file such as blackhole.jpg, you'll get a 404 response with the message "sadly, you've hit a brick wall buddy!".
Now the problem with writing a try_files directive this way is that no matter what URL you visit, as long as a request is received by the server and the the-nginx-handbook.jpg file is found on the disk, NGINX will send that back.

And that's why try_files is often used with the $uri NGINX variable.
events {

}

http {

    include /etc/nginx/mime.types;

    server {

        listen 80;
        server_name nginx-handbook.test;

        root /srv/nginx-handbook-projects/static-demo;

        try_files $uri /not_found;

        location /not_found {
                return 404 "sadly, you've hit a brick wall buddy!\n";
        }
    }
}
By writing try_files $uri /not_found; you're instructing NGINX to try for the URI requested by the client first. If it doesn't find that one, then try the next one.
So now if you visit http://nginx-handbook.test/index.html you should get the old index.html page. The same goes for the about.html page:

But if you request a file that doesn't exist, you'll get the response from the /not_found location:
curl -i http://nginx-handbook.test/nothing

# HTTP/1.1 404 Not Found
# Server: nginx/1.18.0 (Ubuntu)
# Date: Thu, 22 Apr 2021 20:01:57 GMT
# Content-Type: text/plain
# Content-Length: 38
# Connection: keep-alive

# sadly, you've hit a brick wall buddy!
One thing that you may have already noticed is that if you visit the server root http://nginx-handbook.test, you get the 404 response.
This is because when you're hitting the server root, the $uri variable doesn't correspond to any existing file so NGINX serves you the fallback location. If you want to fix this issue, update your configuration as follows:
events {

}

http {

    include /etc/nginx/mime.types;

    server {

        listen 80;
        server_name nginx-handbook.test;

        root /srv/nginx-handbook-projects/static-demo;

        try_files $uri $uri/ /not_found;

        location /not_found {
                return 404 "sadly, you've hit a brick wall buddy!\n";
        }
    }
}
By writing try_files $uri $uri/ /not_found; you're instructing NGINX to try for the requested URI first. If that doesn't work then try for the requested URI as a directory, and whenever NGINX ends up into a directory it automatically starts looking for an index.html file.
Now if you visit the server, you should get the index.html file just right:
The try_files is the kind of directive that can be used in a number of variations. In the upcoming sections, you'll encounter a few other variations but I would suggest that you do some research on the internet regarding the different usage of this directive by yourself.
Logging in NGINX
By default, NGINX's log files are located inside /var/log/nginx. If you list the content of this directory, you may see something as follows:
ls -lh /var/log/nginx/

# -rw-r----- 1 www-data adm     0 Apr 25 07:34 access.log
# -rw-r----- 1 www-data adm     0 Apr 25 07:34 error.log
Let's begin by emptying the two files.
# delete the old files
sudo rm /var/log/nginx/access.log /var/log/nginx/error.log

# create new files
sudo touch /var/log/nginx/access.log /var/log/nginx/error.log

# reopen the log files
sudo nginx -s reopen
If you do not dispatch a reopen signal to NGINX, it'll keep writing logs to the previously open streams and the new files will remain empty.
Now to make an entry in the access log, send a request to the server.
curl -I http://nginx-handbook.test

# HTTP/1.1 200 OK
# Server: nginx/1.18.0 (Ubuntu)
# Date: Sun, 25 Apr 2021 08:35:59 GMT
# Content-Type: text/html
# Content-Length: 960
# Last-Modified: Sun, 25 Apr 2021 08:35:33 GMT
# Connection: keep-alive
# ETag: "608529d5-3c0"
# Accept-Ranges: bytes

sudo cat /var/log/nginx/access.log

# 192.168.20.20 - - [25/Apr/2021:08:35:59 +0000] "HEAD / HTTP/1.1" 200 0 "-" "curl/7.68.0"
As you can see, a new entry has been added to the access.log file. Any request to the server will be logged to this file by default. But we can change this behavior using the access_log directive.
events {

}

http {

    include /etc/nginx/mime.types;

    server {

        listen 80;
        server_name nginx-handbook.test;

        location / {
            return 200 "this will be logged to the default file.\n";
        }

        location = /admin {
            access_log /var/logs/nginx/admin.log;

            return 200 "this will be logged in a separate file.\n";
        }

        location = /no_logging {
            access_log off;

            return 200 "this will not be logged.\n";
        }
    }
}
The first access_log directive inside the /admin location block instructs NGINX to write any access log of this URI to the /var/logs/nginx/admin.log file. The second one inside the /no_logging location turns off access logs for this location completely.
Validate and reload the configuration. Now if you send requests to these locations and inspect the log files, you should see something like this:
curl http://nginx-handbook.test/no_logging
# this will not be logged

sudo cat /var/log/nginx/access.log
# empty

curl http://nginx-handbook.test/admin
# this will be logged in a separate file.

sudo cat /var/log/nginx/access.log
# empty

sudo cat /var/log/nginx/admin.log
# 192.168.20.20 - - [25/Apr/2021:11:13:53 +0000] "GET /admin HTTP/1.1" 200 40 "-" "curl/7.68.0"

curl  http://nginx-handbook.test/
# this will be logged to the default file.

sudo cat /var/log/nginx/access.log
# 192.168.20.20 - - [25/Apr/2021:11:15:14 +0000] "GET / HTTP/1.1" 200 41 "-" "curl/7.68.0"
The error.log file, on the other hand, holds the failure logs. To make an entry to the error.log, you'll have to make NGINX crash. To do so, update your configuration as follows:
events {

}

http {

    include /etc/nginx/mime.types;

    server {

        listen 80;
        server_name nginx-handbook.test;

        return 200 "..." "...";
    }

}
As you know, the return directive takes only two parameters – but we've given three here. Now try reloading the configuration and you'll be presented with an error message:
sudo nginx -s reload

# nginx: [emerg] invalid number of arguments in "return" directive in /etc/nginx/nginx.conf:14
Check the content of the error log and the message should be present there as well:
sudo cat /var/log/nginx/error.log

# 2021/04/25 08:35:45 [notice] 4169#4169: signal process started
# 2021/04/25 10:03:18 [emerg] 8434#8434: invalid number of arguments in "return" directive in /etc/nginx/nginx.conf:14
Error messages have levels. A notice entry in the error log is harmless, but an emerg or emergency entry has to be addressed right away.
There are eight levels of error messages:
debug– Useful debugging information to help determine where the problem lies.info– Informational messages that aren't necessary to read but may be good to know.notice– Something normal happened that is worth noting.warn– Something unexpected happened, however is not a cause for concern.error– Something was unsuccessful.crit– There are problems that need to be critically addressed.alert– Prompt action is required.emerg– The system is in an unusable state and requires immediate attention.
By default, NGINX records all level of messages. You can override this behavior using the error_log directive. If you want to set the minimum level of a message to be warn, then update your configuration file as follows:
events {

}

http {

    include /etc/nginx/mime.types;

    server {

        listen 80;
        server_name nginx-handbook.test;

        error_log /var/log/error.log warn;

        return 200 "..." "...";
    }

}
Validate and reload the configuration, and from now on only messages with a level of warn or above will be logged.
cat /var/log/nginx/error.log

# 2021/04/25 11:27:02 [emerg] 12769#12769: invalid number of arguments in "return" directive in /etc/nginx/nginx.conf:16
Unlike the previous output, there are no notice entries here. emerg is a higher level error than warn and that's why it has been logged.
For most projects, leaving the error configuration as it is should be fine. The only suggestion I have is to set the minimum error level to warn. This way you won't have to look at unnecessary entries in the error log.
But if you want to learn more about customizing logging in NGINX, this link to the official docs may help.
How to Use NGINX as a Reverse Proxy
When configured as a reverse proxy, NGINX sits between the client and a back end server. The client sends requests to NGINX, then NGINX passes the request to the back end.
Once the back end server finishes processing the request, it sends it back to NGINX. In turn, NGINX returns the response to the client.
During the whole process, the client doesn't have any idea about who's actually processing the request. It sounds complicated in writing, but once you do it for yourself you'll see how easy NGINX makes it.
Let's see a very basic and impractical example of a reverse proxy:
events {

}

http {

    include /etc/nginx/mime.types;

    server {
        listen 80;
        server_name nginx.test;

        location / {
                proxy_pass "https://nginx.org/";
        }
    }
}
Apart from validating and reloading the configuration, you'll also have to add this address to your hosts file to make this demo work on your system:
192.168.20.20 nginx.test
Now if you visit http://nginx.test, you'll be greeted by the original https://nginx.org site while the URI remains unchanged.
You should be even able to navigate around the site to an extent. If you visit http://nginx.test/en/docs/ you should get the http://nginx.org/en/docs/ page in response.
So as you can see, at a basic level, the proxy_pass directive simply passes a client's request to a third party server and reverse proxies the response to the client.
Node.js With NGINX
Now that you know how to configure a basic reverse proxy server, you can serve a Node.js application reverse proxied by NGINX. I've added a demo application inside the repository that comes with this article.
I'm assuming that you have experience with Node.js and know how to start a Node.js application using PM2.
If you've already cloned the repository inside /srv/nginx-handbook-projects then the node-js-demo project should be available in the /srv/nginx-handbook-projects/node-js-demo directory.
For this demo to work, you'll need to install Node.js on your server. You can do that following the instructions found here.
The demo application is a simple HTTP server that responds with a 200 status code and a JSON payload. You can start the application by simply executing node app.js but a better way is to use PM2.
For those of you who don't know, PM2 is a daemon process manager widely used in production for Node.js applications. If you want to learn more, this link may help.
Install PM2 globally by executing sudo npm install -g pm2. After the installation is complete, execute following command while being inside the /srv/nginx-handbook-projects/node-js-demo directory:
pm2 start app.js

# [PM2] Process successfully started
# ┌────┬────────────────────┬──────────┬──────┬───────────┬──────────┬──────────┐
# │ id │ name               │ mode     │ ↺    │ status    │ cpu      │ memory   │
# ├────┼────────────────────┼──────────┼──────┼───────────┼──────────┼──────────┤
# │ 0  │ app                │ fork     │ 0    │ online    │ 0%       │ 21.2mb   │
# └────┴────────────────────┴──────────┴──────┴───────────┴──────────┴──────────┘
Alternatively you can also do pm2 start /srv/nginx-handbook-projects/node-js-demo/app.js from anywhere on the server. You can stop the application by executing the pm2 stop app command.
The application should be running now but should not be accessible from outside of the server. To verify if the application is running or not, send a get request to http://localhost:3000 from inside your server:
curl -i localhost:3000

# HTTP/1.1 200 OK
# X-Powered-By: Express
# Content-Type: application/json; charset=utf-8
# Content-Length: 62
# ETag: W/"3e-XRN25R5fWNH2Tc8FhtUcX+RZFFo"
# Date: Sat, 24 Apr 2021 12:09:55 GMT
# Connection: keep-alive
# Keep-Alive: timeout=5

# { "status": "success", "message": "You're reading The NGINX Handbook!" }
If you get a 200 response, then the server is running fine. Now to configure NGINX as a reverse proxy, open your configuration file and update its content as follows:
events {

}

http {
    listen 80;
    server_name nginx-handbook.test

    location / {
        proxy_pass http://localhost:3000;
    }
}
Nothing new to explain here. You're just passing the received request to the Node.js application running at port 3000. Now if you send a request to the server from outside you should get a response as follows:
curl -i http://nginx-handbook.test

# HTTP/1.1 200 OK
# Server: nginx/1.18.0 (Ubuntu)
# Date: Sat, 24 Apr 2021 14:58:01 GMT
# Content-Type: application/json
# Transfer-Encoding: chunked
# Connection: keep-alive

# { "status": "success", "message": "You're reading The NGINX Handbook!" }
Although this works for a basic server like this, you may have to add a few more directives to make it work in a real world scenario depending on your application's requirements.
For example, if your application handles web socket connections, then you should update the configuration as follows:
events {

}

http {
    listen 80;
    server_name nginx-handbook.test

    location / {
        proxy_pass http://localhost:3000;
        proxy_http_version 1.1;
        proxy_set_header Upgrade $http_upgrade;
        proxy_set_header Connection 'upgrade';
    }
}
The proxy_http_version directive sets the HTTP version for the server. By default it's 1.0, but web socket requires it to be at least 1.1. The proxy_set_header directive is used for setting a header on the back-end server. Generic syntax for this directive is as follows:
proxy_set_header <header name> <header value>
So, by writing proxy_set_header Upgrade $http_upgrade; you're instructing NGINX to pass the value of the $http_upgrade variable as a header named Upgrade – same for the Connection header.
If you would like to learn more about web socket proxying, this link to the official NGINX docs may help.
Depending on the headers required by your application, you may have to set more of them. But the above mentioned configuration is very commonly used to serve Node.js applications.
PHP With NGINX
PHP and NGINX go together like bread and butter. After all the E and the P in the LEMP stack stand for NGINX and PHP.
I'm assuming you have experience with PHP and know how to run a PHP application.
I've already included a demo PHP application in the repository that comes with this article. If you've already cloned it in the /srv/nginx-handbook-projects directory, then the application should be inside /srv/nginx-handbook-projects/php-demo.
For this demo to work, you'll have to install a package called PHP-FPM. To install the package, you can execute following command:
sudo apt install php-fpm -y
To test out the application, start a PHP server by executing the following command while inside the /srv/nginx-handbook-projects/php-demo directory:
php -S localhost:8000

# [Sat Apr 24 16:17:36 2021] PHP 7.4.3 Development Server (http://localhost:8000) started
Alternatively you can also do php -S localhost:8000 /srv/nginx-handbook-projects/php-demo/index.php from anywhere on the server.
The application should be running at port 8000 but it can not be accessed from the outside of the server. To verify, send a get request to http://localhost:8000 from inside your server:
curl -I localhost:8000

# HTTP/1.1 200 OK
# Host: localhost:8000
# Date: Sat, 24 Apr 2021 16:22:42 GMT
# Connection: close
# X-Powered-By: PHP/7.4.3
# Content-type: application/json

# {"status":"success","message":"You're reading The NGINX Handbook!"}
If you get a 200 response then the server is running fine. Just like the Node.js configuration, now you can simply proxy_pass the requests to localhost:8000 – but with PHP, there is a better way.
The FPM part in PHP-FPM stands for FastCGI Process Module. FastCGI is a protocol just like HTTP for exchanging binary data. This protocol is slightly faster than HTTP and provides better security.
To use FastCGI instead of HTTP, update your configuration as follows:
events {

}

http {

      include /etc/nginx/mime.types;

      server {

          listen 80;
          server_name nginx-handbook.test;
          root /srv/nginx-handbook-projects/php-demo;

          index index.php;

          location / {
              try_files $uri $uri/ =404;
          }

          location ~ \.php$ {
              fastcgi_pass unix:/var/run/php/php7.4-fpm.sock;
              fastcgi_param REQUEST_METHOD $request_method;
              fastcgi_param SCRIPT_FILENAME $realpath_root$fastcgi_script_name;
      }
   }
}
Let's begin with the new index directive. As you know, NGINX by default looks for an index.html file to serve. But in the demo-project, it's called index.php. So by writing index index.php, you're instructing NGINX to use the index.php file as root instead.
This directive can accept multiple parameters. If you write something like index index.php index.html, NGINX will first look for index.php. If it doesn't find that file, it will look for an index.html file.
The try_files directive inside the first location context is the same as you've seen in a previous section. The =404 at the end indicates the error to throw if none of the files are found.
The second location block is the place where the main magic happens. As you can see, we've replaced the proxy_pass directive by a new fastcgi_pass. As the name suggests, it's used to pass a request to a FastCGI service.
The PHP-FPM service by default runs on port 9000 of the host. So instead of using a Unix socket like I've done here, you can pass the request to http://localhost:9000 directly. But using a Unix socket is more secure.
If you have multiple PHP-FPM versions installed, you can simply list all the socket file locations by executing the following command:
sudo find / -name *fpm.sock

# /run/php/php7.4-fpm.sock
# /run/php/php-fpm.sock
# /etc/alternatives/php-fpm.sock
# /var/lib/dpkg/alternatives/php-fpm.sock
The /run/php/php-fpm.sock file refers to the latest version of PHP-FPM installed on your system. I prefer using the one with the version number. This way even if PHP-FPM gets updated, I'll be certain about the version I'm using.
Unlike passing requests through HTTP, passing requests through FPM requires us to pass some extra information.
The general way of passing extra information to the FPM service is using the fastcgi_param directive. At the very least, you'll have to pass the request method and the script name to the back-end service for the proxying to work.
The fastcgi_param REQUEST_METHOD $request_method; passes the request method to the back-end and the fastcgi_param SCRIPT_FILENAME $realpath_root$fastcgi_script_name; line passes the exact location of the PHP script to run.
At this state, your configuration should work. To test it out, visit your server and you should be greeted by something like this:

Well, that's weird. A 500 error means NGINX has crashed for some reason. This is where the error logs can come in handy. Let's have a look at the last entry in the error.log file:
tail -n 1 /var/log/nginx/error.log

# 2021/04/24 17:15:17 [crit] 17691#17691: *21 connect() to unix:/var/run/php/php7.4-fpm.sock failed (13: Permission denied) while connecting to upstream, client: 192.168.20.20, server: nginx-handbook.test, request: "GET / HTTP/1.1", upstream: "fastcgi://unix:/var/run/php/php7.4-fpm.sock:", host: "nginx-handbook.test"
Seems like the NGINX process is being denied permission to access the PHP-FPM process.
One of the main reasons for getting a permission denied error is user mismatch. Have a look at the user owning the NGINX worker process.
ps aux | grep nginx

# root         677  0.0  0.4   8892  4260 ?        Ss   14:31   0:00 nginx: master process /usr/sbin/nginx -g daemon on; master_process on;
# nobody     17691  0.0  0.3   9328  3452 ?        S    17:09   0:00 nginx: worker process
# vagrant    18224  0.0  0.2   8160  2552 pts/0    S+   17:19   0:00 grep --color=auto nginx
As you can see, the process is currently owned by nobody. Now inspect the PHP-FPM process.
# ps aux | grep php

# root       14354  0.0  1.8 195484 18924 ?        Ss   16:11   0:00 php-fpm: master process (/etc/php/7.4/fpm/php-fpm.conf)
# www-data   14355  0.0  0.6 195872  6612 ?        S    16:11   0:00 php-fpm: pool www
# www-data   14356  0.0  0.6 195872  6612 ?        S    16:11   0:00 php-fpm: pool www
# vagrant    18296  0.0  0.0   8160   664 pts/0    S+   17:20   0:00 grep --color=auto php
This process, on the other hand, is owned by the www-data user. This is why NGINX is being denied access to this process.
To solve this issue, update your configuration as follows:
user www-data;

events {

}

http {

      include /etc/nginx/mime.types;

      server {

          listen 80;
          server_name nginx-handbook.test;
          root /srv/nginx-handbook-projects/php-demo;

          index index.php;

          location / {
              try_files $uri $uri/ =404;
          }

          location ~ \.php$ {
              fastcgi_pass unix:/var/run/php/php7.4-fpm.sock;
              fastcgi_param REQUEST_METHOD $request_method;
              fastcgi_param SCRIPT_FILENAME $realpath_root$fastcgi_script_name;
      }
   }
}
The user directive is responsible for setting the owner for the NGINX worker processes. Now inspect the the NGINX process once again:
# ps aux | grep nginx

# root         677  0.0  0.4   8892  4264 ?        Ss   14:31   0:00 nginx: master process /usr/sbin/nginx -g daemon on; master_process on;
# www-data   20892  0.0  0.3   9292  3504 ?        S    18:10   0:00 nginx: worker process
# vagrant    21294  0.0  0.2   8160  2568 pts/0    S+   18:18   0:00 grep --color=auto nginx
Undoubtedly the process is now owned by the www-data user. Send a request to your server to check if it's working or not:
# curl -i http://nginx-handbook.test

# HTTP/1.1 200 OK
# Server: nginx/1.18.0 (Ubuntu)
# Date: Sat, 24 Apr 2021 18:22:24 GMT
# Content-Type: application/json
# Transfer-Encoding: chunked
# Connection: keep-alive

# {"status":"success","message":"You're reading The NGINX Handbook!"}
If you get a 200 status code with a JSON payload, you're good to go.
This simple configuration is fine for the demo application, but in real-life projects you'll have to pass some additional parameters.
For this reason, NGINX includes a partial configuration called fastcgi_params. This file contains a list of the most common FastCGI parameters.
cat /etc/nginx/fastcgi_params

# fastcgi_param  QUERY_STRING       $query_string;
# fastcgi_param  REQUEST_METHOD     $request_method;
# fastcgi_param  CONTENT_TYPE       $content_type;
# fastcgi_param  CONTENT_LENGTH     $content_length;

# fastcgi_param  SCRIPT_NAME        $fastcgi_script_name;
# fastcgi_param  REQUEST_URI        $request_uri;
# fastcgi_param  DOCUMENT_URI       $document_uri;
# fastcgi_param  DOCUMENT_ROOT      $document_root;
# fastcgi_param  SERVER_PROTOCOL    $server_protocol;
# fastcgi_param  REQUEST_SCHEME     $scheme;
# fastcgi_param  HTTPS              $https if_not_empty;

# fastcgi_param  GATEWAY_INTERFACE  CGI/1.1;
# fastcgi_param  SERVER_SOFTWARE    nginx/$nginx_version;

# fastcgi_param  REMOTE_ADDR        $remote_addr;
# fastcgi_param  REMOTE_PORT        $remote_port;
# fastcgi_param  SERVER_ADDR        $server_addr;
# fastcgi_param  SERVER_PORT        $server_port;
# fastcgi_param  SERVER_NAME        $server_name;

# PHP only, required if PHP was built with --enable-force-cgi-redirect
# fastcgi_param  REDIRECT_STATUS    200;
As you can see, this file also contains the REQUEST_METHOD parameter. Instead of passing that manually, you can just include this file in your configuration:
user www-data;

events {

}

http {

      include /etc/nginx/mime.types;

      server {

          listen 80;
          server_name nginx-handbook.test;
          root /srv/nginx-handbook-projects/php-demo;

          index index.php;

          location / {
              try_files $uri $uri/ =404;
          }

          location ~ \.php$ {
              fastcgi_pass unix:/var/run/php/php7.4-fpm.sock;
              fastcgi_param SCRIPT_FILENAME $realpath_root$fastcgi_script_name;
              include /etc/nginx/fastcgi_params;
      }
   }
}
Your server should behave just the same. Apart from the fastcgi_params file, you may also come across the fastcgi.conf file which contains a slightly different set of parameters. I would suggest that you avoid that due to some inconsistencies with its behavior.
How to Use NGINX as a Load Balancer
Thanks to the reverse proxy design of NGINX, you can easily configure it as a load balancer.
I've already added a demo to the repository that comes with this article. If you've already cloned the repository inside the /srv/nginx-handbook-projects/ directory then the demo should be in the /srv/nginx-handbook-projects/load-balancer-demo/ directory.
In a real life scenario, load balancing may be required on large scale projects distributed across multiple servers. But for this simple demo, I've created three very simple Node.js servers responding with a server number and 200 status code.
For this demo to work, you'll need Node.js installed on the server. You can find instructions in this link to help you get it installed.
Apart from this, you'll also need PM2 for daemonizing the Node.js servers provided in this demo.
If you haven't already, install PM2 by executing sudo npm install -g pm2. After the installation finishes, execute the following commands to start the three Node.js servers:
pm2 start /srv/nginx-handbook-projects/load-balancer-demo/server-1.js

pm2 start /srv/nginx-handbook-projects/load-balancer-demo/server-2.js

pm2 start /srv/nginx-handbook-projects/load-balancer-demo/server-3.js

pm2 list

# ┌────┬────────────────────┬──────────┬──────┬───────────┬──────────┬──────────┐
# │ id │ name               │ mode     │ ↺    │ status    │ cpu      │ memory   │
# ├────┼────────────────────┼──────────┼──────┼───────────┼──────────┼──────────┤
# │ 0  │ server-1           │ fork     │ 0    │ online    │ 0%       │ 37.4mb   │
# │ 1  │ server-2           │ fork     │ 0    │ online    │ 0%       │ 37.2mb   │
# │ 2  │ server-3           │ fork     │ 0    │ online    │ 0%       │ 37.1mb   │
# └────┴────────────────────┴──────────┴──────┴───────────┴──────────┴──────────┘
Three Node.js servers should be running on localhost:3001, localhost:3002, localhost:3003 respectively.
Now update your configuration as follows:
events {

}

http {

    upstream backend_servers {
        server localhost:3001;
        server localhost:3002;
        server localhost:3003;
    }

    server {

        listen 80;
        server_name nginx-handbook.test;

        location / {
            proxy_pass http://backend_servers;
        }
    }
}
The configuration inside the server context is the same as you've already seen. The upstream context, though, is new. An upstream in NGINX is a collection of servers that can be treated as a single backend.
So the three servers you started using PM2 can be put inside a single upstream and you can let NGINX balance the load between them.
To test out the configuration, you'll have to send a number of requests to the server. You can automate the process using a while loop in bash:
while sleep 0.5; do curl http://nginx-handbook.test; done

# response from server - 2.
# response from server - 3.
# response from server - 1.
# response from server - 2.
# response from server - 3.
# response from server - 1.
# response from server - 2.
# response from server - 3.
# response from server - 1.
# response from server - 2.
You can cancel the loop by hitting Ctrl + C on your keyboard. As you can see from the responses from the server, NGINX is load balancing the servers automatically.
Of course, depending on the project scale, load balancing can be a lot more complicated than this. But the goal of this article is to get you started, and I believe you now have a basic understanding of load balancing with NGINX. You can stop the three running server by executing pm2 stop server-1 server-2 server-3 command (and it's a good idea here).
How to Optimize NGINX for Maximum Performance
In this section of the article, you'll learn about a number of ways to get the maximum performance from your server.
Some of these methods will be application-specific, which means they'll probably need tweaking considering your application requirements. But some of them will be general optimization techniques.
Just like the previous sections, changes in configuration will be frequesnt in this one, so don't forget to validate and reload your configuration file every time.
How to Configure Worker Processes and Worker Connections
As I've already mentioned in a previous section, NGINX can spawn multiple worker processes capable of handling thousands of requests each.
sudo systemctl status nginx

# ● nginx.service - A high performance web server and a reverse proxy server
#      Loaded: loaded (/lib/systemd/system/nginx.service; enabled; vendor preset: enabled)
#      Active: active (running) since Sun 2021-04-25 08:33:11 UTC; 5h 45min ago
#        Docs: man:nginx(8)
#    Main PID: 3904 (nginx)
#       Tasks: 2 (limit: 1136)
#      Memory: 3.2M
#      CGroup: /system.slice/nginx.service
#              ├─ 3904 nginx: master process /usr/sbin/nginx -g daemon on; master_process on;
#              └─16443 nginx: worker process
As you can see, right now there is only one NGINX worker process on the system. This number, however, can be changed by making a small change to the configuration file.
worker_processes 2;

events {

}

http {

    server {

        listen 80;
        server_name nginx-handbook.test;

        return 200 "worker processes and worker connections configuration!\n";
    }
}
The worker_process directive written in the main context is responsible for setting the number of worker processes to spawn. Now check the NGINX service once again and you should see two worker processes:
sudo systemctl status nginx

# ● nginx.service - A high performance web server and a reverse proxy server
#      Loaded: loaded (/lib/systemd/system/nginx.service; enabled; vendor preset: enabled)
#      Active: active (running) since Sun 2021-04-25 08:33:11 UTC; 5h 54min ago
#        Docs: man:nginx(8)
#     Process: 22610 ExecReload=/usr/sbin/nginx -g daemon on; master_process on; -s reload (code=exited, status=0/SUCCESS)
#    Main PID: 3904 (nginx)
#       Tasks: 3 (limit: 1136)
#      Memory: 3.7M
#      CGroup: /system.slice/nginx.service
#              ├─ 3904 nginx: master process /usr/sbin/nginx -g daemon on; master_process on;
#              ├─22611 nginx: worker process
#              └─22612 nginx: worker process
Setting the number of worker processes is easy, but determining the optimal number of worker processes requires a bit more work.
The worker processes are asynchronous in nature. This means that they will process incoming requests as fast as the hardware can.
Now consider that your server runs on a single core processor. If you set the number of worker processes to 1, that single process will utilize 100% of the CPU capacity. But if you set it to 2, the two processes will be able to utilize 50% of the CPU each. So increasing the number of worker processes doesn't mean better performance.
A rule of thumb in determining the optimal number of worker processes is number of worker process = number of CPU cores.
If you're running on a server with a dual core CPU, the number of worker processes should be set to 2. In a quad core it should be set to 4...and you get the idea.
Determining the number of CPUs on your server is very easy on Linux.
nproc

# 1
I'm on a single CPU virtual machine, so the nproc detects that there's one CPU. Now that you know the number of CPUs, all that is left to do is set the number on the configuration.
That's all well and good, but every time you upscale the server and the CPU number changes, you'll have to update the server configuration manually.
NGINX provides a better way to deal with this issue. You can simply set the number of worker processes to auto and NGINX will set the number of processes based on the number of CPUs automatically.
worker_processes auto;

events {

}

http {

    server {

        listen 80;
        server_name nginx-handbook.test;

        return 200 "worker processes and worker connections configuration!\n";
    }
}
Inspect the NGINX process once again:
sudo systemctl status nginx

# ● nginx.service - A high performance web server and a reverse proxy server
#      Loaded: loaded (/lib/systemd/system/nginx.service; enabled; vendor preset: enabled)
#      Active: active (running) since Sun 2021-04-25 08:33:11 UTC; 6h ago
#        Docs: man:nginx(8)
#     Process: 22610 ExecReload=/usr/sbin/nginx -g daemon on; master_process on; -s reload (code=exited, status=0/SUCCESS)
#    Main PID: 3904 (nginx)
#       Tasks: 2 (limit: 1136)
#      Memory: 3.2M
#      CGroup: /system.slice/nginx.service
#              ├─ 3904 nginx: master process /usr/sbin/nginx -g daemon on; master_process on;
#              └─23659 nginx: worker process
The number of worker processes is back to one again, because that's what is optimal for this server.
Apart from the worker processes there is also the worker connection, indicating the highest number of connections a single worker process can handle.
Just like the number of worker processes, this number is also related to the number of your CPU core and the number of files your operating system is allowed to open per core.
Finding out this number is very easy on Linux:
ulimit -n

# 1024
Now that you have the number, all that is left is to set it in the configuration:
worker_processes auto;

events {
    worker_connections 1024;
}

http {

    server {

        listen 80;
        server_name nginx-handbook.test;

        return 200 "worker processes and worker connections configuration!\n";
    }
}
The worker_connections directive is responsible for setting the number of worker connections in a configuration. This is also the first time you're working with the events context.
In a previous section, I mentioned that this context is used for setting values used by NGINX on a general level. The worker connections configuration is one such example.
How to Cache Static Content
The second technique for optimizing your server is caching static content. Regardless of the application you're serving, there is always a certain amount of static content being served, such as stylesheets, images, and so on.
Considering that this content is not likely to change very frequently, it's a good idea to cache them for a certain amount of time. NGINX makes this task easy as well.
worker_processes auto;

events {
    worker_connections 1024;
}

http {

    include /env/nginx/mime.types;

    server {

        listen 80;
        server_name nginx-handbook.test;

        root /srv/nginx-handbook-demo/static-demo;

        location ~* \.(css|js|jpg)$ {
            access_log off;

            add_header Cache-Control public;
            add_header Pragma public;
            add_header Vary Accept-Encoding;
            expires 1M;
        }
    }
}
By writing location ~* .(css|js|jpg)$ you're instructing NGINX to match requests asking for a file ending with .css, .js and .jpg.
In my applications, I usually store images in the WebP format even if the user submits a different format. This way, configuring the static cache becomes even easier for me.
You can use the add_header directive to include a header in the response to the client. Previously you've seen the proxy_set_header directive used for setting headers on an ongoing request to the backend server. The add_header directive on the other hand only adds a given header to the response.
By setting the Cache-Control header to public, you're telling the client that this content can be cached in any way. The Pragma header is just an older version of the Cache-Control header and does more or less the same thing.
The next header, Vary, is responsible for letting the client know that this cached content may vary.
The value of Accept-Encoding means that the content may vary depending on the content encoding accepted by the client. This will be clarified further in the next section.
Finally the expires directive allows you to set the Expires header conveniently. The expires directive takes the duration of time this cache will be valid. By setting it to 1M you're telling NGINX to cache the content for one month. You can also set this to 10m or 10 minutes, 24h or 24 hours, and so on.
Now to test out the configuration, sent a request for the the-nginx-handbook.jpg file from the server:
curl -I http://nginx-handbook.test/the-nginx-handbook.jpg

# HTTP/1.1 200 OK
# Server: nginx/1.18.0 (Ubuntu)
# Date: Sun, 25 Apr 2021 15:58:22 GMT
# Content-Type: image/jpeg
# Content-Length: 19209
# Last-Modified: Sun, 25 Apr 2021 08:35:33 GMT
# Connection: keep-alive
# ETag: "608529d5-4b09"
# Expires: Tue, 25 May 2021 15:58:22 GMT
# Cache-Control: max-age=2592000
# Cache-Control: public
# Pragma: public
# Vary: Accept-Encoding
# Accept-Ranges: bytes
As you can see, the headers have been added to the response and any modern browser should be able to interpret them.
How to Compress Responses
The final optimization technique that I'm going to show today is a pretty straightforward one: compressing responses to reduce their size.
worker_processes auto;

events {
    worker_connections 1024;
}

http {
    include /env/nginx/mime.types;

    gzip on;
    gzip_comp_level 3;

    gzip_types text/css text/javascript;

    server {

        listen 80;
        server_name nginx-handbook.test;

        root /srv/nginx-handbook-demo/static-demo;

        location ~* \.(css|js|jpg)$ {
            access_log off;

            add_header Cache-Control public;
            add_header Pragma public;
            add_header Vary Accept-Encoding;
            expires 1M;
        }
    }
}
If you're not already familiar with it, GZIP is a popular file format used by applications for file compression and decompression. NGINX can utilize this format to compress responses using the gzip directives.
By writing gzip on in the http context, you're instructing NGINX to compress responses. The gzip_comp_level directive sets the level of compression. You can set it to a very high number, but that doesn't guarantee better compression. Setting a number between 1 - 4 gives you an efficient result. For example, I like setting it to 3.
By default, NGINX compresses HTML responses. To compress other file formats, you'll have to pass them as parameters to the gzip_types directive. By writing gzip_types text/css text/javascript; you're telling NGINX to compress any file with the mime types of text/css and text/javascript.
Configuring compression in NGINX is not enough. The client has to ask for the compressed response instead of the uncompressed responses. I hope you remember the add_header Vary Accept-Encoding; line in the previous section on caching. This header lets the client know that the response may vary based on what the client accepts.
As an example, if you want to request the uncompressed version of the mini.min.css file from the server, you may do something like this:
curl -I http://nginx-handbook.test/mini.min.css

# HTTP/1.1 200 OK
# Server: nginx/1.18.0 (Ubuntu)
# Date: Sun, 25 Apr 2021 16:30:32 GMT
# Content-Type: text/css
# Content-Length: 46887
# Last-Modified: Sun, 25 Apr 2021 08:35:33 GMT
# Connection: keep-alive
# ETag: "608529d5-b727"
# Expires: Tue, 25 May 2021 16:30:32 GMT
# Cache-Control: max-age=2592000
# Cache-Control: public
# Pragma: public
# Vary: Accept-Encoding
# Accept-Ranges: bytes
As you can see, there's nothing about compression. Now if you want to ask for the compressed version of the file, you'll have to send an additional header.
curl -I -H "Accept-Encoding: gzip" http://nginx-handbook.test/mini.min.css

# HTTP/1.1 200 OK
# Server: nginx/1.18.0 (Ubuntu)
# Date: Sun, 25 Apr 2021 16:31:38 GMT
# Content-Type: text/css
# Last-Modified: Sun, 25 Apr 2021 08:35:33 GMT
# Connection: keep-alive
# ETag: W/"608529d5-b727"
# Expires: Tue, 25 May 2021 16:31:38 GMT
# Cache-Control: max-age=2592000
# Cache-Control: public
# Pragma: public
# Vary: Accept-Encoding
# Content-Encoding: gzip
As you can see in the response headers, the Content-Encoding is now set to gzip meaning this is the compressed version of the file.
Now if you want to compare the difference in file size, you can do something like this:
cd ~
mkdir compression-test && cd compression-test

curl http://nginx-handbook.test/mini.min.css > uncompressed.css

curl -H "Accept-Encoding: gzip" http://nginx-handbook.test/mini.min.css > compressed.css

ls -lh

# -rw-rw-r-- 1 vagrant vagrant 9.1K Apr 25 16:35 compressed.css
# -rw-rw-r-- 1 vagrant vagrant  46K Apr 25 16:35 uncompressed.css
The uncompressed version of the file is 46K and the compressed version is 9.1K, almost six times smaller. On real life sites where stylesheets can be much larger, compression can make your responses smaller and faster.
How to Understand the Main Configuration File
I hope you remember the original nginx.conf file you renamed in an earlier section. According to the Debian wiki, this file is meant to be changed by the NGINX maintainers and not by server administrators, unless they know exactly what they're doing.
But throughout the entire article, I've taught you to configure your servers in this very file. In this section, however, I'll who you how you should configure your servers without changing the nginx.conf file.
To begin with, first delete or rename your modified nginx.conf file and bring back the original one:
sudo rm /etc/nginx/nginx.conf

sudo mv /etc/nginx/nginx.conf.backup /etc/nginx/nginx.conf

sudo nginx -s reload
Now NGINX should go back to its original state. Let's have a look at the content of this file once again by executing the sudo cat /etc/nginx/nginx.conf file:
user www-data;
worker_processes auto;
pid /run/nginx.pid;
include /etc/nginx/modules-enabled/*.conf;

events {
    worker_connections 768;
    # multi_accept on;
}

http {

    ##
    # Basic Settings
    ##

    sendfile on;
    tcp_nopush on;
    tcp_nodelay on;
    keepalive_timeout 65;
    types_hash_max_size 2048;
    # server_tokens off;

    # server_names_hash_bucket_size 64;
    # server_name_in_redirect off;

    include /etc/nginx/mime.types;
    default_type application/octet-stream;

    ##
    # SSL Settings
    ##

    ssl_protocols TLSv1 TLSv1.1 TLSv1.2 TLSv1.3; # Dropping SSLv3, ref: POODLE
    ssl_prefer_server_ciphers on;

    ##
    # Logging Settings
    ##

    access_log /var/log/nginx/access.log;
    error_log /var/log/nginx/error.log;

    ##
    # Gzip Settings
    ##

    gzip on;

    # gzip_vary on;
    # gzip_proxied any;
    # gzip_comp_level 6;
    # gzip_buffers 16 8k;
    # gzip_http_version 1.1;
    # gzip_types text/plain text/css application/json application/javascript text/xml application/xml application/xml+rss text/javascript;

    ##
    # Virtual Host Configs
    ##

    include /etc/nginx/conf.d/*.conf;
    include /etc/nginx/sites-enabled/*;
}


#mail {
#    # See sample authentication script at:
#    # http://wiki.nginx.org/ImapAuthenticateWithApachePhpScript
#
#    # auth_http localhost/auth.php;
#    # pop3_capabilities "TOP" "USER";
#    # imap_capabilities "IMAP4rev1" "UIDPLUS";
#
#    server {
#        listen     localhost:110;
#        protocol   pop3;
#        proxy      on;
#    }
#
#    server {
#        listen     localhost:143;
#        protocol   imap;
#        proxy      on;
#    }
#}
You should now be able to understand this file without much trouble. On the main context user www-data;, the worker_processes auto; lines should be easily recognizable to you.
The line pid /run/nginx.pid; sets the process ID for the NGINX process and include /etc/nginx/modules-enabled/*.conf; includes any configuration file found on the /etc/nginx/modules-enabled/ directory.
This directory is meant for NGINX dynamic modules. I haven't covered dynamic modules in this article so I'll skip that.
Now inside the the http context, under basic settings you can see some common optimization techniques applied. Here's what these techniques do:
sendfile on;disables buffering for static files.tcp_nopush on;allows sending response header in one packet.tcp_nodelay on;disables Nagle's Algorithm resulting in faster static file delivery.
The keepalive_timeout directive indicates how long to keep a connection open and the types_hash_maxsize directive sets the size of the types hash map. It also includes the mime.types file by default.
I'll skip the SSL settings simply because we haven't covered them in this article. We've already discussed the logging and gzip settings. You may see some of the directives regarding gzip as commented. As long as you understand what you're doing, you may customize these settings.
You use the mail context to configure NGINX as a mail server. We've only talked about NGINX as a web server so far, so I'll skip this as well.
Now under the virtual hosts settings, you should see two lines as follows:
##
# Virtual Host Configs
##

include /etc/nginx/conf.d/*.conf;
include /etc/nginx/sites-enabled/*;
These two lines instruct NGINX to include any configuration files found inside the /etc/nginx/conf.d/ and /etc/nginx/sites-enabled/ directories.
After seeing these two lines, people often take these two directories as the ideal place to put their configuration files, but that's not right.
There is another directory /etc/nginx/sites-available/ that's meant to store configuration files for your virtual hosts. The /etc/nginx/sites-enabled/ directory is meant for storing the symbolic links to the files from the /etc/nginx/sites-available/ directory.
In fact there is an example configuration:
ln -lh /etc/nginx/sites-enabled/

# lrwxrwxrwx 1 root root 34 Apr 25 08:33 default -> /etc/nginx/sites-available/default
As you can see, the directory contains a symbolic link to the /etc/nginx/sites-available/default file.
The idea is to write multiple virtual hosts inside the /etc/nginx/sites-available/ directory and make some of them active by symbolic linking them to the /etc/nginx/sites-enabled/ directory.
To demonstrate this concept, let's configure a simple static server. First, delete the default virtual host symbolic link, deactivating this configuration in the process:
sudo rm /etc/nginx/sites-enabled/default

ls -lh /etc/nginx/sites-enabled/

# lrwxrwxrwx 1 root root 41 Apr 25 18:01 nginx-handbook -> /etc/nginx/sites-available/nginx-handbook
Create a new file by executing sudo touch /etc/nginx/sites-available/nginx-handbook and put the following content in there:
server {
    listen 80;
    server_name nginx-handbook.test;

    root /srv/nginx-handbook-projects/static-demo;
}
Files inside the /etc/nginx/sites-available/ directory are meant to be included within the main http context so they should contain server blocks only.
Now create a symbolic link to this file inside the /etc/nginx/sites-enabled/ directory by executing the following command:
sudo ln -s /etc/nginx/sites-available/nginx-handbook /etc/nginx/sites-enabled/nginx-handbook

ls -lh /etc/nginx/sites-enabled/

# lrwxrwxrwx 1 root root 34 Apr 25 08:33 default -> /etc/nginx/sites-available/default
# lrwxrwxrwx 1 root root 41 Apr 25 18:01 nginx-handbook -> /etc/nginx/sites-available/nginx-handbook
Before validating and reloading the configuration file, you'll have to reopen the log files. Otherwise you may get a permission denied error. This happens because the process ID is different this time as a result of swapping the old nginx.conf file.
sudo rm /var/log/nginx/*.log

sudo touch /var/log/nginx/access.log /var/log/nginx/error.log

sudo nginx -s reopen
Finally, validate and reload the configuration file:
sudo nginx -t

# nginx: the configuration file /etc/nginx/nginx.conf syntax is ok
# nginx: configuration file /etc/nginx/nginx.conf test is successful

sudo nginx -s reload
Visit the server and you should be greeted with the good old The NGINX Handbook page:

If you've configured the server correctly and you're still getting the old NGINX welcome page, perform a hard refresh. The browser often holds on to old assets and requires a little cleanup.
How To Configure SSL and HTTP/2
HTTP/2 is the newest version of the wildly popular Hyper Text Transport Protocol. Based on Google's experimental SPDY protocol, HTTP/2 provides better performance by introducing features like full request and response multiplexing, better compression of header fields, server push and request prioritization.
Some of the notable features of HTTP/2 is as follows:
- Binary Protocol - While HTTP/1.x was a text based protocol, HTTP/2 is a binary protocol resulting in less error during data transfer process.
- Multiplexed Streams - All HTTP/2 connections are multiplexed streams meaning multiple files can be transferred in a single stream of binary data.
- Compressed Header - HTTP/2 compresses header data in responses resulting in faster transfer of data.
- Server Push - This capability allows the server to send linked resources to the client automatically, greatly reducing the number of requests to the server.
- Stream Prioritization - HTTP/2 can prioritize data streams based on their type resulting in better bandwidth allocation where necessary.
If you want to learn more about the improvements in HTTP/2 this article by Kinsta may help.
While a significant upgrade over its predecessor, HTTP/2 is not as widely adapted as it should have been. In this section, I'll introduce you to some of the new features mentioned previously and I'll also show you how to enable HTTP/2 on your NGINX powered web server.
For this section, I'll be using the static-demo project. I'm assuming you've already cloned the repository inside /srv/nginx-handbook-projects directory. If you haven't, this is the time to do so. Also, this section has to be done on a virtual private server instead of a virtual machine.
For simplicity, I'll use the /etc/nginx/sites-available/default file as my configuration. Open the file using nano or vi if you fancy that.
nano /etc/nginx/sites-available/default
Update the file's content as follows:
server {
        listen 80;
        server_name nginx-handbook.farhan.dev;

        root /srv/nginx-handbook-projects/static-demo;
}
As you can see, the /srv/nginx-handbook-projects/static-demo; directory has been set as the root of this site and nginx-handbook.farhan.dev has been set as the server name. If you do not have a custom domain set up, you can use your server's IP address as the server name here.
nginx -t

# nginx: the configuration file /etc/nginx/nginx.conf syntax is ok
# nginx: configuration file /etc/nginx/nginx.conf test is successful

nginx -s reload
Test the configuration by executing nginx -t and reload the configuration by executing nginx -s reload commands.
Finally visit your server and you should be greeted with a simple static HTML page.

One of the pre-requisite to have HTTP/2 working on your server is to have a valid SSL certificate. Lets do that first.
How To Configure SSL
For those of you who may not know, an SSL certificate is what allows a server to make the move from HTTP to HTTPS. These certificates are issued by a certificate authority (CA). Most of the authorities charge a fee for issuing certificates but nonprofit authorities such as Let's Encrypt, issues certificates for free.
If you want to understand the theory of SSL in a bit more detail, this article on the Cloudflare Learning Center may help.
Thanks to open-source tools like Certbot, installing a free certificate is dead easy. Head over to certbot.eff.org link. Now select the software and system that powers your server.

I'm running NGINX on Ubuntu 20.04 and if you've been in line with this article, you should have the same combination.
After selecting your combination of software and system, you'll be forwarded to a new page containing step by step instructions for installing certbot and a new SSL certificate.
The installation steps for certbot may differ from system to system but rest of the instructions should remain same. On Ubuntu, the recommended way is to use snap.
snap install --classic certbot

# certbot 1.14.0 from Certbot Project (certbot-eff✓) installed

certbot --version

# certbot 1.14.0
Certbot is now installed and ready to be used. Before you install a new certificate, make sure the NGINX configuration file contains all the necessary server names. Such as, if you want to install a new certificate for yourdomain.tld and www.yourdomain.tld, you'll have to include both of them in your configuration.
Once you're happy with your configuration, you can install a newly provisioned certificate for your server. To do so, execute the certbot program with --nginx option.
certbot --nginx

# Saving debug log to /var/log/letsencrypt/letsencrypt.log
# Plugins selected: Authenticator nginx, Installer nginx
# Enter email address (used for urgent renewal and security notices)
#  (Enter 'c' to cancel): shovik.is.here@gmail.com

# - - - - - - - - - - - - - - - - - - - - - - - - - - - - - - - - - - - - - - - -
# Please read the Terms of Service at
# https://letsencrypt.org/documents/LE-SA-v1.2-November-15-2017.pdf. You must
# agree in order to register with the ACME server. Do you agree?
# - - - - - - - - - - - - - - - - - - - - - - - - - - - - - - - - - - - - - - - -
# (Y)es/(N)o: Y

# - - - - - - - - - - - - - - - - - - - - - - - - - - - - - - - - - - - - - - - -
# Would you be willing, once your first certificate is successfully issued, to
# share your email address with the Electronic Frontier Foundation, a founding
# partner of the Let's Encrypt project and the non-profit organization that
# develops Certbot? We'd like to send you email about our work encrypting the web,
# EFF news, campaigns, and ways to support digital freedom.
# - - - - - - - - - - - - - - - - - - - - - - - - - - - - - - - - - - - - - - - -
# (Y)es/(N)o: N
# Account registered.

# Which names would you like to activate HTTPS for?
# - - - - - - - - - - - - - - - - - - - - - - - - - - - - - - - - - - - - - - - -
# 1: nginx-handbook.farhan.dev
# - - - - - - - - - - - - - - - - - - - - - - - - - - - - - - - - - - - - - - - -
# Select the appropriate numbers separated by commas and/or spaces, or leave input
# blank to select all options shown (Enter 'c' to cancel):
# Requesting a certificate for nginx-handbook.farhan.dev
# Performing the following challenges:
# http-01 challenge for nginx-handbook.farhan.dev
# Waiting for verification...
# Cleaning up challenges
# Deploying Certificate to VirtualHost /etc/nginx/sites-enabled/default
# Redirecting all traffic on port 80 to ssl in /etc/nginx/sites-enabled/default

# - - - - - - - - - - - - - - - - - - - - - - - - - - - - - - - - - - - - - - - -
# Congratulations! You have successfully enabled
# https://nginx-handbook.farhan.dev
# - - - - - - - - - - - - - - - - - - - - - - - - - - - - - - - - - - - - - - - -

# IMPORTANT NOTES:
#  - Congratulations! Your certificate and chain have been saved at:
#    /etc/letsencrypt/live/nginx-handbook.farhan.dev/fullchain.pem
#    Your key file has been saved at:
#    /etc/letsencrypt/live/nginx-handbook.farhan.dev/privkey.pem
#    Your certificate will expire on 2021-07-30. To obtain a new or
#    tweaked version of this certificate in the future, simply run
#    certbot again with the "certonly" option. To non-interactively
#    renew *all* of your certificates, run "certbot renew"
#  - If you like Certbot, please consider supporting our work by:

#    Donating to ISRG / Let's Encrypt:   https://letsencrypt.org/donate
#    Donating to EFF:                    https://eff.org/donate-le
You'll be asked for an emergency contact email address, license agreement and if you would like to receive emails from them or not.
The certbot program will automatically read the server names from your configuration file and show you a list of them. If you have multiple virtual hosts on your server, certbot will recognize them as well.
Finally if the installation is successful, you'll be congratulated by the program. To verify if everything's working or not, visit your server with HTTPS this time:
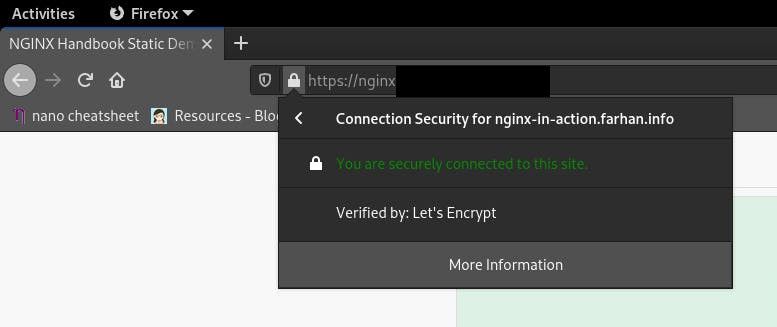
As you can see, HTTPS has been enabled successfully and you can confirm that the certificate is verified by Let's Encrypt authority. Later on, if you add new virtual hosts to this server with new domains or sub domains, you'll have to reinstall the certificates.
It's also possible to install wildcard certificate such as *.yourdomain.tld for some supported DNS managers. Detailed instructions can be found on the previously shown installation instruction page.
A newly installed certificate will be valid for 90 days. After that, a renewal will be required. Certbot does the renewal automatically. You can execute certbot renew command with the --dry-run option to test out the auto renewal feature.
certbot renew --dry-run

# Saving debug log to /var/log/letsencrypt/letsencrypt.log

# - - - - - - - - - - - - - - - - - - - - - - - - - - - - - - - - - - - - - - - -
# Processing /etc/letsencrypt/renewal/nginx-handbook.farhan.dev.conf
# - - - - - - - - - - - - - - - - - - - - - - - - - - - - - - - - - - - - - - - -
# Cert not due for renewal, but simulating renewal for dry run
# Plugins selected: Authenticator nginx, Installer nginx
# Account registered.
# Simulating renewal of an existing certificate for nginx-handbook.farhan.dev
# Performing the following challenges:
# http-01 challenge for nginx-handbook.farhan.dev
# Waiting for verification...
# Cleaning up challenges

# - - - - - - - - - - - - - - - - - - - - - - - - - - - - - - - - - - - - - - - -
# new certificate deployed with reload of nginx server; fullchain is
# /etc/letsencrypt/live/nginx-handbook.farhan.dev/fullchain.pem
# - - - - - - - - - - - - - - - - - - - - - - - - - - - - - - - - - - - - - - - -

# - - - - - - - - - - - - - - - - - - - - - - - - - - - - - - - - - - - - - - - -
# Congratulations, all simulated renewals succeeded:
#   /etc/letsencrypt/live/nginx-handbook.farhan.dev/fullchain.pem (success)
# - - - - - - - - - - - - - - - - - - - - - - - - - - - - - - - - - - - - - - - -
The command will simulate a certificate renewal to test if it's correctly set up or not. If it succeeds you'll be congratulated by the program. This step ends the procedure of installing an SSL certificate on your server.
To understand what certbot did behind the scenes, open up the /etc/nginx/sites-available/default file once again and see how its content has been altered.
server {

    server_name nginx-handbook.farhan.dev;

    root /srv/nginx-handbook-projects/static-demo;

    listen [::]:443 ssl ipv6only=on; # managed by Certbot
    listen 443 ssl; # managed by Certbot
    ssl_certificate /etc/letsencrypt/live/nginx-handbook.farhan.dev/fullchain.pem; # managed by Certbot
    ssl_certificate_key /etc/letsencrypt/live/nginx-handbook.farhan.dev/privkey.pem; # managed by Certbot
    include /etc/letsencrypt/options-ssl-nginx.conf; # managed by Certbot
    ssl_dhparam /etc/letsencrypt/ssl-dhparams.pem; # managed by Certbot

}
server {
    if ($host = nginx-handbook.farhan.dev) {
        return 301 https://$host$request_uri;
    } # managed by Certbot


    listen 80;
    listen [::]:80;

    server_name nginx-handbook.farhan.dev;
    return 404; # managed by Certbot
}
As you can see, certbot has added quite a few lines here. I'll explain the notable ones.
server {
    # ...
    listen [::]:443 ssl ipv6only=on; # managed by Certbot
    listen 443 ssl; # managed by Certbot
    # ...
}
Like the 80 port, 443 is widely used for listening to HTTPS requests. By writing listen 443 ssl; certbot is instructing NGINX to listen for any HTTPS request on port 443. The listen [::]:443 ssl ipv6only=on; line is for handling IPV6 connections.
server {
    # ...
    ssl_certificate /etc/letsencrypt/live/nginx-handbook.farhan.dev/fullchain.pem; # managed by Certbot
    ssl_certificate_key /etc/letsencrypt/live/nginx-handbook.farhan.dev/privkey.pem; # managed by Certbot
    include /etc/letsencrypt/options-ssl-nginx.conf; # managed by Certbot
    ssl_dhparam /etc/letsencrypt/ssl-dhparams.pem; # managed by Certbot
    # ...
}
The ssl_certificate directive is used for indicating the location of the certificate and the private key file on your server. The /etc/letsencrypt/options-ssl-nginx.conf; includes some common directives necessary for SSL.
Finally the ssl_dhparam indicates to the file defining how OpenSSL is going to perform Diffie–Hellman key exchange. If you want to learn more about the purpose of /etc/letsencrypt/ssl-dhparams.pem; file, this stack exchange thread may help you.
server {
    if ($host = nginx-handbook.farhan.dev) {
        return 301 https://$host$request_uri;
    } # managed by Certbot


    listen 80;
    listen [::]:80;

    server_name nginx-handbook.farhan.dev;
    return 404; # managed by Certbot
}
This newly added server block is responsible for redirecting any HTTP requests to HTTPS disabling HTTP access completely.
How To Enable HTTP/2
Once you've successfully installed a valid SSL certificate on your server, you're ready to enable HTTP/2. SSL is a prerequisite for HTTP/2, so right off the bat you can see, security is not optional in HTTP/2.
HTTP/2 support for NGINX is provided by the ngx_http_v2_module module. Pre-built binaries of NGINX on most of the systems come with this module baked in. If you've built NGINX from source however, you'll have to include this module manually.
Before upgrading to HTTP/2, send a request to your server and see the current protocol version.
curl -I -L https://nginx-handbook.farhan.dev

# HTTP/1.1 200 OK
# Server: nginx/1.18.0 (Ubuntu)
# Date: Sat, 01 May 2021 10:46:36 GMT
# Content-Type: text/html
# Content-Length: 960
# Last-Modified: Fri, 30 Apr 2021 20:14:48 GMT
# Connection: keep-alive
# ETag: "608c6538-3c0"
# Accept-Ranges: bytes
As you can see, by default the server is on HTTP/1.1 protocol. On the next step, we'll update the configuration file as necessary for enabling HTTP/2.
To enable HTTP/2 on your server, open the /etc/nginx/sites-available/default file once again. Find wherever it says listen [::]:443 ssl ipv6only=on; or listen 443 ssl; and update them to listen [::]:443 ssl http2 ipv6only=on; and listen 443 ssl http2; respectively.
server {

    server_name nginx-handbook.farhan.dev;

    root /srv/nginx-handbook-projects/static-demo;

    listen [::]:443 ssl http2 ipv6only=on; # managed by Certbot
    listen 443 ssl http2; # managed by Certbot
    ssl_certificate /etc/letsencrypt/live/nginx-handbook.farhan.dev/fullchain.pem; # managed by Certbot
    ssl_certificate_key /etc/letsencrypt/live/nginx-handbook.farhan.dev/privkey.pem; # managed by Certbot
    include /etc/letsencrypt/options-ssl-nginx.conf; # managed by Certbot
    ssl_dhparam /etc/letsencrypt/ssl-dhparams.pem; # managed by Certbot

}
server {
    if ($host = nginx-handbook.farhan.dev) {
        return 301 https://$host$request_uri;
    } # managed by Certbot


    listen 80;
    listen [::]:80;

    server_name nginx-handbook.farhan.dev;
    return 404; # managed by Certbot
}
Test the configuration file by executing niginx -t and reload the configuration by executing nginx -s reload commands. Now send a request to your server again.
curl -I -L https://nginx-handbook.farhan.dev

# HTTP/2 200
# server: nginx/1.18.0 (Ubuntu)
# date: Sat, 01 May 2021 09:03:10 GMT
# content-type: text/html
# content-length: 960
# last-modified: Fri, 30 Apr 2021 20:14:48 GMT
# etag: "608c6538-3c0"
# accept-ranges: bytes
As you can see, HTTP/2 has been enabled for any client supporting the new protocol.
How to Enable Server Push
Server push is one of the many features that HTTP/2 brings to the table. Which means the server can push files to the client without the client having to request for them. In a HTTP/1.x server, a typical request for static content may look like as follows:
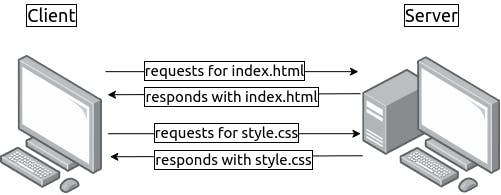
But on a server push enabled HTTP/2 server, it may look like as follows:
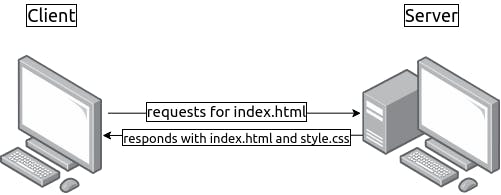
On a single request for the index.html file the server responds with the style.css file as well, minimizing the number of requests in the process.
In this section, I'll use an open-source HTTP client named Nghttp2 for testing the server.
apt install nghttp2-client -y

# Reading package lists... Done
# Building dependency tree
# Reading state information... Done
# The following additional packages will be installed:
#   libev4 libjansson4 libjemalloc2
# The following NEW packages will be installed:
#   libev4 libjansson4 libjemalloc2 nghttp2-client
# 0 upgraded, 4 newly installed, 0 to remove and 0 not upgraded.
# Need to get 447 kB of archives.
# After this operation, 1,520 kB of additional disk space will be used.
# Get:1 http://archive.ubuntu.com/ubuntu focal/main amd64 libjansson4 amd64 2.12-1build1 [28.9 kB]
# Get:2 http://archive.ubuntu.com/ubuntu focal/universe amd64 libjemalloc2 amd64 5.2.1-1ubuntu1 [235 kB]
# Get:3 http://archive.ubuntu.com/ubuntu focal/universe amd64 libev4 amd64 1:4.31-1 [31.2 kB]
# Get:4 http://archive.ubuntu.com/ubuntu focal/universe amd64 nghttp2-client amd64 1.40.0-1build1 [152 kB]
# Fetched 447 kB in 1s (359 kB/s)
# Selecting previously unselected package libjansson4:amd64.
# (Reading database ... 107613 files and directories currently installed.)
# Preparing to unpack .../libjansson4_2.12-1build1_amd64.deb ...
# Unpacking libjansson4:amd64 (2.12-1build1) ...
# Selecting previously unselected package libjemalloc2:amd64.
# Preparing to unpack .../libjemalloc2_5.2.1-1ubuntu1_amd64.deb ...
# Unpacking libjemalloc2:amd64 (5.2.1-1ubuntu1) ...
# Selecting previously unselected package libev4:amd64.
# Preparing to unpack .../libev4_1%3a4.31-1_amd64.deb ...
# Unpacking libev4:amd64 (1:4.31-1) ...
# Selecting previously unselected package nghttp2-client.
# Preparing to unpack .../nghttp2-client_1.40.0-1build1_amd64.deb ...
# Unpacking nghttp2-client (1.40.0-1build1) ...
# Setting up libev4:amd64 (1:4.31-1) ...
# Setting up libjemalloc2:amd64 (5.2.1-1ubuntu1) ...
# Setting up libjansson4:amd64 (2.12-1build1) ...
# Setting up nghttp2-client (1.40.0-1build1) ...
# Processing triggers for man-db (2.9.1-1) ...
# Processing triggers for libc-bin (2.31-0ubuntu9.2) ...

nghttp --version

# nghttp nghttp2/1.40.0
Lets test by sending a request to the server without server push.
nghttp --null-out --stat https://nginx-handbook.farhan.dev/index.html

# id  responseEnd requestStart  process code size request path
#  13      +836us       +194us    642us  200  492 /index.html

nghttp --null-out --stat --get-assets https://nginx-handbook.farhan.dev/index.html

# id  responseEnd requestStart  process code size request path
#  13      +836us       +194us    642us  200  492 /index.html
#  15     +3.11ms      +2.65ms    457us  200  45K /mini.min.css
#  17     +3.23ms      +2.65ms    578us  200  18K /the-nginx-handbook.jpg
On the first request --null-out means discard downloaded data and --stat means print statistics on terminal. On the second request --get-assets means also download assets such as stylesheets, images and scripts linked to this files. As a result you can tell by the requestStart times, the css file and image was downloaded shortly after the html file was downloaded.
Now, lets enable server push for stylesheets and images. Open /etc/nginx/sites-available/default file and update its content as follows:
server {

    server_name nginx-handbook.farhan.dev;

    root /srv/nginx-handbook-projects/static-demo;

    listen [::]:443 ssl http2 ipv6only=on; # managed by Certbot
    listen 443 ssl http2; # managed by Certbot
    ssl_certificate /etc/letsencrypt/live/nginx-handbook.farhan.dev/fullchain.pem; # managed by Certbot
    ssl_certificate_key /etc/letsencrypt/live/nginx-handbook.farhan.dev/privkey.pem; # managed by Certbot
    include /etc/letsencrypt/options-ssl-nginx.conf; # managed by Certbot
    ssl_dhparam /etc/letsencrypt/ssl-dhparams.pem; # managed by Certbot

    location = /index.html {
        http2_push /mini.min.css;
        http2_push /the-nginx-handbook.jpg;
    }

    location = /about.html {
        http2_push /mini.min.css;
        http2_push /the-nginx-handbook.jpg;
    }

}
server {
    if ($host = nginx-handbook.farhan.dev) {
        return 301 https://$host$request_uri;
    } # managed by Certbot


    listen 80;
    listen [::]:80;

    server_name nginx-handbook.farhan.dev;
    return 404; # managed by Certbot
}
Two location blocks have been added to exactly match /index.html and /about.html locations. The http2_push directive is used for sending back additional response. Now whenever NGINX receives a request for one of these two locations, it'll automatically send back the css and image file.
Test the configuration by executing nginx -t and reload the configuration by executing nginx -s reload commands.
nginx -t

# nginx: the configuration file /etc/nginx/nginx.conf syntax is ok
# nginx: configuration file /etc/nginx/nginx.conf test is successful

nginx -s reload
Now send another request to the server using nghttp and do not include --get-assets option.
nghttp --null-out --stat https://nginx-handbook.farhan.dev/index.html

# id  responseEnd requestStart  process code size request path
#  13     +1.49ms       +254us   1.23ms  200  492 /index.html
#   2     +1.56ms *    +1.35ms    212us  200  45K /mini.min.css
#   4     +1.71ms *    +1.39ms    318us  200  18K /the-nginx-handbook.jpg
As you can see, although the assets were not requested, the server has sent them to the client. Looking at the time measurements, process time has gone down and the three responses ended almost simultaneously.
This was a very simple example of server push but depending on the necessities of your project, this configuration can become much complex. This article by Owen Garrett on the official NGINX blog can help you with more complex server push configuration.
Conclusion
I would like to thank you from the bottom of my heart for the time you've spent on reading this article. I hope you've enjoyed your time and have learned all the essentials of NGINX.
Apart from this one, I've written full-length handbooks on other complicated topics available for free on freeCodeCamp.
These handbooks are part of my mission to simplify hard to understand technologies for everyone. Each of these handbooks takes a lot of time and effort to write.
If you've enjoyed my writing and want to keep me motivated, consider leaving starts on GitHub and endorse me for relevant skills on LinkedIn. I also accept sponsorship so you may consider buying me a coffee if you want to.
I'm always open to suggestions and discussions on Twitter or LinkedIn. Hit me with direct messages.
In the end, consider sharing the resources with others, because
Sharing knowledge is the most fundamental act of friendship. Because it is a way you can give something without loosing something. — Richard Stallman
Till the next one, stay safe and keep learning.