
By Enrico Piccinin
These days, many software systems have to deal with asynchronous behaviors and time-related issues.
Continuous connectivity, distributed systems, microservices-based architectures, the cloud, non blocking platforms — the consequence of all these things is that we somehow have to deal with asynchronicity and time. Our software systems have to learn how to deal with streams of events, which are, by their nature, asynchronous.
Reactive programming provides powerful tools, based on a functional programming style, that help us model systems that work in such a world. But these systems require us to think reactively when we design our solutions.
Thinking reactively often represents a challenge, as does any change of perspective. At the same time, it may be easier than you expect. Just look at what happens in the real world and try to map it in a straightforward way.
In this article, I aim to show you how to apply reactive and functional thinking to solve a very well-known problem in a natural way: how to animate an object with controlled motion. The metaphor I’ll use is that of a vehicle which can accelerate and brake, following the commands issued by a remote controller.
In the implementation we’ll be using RxJs, the JavaScript version of ReactiveX, and Typescript.
The code for a full demo implementation can be found here.
If you like this, this is a second article around these themes.
A quick recap of the simple basics of dynamics
If you want to change the velocity of an object, you need to apply a force to it which in turn impresses an acceleration to the same object. If you know the value of acceleration A of the object, you can calculate the variation of its velocity dV in a certain time interval dT with the formula
dV = A * dT
Similarly, if you know the velocity V, then you can calculate the variation in space dS in a time interval dT with the formula
dS = V * dT
Conclusion: if you have an acceleration A impressed to an object whose initial velocity is V0, you can approximate the velocity of the object in the time interval dT with its average, like this:
averageVel = (V0 + V1) / 2 = (V0 + V0 + dV) / 2 = V0 + A/2 * dT
and then calculate the approximate variation of space dS in the same interval dT with the formula
dS = averageVel dT = V0 dT + A/2 * dT²
The shorter the time interval dT, the better the approximation.
What “animating an object with movement” means
If we want to animate an object with a movement controlled by acceleration, (that is, if we want to simulate how an object would move if subject to forces), we have to introduce the dimension of time.
We have to divide the time in intervals, dT, calculate the space travelled for every dT, and show the new position at every interval.
Using the PULL approach — ask for information
We can use the above function, and pull from it the information we need (how much the object moved during the last time interval dT given a certain acceleration A and initial velocity V). We would take the result of the function and use it to calculate the new position, as long as we are able to somehow remember the previous position.
If we rely on a pull approach, it is the caller (the SW component) calling the function that does most of the work. It keeps and updates state, controls time, and manages the entire movement.
The reactive way: the PUSH (and command) approach
If you think of a vehicle which is controlled remotely by someone, then you would probably imagine that:
- the vehicle transmits at a regular frequency its position and velocity to the controller
- the controller can change the acceleration of the vehicle (steering and braking are just changes in the accelerations along the space axis) to guide the vehicle’s movement
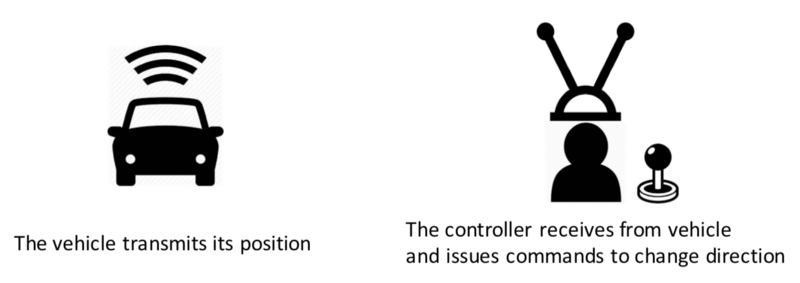
Such an approach has the advantage to clearly separate responsibilities:
- the vehicle is responsible for transmitting its state at any moment to any interested party
- the controller is responsible for listening to the data transmitted by the vehicle and for issuing the right commands
Reactive programming provides the tools to build a software solution to this problem mirroring exactly this model. This is probably what you would expect in the real world:
- a vehicle that transmits the details of its dynamics (for example, speed, position, direction) — the Observable
- a controller that listens to such transmissions and issues commands to accelerate, decelerate, steer, and brake — the Observer
Reactive implementation — RxJs
To develop the solution, we use Typescript as our programming language and the ReactiveX model via RxJs implementation. But the concepts can be easily transposed to many of the other languages supported by ReactiveX.
The MobileObject class — a representation of objects that move in space
We are going to build our simulator using reactive techniques with a functional programming style. But we’ll still use good old object-oriented (OO) concepts to build a clear frame for our implementation. So let’s start with the MobileObject class:
export class MobileObject {

}
This class will represent the objects that transmit at regular intervals of time all relevant data about their dynamics, like speed, position, and acceleration. Within this class we will work reactively.
Let’s introduce Mr. Observable, the core of our MobileObject
As we know, to be controlled remotely, a vehicle must continuously transmit to its controller data about itself, namely:
- its current velocity
- its current position
- how much its position and velocity varied since the last interval of time
This is just a stream of data over time emitted by the vehicle. The ReactiveX Observable is a way to model streams of events carrying data over time. So we can use Observables to model the data transmitted by our vehicle.
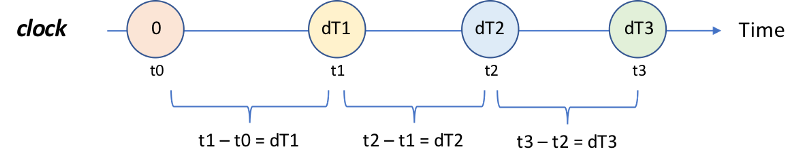
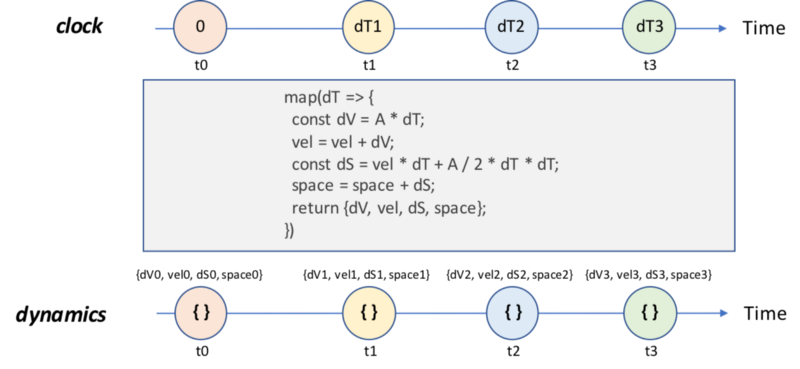
Our clock: a sequence of time intervals
The first thing we need to create is a sequence of time intervals. Each event emitted in this sequence knows the time elapsed since its predecessor, as illustrated in the following diagram:
With RxJs we can create such a clock with an Observable using the following function:
private buildClock(frameApproximateLenght: number) {
  let t0 = Date.now();
  let t1: number;
  return Observable.timer(0, frameApproximateLenght)
    .do(() => t1 = Date.now())
    .map(() => t1 - t0)
    .tap(() => t0 = t1)
    .share();
}
const clock = buildClock(xxx);
Let’s call this observable clock. Our clock emits approximatively every xxx milliseconds. Each event emitted by clock will carry the exact number of milliseconds elapsed since the previous emission.
We will see later, when talking about animation frames, why this method for creating an observable of time intervals is convenient. Later we will also cover why it is important to use the share operator while creating the clock.
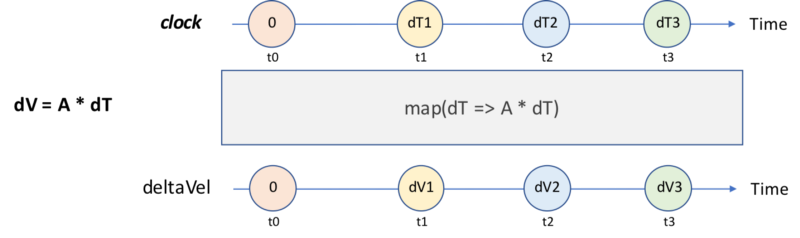
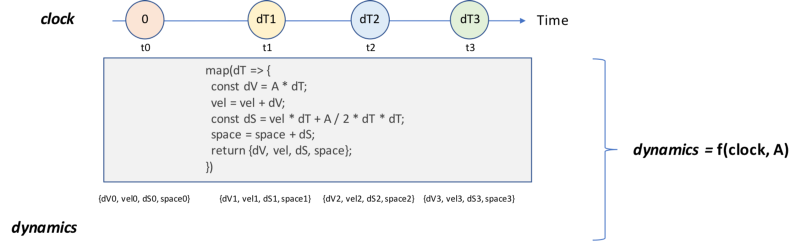
Calculate the variation of speed and space in a time interval
Let’s assume MobileObject is subject to an acceleration A. Now that we a clock, we can calculate the variation of speed dV using the formula dV = A * dT. Using this formula and the map operator of RxJs, we can create an Observable that emits the variation of speed over time:
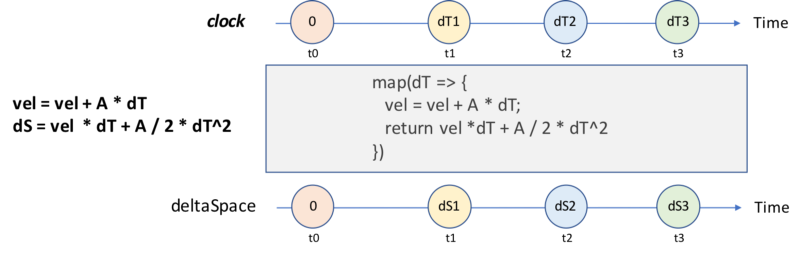
If we store in a variable velocity vel at time tX, we can calculate the approximate variation in space at the next time interval t(X+1) with the formula dS = vel dT + A / 2 dT². Again, using the map operator, we can obtain an Observable that emits the variation of space over time.
Using the same approach, we can build an observable that emits at every tick of the clock all the relevant information about the dynamics of MobileObject, starting just from its acceleration A. We call this observable dynamics.
But acceleration can change — so what?
This works if we know the acceleration A and if A is a constant.
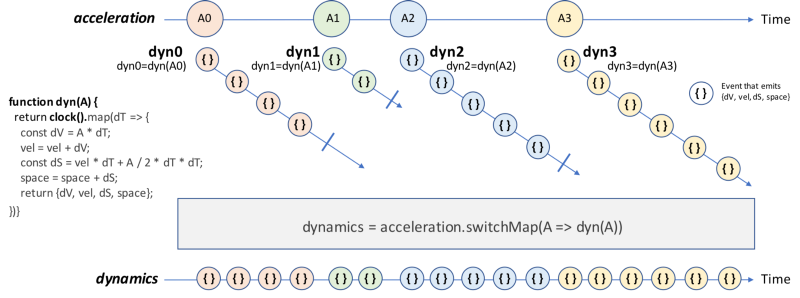
What happens though if the acceleration changes over time? Maybe we start with an acceleration A0, then after a period of time P0 a force changes it to A1, then after P1 it changes to A2, and then to A3, like in the following diagram.

acceleration looks like an Observable, doesn’t it? Each event represents a change in the acceleration of the MobileObject (that is, the fact that a new force has been applied to MobileObject).
Knowing A0 we can calculate the speed and position of MobileObject for the period P0 using an observable dyn0, built according to the logic described above. When the acceleration changes, we can still calculate speed and position, but we have to abandon dyn0 and **_switch_** to a new Observable dyn1, which is built with the same logic as dyn0, but now using the new acceleration A1. The same switching is repeated when acceleration becomes A2 and then A3.

This is where the operator switchMap comes in handy. Via switchMap we can transform the acceleration observable into a new version of the dynamics observable. It can receive a new value emitted by acceleration, start off a new observable dynX, complete the previous observable dynX-1, and emit all the events generated by the various observables of type dynX which it has spun off during this processing. The following diagram illustrates the switchMap mechanism.
Welcome now Mr. Subject — the accelerator pedal of MobileObject
For this to work, we need to create the accelerator pedal. This is a mechanism that allows external controllers to change the acceleration of MobileObject.
Acceleration needs to be controlled, so we need a command mechanism.
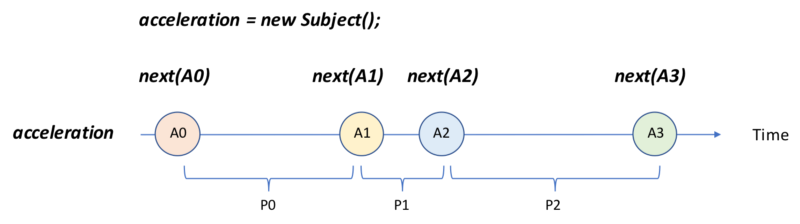
To change the acceleration of MobileObject, we need to cause the acceleration observable to emit events when the controller decides so. If we need to control when an Observable emits, we need to look at Subject, another type provided by RxJs.
A Subject is an Observable which offers the following methods:
- next(val) : emits an event with val as value
- error() : terminates itself with an error
- complete() : completes gracefully
So, if we want to change the acceleration over time, we can create the acceleration observable as a Subject, and then use the next() method to emit the event when needed.
Wrap everything into the MobileObject class
Now that we have all the parts required, we have just to assemble them into a coherent MobileObject class.
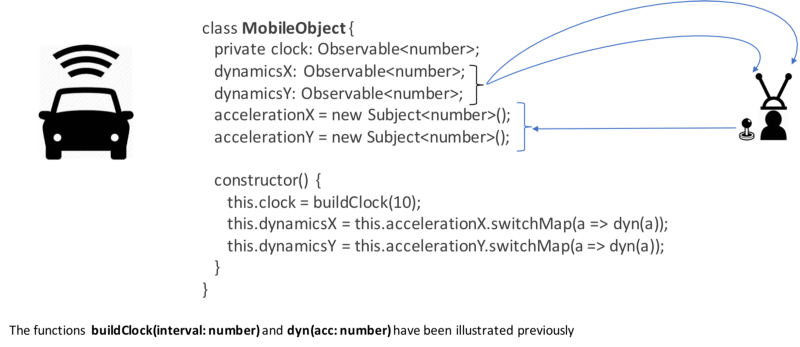
In a nutshell, this is how a MobileObject is modeled in a reactive world. There are:
- some observables, dynamicsX and dynamicsY from the example, that emit data about its dynamics along the various dimensions of space (in the above example just 2, X and Y, in a bi-dimensional plan)
- some subjects, accelerationX and accelerationY from the example, that allow controllers to change acceleration along the various dimensions
- an internal clock that establishes the frequency of the time intervals
In a 2 dimensional space, we have 2 different observables emitting the variation of space. Such observables need to **_share_** the same clock if we want a coherent movement. And clock is in itself an observable. So that they can share the same observable, we have added the share() operator at the end of the buildClock() function we described previously.
Final touch: brake
Let’s look at this very simplistically. If you want to stop or slow down a car that moves with velocity V0, you have to apply to the car an acceleration in the direction opposite that of its velocity.
After a period of time, the velocity of the car will become 0, and at that point no further acceleration is applied to the car.
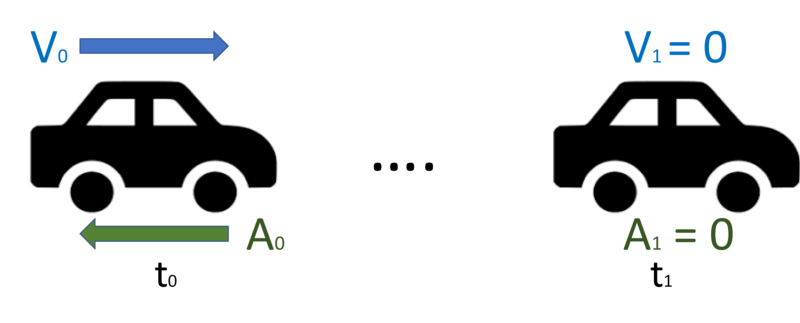
To obtain a brake effect, we therefore have to know the direction of the MobileObject and stop the negative acceleration when the MobileObject reaches velocity 0.
Knowing the direction is easy. We have just to take the first event emitted by the dynamicsX or dynamicsY observable, depending on the axis we are interested in, and check if the velocity of the last event is positive or negative. The sign of the velocity is the direction.
directionX = mobileObject.dynamicsX
.take(1)
.map(dynamics => dynamics.vel > 0 ? 1 : -1)
directionX is an observable which emits only one event. The value emitted is 1 if the velocity is positive, -1 otherwise.
So, when MobileObject receives the command to brake, all it has to do is to get the direction and apply an opposite acceleration, like this:
directionX
.switchMap(
   // BRAKE is a constant of acceleration when mobileObject brakes
   dir => mobileObject.accelerationX.next(-1 * dir * BRAKE)
)
We are almost there. We just need to make sure that once the velocity reaches 0, or close to 0, we remove any acceleration. And this is how we can get what we want.
directionX
.switchMap(
   // BRAKE is a constant of acceleration when mobileObject brakes
   dir => {
      mobileObject.accelerationX.next(-1 * dir * BRAKE);
      return mobileObject.dynamicsX
      // VEL_0 is a small value below which we consider vel as 0
      .filter(dynamics => Math.abs(dynamics.vel) < VEL_0)
      .do(() => mobileObject.accelerationX.next(0)
      .take(1)
   }
).subscribe()
Here, after issuing the brake acceleration command, we simply select the first event of dynamicsX observable where the velocity is sufficiently small to be considered 0. Then we issue a command to apply an acceleration equal to zero. The last take(1) operator is added to make sure that we immediately unsubscribe, since the brake observable has completed its job.
This code needs some refinement to work really smoothly, but it is enough to convey the basics of braking reactively.
Back to the start: animation
All this may look good, but we still want to animate our MobileObject. For instance, we want to create an application where a user can issue acceleration commands via a 4-button console and see the MobileOject move accordingly.

Such an app acts as the controller of MobileObject and as the monitor to show the animation.
Issuing commands
Controlling the movement of MobileObject means that we need to apply acceleration. The browser app can do this using the accelerationX subject provided by MobileObject, as shown in the following snippet.
<button id="positiveAccX"
   (mousedown)="pAccX()" (mouseup)="releaseAccX()"/>

// mobileObject contains the instance we want to control
const accelerationValue = 100;
pAccX() {
   mobileObject.accelerationX.next(accelerationValue);
}
releaseAccX() {
   mobileObject.accelerationX.next(0);
}
An acceleration of 100 is applied when the mouse button is down and acceleration is set to 0 when the mouse button is released, simulating the accelerator pedal.
Show animated movement
MobileObject exposes dynamicsX and dynamicsY, 2 Observables that continuously emit data about the movement along the respective axis (for example, deltaSpace, current velocity, acceleration along X and Y). So the browser app has to subscribe to them to receive this streams of events and change the position of MobileObject at every event emitted, as shown in this sample snippet:
interface Dynamics {deltaVel: number; vel: number; deltaSpace: number; space: number}
const mobileObjectElement = document.querySelector('.mobileobj');
mobileObject.dynamicsX.subscribe(
   (dyn: Dynamics) => {
     const currentPositionX = mobileObjectElement.style.left;
     const deltaSpaceX = dyn.deltaSpace;
     mobileObjectElement.style.left = currentPositionX + deltaSpace;
   }
)
Animation Frame
The browser works asynchronously, and it is not possible to predetermine when it is ready to display a new frame. The animation, or the simulation of movement, is provided by changing the position of an object over time. A smooth animation changes the position at every frame displayed by the browser.
RxJs provides a Scheduler called animationFrame which wraps the requestAnimationFrame browser API. A Scheduler is a type of RxJs that controls when the events emitted by an observable really occur.
We can use animationFrame and the interval static method of Observable to create an observable that emits one event every time the browser is ready to display a new frame.
Observable.interval(0, animationFrame)
Now we just need to add the length of time passed since the last frame to the events emitted by the this observable, and we have what we needed: an observable that emits every time the browser is ready to display a new frame with the amount of time passed since the last frame was displayed.
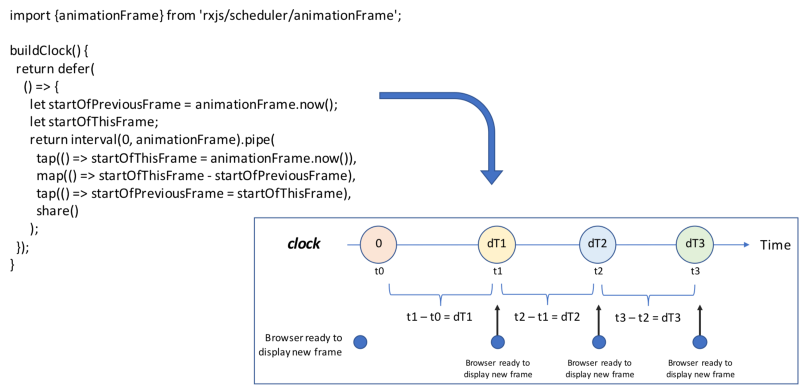
This is the new clock which we use in MobileObject to provide a stream of events relative to the movements (dynamicsX and dynamicsY). These movements are synchronized with when the browser is ready to show a new frame.
You may have noticed that, in this last code example, the syntax has slightly changed. We are now using the “pipeable” operators. We did not use them before, since they don’t add anything to our reasoning. Still, it is worth introducing them since they represent new syntax you can use since RxJS 6.
You may also notice the defer function. This is an RxJs function that returns an Observable, but makes sure that the logic defined within the function passed as a parameter to defer is executed only when the Observable is subscribed.
This allows us to execute the buildClock() method at any time, maybe while initializing a UI component. It also allows us to be sure that the clock will start ticking only when subscribed and with the right timing. More specifically let startOfPreviousFrame = animationFrame.now(); will be executed only when the clock observable is subscribed.
Last but not least, a few words about the functional programming style
At the beginning of our discussion, we talked about building the stream of data representing the movement of MobileObject over time. We called this the dynamics observable, and used the following transformation logic:
map(dT => {
  const dV = A * dT;
  vel = vel + dV;
  const dS = vel * dT + A / 2 * dT * dT;
  space = space + dS;
  return {dV, vel, dS, space};
})
This assumes that we have defined the variables vel and space somewhere so that they are visible within the scope of the function passed as a parameter to the map operator.
The first solution that might come to mind for a traditional OO programmer is to define such variables as properties of the MobileObject class. But this would mean storing state information at the object level that should only be changed by the transformation defined within the map operator shown above.
If you make this state information accessible to potentially any piece of logic within MobileObject, you risk changing it by mistake, making the entire object inconsistent. Plus, any time such state is changed, we have to think about other parts of logic that are potentially relying on this state. We need to consider the consequences of such dependencies, which sometimes may be pretty well hidden.
Here is where functional programming comes to our rescue.
Higher level functions
A higher level function is a function which returns a function. The name might reminds you of higher level observables, which are observables that emit other observables.
The dynamics observable of MobileObject can be built if we have the clock observable and we know the acceleration A. So we can say that dynamics is function of the clock observable and the acceleration value A.
We can also create a function, dynamicsF, which returns a function dF. It in turn, when called, returns the dynamics observable, as shown in the snippet below.
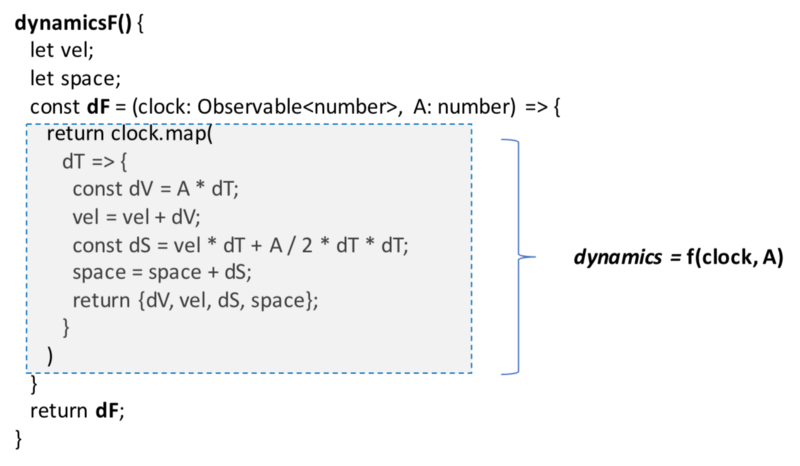
Notice that in dynamicsF, we have defined the variables vel and space, which are perfectly visible from within dF, making our code consistent and correct.
If we have a variable clock where we store the clock observable and a variable acc where we store the value of the acceleration A, we can use the function dynamicsF, which we have just defined, to build our dynamics observable as shown in the following snippet.
const dynFunction = dynamicsF();
const dynamics = dynFunction(clock, A);
The key point is that now dynFunction contains in its internals the variables vel and space. It stores them internally in its own state, a state which is not visible to anything outside the function.
Assuming that dynamicsF is a method of MobileObject class, the final version of the code that creates the dynamics observable in MobileObject constructor can be written as
const dfX = this.dynamicsF();
this.dynamicsX = this.accelerationX
                     .swithMap(a => dfX(this.clock, a));
In doing so, we have confined the state information about current velocity and space into the function dfX. We’ve also removed the need to define properties for current velocity and space in MobileObject. And we have improved reuse, since dynamicsF() does not have any reference to any axis and can be used to calculate both dynamicsX and dynamicsY via function composition.
By applying a functional programming style (in this case higher isolation), we have gained higher security for our code and higher reuse.
Conclusion
It has been a pretty long journey. We have seen the use of some of the most important RxJs operators and how Subjects can be handy. We have seen also how to use a functional programming style to increase the security of our code as well as its reusability.
I hope I’ve been able to show how, using a reactive thinking approach to this problem, it is possible to build a software solution which very naturally mirrors a real life model for objects that are remotely controlled.
Any time you have to face a problem where time and asynchronicity play a role, then reactive thinking supported by reactive libraries such as RxJs can lead you to a simpler and more solid design. In this world of constant connectivity, the cloud, non-blocking platforms, and microservices, time and asynchronicity are going to play an ever-increasing role.
If you liked what you have just read, you may be interested in reading also this article, where I describe how to build a distributed system to control and display in action multiple MobileObjects in a distributed environment.
The entire code base can be found here.
I want to thank Ben Lesh who inspired this piece with one of his talks.