
By Daniel Asta
If you've been using React for a while, you may have noticed times when the freedom and wild nature of JavaScript works against you (and not because of JS 😄). This can be especially true if you're working in a team.
You may not know it, but you need TypeScript – or at least, you need to test it.
Let me be clear, I love JavaScript and the freedom it provides. In fact, for a long time I was "against" TypeScript.
So I want to go on a journey together, figuring out if TypeScript is worth using or whether it's only for people who don't know how to code properly (this was an inside joke in my team a long time ago!).
The idea behind this article is to go through the basics of TS and understand the benefits. This should help you decide if you want those benefits or not. Then in the second section of this article, I will cover the specifics of TS with React.
Table of Contents
- Resources
- Why Use ESLint, Prettier, and Husky?
- What is TypeScript?
- Why Bother Dealing with TS?
- How to Setup TypeScript
- Sample Shopping List Project
- How to Combine React + TypeScript
- Conclusion
Resources
Here's some small boilerplates to start with:
- Create React App + TypeScript + ESLint + Prettier Boilerplate
- Vite + TypeScript + ESLint + Prettier Boilerplate
If you like programming games, try PhaserJS. You can make games for the browser with TypeScript and it's a fun way to learn it.
Also be sure to check out The Official Handbook of TS. It has tons of useful documentation and examples.
Also we'll look at two sample projects so you have some real code to refer to and test real implementations. Here they are:
Shopping List project
This is a simple project to test the TypeScript developer experience without Webpack, React, or any other add-ons – just plain TypeScript converted to JavaScript.
AnimeTrailers project

For the integration of TypeScript with React I built another example project. It's a dummy application that, thanks to JikanAPI, provides a list of anime and basic information to watch the latest trailers of your favourite anime.
Why Use ESLint, Prettier, and Husky?
On the boilerplates I tend to use Airbnb's ESLint rules, Prettier's recommended rules, and Husky's pre-commits actions. This is quite useful especially in a team environment where you need everyone to follow the same style of code. But you can also benefit as a solo developer or as a learner.
The Airbnb rules can be strange sometimes, but they provide a great explanation and examples. This way you can decide if the rule makes sense for you or not. If they don't, you can disable it in the .eslintrc file.
I found that for junior devs or people who are just starting out with JS or TS, these rules are very useful. So I recommend you at least try to include them in a project and check the results. 😉
What is TypeScript?
TypeScript or TS is an open source language developed and maintained by Microsoft. Here are some other facts about TS:
- It's a multi-paradigm language (like JavaScript).
- It's an alternative to JavaScript (more precisely, a superset)
- It allows the use of static types
- It has extra features (generics, interfaces, tuples, etc which will be explained in detail below)
- It allows for gradual adoption (that is, uou can turn an existing project into a TS project by changing the files one by one, it's not a big bang change).
- You can use it for front-end and back-end development (just like JS)
The browser does not understand TS code. It must be transcompiled into JS. JS has a dynamic type mapping value and TS has static types which is less error prone.
In React you already transcompile JS with Babel, so having to transcompile the code is not an extra inconvenience nowadays.
Why Bother Dealing with TS?
That's the thing – why even bother with TS when you are happy with JS and everything is fine? A while back, as I said before, we had an inside joke about languages like TS with types (I was doing Java at the time by the way). My team joked that you need types if you don't know how to code correctly.
TypeScript, Java, and a bunch of other languages have static typing that will define a type associated with a variable. The type will be checked during compile time. Once you define something to be a string or a boolean you can't change its type.
JavaScript, on the other hand, has dynamic typing. This means that you can assign a string to a variable, and later convert it to a boolean, a number, or whatever you want. The type will be dynamically assigned at run time.
But when you look at the TS code on the Internet, you can see...

So going back to my team's old joke, yes indeed it was correct: if you know exactly what you're doing, you don't need someone constantly telling you that this is a string and only a string, and if at some point it becomes a boolean or something else.... I know what I'm doing!
But the truth is that we are not perfect, and things happen:
- Working in a hurry.
- Having a bad day.
- Leaving an idea on Friday and when you come back on Monday you don't have the same picture of the situation.
- Working in a team, and not everyone has the same level and/or vision.
For the same reasons we use an IDE, IDE extensions, syntax highlighting and linters instead of the Notepad app. TypeScript can fit into these aids.

Some examples of common mistakes
Let's look at some basic examples with and without TS in the equation:
Please, I know what I'm using
// App.js
import { MemoryRouter as Router } from 'react-router-dom'

import Routes from './routes'

export default function App() {
  return (
    <Router basename="/my-fancy-app">
      <Routes />
    </Router>
  )
}
Do you see anything unusual in the code above? If so, congratulate yourself.
This file was in my boilerplate for a long time. It's not a bug but... MemoryRouter doesn't need any basename at all. This happens because at some point in the past BrowserRouter was used, which in fact needs a basename property.
With TS you will be notified that No overload matches this call which tells you that there is no signature for that component with that property.
TypeScript not only works as static typing, but it helps you better understand the needs of other libraries. By others I mean components and functions from third parties or your co-workers.
Yes I can hear the answer – you must properly know the libraries you are using, and again yes you are right. But assuming that everyone involved in a project knows every "external" library and the nuances of the versions can be a daunting task.
The devil's flag
let isVerified = false;
verifyAmount();

// isVerified = "false"
if (isVerified) proceedPayment();
I have seen this error many times. I don't have the exact code and each time it has a different nuance, but you can get the point. You have a boolean variable that is responsible for letting some code run or not and at some point someone else (or maybe yourself in an error) turns the boolean into a string and a non-empty string is a true value.
With TypeScript you would have had the error: The type 'string' is not assignable to the type 'boolean'. This error will occur at compile time, even if you don't have your application running at the time. So the chances of the error making it to production are very small.
Again, we can apply the same rule as before – if you code correctly this doesn't happen. If you follow the rules of Clean Code and be careful with what you are doing this can also be avoided. TypeScript is not meant to allow us to be lazy and disorganized – but it can be a good ally, as syntax highlighting can help to avoid some errors or detect unused variables.
I though the cat was alive inside that box
const MONTH_SELECT_OPTIONS = MONTHS.map((month) => ({
  label: getMonthName(month),
  value: month,
}))

export default function PaymentDisplayer() {
  const [currentMonthFilter, setCurrentMonthFilter] = useState(
    MONTH_SELECT_OPTIONS[0]
  )

  const onChangeHandler = option => {
    setCurrentMonthFilter(option.value)
  }

  return (
    <select onChange={onChangeHandler}>
      {MONTH_SELECT_OPTIONS.map(({ label, value }) => (
        <option key="value" value={value}>
          {label}
        </option>
      ))}
    </select>
  )
}
It is very common (and perhaps not recommended) to change a state's type. Sometimes it is on purpose like having an isError flag and suddenly changing it from boolean false to error message string (and again not recommended at all!). But in other scenarios it is by mistake, like the example above.
The person who wrote this in the first instance thought that in currentMonthFilter they would store the actual option of the select, an HTMLOptionElement with label and value. Later, the same person on another day (or perhaps another developer) makes the changeHandler and sets the value instead of the full option.
The above example works, and is simplified for learning. But imagine this on a large scale, especially in those components where actions are passed underneath as props.
Here TypeScript would help us in two ways:
- Static typing will throw an error when trying to change the type of
currentMonthFilterfrom{label: string, value: number}tonumber. - The person coding the next step of calling a service to retrieve payments with that filter will know through IntelliSense what type they will get from the state and whether it matches the type the service needs.
So TypeScript also allows us to inspect from the IDE the different functions, parameters and documentation of third-party libraries and components of our peers.
Through these examples (which are perhaps not too representative to be honest) we can conclude that TypeScript tries to help us in a React environment with:
- Being coherent in typing and consistent with static types
- Providing documentation and IntelliSense of the available possibilities
- Detecting bugs early
How to Setup TypeScript
In this article we will use the Global Installation. This is because I think it is better to first dive into TypeScript in isolation without any Webpack, React or any other variables and see how it works and what problems it solves.
How to Install TypeScript Globally
npm install -g typescript

#or

yarn install --global typescript
How the TypeScript Compiler Works (tsc)
Once you have installed TypeScript on your system or with any of the other options mentioned above, you can use the TypeScript compiler, using the tsc command.
Let's test the compiler with the minimum configuration:
- Create a new empty folder
- Place an
index.htmlwith the basic HTML5 structure inside. - Create an empty
index.tsfile at the same level asindex.html. - Open a terminal and type
tsc --init(assuming you have installed global TypeScript) this will create for you atsconfig.json(we will look at this file in detail in the next section).
You will have something like this:
- index.html
- index.ts
- tsconfig.json
<!DOCTYPE html>
<html lang="en">
  <head>
    <meta charset="UTF-8" />
    <meta http-equiv="X-UA-Compatible" content="IE=edge" />
    <meta name="viewport" content="width=device-width, initial-scale=1.0" />
    <title>Document</title>
  </head>
  <body></body>
</html>
Now you need to include the TS file in the HTML. But browsers don't understand TypeScript they understand JavaScript, so you can modify your index.html to:
<!DOCTYPE html>
<html lang="en">
  <head>
    <meta charset="UTF-8" />
    <meta http-equiv="X-UA-Compatible" content="IE=edge" />
    <meta name="viewport" content="width=device-width, initial-scale=1.0" />
    <title>Document</title>
  </head>
  <body></body>
  <script src="./index.js"></script>
</html>
Open a new terminal and type tsc. Your index.ts file will be converted into an index.js that the browser can read.
Instead of typing the tsc command every time you want to compile the TS file into a JS file, you can put TypeScript in watch mode with tsc -w.
Now my recommendation is that you open both TS and JS files side by side. Then type regular JS into the index.ts file, and test what the outputs are. (We'll use this a lot in the next sections to test what TS generates).

What's in tsconfig.json
If you are following the article, you have created this file with the tsc --init command. It creates the tsconfig.json with some default configuration and a bunch of comments which are great to start with.
Let's look at some of the properties that might be useful to get you started:
targetis the version of JS we are converting our TS code to. Depending on the browsers you want to support, you may need to set some older version. It can be a good learning resource too – try playing with different versions and see what JS code is generated.moduledefines what kind of syntax you will use for modules.commonjswhich is the default usesrequire/module.exportsand modern JS (ES6+) usesimport/export. If you want to useimport/exportyou need to changetargetto ES6 or higher. In the example project we will use this syntax so check the rest of the article for this.libYou need it to specify additional libraries you will use in your project and check additional types, for example DOM related.jsxIn React you will need to set it to at leastpreserve. This mode assumes that another tool will compile that part (Babel in this case) but TSC will do the type checking. You can set this property toreactorreact-native. You use this if you want TSC to compile your JSX code into regular JS code. In most cases we will leave this property topreservewhich will send the file as regular JSX and Babel/Webpack will do the rest.outDirwhere the files will be placed after the compilation, for example in most React projects it will be placed in abuildfolder.rootDirwhere the files will be taken for compilation. On most React projects this will be./src.strictenables a set of rules for type checking which results in a stronger check for what is considered "correct"/ I recommend starting with this on false when you are learning. Then when you feel confident enough turn it on and check what new red flags you have. But remember you will get the full potential of TS with this option enabled. This option also enables all the strict options below, which you can disable individually.includethe folder(s) you want to include to be compiled, for example thesrcfolderexcludethe folder(s) you want to prevent from being compiled, for example thenode_modulesfolder.
In the sample project for this article, we will take the files rootDir from ./src and will place it outDir in the public folder.
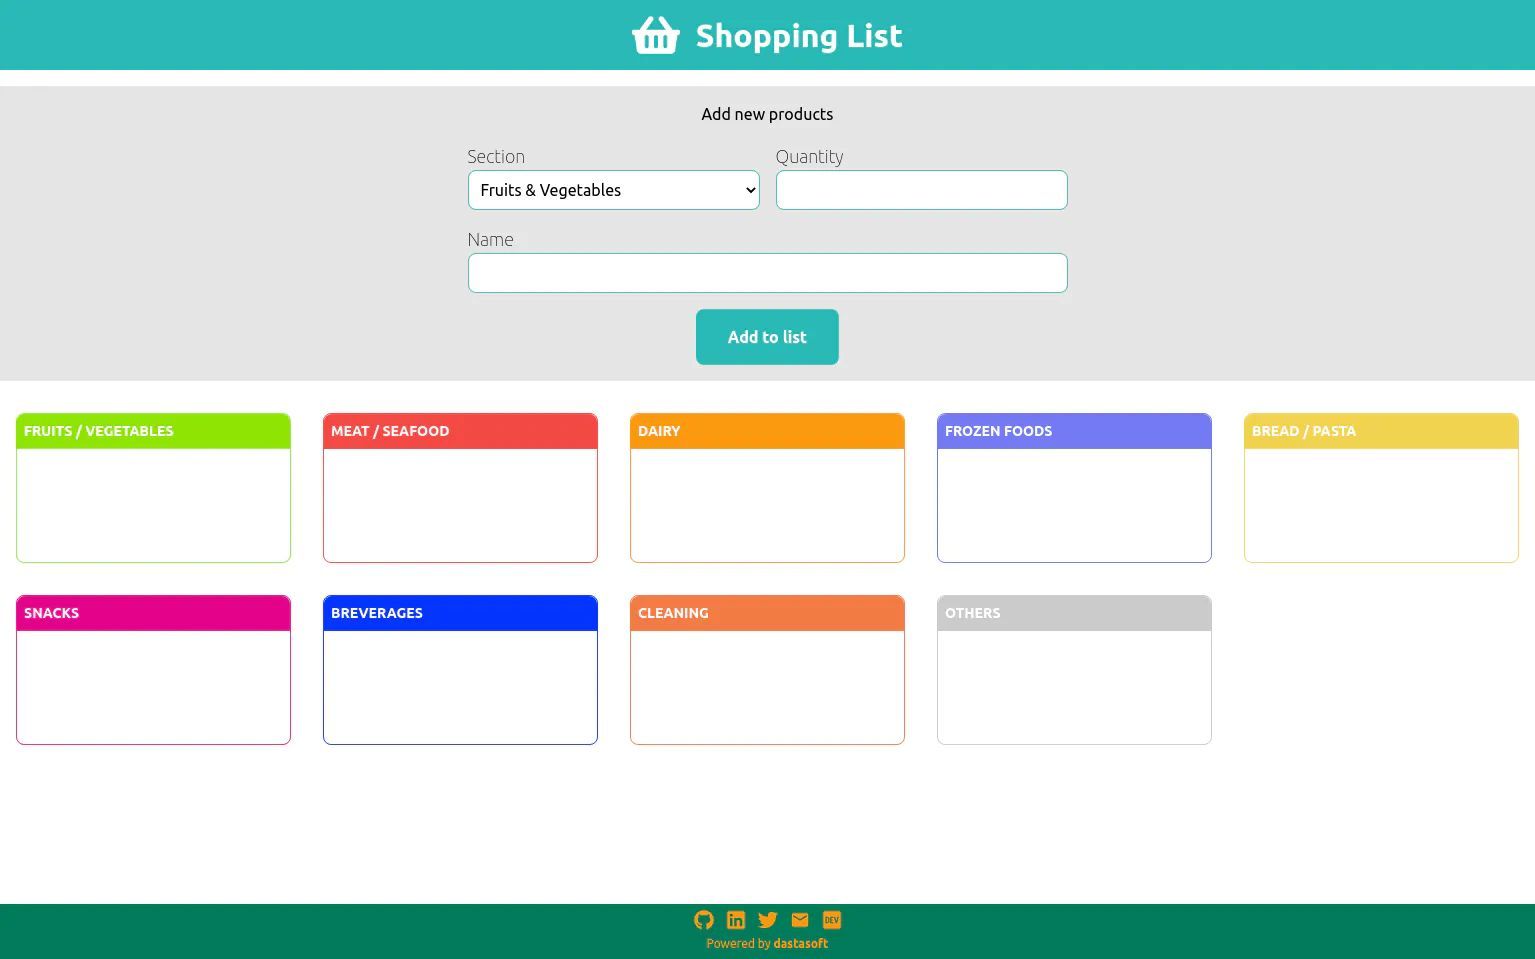
Sample Shopping List Project
The sample project is very basic stuff: you can insert different items and their quantities in different sections of your shopping list. Then later you can remove them while you shop and check what you have to buy next.
The idea behind this example project is to get used to TypeScript and the general workflow. Once you get into the React environment a lot of the magic is done for you by Webpack or any other bundler. So I think it's important to know the very basic things and later enjoy the work that the bundler does for you.
Let's see what we can use from TS to get a better, less error-prone code base.
TypeScript Modules
If you want to use ES6 import/export modules you must configure tsconfig with:
- target: es6 or higher
- module: es2015 or later
And in the index.html file you must add the module type like this:
<script type="module" src="app.js"></script>
But keep in mind that using modules has two drawbacks:
- Compatibility with older browsers is less likely.
- Files in production will be split, so you will have multiple requests for each file (this can be fixed by using a bundler like Webpack).
TypeScript Types
In JavaScript, types are assigned at runtime. When the interpreter sees your variable and the value, it decides what type it is. This means that we can do things like this:
let job = "Warrior"; // string
let level = 75; // number
let isExpansionJob = false; // boolean

level = "iLevel" + 75
// now it's an string
In TypeScript, types are assigned at compile time. So once the type is defined it will be protected under that signature.
let job: string = "Samurai";
let level: number = 75;
let isExpansionJob: boolean = true;

level = "iLevel" + 75
// Error, Type string cannot
// be assign to type number!
Inference in TypeScript
In fact, it is not necessary to explicitly state the type you want the variables to be. TS can infer the type by its value.
let job = "Samurai";
let level = 75;
let isExpansionJob = true;

level = "iLevel" + 75
// Error, Type string cannot
// be assign to type number!
In React, which we'll look at in the second section of this article in detail, you'll see the inference as well – for example in useState
const [currentMonthFilter, setCurrentMonthFilter] = useState("January")

useEffect(() => {
   setCurrentMonthFilter(1)
   // Error, Type number cannot
   // be assign to type string!
}, [])
any and unknown in TypeScript
I have said all along that the TS has static types, but there is a nuance to that statement.
let level: any = 10;

level = "iLevel" + 125;
// OK, still type any

level = false;
// OK, still type any
Welcome back to JavaScript! any is a dynamic type for when you don't know what type the variable will be in the future – but it somehow reverses all the advantages that TS provides.
let level: any = 10;

level = "iLevel" + 125;

level = false;

let stringLevel: string = level;
console.log(typeof stringLevel);
stringLevel.replace("false", "true");
When you assign level to stringLevel of type string it does not become a string, it is still a boolean. So the replace function does not exist and the code fails at runtime. You'll get Uncaught TypeError: stringLevel.replace is not a function.
For that we have another type which is the safe counterpart of the any type:
let level: unknown = 10;

level = "iLevel" + 125;

level = false;

let stringLevel: string = level;
// Error
With unknown you can assign any type as in any, but this time the compiler gets the error when you try to assign to another type. So if you don't know what type it will be, try using unknown instead of any.
Arrays in TypeScript
let job = "Red Mage";
let level = 75;
let isExpansionJob = false;
let jobAbilities = ['Chainspell', 'Convert'];

jobAbilities.push('Composure'); // OK
jobAbilities.push(2); // Error
jobAbilities[0] = 2; // Error
In the example above, we declared an array of strings jobAbilities. We can add more strings, but we cannot add other types or change the current values to values of other types. This is because in the declaration we have made the inference of type string[].
let job = "Red Mage";
let level = 75;
let isExpansionJob = false;
let jobAbilities = ['Chainspell', 'Convert'];
let swordSkill = ["B", 5, 144, 398];

swordSkill.push("B+"); // OK
swordSkill.push(230); // OK

swordSkill[1] = "C";
// OK, the type is not position related

swordSkill.push(true); // Error
As in the previous example, type inference is done in the declaration. We now declare an array of strings and numbers for swordSkill.
If you want to explicitly declare the types for the arrays we saw in the examples:
let jobAbilities: string[] = ['Chainspell', 'Convert'];
let swordSkill: (string | number)[] = ["B", 5, 144, 398];
By the way, | is for doing a union of different types.
Objects in TypeScript
Let's go back to the example – but now in the form of an object:
let job = {
  name: "Summoner",
  level: 75,
  isExpansion: true,
  jobAbilities: ["Astral Flow", "Elemental Siphon"]
};

job.name = "Blue Mage"; // OK
job.level = "Four" // Error
job.avatars = ["Carbuncle"]; // Error
job.level = "Four"cannot be done because we cannot change the type of a property. Properties have static types as well.job.avatars = ["Carbuncle"]– we cannot add new properties, as thejobobject already has a type that has a defined structure.
let job = {
  name: "Summoner",
  level: 75,
  isExpansion: true,
  jobAbilities: ["Astral Flow", "Elemental Siphon"]
};

job = {
  name: "Blue Mage",
  level: 4,
  isExpansion: true,
  jobAbilities: ["Azure Lore", "Burst Affinity"]
}; // OK

job = {
  name: "Corsair",
  level: 25,
  isExpansion: true
}; // Error
We can assign another object, because we define the object as let but it has to be in the exact same form.
Take a moment and think about it: how many times do you repeat object structures in the front-end without any kind of check like this? How many times have you made a typo by typing data.descrption and days later you discover the bug? If not, I can promise you that this will happen sooner rather than later.
Let's check the explicit type of our example:
let job: {
  name: string;
  level: number;
  isExpansion: boolean;
  jobAbilities: string[];
} = {
  name: "Summoner",
  level: 75,
  isExpansion: true,
  jobAbilities: ["Astral Flow", "Elemental Siphon"]
};
As you can see, this gets a bit bigger for a simple object, so in this case we can use type aliases.
Aliases in TypeScript
type Job = {
  name: string;
  level: number;
  isExpansion: boolean;
  jobAbilities: string[];
};

let Summoner: Job = {
  name: "Summoner",
  level: 75,
  isExpansion: true,
  jobAbilities: ["Astral Flow", "Elemental Siphon"]
};

let BlueMage: Job = {
  name: "Blue Mage",
  level: 4,
  isExpansion: true,
  jobAbilities: ["Azure Lore", "Burst Affinity"]
};
With type aliases we can define a common type for reuse. In React, DOM, and other libraries you will find a lot of ready-to-use defined types.
Functions in TypeScript
The syntax of the functions is quite similar to JS, but you can specify the type of the parameter and the type of the return.
type Enemy = {
  name: string;
  hp: number;
  level: number;
  exp: number;
};

let attack = (target: Enemy) => {
  console.log(`Attacking to ${target.name}`);
};

attack = "Hello Enemy"; // Error
I use an arrow function, but you can also use regular function declarations. There are two main differences in functions between JS and TS:
- You specify the type of the parameters you pass to the function, like our
target: Enemy. - The variable
attackis given the type of the function's return, so you cannot change its type afterwards.
The type of the function is described as follows:
let attack = (target: Enemy): void => {
  console.log(`Attacking to ${target.name}`);
};
The void type is used when the return type is nothing, and it is also not necessary to explicitly set the type:
// let attack = (target: Enemy): number => {
let attack = (target: Enemy) => {
  return target.hp - 2;
};
As with any, the void type has some nuances:
let attack = (target: Enemy): void => {
  console.log(`Attacking to ${target.name}`);
};

attack = (target: Enemy): number => {
  return target.hp - 2;
};

// lizard has 200hp
console.log(attack(lizard)); // 198
The example above has no errors – even if you think you have changed attack from (target: Enemy) => void to (target: Enemy) => number it is still void.
Check what happens if you define the function with the number first.
let attack = (target: Enemy) => {
  return target.hp - 2;
};

attack = (target: Enemy) => {
  console.log(`Attacking to ${target.name}`);
}; // Error

let attackResult = attack(lizard);
Type '(target: Enemy) => void' is not assignable to the type '(target: Enemy) => number'. Type 'void' is not assignable to the type 'number'. So, void works as any in this scenario.
For the attackResult the type will be number. There is no need to specify it – TS will infer the type from the return type of the function.
Optional parameters in TypeScript
You can define optional parameters in functions with ?.
let heal = (target: Player | Enemy, spell: Spell, message?: string) => {
  if (message) console.log(message);
  return target.hp + spell.power;
};

heal(player1); // Error
heal(player1, cure, "Healing player1"); // OK
heal(skeleton, cure); // OK
The first call won't work because we need to pass at least two parameters, but the second and third are fine. message is an optional parameter. When not passed it will be received as undefined.
If you compare the last example with a simple JS function:
let heal = (target, spell, message) => {
  if (message) console.log(message);
  return target.hp + spell.power;
};

heal(player1); // Error
heal(player1, cure, "Healing player1"); // OK
heal(skeleton, cure); // OK
The basic behavior will be the same, but the difference is that the error will appear at runtime, because in the first call you cannot call power from an undefined value.
As you can see from these examples, working with functions is safer in TS because you don't need to rely on what happens outside. You know what parameters must arrive and what form they take.
The same goes for the people using your function: they will know exactly what parameters are needed, the form, and what they will get from the function.
TypeScript Enums
With enums, we can define a collection of constants.
enum BattleMenu {
  ATTACK,
  MAGIC,
  ABILITIES,
  ITEMS,
  DISENGAGE
}

enum Equipment {
  WEAPON = 0,
  HEAD = 1,
  BODY = 2,
  HANDS = 3,
  LEGS = 4
}

console.log(BattleMenu.ATTACK, Equipment.WEAPON);
// 0 0
Enums are auto-indexed by default – both statements in the example above are equivalent.
Enums can also store strings. For example in React I often use enums to store paths:
enum Routes {
  HOME = "/",
  ABOUT = "/about",
  BLOG = "/blog"
}
TypeScript Generics
const getPartyLeader = (memberList: Player[]) => {
  return memberList[0];
};

const partyLeader = getPartyLeader(partyA);
We want to implement a getPartyLeader function that returns the party leader group that is first in the array.
What if we want to support other types besides Player? We can come up with this solution for now:
const getPartyLeader = (memberList: Player[] | Enemy[]) => {
  return memberList[0];
};

const partyLeader = getPartyLeader(partyA);
// Player[] | Enemy[]
OK, now we can pass a Player group or an Enemy group but our PartyLeader constant can be either. So the type check is Player[] | Enemy[].
If we want to assign the type exactly, one way is to use generics:
const getPartyLeader = <T>(memberList: T[]) => {
  return memberList[0];
};

const partyLeader = getPartyLeader(partyA); // Player
As partyA is full of Player types, partyLeader will be of type Player. But let's check the syntax:
Tis the common way to define a generic, but you can call it whatever you want.
Now the problem can be, as with any, that T accepts everything. So we can adjust what kind of things we want to be able to pass to that function:
type Player = {
  name: string;
  hp: number;
};

type Enemy = {
  name: string;
  hp: number;
};

type Spell = {
  name: string;
  power: number;
};

const getPartyLeader = <T extends { hp: number }>(memberList: T[]) => {
  return memberList[0];
};

const playerPartyLeader = getPartyLeader(partyOfPlayers); // Ok
const enemyPartyLeader = getPartyLeader(partyOfEnemies); // Ok
const whatAreYouTrying = getPartyLeader(spellList); // Error
We can now only pass types containing the hp property.
Tuples in TypeScript
As we saw before, an Array can contain different types but is not restricted to position. The Tuple type is just to cover that:
type Weapon = {
  name: string;
  damage: number;
};

type Shield = {
  name: string;
  def: number;
};

const sword: Weapon = {
  name: "Onion Sword",
  damage: 10
};

const shield: Shield = {
  name: "Rusty Shield",
  def: 5
};

let equipment: [Weapon, Shield, boolean];

equipment = [sword, shield, true]; // OK
equipment[2] = false; // OK

equipment = [shield, sword, false]; // Error
equipment[1] = true; // Error
We now have an array-like type, which cares about where the types are placed.
Classes in TypeScript
With ES6, classes were added to JavaScript. So there is no big difference between JS classes and TS classes.
class Job {
  public name: string;
  private level: number;
  readonly isExpansion: boolean;

  constructor(name: string, level: number, isExpansion: boolean) {
    this.name = name;
    this.level = level;
    this.isExpansion = isExpansion;
  }
}

const whiteMage = new Job("White Mage", 75, false);

console.log(whiteMage.name); // "White Mage"
console.log(whiteMage.level); // Error
console.log(whiteMage.isExpansion); // false

whiteMage.name = "Blue Mage"; // Ok
whiteMage.level = 50; // Error
whiteMage.isExpansion = true; // Error
In TS classes, you have access modifiers for the properties of a class:
- public - properties and methods will be accessible from all locations. This is the value by default.
- private - you can only access to the property inside the same class.
- protected - limits the access to the class and sub classes.
- readonly - marks the property as immutable.
Interfaces in TypeScript
Similar to what we saw with type aliases, we can define a type through an interface.
interface Enemy {
  name: string;
  hp: number;
}

let attack = (target: Enemy): void => {
  console.log(`Attacking to ${target.name}`);
};
So, it seems to be the same as type aliases, right? Which one to use there? Both have been gaining capabilities over the different versions of TS and the nuances between them are now very slight.
You should follow these rules:
- If you write object-oriented code, use interfaces. If you write functional code, use type aliases.
- Use interfaces for public API libraries and types for components, state, JSX, etc.
For that reason I included in the boilerplates that ESLint autofixes interfaces to types.
If you want to go deeper into the differences you can read this post in the TS Handbook but nowadays most of the features present in an interface are in a type as well, and vice versa.
DOM Manipulation in TypeScript
In React we won't use (directly) much DOM manipulation. But I think it's useful to know how it works.
How to Retrieve elements from the DOM
// HTMLFormElement | null
const form = document.querySelector("form");

// HTMLElement | null
const otherForm = document.getElementById("myFancyForm");

// HTMLSelectElement
const select = document.createElement("select");
When we perform document.querySelector("form") our constant form is inferred with type HTMLFormElement or null. But in the second example, we get a form via its ID. The TS does not know what exact HTML element it is, so it gives a more generic type HTMLElement.
const form = document.querySelector("form");

form.addEventListener("submit", (e: Event) => {
  e.preventDefault();
  console.log(e);
}); // Error
TS doesn't know if it will find anything in the HTML about the query selector, so it can't assign the addEventListener function to a possible null type. You can fix this in three ways.
I promise you that you will find that element:
// HTMLFormElement
const form = document.querySelector("form")!;
With ! you tell TS not to worry, it will find it, and it can't be null.
Do it only if it is not null:
const form = document.querySelector("form");

form?.addEventListener("submit", (e: Event) => {
  e.preventDefault();
  console.log(e);
});
You may have already seen ? of JS Optional Chaining operator
It's type casting time:
const otherForm = document.getElementById("myFancyForm") as HTMLFormElement;

otherForm.addEventListener("submit", (e: Event) => {
  e.preventDefault();
  console.log(e);
});
You tell TS what type it will get when it finds that element. With this, you make sure it will be HTMLFormElement and not null.
How to Combine React + TypeScript
Let's get started with the second secion of this article. Remember, the first section was about why to use TypeScript in general, how to use it, and an overview of the language.
In this second section you can take a closer look at how to use TypeScript in React and how to solve the different challenges you will face when trying to develop an app with React and TypeScript.
Setup
Create React App
For CRA users, you only need to specify the template:
npx create-react-app my-awesome-project --template typescript
Vite
Creating a TypeScript project with Vite is as easy as using the CLI and choosing the TypeScript template.
npm create vite@latest my-awesome-project
Add to existing project
If you want to add TypeScript to a project that is in JavaScript, just add TypeScript as a development dependency.
npm install -D typescript
I should warn you that if this is your first encounter with TypeScript, I do not recommend that you try it on a project that you have already built. This is because your experience will be to constantly think that you have something working and that it is all just more work for nothing. But that cannot be further from the real benefits of TypeScript.
Typing Component Props
The first and most common scenario when using TypeScript in a React project is to write the props for a component.
To correctly write the component props, you need to specify what properties you are accepting on the component, the type, and if it is required or not.
// src/components/AnimeDetail/Cover/index.tsx

type CoverProps = {
  url: string
}

export default function Cover({ url }: CoverProps) {
  // ...
}
We only use a url prop which is a string and is a mandatory prop.
Another example with more props and optionals:
// src/components/AnimeDetail/StreamingList/PlatformLink/index.tsx

type PlatformLinkProps = {
  name: string
  url?: string
}

export default function PlatformLink({ name, url }: PlatformLinkProps) {
  // ...
}
With ? we are indicating that it is an optional parameter, so TypeScript knows that the type of url in this case will be string or undefined. Also, consumers of this component will not get an error if they do not pass a url prop to the component.
Let's look at one last, more complex example:
// src/components/AnimeDetail/Detail/index.tsx

type AnimeType = 'TV' | 'Movie'

type DetailProps = {
  liked: boolean
  toggleFav: () => void
  title: string
  type: AnimeType
  episodeCount: number
  score: number
  status: string
  year: number
  votes: number
}

export default function Detail({
  liked,
  toggleFav,
  title,
  type,
  episodeCount,
  score,
  status,
  year,
  votes,
}: DetailProps) {
  // ...
}
This time you can see a myriad of types, including a function and a custom type AnimeType.
So, to summarise, writing props is useful for:
- Actual validation of the prop type from the consumer's side.
- No more guessing what a component needs.
- No more opening a component's source code to check what it does with the data.
- Auto-completion and documentation
- Know directly from the consumer what props and values are needed through auto-completion without knowing in advance.
Of course, this will absolutely shine on complex components and third party components that come from fancy libraries you use in your project.
React Built-in Types
With React and a lot of libraries, you will find tons of pre-built types to ease your experience as a developer. For example in React it is quite common to have the following component:
// src/components/Layout/index.tsx

type LayoutProps = {
  children: React.ReactNode
}

export default function Layout({ children }: LayoutProps) {
  // ...
}
A custom React component that receives other element as children. For those cases you will define children as a ReactNode type.
A warning about React.FC && React.FunctionComponent
You may find code with this syntax for declaring component props:
type PlatformLinkProps = {
  name: string
  url?: string
}

const PlatformLink: React.FC<PlatformLinkProps> = ({ name, url }) => {
  // ...
}
This code works using React.FC, or its longer version React.FunctionComponent. But you should know that it has some disadvantages and that is why we are not using it in this article:
- You have to use a function expression and you can't use a function declaration. This is a minor point, but I built all components with function declaration on purpose.
- You can't use generics (we'll see this later).
- In the past, this caused your props to indirectly accept the
childrenproperty and in this component you don't use it. This was true until React 18, nowadays it doesn't apply.
Return type of a React component
Last piece of the puzzle, what does a component return? You can use React's built-in types React.ReactElement, React.ReactNode and JSX.Element:
export default function Favorites(): JSX.Element {
  // ...
}
To summarise the answer from this section: let TypeScript automatically infer the return type. If you need a detailed list of the differences between those 3 types, I suggest you have a look at this SO post
Combinations with Template Literals
Inside AnimeTrailers I have included a simple custom UI that will be useful to demonstrate cases like this. You can check the different simple components in src/components/UI but most of them will be explained through this guide.
Let's take a look at the Position custom component:
// src/components/UI/Position/index.tsx

import React from 'react'

import { StyledPosition } from './StyledPosition'

type VPosition = 'top' | 'bottom'
type HPositon = 'left' | 'right'

export type PositionValues = `${VPosition}-${HPositon}`

type PositionProps = {
  children: React.ReactNode
  position?: PositionValues
}

export default function Position({
  children,
  position = 'top-right',
}: PositionProps) {
  return <StyledPosition position={position}>{children}</StyledPosition>
}
Position is a simple component to use with any other component with absolute positon and place it on any of the four edges with top-left, top-right, bottom-left and bottom-right.
Creating a new type with template literals is no secret if you are already using it in JavaScript. The clever trick here is when you combine template literals ${VPosition}-${HPositon} with union types top | bottom like in the example above, TypeScript will generate all possible combinations of both. This lets us generate the four different values we need.
How to use Exclude
Let's take the previous example and add more values to the union:
type VPosition = 'top' | 'middle' | 'bottom'
type HPositon = 'left' | 'center' | 'right'

export type PositionValues = `${VPosition}-${HPositon}`
This template literal will generate all possible combinations of unions, so we will have "top-left" | "top-center" | "top-right" | "top-left" | "center-left" | "center-right" | "bottom-left" | "bottom-center" | "bottom-right".
There is one case that is a bit strange, middle-center. In this case you may want to simply put center, in which case Exclude is very useful.
type PositionValues =
  | Exclude<`${VPosition}-${HPositon}`, 'middle-center'>
  | 'center'
Now PositionValues will generate "center" | "top-left" | "top-center" | "top-right" | "middle-left" | "middle-right" | "bottom-left" | "bottom-center" | "bottom-right".
With exclude you can remove the middle-center and add center afterwards with a union.
Custom HTML Components
If you want to create a component that behaves like an input but you don't want to write every single property and function of the input HTML, you can achieve this with:
// src/components/UI/Input/index.tsx

import React from 'react'

import styles from './StyledInput.module.css'

type InputProps = React.ComponentProps<'input'>

const Input = React.forwardRef(
  (props: InputProps, ref: React.Ref<HTMLInputElement>) => {
    return <input {...props} className={styles.StyledInput} ref={ref} />
  }
)

export default Input
With React.ComponentProps you can specify which element you are basing your new type on and get everything a real HTML input has to create a custom UI component. But what happens when you want to override some of these properties or forbid their use?
Omit
Let's take a look at the Tag UI component:
// src/components/UI/Tag/index.tsx

import React from 'react'

import { StyledTag } from './StyledTag' // aka a styled span

type TagProps = {
  variant?: 'solid' | 'outlined'
  text: string
} & Omit<React.ComponentProps<'span'>, 'children'>

export default function Tag({ text, variant = 'solid' }: TagProps) {
  return <StyledTag variant={variant}>{text}</StyledTag>
}
In this case, this component explicitly passes a text to display as children of the component. You may not want consumers of this component to use the original children, so you can omit that property from the collection given by React.ComponentProps.
Typing Hooks
Now let's dive into how to write each of the most commonly used hooks in React.
useState hook
In most cases, typing useState will not require anything from you, because TypeScript will try to infer the type. In other scenarios, for example when the initial value is different from future values, you need to specify it directly.
// src/pages/Search.tsx

export default function Search() {
  const [animeList, setAnimeList] = useState<Anime[] | null>(null)
  const [page, setPage] = useState(1)
  // const [page, setPage] = useState<number>(1)
  // ...
}
From the state page, the type is inferred as a number based on the initial value provided. It will be exactly the same as the commented version. Also state setters are automatically typed as React.Dispatch<React.SetStateAction<number>> with number replaced by the inferred/specified type.
On the other hand animeList without any explicit type would be only null. This is true before the component gets the necessary data but will eventually contain a collection of Anime types for which you must explicitly set the type with a union of the two possible types.
Beyond setting the type to null for initial control states in useState, there are other similar solutions, such as:
export default function Search() {
  // const [animeList, setAnimeList] = useState<Anime[] | null>(null)
  const [animeList, setAnimeList] = useState<Anime[]>([])
  const [anime, setAnime] = useState<Anime>({} as Anime)
  // ...
}
It's important to take a closer look at the anime, setAnime line. In that case it works because it is not a collection, but rather is a single element.
The main difference with these additional solutions is that you are not 100% honest with the compiler. You are assuming that you will have a value with that shape, and that has an implicit risk.
export default function Search() {
  const [anime, setAnime] = useState<Anime>({} as Anime)
  // ...

  return <div>{anime.coverURL}</div>
}
If you do not provide a correct value with this option, this may explode at runtime.
How to pass state as props
Quite often you may need to pass state down in the hirearchy and delegate to a child when a state is read or set. You will need to write the props for that component with state types in mind.
type FancyComponentProps = {
  anime: Anime,
  setAnime: React.Dispatch<React.SetStateAction<Anime>>
}

const FancyComponent = ({anime, setAnime}: FancyComponentProps) => {
  // ...
}
It is best to understand what types you need to pass. But if you have difficulty with that, you can check the current state variables and the IDE will tell you what you need to pass.

useReducer hook
At this point you have mostly all the tools to correctly define the types for useReducer.
For the following example, I have simplified it here and we will cover the actual code in the Generics section.
// src/hooks/useFetch.ts

const enum ACTIONS {
  LOADING,
  FETCHED,
  ERROR,
}

type State = {
  data?: Anime[]
  loading: boolean
  error?: Error
}

type Action =
  | { type: ACTIONS.LOADING }
  | { type: ACTIONS.FETCHED; payload: Anime }
  | { type: ACTIONS.ERROR; payload: Error }

const initialState: State = {
  loading: true,
  error: undefined,
  data: undefined,
}

const fetchReducer = (state: State, action: Action): State => {
    switch (action.type) {
      case ACTIONS.LOADING:
        return { ...initialState }
      case ACTIONS.FETCHED:
        return { ...initialState, data: action.payload, loading: false }
      case ACTIONS.ERROR:
        return { ...initialState, error: action.payload, loading: false }
      default:
        return state
    }
  }

const [state, dispatch] = useReducer(fetchReducer, initialState)
As always, you get a status and a dispatch from useReducer when you provide a reducer function and an initial state. You don't need to do anything in the useReducer itself, but you must write the state and actions because this will define how the state and dispatch will behave.
initialState
For the initial state you can simplify the process. Instead of creating a State type, you can use typeof initialState whenever you need to define a type based on the initial state.
const initialState: State = {
  loading: true,
  error: undefined,
  data: undefined,
}

const fetchReducer = (state: typeof initialState, action: Action) => {
  // ...
}
The drawback of this version is that it does not control the future values of data and error. This may work when the type is always the same but it is not the case here so you can use a custom State type for that.
Actions
You have to specify which actions the reducer will be able to handle, and you do that with unions. The enum part is entirely optional, but it helps to be less error-prone than writing strings in several places.
reducer function
You only have to specify the types of the params passed to the function, which are in fact the ones you created in the previous steps.
Passing as props
Again, if you want to pass something from useReducer as a prop, you will have to write the consumer props accordingly.
statewill be the type you have defined in yourinitialStateand/or a customStatetype as in the example above.dispatchwill beReact.Dispatch<Action>whereActionis the custom type for actions.
useContext
The context in the example project is used to manage a list of anime you like and toggle the state at different points in the application. At this point useContext shouldn't give you any trouble because it is simply a combination of what you have seen so far – but let's look at an example:
// src/context/FavContext.tsx

type FavContextType = {
  favList: Favorite[]
  // setFavList: React.Dispatch<React.SetStateAction<Favorite[]>>
  toggleFav: (id: number, favorite: Favorite) => void
}

export const FavContext = createContext({} as FavContextType)

export const FavContextProvider = ({ children }: FavContextProviderProps) => {
  const [favList, setFavList] = useState<Favorite[]>([])

  const toggleFav = (id: number, favorite: Favorite) => { /* ... */ }

  // ...

  return (
    <FavContext.Provider value={{ favList, toggleFav }}>
      {children}
    </FavContext.Provider>
  )
}
useContext follows the same rules as useState for typing. In this case, the initial value will be null but we trick TypeScrpt with as on createContext and define an object that will contain an array of favourite animes and a function to toggle.
Commented you have the typical setter scenario in case you need it.
For the rest of the code, you already learned useState in the previous section so nothing new. With the Favorite type, useState will determine the necessary types and those types will be available directly on the consumer side.
// src/components/AnimeDetail/index.tsx

const { favList, toggleFav } = useContext(FavContext)
useRef hook
You can use useRef in two different ways, so the typing will be slightly different in each case.
DOM references
One of the uses of useRef is to keep a reference to a DOM element.
In the example project, you'll find this for infinite scrolling by holding a reference to an observable of the last item in the anime list. This lets you know when the user is viewing that item in the viewport and trigger a new fetch.
Let's look at a shorter example of useRef for the DOM reference, but you can check the full version of the useRef + observer:
  const myDomReference = useRef<HTMLInputElement>(null)

  useEffect(() => {
    if(myDomReference.current) myDomReference.current.focus()
  }, [])
A typical case might be when a page loads and you want an automatic focus on an input. Just specify the type of the DOM element being referenced, in this case HTMLInputElement.
Some considerations about the above code:
- The hook will return a read-only
currentproperty. - You don't need to manually write
current. React will handle it throughReact.RefObject<HTMLInputElement>in this case. - If the DOM element is always present, you can set the initial value to
null!and avoid the if check.
Mutable references
The second use of useRef is when you want to keep mutable values between renders. For example, in cases where you need a unique variable for each instance of a component that survives between renders and does not trigger a re-render.
const isFirstRun = useRef(true)

useEffect(() => {
  if(isFirstRun) {
    // ...
    isFirstRun.current = false
  }
}, [])
Some considerations you will notice compared to the previous example:
- You can now mutate the value inside
current. - React provides
React.MutableRefObject<boolean>is now aMutableRefObjectinstead ofRefObject.
Forwarding ref
If at some point you need to pass a reference to an HTML element as in the useRef section, writing the props for that component will be slightly different:
// src/components/AnimeGrid/Card/index.tsx

const Card = React.forwardRef(
(
  { id, coverURL, title, status, score, type, year }: CardProps,
  ref: React.Ref<HTMLImageElement>
) => {
  // ...
})
To pass the reference you will need to wrap your component with React.forwardRef. That will inject along with the regular props of the component the ref (which will be any HTML element wrapped in the React.Ref type).
In this case we know the type of the HTML element we are forwarding to, but if this is not your case, this might be a good time to use generics.
How to Use TypeScript Generics in React
Let's imagine we want to create a custom UI component by wrapping existing HTML elements but giving it a set of custom properties as most component libraries do.
Most of these libraries also provide the flexibility to decide which HTML element is finally rendered with an as property – and that is exactly the case for the Text UI component.
This Text UI component is used to display any text with a set of sizes and colors. Plus we want to allow the user to choose any HTML element – they need, not restrict themselves to a single p or span.
In this scenario you don't know in advance what element the consumer will pass to your component, so you need to use generics to infer the type to whichever one they pass.
So the prop types for the component will be:
// src/components/UI/Text/index.tsx

type TextOwnProps<T extends React.ElementType> = {
  size?: 'xs' | 'sm' | 'md' | 'lg' | 'xl'
  variant?: 'base' | 'primary' | 'secondary'
  as?: T | 'div'
}

type TextProps<T extends React.ElementType> = TextOwnProps<T> &
  React.ComponentPropsWithoutRef<T>

export default function Text<T extends React.ElementType = 'div'>({
  size = 'md',
  variant = 'base',
  children,
  as = 'div',
}: TextProps<T>) {
  // ...
}
Let's examine in detail what happens in the example above:
- We use
Tfor generics here, but you can use any name you want. - T extends from
React.ElementTypewhich is the most generic type for HTML elements. So we know that whatever is passed to the component is based on an HTML element rather than a manually typed union of all possible HTML elements. - The second type
TextPropsis used for two things:- We need extra properties depending on the type of HTML element. When a consumer uses the Text component as a
labelwe want to check and suggest different properties than when it is aspan. For that we need to useReact.ComponentProps. In this case we don't need references so we explicitly use the typeComponentPropsWithoutRef. React.ComponentPropsalso provides thechildrenprop so you don't need to include inTextOwnProps.- There is no need to deal with
Omitor other exclusion techniques becausechildrenis not modified or overwritten by anyTextOwnPropsprops.
- We need extra properties depending on the type of HTML element. When a consumer uses the Text component as a
With this example, we have a very flexible component that is correctly typed and provides a good developer experience.
Within the example project you can examine the different custom UI components to check the implementation following this same pattern.
Typing a Custom useFetch Hook
In the example project I have included a simple hook to get the data and use localStorage as a temporary cache so as not to exceed the API limit. It is not a big deal but I think it is a complete example of everything explained in this article.
Let's take a look at some parts of that hook – but I encourague you to watch the real file and try to understand everything with the different sections explained in this article.
// src/hooks/useFetch.ts

type State<T> = {
  data?: T
  loading: boolean
  error?: Error
}

function useFetch<T = unknown>(
  url?: string,
  { initialFetch, delayFetch }: Options = { initialFetch: true, delayFetch: 0 }
): State<T> {
// ...
}
- The hook receives a generic type that you can't know in advance what kind of data it will handle.
- The hook accepts
urlon where to do the fetch and options to decide if the hook does an initial fetch and if there is a delay between fetches. - The
optionsobject has default values if nothing is provided. - The hook returns a
Stateof the type specified by the consumer via the generics. - The status type defines that optionally a data of the type provided by the consumer, a loading flag, or an error is returned if something goes wrong.
Let's check the usage on the consumer side:
// src/pages/AnimeDetail.tsx

const { data, loading, error } = useFetch<JikanAPIResponse<RawAnimeData>>(
    getAnimeFullById(Number(id))
  )
getAnimeFullByIdreturns the URL of that endpoint.useFetchin this case will return adataof typeJikanAPIResponsewhich also has different possibilities, in this caseRawAnimeData.
Conclusion
Throughout this article you've seen the most common pain points that using TypeScript can help solve. It's especially useful when you're working with others that you fully understand the ins and outs of every component, hook, and context you need to use.
Using TypeScript means investing in code that is more reliable, better documented, and more readable. It's also less error-prone and more maintainable.
Coding isn't just about making an efficient algorithm. You're going to be working with other people (even if you're working as a solo developer, at some point you might publish your work, seek collaboration or help). In those scenarios, good communication between members is key.
I like to think of TypeScript as the Babel for humans: you can optimize your code for the CPU with Babel, but you need something to scale and guide others around your ideas and vice versa.
Only one question remains, when should you use TypeScript?
- If you work with more people or plan to publish your code, chances are you want the code to be as readable and representative of your ideas as possible.
- If you're working on a large project.
Every big project starts out as a small project, so be careful with this statement about only using it on "big" projects.
This has been a long article no doubt. If you have reached this point I must really thank you for your effort and passion. My initial idea was not so broad but I wanted to explain the whys and wherefores.
I hope you enjoy this article. If you've already switched from JS to TS, are using both, are considering it, at some point thought about it but didn't like it or any other situation – I would like to read about your experience.