
State management is one of the most important things you'll deal with in front end development.
You can manage state in React in various ways. Some examples include using state in class components, using React hooks such as useState and useEffect hook, using the Context API, or using Redux.
In this article I will show you how to use the Redux toolkit for state management in React.
Prerequisites
- Basic knowledge of React (beginners are welcome) and JavaScript is required.
- Have Node installed so you can download the package using
npm.
What is Redux toolkit?
Redux Toolkit is a set of tools you can use for state management in React in place of Redux. The Redux team created it.
Redux Toolkit offers a standardized approach to building Redux code and comes with libraries and tools that make it simpler to create scalable, maintainable, and effective Redux code.
How is it different from the old Redux?
Redux toolkit is different from Redux in a few ways. First, it has less boilerplate code, and it has decent support. It also works best with functional components (unlike Redux which works best with class components).
There are various reasons why you should use Redux toolkit over Redux for state management:
- Less boilerplate code than Redux.
- You don't have to set up thunk manually in Redux toolkit as it comes with
createAsyncThunk. This enables you to perform async operations. - Enhancing developer experience: Redux Toolkit includes a number of tools and utilities that can enhance the developer experience, such as the ability to use Redux DevTools out-of-the-box.
- Redux hooks like useSelector and useDispatch make your code shorter and easier to read/write.
- Improving performance: Redux Toolkit includes a built-in memoization feature that can help improve the performance of your Redux application by reducing unnecessary re-renders.
In summary, Redux Toolkit is a great choice for developers who want to simplify their Redux code and improve performance, while also enhancing the developer experience. It can be particularly useful in larger, more complex applications where managing state can become difficult.
How to Get Started with Redux Toolkit
For this project, you won't use create-react-app to create your React app. Instead, you'll use Vite and React plugins. This is because CRA is no longer recommended by the React docs.
To create your app, run the code below in your terminal:
npm create vite@latest my-app --template react
Next, run the following commands in the terminal:
cd my-app
npm install
npm run dev
How to install Redux Toolkit
To make use of Redux Toolkit in your project, run the code below in your terminal:
npm install @reduxjs/toolkit react-redux
How to create a Redux store
After the installation is complete, create a file named src/redux/store.jsx . Import configureStore from Redux Toolkit and then create an empty Redux store which will be exported like you can see in the code below:
import { configureStore } from '@reduxjs/toolkit'

export const store = configureStore({
  reducer: {},
})
This code creates a Redux store, and also automatically configures the Redux DevTools extension so that you can inspect the store while developing.
How to connect the Redux Store to React
After you've created the store, you will have to wrap your <App/> with a <Provider/> which will be imported from react-redux. Also the store you created above will be passed in into the provider as a prop.
//main.js
import React from 'react'
import ReactDOM from 'react-dom'
import './index.css'
import App from './App'
//Importing the store we created above
import { store } from "./redux/store"
//importing the provider from react-redux
import { Provider } from 'react-redux'

ReactDOM.render(
    //This makes the store accessible to the App that is passing it as a prop
  <Provider store={store}>
    <App />
  </Provider>,
  document.getElementById('root')
)
How to create a Redux state slice
After the store has been created, create a file src/redux/countslice.jsx. Then import createSlice from @redux/toolkit.
A Redux slice is a concept introduced by Redux Toolkit that represents a self-contained piece of the Redux store that includes a reducer function, initial state, and action creators.
Slices provide a way to organize and modularize Redux code, making it easier to manage and maintain as your application grows. You can think of slices as mini-Redux stores that handle a specific piece of state within your application.
Creating a slice requires three things:
- Name, which is usually set to be a string.
- Initial State Value.
- Reducer, which contains actions that define how the state can be updated.
Creating a state slice creates a more modular and maintainable architecture for your application, making it easier to reason about and update as your application grows.
By organizing your Redux code into slices, you can create a more modular and maintainable architecture for your application, making it easier to reason about and update as your application grows.
After you create the slice, the reducers and the Redux actions inside the reducers are exported differently. This is because the slice created will need to be exported before it can be used inside the store.
By exporting the reducer from the slice, you can easily use it to configure your Redux store. It also makes it easy to test the reducer in isolation, without needing to set up a full Redux store. This can be useful for unit testing and ensuring that the reducer behaves as expected for each action it handles.
import { createSlice } from '@reduxjs/toolkit'

const initialState = {
  count: 0,
}

export const counterSlice = createSlice({
  name: 'counter',
  initialState,
  reducers: {
    increment: (state) => {
      state.count += 1
    },
    decrement: (state) => {
      state.count -= 1
    },
    incrementByAmount: (state, action) => {
      state.count += action.payload
    },
  },
})

// Action creators are generated for each case reducer function
export const { increment, decrement, incrementByAmount } = counterSlice.actions

export default counterSlice.reducer
How to add the slice to the store
The Reducer exported from the slice is imported and added to the store you created earlier. This allows you to complete the configuration of the store.
//store.jsx
import { configureStore } from '@reduxjs/toolkit'
//Importing the reducer from countSlice
import counterReducer from "./countslice"

export const store = configureStore({
  reducer: {
    counter: counterReducer,
  },
})
How to use the state and actions in your React components.
Up until now, you've just been going through the initial set up for Redux Toolkit, setting up the store and creating the reducer. Now you need to start making use of the state and actions in your app to achieve the desired functionality.
You will be using two hooks: useDispatch and useSelector . Data are being read from the store through the useSelector hook while the actions are being dispatched using the useDispatch hook.
The corresponding actions (increment, decrement, and incrementByAmount) are being imported from the countSlice.jsx file to be used by the dispatch.
Take a look at the code below where the state is set to a variable count using the useSelector hook and the actions is set to a variable dispatch using the useDispatch. There are three buttons: the increase button, decrease button, and increaseByAmount button. An onClick event was placed on each button which run the various action.
When these buttons are clicked, two things happens:
- The Redux action is dispatched to the store.
- The slice reducer will see the action and then update the state.
Here's the code that does all that:
//App.jsx
import React from 'react'
import { useSelector, useDispatch } from 'react-redux'
import { decrement, increment, incrementByAmount } from "./redux/countslice"

export default function App() {
  const count = useSelector((state) => state.counter.count)
  const dispatch = useDispatch()

  return (

      <div className='App'>
        <h1>The count is {count}</h1>
        <div className="button">
        <button
          onClick={() => dispatch(increment())}
        >
          Increase
        </button>
        <button
          onClick={() => dispatch(decrement())}
        >
          Decrease
        </button>
        <button onClick={()=>dispatch(incrementByAmount(10))} > Increase by 10</button>

        </div>

      </div>

  )
}
The Result
This is exactly what you should get when you run your code:
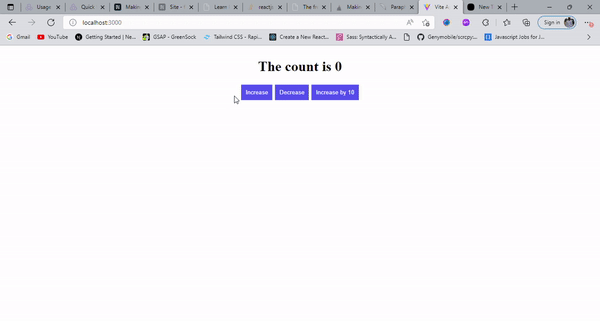 App Showing the function of Redux Toolkit
Conclusion
This tutorial walked you through how you can make use of Redux toolkit in handling your state in React. You learned how to create a store using various hooks such as the useSelector and useDispatch hook to read data from the store.
At this point you should be confident enough to use the Redux toolkit for managing state in your React app.