
User authentication is critical to mobile app development. It helps make sure that only authorized users can access sensitive information and perform actions within an application.
In this tutorial, we will explore how to build secure user authentication in Flutter using Firebase for authentication and the Bloc state management pattern for handling application state. By the end, you'll have a solid understanding of how to integrate Firebase authentication and implement a secure login and sign-up process using Bloc.
Prerequisites:
To get the most out of this tutorial, you should have the following:
- A good understanding of Flutter and Dart
- A Firebase account: Create a Firebase account if you don't have one. You can set up a Firebase project through the Firebase Console.
How Firebase Authentication Works
Firebase Authentication is a powerful service that simplifies the process of authenticating users in your app. It supports various authentication methods, including email/password, social media, and more.
One of the key advantages of Firebase Authentication is its built-in security features, such as secure storage of user credentials and encryption of sensitive data.
FlowChart Description
Let's visualize the flow of actions using a flowchart to understand the concept you are going to learn. Take a look at the diagram below to get a better understanding:
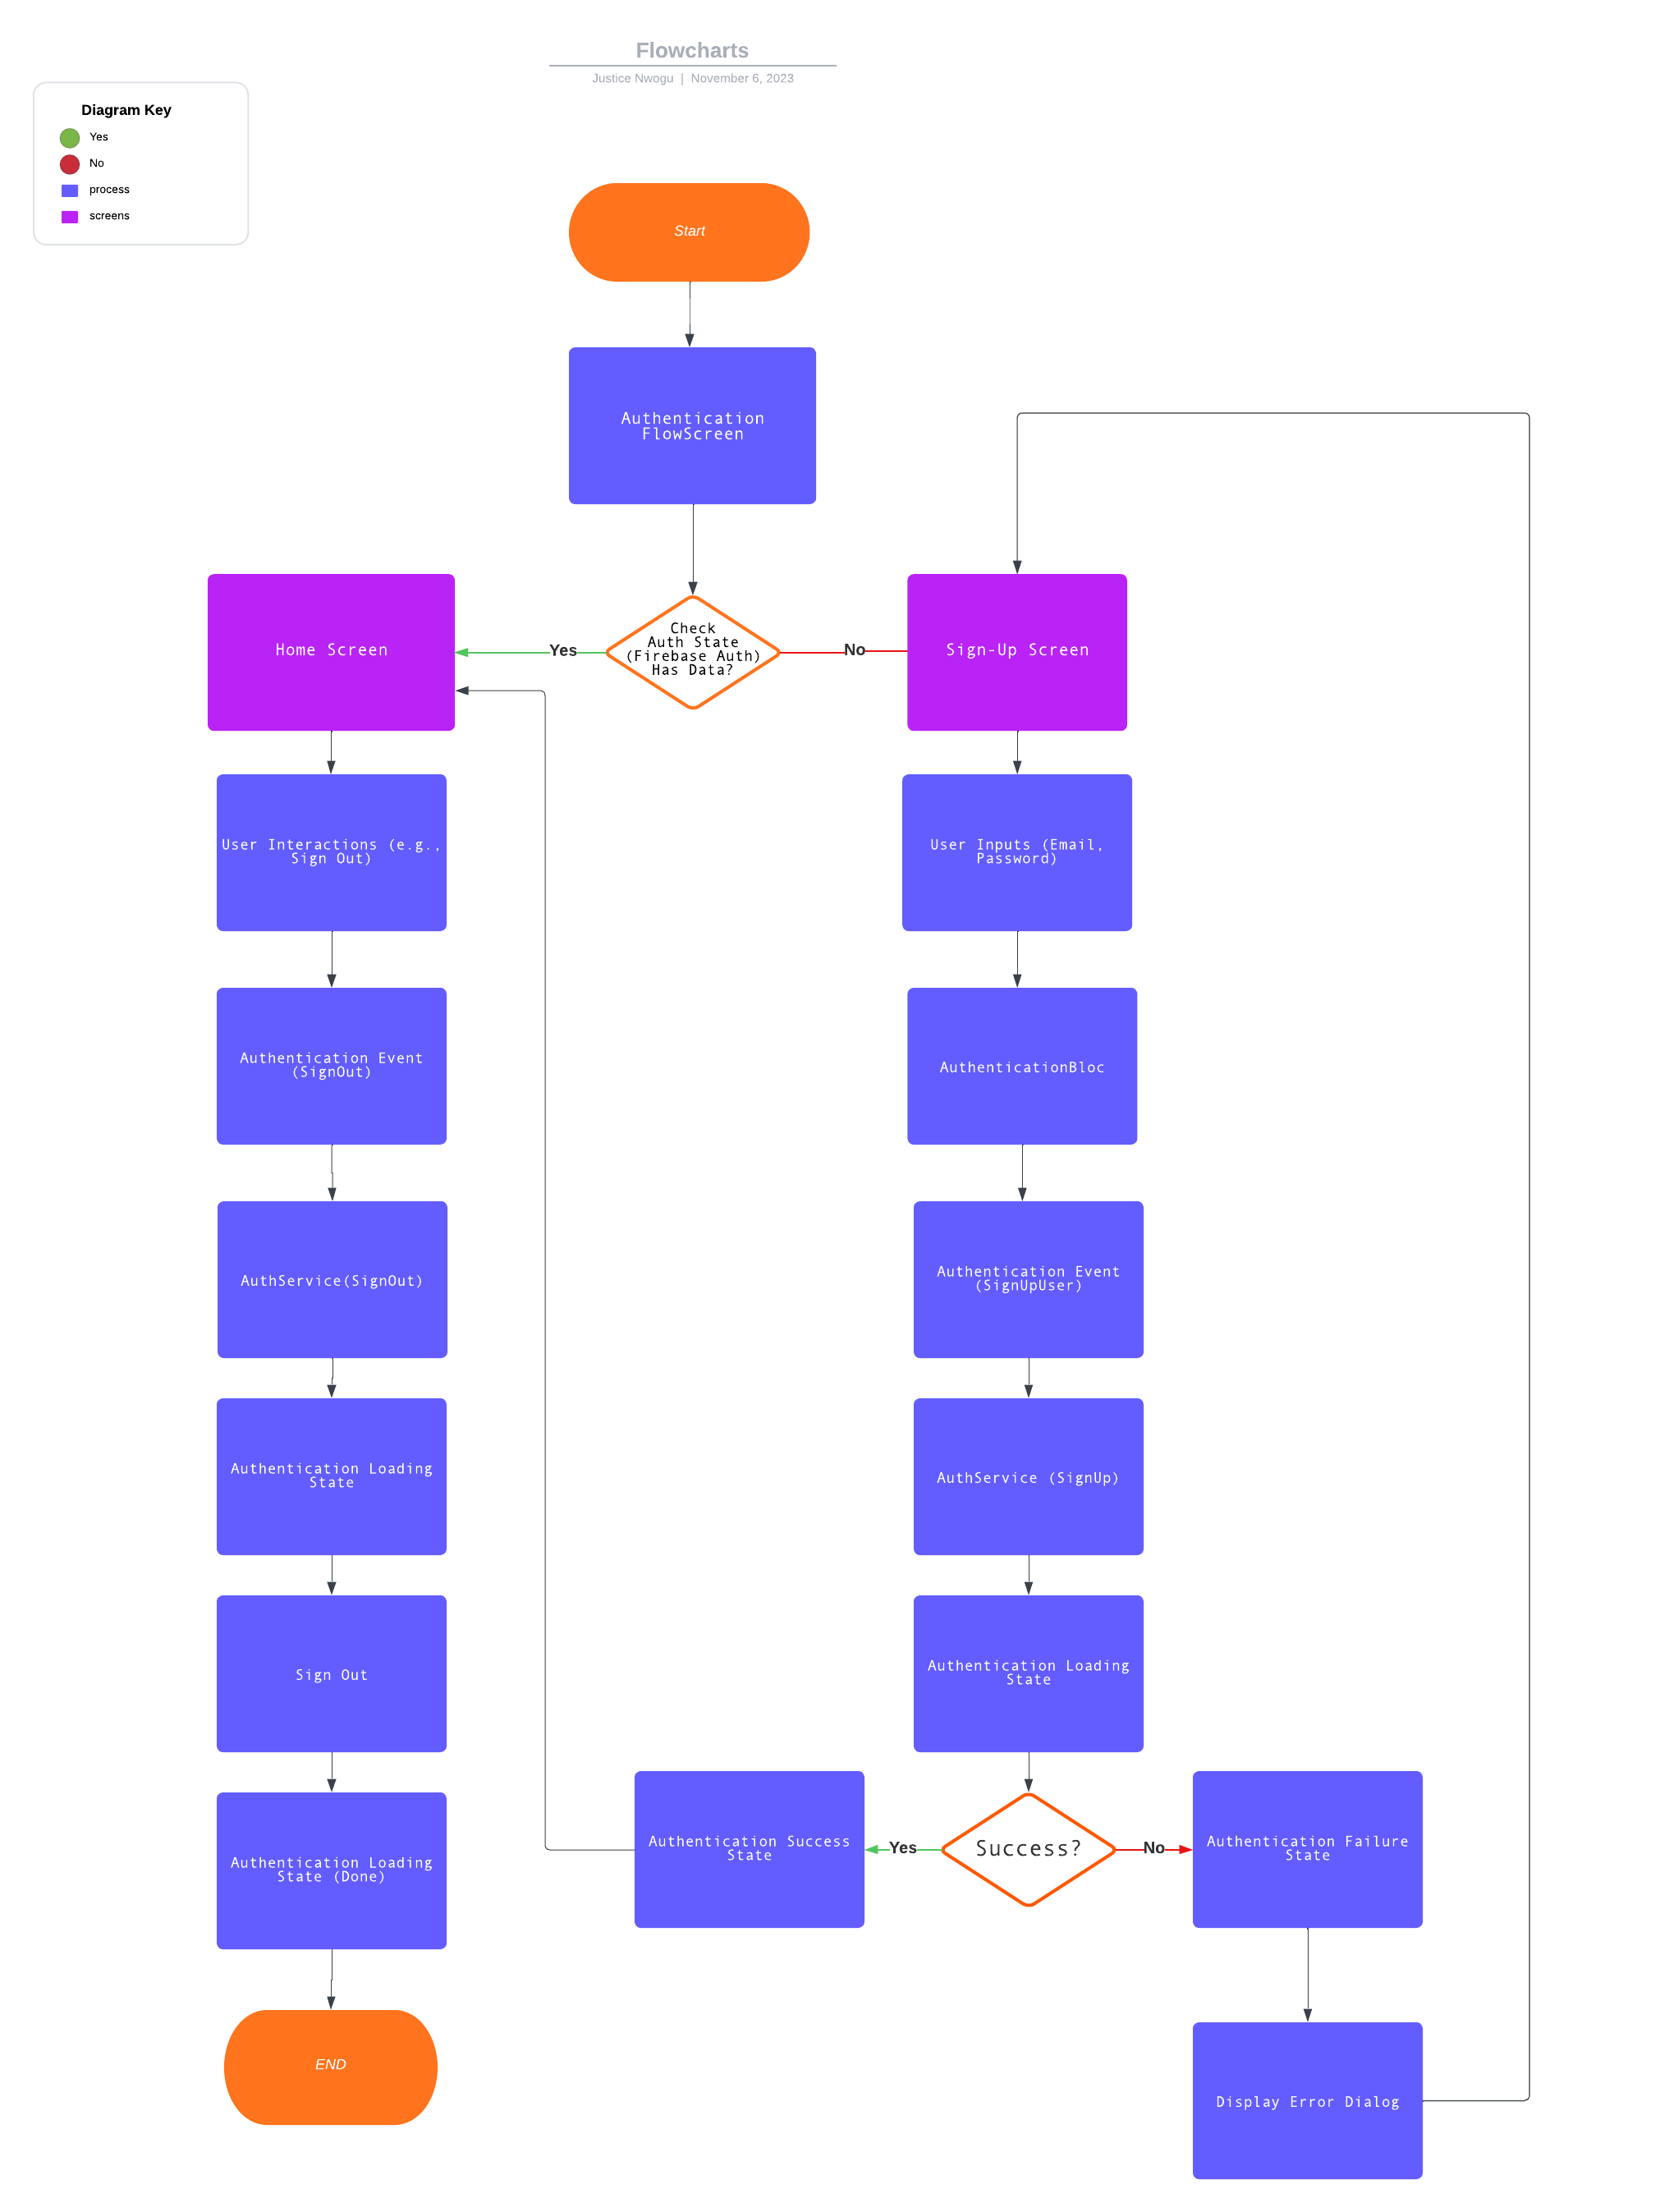 Img 1: The flowchart of the app
The image above is a flowchart to visualize the flow of the app let's discuss what each parts represents. The rounded rectangles represent the starting and ending points of the flow; the purple rectangles represent the screens; the light blue rectangles represent the processes that take place; and finally, the rhombus represents decision-making.
- The application starts at the
AuthenticationFlowScreen. - The
StreamBuilderlistens to authentication state changes. - If a user is authenticated, it directs to the
HomeScreen; otherwise, it leads to theSignupScreen. AuthenticationBlocmanages user authentication events and states.- When the user signs up (
SignUpUserevent is triggered): - It initiates the authentication loading state (
AuthenticationLoadingState). - Calls
signUpUserfromAuthServicefor user registration. - If successful, it emits
AuthenticationSuccessStatewith user data; otherwise, emitsAuthenticationFailureState. - When the user initiates the sign-out process (
SignOutevent is triggered): - It starts the authentication loading state (
AuthenticationLoadingState). - Calls
signOutUserfromAuthServiceto sign the user out. - If an error occurs during sign-out, it logs the error message.
Project Setup
To get started with Firebase Authentication, you must set up Firebase in your Flutter project.
Follow these steps to add Firebase and bloc to your project:
Add Dependencies to Your Project
Open your project in your preferred code editor.
Add the following dependencies to your pubspec.yaml file:
dependencies:
firebase_core: ^2.20.0
firebase_auth: ^4.12.0
flutter_bloc: ^8.1.3
Then save the pubspec.yaml file to fetch the dependencies.
Configure Firebase
Create a new Firebase project through the Firebase Console. Click on authentication in the project, and follow the provided instructions.
For more information, you can go through the Firebase website.
Initialize Firebase
First, open the main.dart file in the lib folder.
Add the following code to the file to initialize Firebase:
void main() async {
WidgetsFlutterBinding.ensureInitialized();
await Firebase.initializeApp(
  options: DefaultFirebaseOptions.currentPlatform
);
The code above shows the code for running the app. There's nothing unusual about this code except that we have added some code to the void main to initialize Firebase.
The User Model
Before creating the Firebase class to communicate with the Firebase service, let's define a UserModel to represent the user data.
Start by creating a user.dart file in your project's lib directory.
Then add the code below in the file:
class UserModel {
final String? id;
final String? email;
final String? displayName;
UserModel({ this.id, this.email, this.displayName, });
}
Now that you have set up Firebase and created a user model, you need to create a service class to communicate with Firebase directly.
The Authentication Service
Create a folder called services, create a file in this folder called authentication.dart You can now add this code to the file.
import 'package:firebase_auth/firebase_auth.dart';

import '../models/user.dart';

class AuthService {
  final FirebaseAuth _firebaseAuth = FirebaseAuth.instance;


  /// create user
  Future<UserModel?> signUpUser(
    String email,
    String password,
  ) async {
    try {
      final UserCredential userCredential =
          await _firebaseAuth.createUserWithEmailAndPassword(
        email: email.trim(),
        password: password.trim(),
      );
      final User? firebaseUser = userCredential.user;
      if (firebaseUser != null) {
        return UserModel(
          id: firebaseUser.uid,
          email: firebaseUser.email ?? '',
          displayName: firebaseUser.displayName ?? '',
        );
      }
    } on FirebaseAuthException catch (e) {
      print(e.toString());
    }
    return null;
  }

   ///signOutUser
   Future<void> signOutUser() async {
      final User? firebaseUser = FirebaseAuth.instance.currentUser;
    if (firebaseUser != null) {
      await FirebaseAuth.instance.signOut();
    }
  }
  // ... (other methods)}
}
The code snippet above is a method to create a user in the app using Firebase. With this method, the signUpUser method takes two string parameters: email and password respectively. Then you call the Firebase method to create a user using the parameters we added.
Now that you know how to create the signup method, you can also create the login method. The class ultimately portrays the communication between Firebase and the app.
The next part is to connect the service to your state management, which we'll see how to do now.
How Bloc State Management Works
Bloc is a popular state management pattern for Flutter that helps manage complex application states predictably and in a testable way. Bloc stands for "Business Logic Component" and it divides the business logic and the UI. Bloc will be the bridge between your app and Firebase.
There's an extension for VScode that creates the boilerplate code for Bloc. You can use the extension to speed up the development process.
Set Up Firebase Authentication Bloc
Bloc consists of events and states. Let's first create the states and events for the Bloc. Then we'll create a AuthenticationBloc that will handle the logic using the events, states, and service we have created.
The AuthenticationState class
The AuthenticationState class is responsible for the authentication process's different states. As we will see in the code, there are initial, loading, success, and failure states to ensure we know what happens during the authentication process.
First, create an authentication_state.dart file in your project's bloc directory.
part of 'authentication_bloc.dart';


abstract class AuthenticationState {
  const AuthenticationState();

  List<Object> get props => [];
}

class AuthenticationInitialState extends AuthenticationState {}

class AuthenticationLoadingState extends AuthenticationState {
 final bool isLoading;

  AuthenticationLoadingState({required this.isLoading});
}

class AuthenticationSuccessState extends AuthenticationState {
  final UserModel user;

  const AuthenticationSuccessState(this.user);
  @override
  List<Object> get props => [user];
}
class AuthenticationFailureState extends AuthenticationState {
  final String errorMessage;

  const AuthenticationFailureState(this.errorMessage);

  @override
  List<Object> get props => [errorMessage];
}
Let's break down the code:
AuthenticationState abstract class:
AuthenticationStateis the base class for different states where the authentication process can be at any time.- It contains a method
propsthat returns a list of objects. This method is used for equality checking when comparing instances of this class.
AuthenticationInitialState class:
AuthenticationInitialStaterepresents the initial state of the authentication process.
AuthenticationLoadingState class:
AuthenticationLoadingStaterepresents a state where the authentication process is in progress, and the UI might show a loading indicator.- It takes a boolean parameter,
isLoading, to indicate whether or not the authentication process is currently loading.
AuthenticationSuccessState class:
AuthenticationSuccessStaterepresents a state where the authentication process has been completed.- It includes a user property of type UserModel representing the authenticated user.
AuthenticationFailureState class:
AuthenticationFailureStaterepresents a state where the authentication process has failed.- It includes an
error messageproperty containing information about the failure.
The AuthenticationEvent class
The AuthenticationEvent is responsible for the events the AuthenticationBloc will perform. In this case, it is the sign-in event. You can write the other events, like sign-up and sign-out, here.
Create a authentication_Event.dart file in your project's bloc directory.
part of 'authentication_bloc.dart';


abstract class AuthenticationEvent {
  const AuthenticationEvent();

  List<Object> get props => [];

}

class SignUpUser extends AuthenticationEvent {
  final String email;
  final String password;

  const SignUpUser(this.email, this.password);

  @override
  List<Object> get props => [email, password];
}


class SignOut extends AuthenticationEvent {}
The AuthenticationEvent class is similar to AuthenticationState. Let's look at the code to see what it's doing:
AuthenticationEvent abstract class:
- This is the base class for different events that trigger authentication state changes.
SignUpUser class:
- This class represents an event where a user is attempting to sign up.
- It takes two parameters,
emailandpassword, representing the credentials the user is using to sign up. - This class's instances will signal the
Blocthat a user is trying to sign up, and theBloccan respond by initiating the sign-up process and transitioning the authentication state accordingly.
SignOut class:
- This class's instances will signal the
Blocthat a user is trying to sign out. Thebloccan respond by initiating the sign-out process and updating the authentication state accordingly.
The AuthenticationBloc class
The AuthenticationBloc will handle the overall authentication state, from what happens when a user clicks a button to what shows on the screen. It also interacts with the Firebase service we created directly.
First, create a file called authentication_bloc.dart in your project's bloc directory.
Add the following code to define the AuthenticationBloc class:
import 'package:bloc/bloc.dart';
import 'package:meta/meta.dart';

import '../models/user.dart';
import '../services/authentication.dart';

part 'authentication_event.dart';
part 'authentication_state.dart';


class AuthenticationBloc extends Bloc<AuthenticationEvent, AuthenticationState> {
  final AuthService authService = AuthService();

  AuthenticationBloc() : super(AuthenticationInitialState()) {
    on<AuthenticationEvent>((event, emit) {});

    on<SignUpUser>((event, emit) async {
      emit(AuthenticationLoadingState(isLoading: true));
      try {
          final UserModel? user =
          await authService.signUpUser(event.email, event.password);
      if (user != null) {
        emit(AuthenticationSuccessState(user));

      } else {
        emit(const AuthenticationFailureState('create user failed'));
      }
      } catch (e) {
        print(e.toString());
      }
     emit(AuthenticationLoadingState(isLoading: false));
    });

     on<SignOut>((event, emit) async {
      emit(AuthenticationLoadingState(isLoading: true));
      try {
        authService.signOutUser();
      } catch (e) {
        print('error');
        print(e.toString());
      }
       emit(AuthenticationLoadingState(isLoading: false));
     });
}
}
In this code snippet, we have created an instance of the AuthService class, which handles user authentication operations, such as signing up and signing out.
on<SignUpUser>((event, emit) async { ... } defines a handler for the SignUpUser event. When this event is triggered, the bloc goes through the following steps:
- It emits an
AuthenticationLoadingStateto indicate that the authentication process is in progress. - It calls for the
signUpUsermethod of theauthServiceto attempt to create a user account with the provided email and password. - If the user account creation is successful (that is, the user is not null), it emits an
AuthenticationSuccessStatewith the user data. - If the user account creation fails, it emits an
AuthenticationFailureStatewith an error message and logs the error. - Regardless of success or failure, it emits another
AuthenticationLoadingStateto signal the end of the authentication process.
on<SignOut>((event, emit) async { ... } defines a handler for the SignOut event. When this event is triggered, the bloc goes through the following steps:
- It emits an
AuthenticationLoadingStateto indicate that the sign-out process is in progress. - It calls the
signOutUsermethod of theauthServiceto sign the user out. - If any errors occur during the sign-out process, it logs the error.
- It emits another
AuthenticationLoadingStateto signal the end of the sign-out process.
The AuthenticationBloc manages the state of the authentication process, including loading, success, and failure states, based on the events triggered by user actions. The authService is responsible for carrying out the actual authentication operations.
With the Bloc set up, we can implement the authentication flow using Bloc.
How to Implement the Authentication Flow with Bloc
To implement the authentication flow, you will create a dedicated Stateless widget to check if a user has logged in already so that we will know what screen to show the user. The page will display different screens based on the user's authentication state.
AuthenticationFlowScreen:
Create a new file called authentication_page.dart in your project's screens directory.
import 'package:bloc_authentication_flow/screens/home.dart';
import 'package:bloc_authentication_flow/screens/sign_up.dart';
import 'package:firebase_auth/firebase_auth.dart';
import 'package:flutter/material.dart';

class AuthenticationFlowScreen extends StatelessWidget {
  const AuthenticationFlowScreen({super.key});
  static String id = 'main screen';
  @override
  Widget build(BuildContext context) {
    return Scaffold(
      body: StreamBuilder<User?>(
        stream: FirebaseAuth.instance.authStateChanges(),
        builder: (context, snapshot) {
          if (snapshot.hasData) {
            return const HomeScreen();
          } else {
            return const SignupScreen();
          }
        },
      ),
    );
  }
}
In the above code, you have a StatelessWidget with a StreamBuilder as the child. The StreamBuilder acts as a judge, using Firebase to check the state changes and if a user has logged in or not. If a user has logged in, it directs them to the home screen, else it goes to the sign-up screen.
Change the home route to AuthenticationFlowScreen to allow the app to check before routing to any page.
home: const AuthenticationFlowScreen()
Sign-up Screen
First, create a new file called sign_up.dart in the screens directory.
import 'package:bloc_authentication_flow/screens/home.dart';
import 'package:flutter/material.dart';
import 'package:flutter_bloc/flutter_bloc.dart';

import '../bloc/authentication_bloc.dart';

class SignupScreen extends StatefulWidget {
  static String id = 'login_screen';

  const SignupScreen({
    Key? key,
  }) : super(key: key);

  @override
  State<SignupScreen> createState() => _SignupScreenState();
}

class _SignupScreenState extends State<SignupScreen> {
  // Text Controllers
  final emailController = TextEditingController();
  final passwordController = TextEditingController();

  @override
  void dispose() {
    emailController.dispose();
    passwordController.dispose();
    super.dispose();
  }

  @override
  Widget build(BuildContext context) {
    return Scaffold(
      appBar: AppBar(
        title: const Text(
          'Login to Your Account',
          style: TextStyle(
            color: Colors.deepPurple,
          ),
        ),
        centerTitle: true,
      ),
      body: Padding(
        padding: const EdgeInsets.all(16.0),
        child: Column(
          crossAxisAlignment: CrossAxisAlignment.start,
          children: [
            const SizedBox(height: 20),
            const Text('Email address'),
            const SizedBox(height: 10),
            TextFormField(
              controller: emailController,
              decoration: const InputDecoration(
                border: OutlineInputBorder(),
                hintText: 'Enter your email',
              ),
            ),
            const SizedBox(height: 10),
            const Text('Password'),
            TextFormField(
              controller: passwordController,
              decoration: const InputDecoration(
                border: OutlineInputBorder(),
                hintText: 'Enter your password',
              ),
              obscureText: false,
            ),
            const SizedBox(height: 10),
            GestureDetector(
              onTap: () {},
              child: const Text(
                'Forgot password?',
                style: TextStyle(
                  color: Colors.deepPurple,
                ),
              ),
            ),
            const SizedBox(height: 20),
            BlocConsumer<AuthenticationBloc, AuthenticationState>(
              listener: (context, state) {
                if (state is AuthenticationSuccessState) {
                  Navigator.pushNamedAndRemoveUntil(
                    context,
                    HomeScreen.id,
                    (route) => false,
                  );
                } else if (state is AuthenticationFailureState) {
                  showDialog(
                      context: context,
                      builder: (context) {
                        return const AlertDialog(
                          content: Text('error'),
                        );
                      });
                }
              },
              builder: (context, state) {
                return SizedBox(
                  height: 50,
                  width: double.infinity,
                  child: ElevatedButton(
                    onPressed: () {
                      BlocProvider.of<AuthenticationBloc>(context).add(
                        SignUpUser(
                          emailController.text.trim(),
                          passwordController.text.trim(),
                        ),
                      );
                    },
                    child:  Text(
                      state is AuthenticationLoadingState
                            ? '.......',
                            : 'Signup',
                      style: TextStyle(
                        fontSize: 20,
                      ),
                    ),
                  ),
                );
              },
            ),
            const SizedBox(height: 20),
            Row(
              mainAxisAlignment: MainAxisAlignment.center,
              children: [
                const Text("Already have an account? "),
                GestureDetector(
                  onTap: () {},
                  child: const Text(
                    'Login',
                    style: TextStyle(
                      color: Colors.deepPurple,
                    ),
                  ),
                )
              ],
            ),
          ],
        ),
      ),
    );
  }
}
This code is just a simple Login UI with two textfields and an elevated button. The BlocConsumer widget wraps the Sign up button and listens for changes in the AuthenticationBloc state. When a user presses the button, it dispatches an event to the AuthenticationBloc to initiate the user sign-up process.
Depending on the authentication state, this button may display different feedback or navigate to another screen. It checks for AuthenticationSuccessState, AuthenticationLoadingState, and AuthenticationFailureState states to respond accordingly.
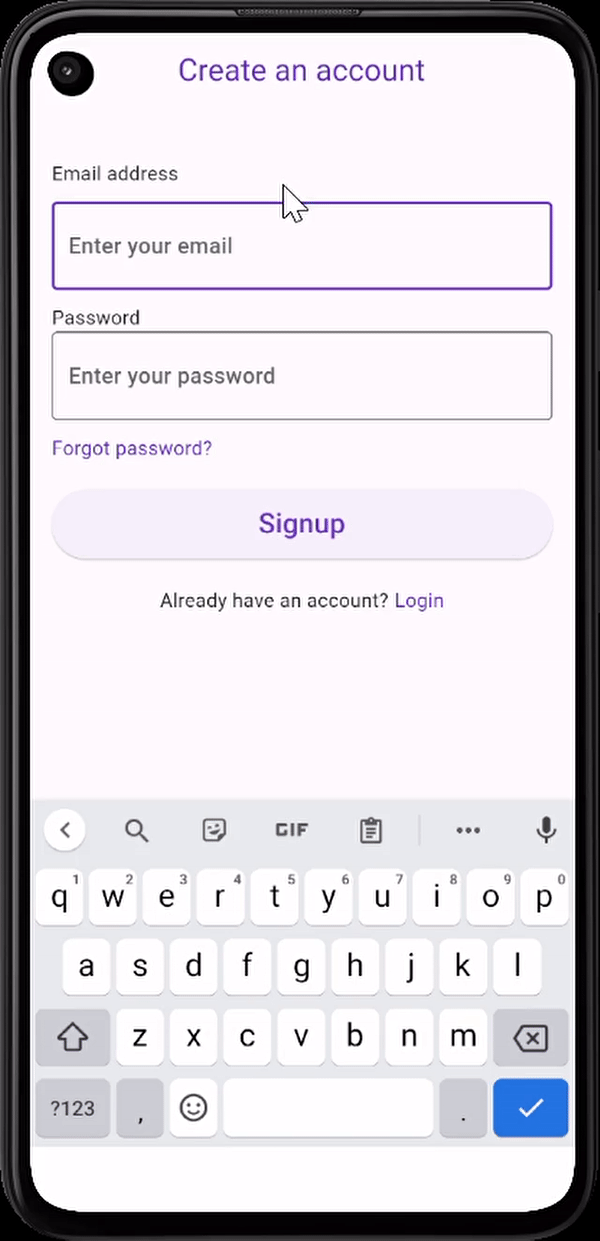 Img 2: A Login screen showing a login process with 2 out of the 3 states.
Home Screen
Create another file called home_screen.dart in the screens directory and add the code below to the file.
import 'package:flutter/material.dart';
import 'package:flutter_bloc/flutter_bloc.dart';

import '../bloc/authentication_bloc.dart';

class HomeScreen extends StatelessWidget {
  static String id = 'home_screen';
  const HomeScreen({super.key});

  @override
  Widget build(BuildContext context) {
    return Scaffold(
      body: Center(
        child: Column(
          mainAxisAlignment: MainAxisAlignment.center,
          children: [
            const Text(
              'Hello User',
              style: TextStyle(
                fontSize: 20,
              ),
            ),
            const SizedBox(
              height: 20,
            ),
            BlocConsumer<AuthenticationBloc, AuthenticationState>(
              listener: (context, state) {
                if (state is AuthenticationLoadingState) {
                   const CircularProgressIndicator();
                } else if (state is AuthenticationFailureState){
                    showDialog(context: context, builder: (context){
                          return const AlertDialog(
                            content: Text('error'),
                          );
                        });
                }
              },
              builder: (context, state) {
                return ElevatedButton(
                    onPressed: () {
                      BlocProvider.of<AuthenticationBloc>(context)
                      .add(SignOut());
                    }, child: const Text(
                      'logOut'
                      ));
              },
            ),
          ],
        ),
      ),
    );
  }
}
The code above represents the HomeScreen and it's also a simple page that consists of scaffold, a column, and a text widget but the interesting part is the BlocConsumer which is at the elevated button that says logOut. Let's look closely at that.
The BlocConsumer Listens to state changes from the AuthenticationBloc. It has two parameters - listener and builder.
- listener: Listens to state changes and reacts based on the current state received from the
AuthenticationBloc. - If the state is
AuthenticationLoadingState, it shows aCircularProgressIndicator. - If the state is
AuthenticationFailureState, it displays anAlertDialogwith the message 'Error'. - builder: Builds the UI based on the current state received from the
AuthenticationBloc. - It renders an
ElevatedButtonlabeled "Log Out". - When pressed, it triggers the
SignOutevent in theAuthenticationBlocvia BlocProvider.
With the Bloc authentication flow implemented, you can run your Flutter app and test the registration functionalities. Make sure to handle other authentication-related scenarios, such as user Login and password recovery, as required by your app's specifications. Also, you'll want to handle the errors gracefully to give the user a good experience.
If you want to clone the repo, you can check it out on GitHub here and leave a like.
Conclusion
In this article, we explored building a user authentication flow in Flutter using Firebase for authentication and the Bloc state management pattern for handling application state.
We learned how to set up Firebase in a Flutter project, create Blocs for authentication, and implement the authentication flow using Bloc.
By leveraging the power of Firebase and the predictability of Bloc, you can ensure a secure and seamless user authentication experience in your Flutter apps.