
By Nate Wang
I introduced Rekit Studio in the last article, and since then many people have been interested in using it in an existing React project. This article will introduce how to do that. To learn how to migrate is really just to learn how Rekit works. So this is not only a guide for the migration, but also an introduction to how Rekit works.
It’s actually better to think about adding Rekit Studio to existing projects rather than migrating it, because you don’t need to refactor all of your existing code to Rekit at one time. You can write new code with Rekit and leave old code as it is — your project will not be broken. Then you can refactor old code at anytime later when necessary. Maybe you want to see full-featured dependency diagraming or edit an old component with Rekit Studio.
We will take Redux’s TodoMVC implementation as our example, so you may need to check its source code first. It is created by create-react-app, which is an official and very popular React boilerplate. If your project is also created by this boilerplate, then this article will be more useful.
Prerequisite
There are only three prerequisites for your project to use Rekit:
- React v0.14+
- Redux
- ES6 modules
To be able to migrate, the project should be based on React, Redux. It doesn’t matter if your project doesn’t use React Router. But you may need an adapter to consume React Router’s JSON API, because Rekit uses it as the routing config. This enables Rekit to know how to create/update/delete and display routing rules.
Rekit uses Babylon, the parser used by Babel, to parse ES6 modules for refactoring and dependency diagraming. So it doesn’t support TypeScript or Flow projects for now.
1. Install rekit-core and rekit-studio
Both Rekit Studio and Rekit CLI use [rekit-core](http://rekit.js.org/docs/core.html) to manage project elements. Install them to your project first:
yarn add rekit-core rekit-studio --dev
Or with npm:
npm install rekit-core rekit-studio --save-dev
2. Copy Rekit folder structure/files to your project
Rekit projects have a special folder structure. To create it for your project quickly, create a clean Rekit app and copy the folders/files to your project.
npm install rekit --globalrekit create my-app --clean
Then copy these two folders to your project:
- src/
- tools/
Keep in mind that there will be conflict with yours: for the folders, just merge them. For files, don’t replace any of your files and remember which ones have conflicts — then merge or rename them manually (I’ll introduce this later).
3. Start Rekit Studio
Rekit uses the script under tools/server.js to start dev servers and Rekit Studio. For an existing project, you should already have your own script for dev server and building. So we need to merge them.
There are 4 functions inside Rekit’s server.js:
- startDevServer: read webpack config and start webpack dev server.
- buildDevDll: build third party libraries into Dll to improve Webpack’s performance for development using the Webpack dll plugin.
- startStudioServer: start an Express server with Rekit Studio middleware
- startBuildServer: start an Express server for verifying the built bundle.
You can either edit server.js to start your dev server or edit your own npm start script by copying startStudioServer function to start Rekit Studio.
For Redux’s TodoMVC example, the script starts dev server is scripts/start.js, we edit it by appending the following code at the bottom to start Rekit Studio:
Alternatively, you can also just save above script as a separate file like start_rekit_studio.js then execute it with node, rather then insert it to your existing script.
Then we need to add necessary deps if not installed yet:
yarn add express express-history-api-fallback --dev
Or with npm:
npm install express express-history-api-fallback --save-dev
And config the Rekit Studio port in package.json:
{ ... "rekit": { "studioPort": 6090 }, ...}
Note that the “rekit” property in package.json is necessary because Rekit uses it to detect a Rekit project.
That’s all. Then you can start Rekit Studio with npm start(assuming you start Studio in your npm start script)! Access http://localhost:6090 for it. And the TodoMVC app itself runs as well. Still access http://localhost:3000 for the app:
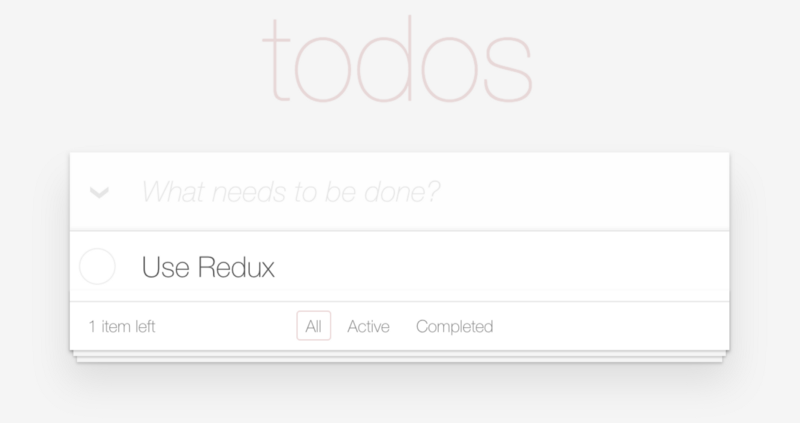
We didn’t change anything, but Rekit Studio is now running behind.
Start using Rekit Studio to write code!
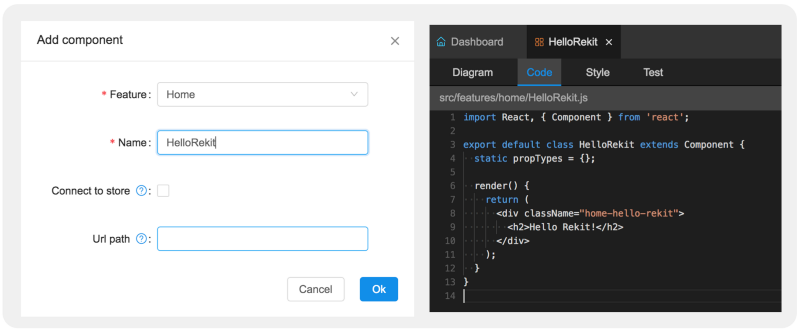
Once Rekit Studio is started you can use it to write code. Remember that Rekit just helps to write standard React, Redux code, so you can use it without any limitation in your project. For example let’s create a component HelloRekit under the home feature by Rekit Studio and edit the default text to “Hello Rekit!”
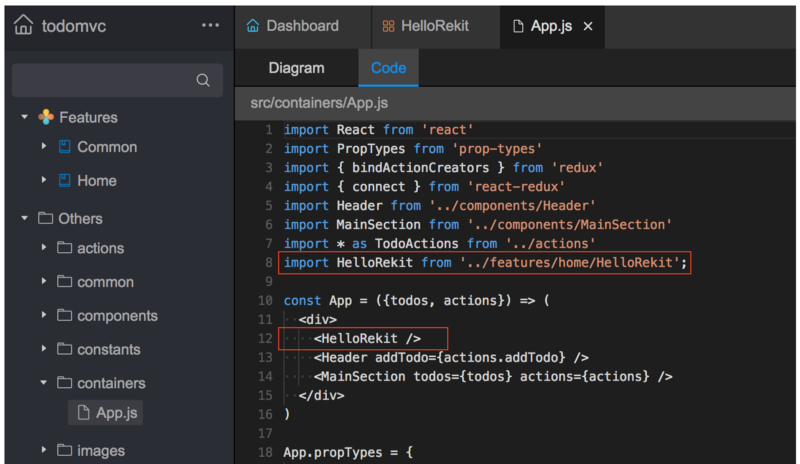
Now we have a React component: src/features/home/HelloRekit.js. Then use it in the TodoMVC app by editing src/containers/App.js which is the root component of the app. You can find it in the others folder in Rekit Studio. Open it and add only 2 lines of code:
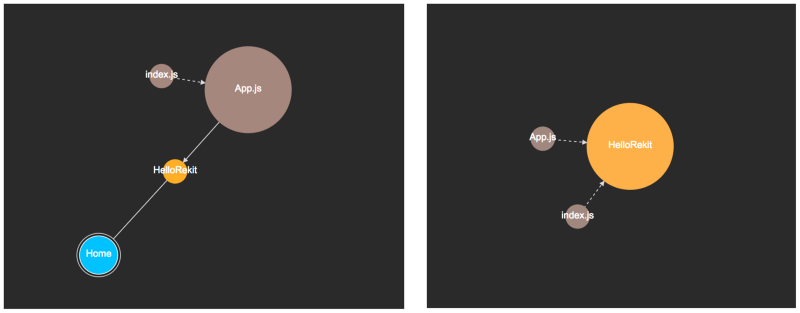
Save the file, and then you can even see the dependency diagram though App.js was not created by Rekit:
One thing to keep in mind is that when importing a module, you should use the physical path rather then the logic path showed in the project explorer.
Then open the TodoMVC app, and you can see the HelloRekit component has been displayed:
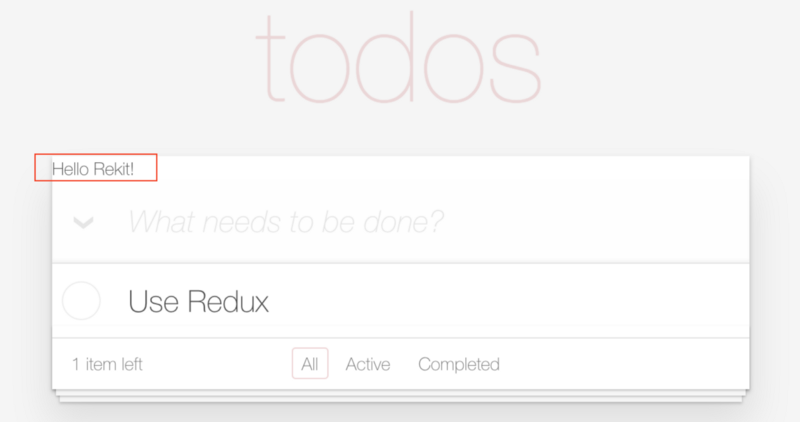
Though not that beautiful, since we have not added style yet, it works well!
Integrating styles
Now, let’s integrate styles managed by Rekit into your project. For now, Rekit only supports Less or Sass as the CSS transpiler. You need to config your bundler (Webpack, Rollup, etc.) to support it: take Less and Webpack, for example, and add src/styles/index.less to the entry in config/webpack.config.dev.js:
entry: [ ..., 'src/styles/index.less', ...],
Note that Rekit uses some default style in src/styles/reset.css which should not be used for existing projects. So just remove that @import line in src/styles/index.less.
Then add the Less-loader to the config under oneOf for the TodoMVC app. It might be unnecessary if your project has been using Less.
{ test: /\.less$/, loader: 'style-loader!css-loader!less-loader'}
Install Less and Less-loader if necessary:
yarn add less@2.3.1 less-loader --dev
Note that Less-loader is now only compatible with Less @2.3.1 but not the latest 3.0.1.
All configuration for styling is done, so now let’s add some style to the component HelloRekit and see the result:
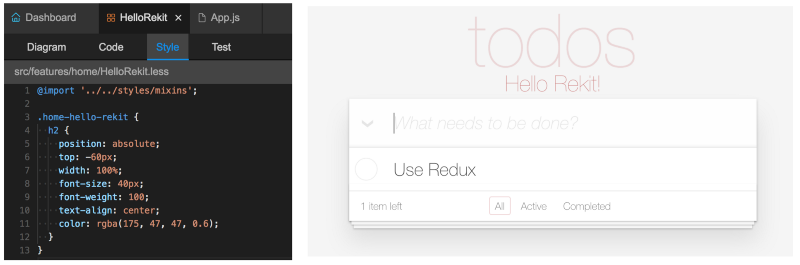
We can see that the style managed by Rekit has been used by the existing project.
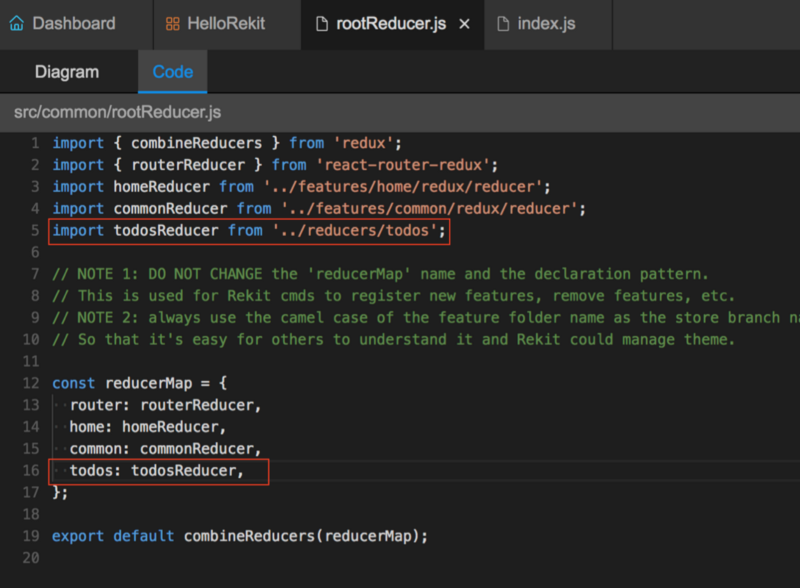
Integrating Redux
Next let’s integrate existing Redux code to Rekit. Each Redux app has a root reducer. The key is to merge Rekit’s reducer with the existing one. It’s super easy! For the TodoMVC app, just import src/reducers/todos.js to Rekit’s root reducer src/common/rootReducer.js:
Then use this root reducer in the TodoMVC app by editing src/index.js:
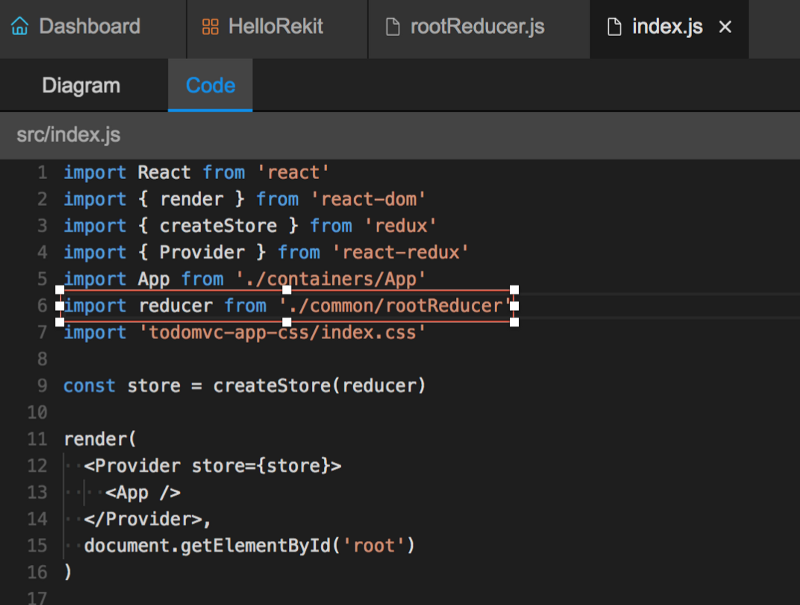
Ok, you’re able to use Rekit to manage new Redux actions and reducers. Now create an action with Rekit by yourself and try it!
Integrating React Router
As mentioned above, Rekit manages routing rules in JSON format. The root route config file is src/common/routeConfig.js which loads route rules from each feature’s src/features/<feature-name>/route.js. When creating a component with some URL path, Rekit updates the route.js file to insert a routing rule.
So it’s not necessary to use React Router — you can use any router library that can consume the rules defined by JSON’s API. In a Rekit app, src/Root.js is the place where JSON rules are handled to generate React Router v4 declarations in JSX.
Since the TodoMVC app doesn’t use a router, we just use Rekit’s default way. First install react-router-dom and react-router-redux to your project if not installed yet:
yarn add react-router-dom react-router-redux@next --dev
Then you need to touch two files of the TodoMVC app:
- Update
src/index.jsto render Root.js instead ofsrc/containers/App.js.
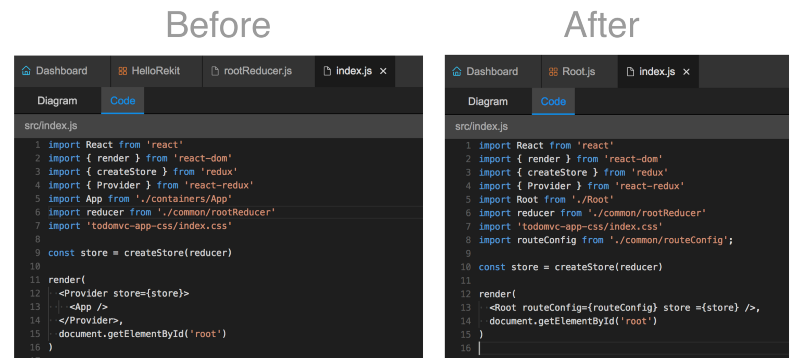
Note that Root.js has used Provider from react-redux for a component, so it’s no longer necessary in index.js.
- Update
src/features/home/route.jsto add a rule which matches some URL path to TodoMVC’s componentsrc/containers/App.js:

You don’t have to add rules to home’s route.js. It could belong to any feature, even the root routeConfig.js.
Now you can access the TodoApp by this URL: http://localhost:3000/todos . We can see that TodoMVC’s container component App.js is managed by React Router now.
We have finished migrating React Router. This was just the sample code of TodoMVC. For your app, the approach is similar. If you also use React Router v4, then just use Root.js — otherwise write your own adapter to consume Rekit’s routing config JSON.
Unit Tests
Rekit Studio uses the script tools/run_test.js to run unit tests by test file pattern so you should not rename or move it. For example use this command to test the home feature:
node run_test.js features/home/**/*.test.js
The script uses Mocha to run tests and nyc to generate a test coverage report. If you use other test frameworks, like Jest, edit this script to run tests for your own.
Build
Rekit Studio uses the script tools/build.js to build the project. So you should not rename or move it. All you need to do is put your build script inside this script so that you can start building via Rekit Studio’s GUI.
Rekit setup is done
For now, we have added Rekit to an existing project. It means you can start to write new code with Rekit Studio and leave the old code as it is. The project should still be running well as before.
But as I mentioned above, we may need refactor the old code so that it can be managed by Rekit. Next let’s see how to do the migration.
Thinking in features
One of the key abilities of Rekit is dividing a complicated application into loosely decoupled features. A feature is a high level concept, and I once introduced the architecture here. For your application, you should also consider creating features to manage existing code rather than putting all code into a single feature.
Migrating components
Each component consists of three files:
- Component.js: should always be put directly under a feature folder:
src/features/<feature-name/Component.js - Component.less/scss: should always be put directly under a feature folder:
src/features/<feature-name/Component.less - Component.test.js: should be in the tests folder:
tests/features/<feature-name>/Component.test.js
The position of files and the naming pattern should follow Rekit’s conventions described here so that Rekit can refactor them when necessary. Rekit detects a component by checking if a module under the feature folder imports React.
Each component’s root DOM node should have a unique CSS class name. In Rekit, the pattern is <feature-name>-<component-name> . It’s always in kebab case using lodash’s _.kebabCase function. This class name will be auto-updated when you rename a component with Rekit.
While keeping these rules in mind, you can move your component to a feature folder. Then Rekit Studio can load it in the project explorer and edit it with the element editor (with tabs for different parts of a component).
You can check the final result here to see how Rekit organizes components for the TodoMVC app.
Migrating actions and reducers
Rekit uses a different approach to organize Redux actions and reducers compared to Redux’s official examples (described here). So you need to split your actions.js and reducers.js into different files. Each file has one action and its reducer. The easiest way is to create an action by Rekit Studio then move your old action/reducer logic inside it.
Action names and action type constants should also be named in the Rekit way so that Rekit can refactor them. For example, this picture shows how to migrate addTodo action to the Rekit way:
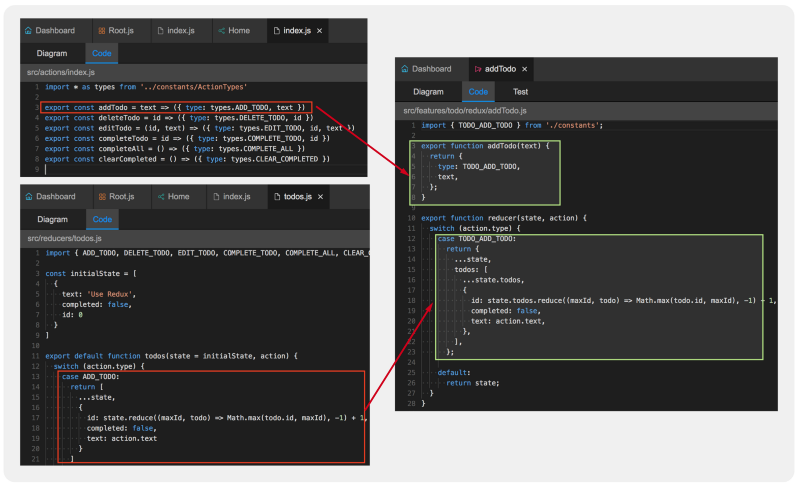
You don’t need to change your business logic. Just put them in a new place. With this approach, you will be able to manage Redux actions/reducers more easily.
You can also check the final result here to see how Rekit organizes actions for the TodoMVC app.
Summary
I have to admit that adding Rekit to an existing project is much easier than I originally thought. You don’t need to change your webpack/rollup/parcel config, how you build/test your project, or how your start your application. But just make sure Rekit runs in your project in three steps:
- Create folder structure/base boilerplate that Rekit understands
- Add
rekit-corerekit-studioto you project. - Create the script to start Rekit Studio
Now you can write new code with Rekit Studio!
This article uses the TodoMVC app as the example to migrate. Your projects might be much more complicated, so you may have some other problems when migrating. If you do, feel free to put your questions in the comments, and I’ll try my best to help you resolve them. Thanks!