

Git has a feature to "sign" commits, but what is signing, and what are the benefits?
TL;DR: If you don't care for the details, and just need to get commit signing setup quickly, skip to How to Sign Commits.
Signing, or code signing specifically, is the process of using cryptography to digitally add a signature to data. The receiver of the data can verify that the signature is authentic, and therefore must've come from the signatory.
It's like physical signatures, but digital and more reliable.
Git's Default Behavior
First let's note that all commits have the following properties:
Author – The contributor who did the work, this is informational.
Committer – The user who committed the change.
In most cases, these will be the same, but they can be overridden when committing, so it's important to note the difference.
When you first installed Git, you probably had to configure a few settings, namely user.email and user.name. This may've been handled for you depending on your Git client.
In the command line, this requires executing the following commands:
git config --global user.email "seth@example.org"
git config --global user.name "Seth Falco"
Git commits are trust-based, so it'll assume you put in your real email and name. You can then commit and push to remote providers like GitHub and GitLab with the details provided.
What happens when someone else uses your email address, and then pushes changes remotely?
git config --global user.email "seth@example.org"
git commit -m "Jen did this."
git push origin main

The result looks normal, but I'm not the one who did this commit. Jen committed to her repository, authenticating with her GitHub credentials, but it's showing my name and linking to my profile. The default behavior sets both the author and committer to the details in git config.
On GitHub, the commit is already indistinguishable from my own. If a user set both user.email and user.name to mine, which they can get from doing git log on any of my commits, then even locally it'd look the same.
This means that anyone can set their user.email to your email address, and it'd look like you made the commit.
Why Does Git Do This?
You might wonder why this is possible. You authenticate to your account when you push to the repository after all, shouldn't it use that email? Doesn't this seem a bit flawed?
When you authenticate to push to remote repositories, you're authenticating to do just that– push changes. The commits don't require authentication regardless of who authored or committed them.
If commits required authentication by default, it'd be impossible to migrate or mirror projects to other platforms. The commit history will include former employees, dead users, inactive accounts, or email addresses that aren't on other platforms.
The only solution would be to rewrite the history to remove that they ever worked on the project, which isn't ideal.
Another scenario would be if I forked a project on GitHub, but want to maintain my fork on GitLab. My first push would include all commits from previous committers. For a large project, it's not feasible to authenticate every committer.
The author of a commit signifies attribution for who did the work, not proof of who did the work.
In fact, you can always override the author when committing just for this purpose. Using the --author argument, you can specify a different name and email to your global settings, even details that aren't associated with an account where the repository is hosted.
On public repositories, be mindful when committing on behalf of someone without an account, though. Names and email addresses become public information once pushed, and are accessible to anyone using git log!
git commit -m "Jen didn't even author this." --author "Jen <jen@example.org>"
git push origin main
This has different behavior than using another email in git config. This makes the author what we specified in --author, but the committer what we specified in git config.

Translation platforms like Weblate rely on this feature to ensure translators still get attribution, even though an automated user commits and opens the pull requests, not the translator.
How to Prove You're the Committer in Git
GNU Privacy Guard (GnuPG or GPG) allows you to create cryptographic asymmetric key pairs that can be used for the encryption and signing of data. They consist of a public and private key.
You can share the public-key with anyone – you may upload this to your GitHub and GitLab accounts, or put it on the internet for anyone to access.
The private-key, as the name suggests, is private. You should treat this like a password, and under no circumstances should you ever share your private-key with anyone.
We'll be generating a key pair, and then uploading the public key to GitHub and GitLab. Using your private-key, you can sign your commits, and servers with the public key will use it to confirm it was really you.
How to Sign Commits in Git
I'll only cover how to do this in the terminal, since this provides a uniform experience across operating systems. If you're uncomfortable with the terminal, you pretty much just have to copy the commands.
Prerequisites
The only prerequisite, other than Git itself, is to install the GPG command-line utility.
You can verify if it's installed with gpg --version.
Windows
Git BASH
If you have Git BASH installed (optionally bundled with Git for Windows), then you already have access to GPG. Just launch an instance of Git BASH, and it'll be available immediately.
Gpg4win
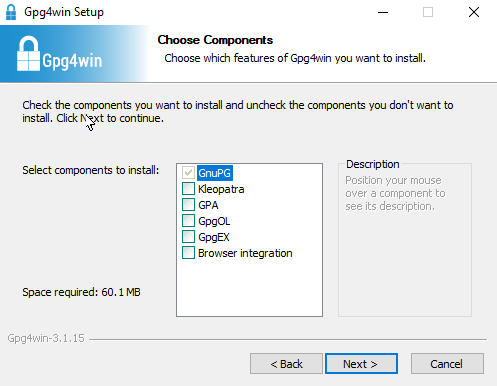
If you don't have Git BASH, then there's no need to install it. You can install Gpg4win, which will provide GPG globally, so you can just use it from PowerShell.
When installing Gpg4win, you can untick all the additional components, as we won't be needing them since we plan to use the terminal.
If you already had PowerShell open, you'll have to restart it before you can use GPG.
Linux
Your distribution most likely already includes GPG. If not, then you can install it through your package manager.
apt (Debian / Ubuntu)
sudo apt install gnupg
pacman (Arch / Manjaro)
sudo pacman -S gnupg
How to Generate GPG Keys
If you already have a GPG key, you can skip this step. It's perfectly fine to reuse GPG keys. Just read below and verify that your key is compatible with Git and GitHub.
You can get a list of your GPG keys with:
gpg --list-keys
First we need to generate an RSA key pair. The following will start an interactive script that will ask questions so we can provide the necessary information.
gpg --full-gen-key
For what kind of key you want, input
1which is "RSA and RSA".For key size, input
4096. This is the minimum size for GitHub and GitLab, and the maximum size GPG will let us generate.For how long the key should last, use whatever suits you. The default is
0, which means to never expire.Verify the information is correct by inputting
y.
GPG will ask for personal information which is stored in your key.
Your name, this can be anything at least 5 characters in length.
Your email address, use an email you plan to commit with. You must've verified this email on the remote account you'll push with.
A comment, you can type whatever, or press enter to leave it blank.
Verify the information is correct by inputting
o.
root@799d1cc3c99c:/# gpg --full-gen-key
gpg (GnuPG) 2.2.19; Copyright (C) 2019 Free Software Foundation, Inc.
This is free software: you are free to change and redistribute it.
There is NO WARRANTY, to the extent permitted by law.

Please select what kind of key you want:
   (1) RSA and RSA (default)
   (2) DSA and Elgamal
   (3) DSA (sign only)
   (4) RSA (sign only)
  (14) Existing key from card
Your selection? 1
RSA keys may be between 1024 and 4096 bits long.
What keysize do you want? (3072) 4096
Requested keysize is 4096 bits
Please specify how long the key should be valid.
         0 = key does not expire
      <n>  = key expires in n days
      <n>w = key expires in n weeks
      <n>m = key expires in n months
      <n>y = key expires in n years
Key is valid for? (0) 0
Key does not expire at all
Is this correct? (y/N) y

GnuPG needs to construct a user ID to identify your key.

Real name: Seth Falco
Email address: seth@example.org
Comment:
You selected this USER-ID:
    "Seth Falco <seth@example.org>"

Change (N)ame, (C)omment, (E)mail or (O)kay/(Q)uit? o
GPG will ask for a passphrase to protect the key. You can set this to anything, or leave it blank for no passphrase at all. Of course, it's ideal to use a good passphrase, rely on your password manager if you use one.
The password prompt is environment-dependent, so this step will look different for different users, but what it's asking is effectively the same.
It'll start generating the key, which requires a lot of randomly generated data. Performing actions on your PC will help make it more random, so I'd recommend moving your mouse around while the key is generating.
How to Export Your Keys
Next you need to get the identifier of the newly generated key so we can refer to it when exporting your key and configuring Git.
GPG keys can be referred to in multiple ways. It's a good a habit to use and share the full fingerprint, to minimize the risk of ambiguity when users request it from a key server. Long (64-bit) IDs are fine for now, but short (32-bit) IDs are best avoided, as it's easy to produce a collision. (More Info)
We'll be using the full GPG fingerprint, which we can get with the command:
gpg --list-keys
You'll get output like the following:
pub   rsa4096 2021-05-23 [SC]
      C6656513A0F9B7B7F4E76389EF39187D04795745
uid           [ultimate] Seth Falco <seth@example.org>
sub   rsa4096 2021-05-23 [E]
For me, it's C6656513A0F9B7B7F4E76389EF39187D04795745. Make sure to use your fingerprint instead of mine when you do the rest of the commands.
You need to export the public-key so you can upload it to GitHub. We use the --armor argument to indicate that we want to export it in an ASCII armored format instead of binary. This writes the public-key to a file named gpg-key.pub.
gpg --export --armor C6656513A0F9B7B7F4E76389EF39187D04795745 > ./gpg-key.pub
How to Back Up Your Keys
It's worth having a remote backup of your GPG keys because you'll likely use them across services. If you lose it, it'd be a pain to have to update everything.
You can export your private-key in the same way we exported the public-key, this writes the private-key to a file named gpg-key.asc:
gpg --export-secret-keys --armor C6656513A0F9B7B7F4E76389EF39187D04795745 > ./gpg-key.asc
You can now back up both your public and private keys, but remember that you should never send the non-encrypted copy of the private-key to the cloud. Always use end-to-end encrypted cloud storage, or a password manager like Bitwarden to back up sensitive data.
How to Enable Commit Signing
Then to enable signing all commits, set the commit.gpgsign setting using git config. This will make git commit sign commits by default.
git config --global commit.gpgsign true
If you have multiple GPG keys, or just for future reference, you may want to set user.signingkey as well. This will indicate specifically which key Git should use for signing to avoid ambiguity.
git config --global user.signingkey C6656513A0F9B7B7F4E76389EF39187D04795745
How to Use your Key
Finally, you have to upload your public key. You can use the same GPG key for both GitHub and GitLab, or any other Git provider.
We'll need the exported public-key for the following steps, so open the gpg-key.pub file in any editor like Visual Studio Code, and copy the contents to your clipboard.
On GitHub, you can go to your settings, under "SSH and GPG keys", then click "New GPG key". Paste the contents of gpg-key.pub into the Key field on GitHub, and click "Add GPG key".
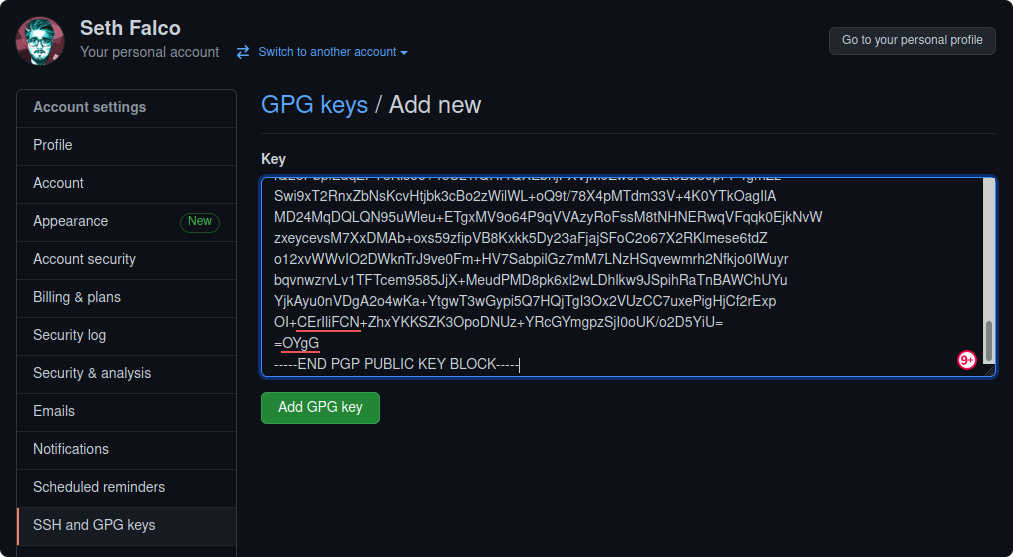
On GitLab, the steps are almost identical, just go to your preferences, then "GPG Keys". Paste the contents of gpg-key.pub into the Key field on GitLab, and click "Add key".
Now you're able to make signed commits to your repositories! The next commit will prompt for your GPG key password, since it's the first time using it. Subsequent commits will be seamless.
How to Verify Commits in Git
GitHub and GitLab will show a "Verified" badge next to your new commits.


The final thing to remember is that commit signing will only verify the committer, not the author. That means when you see a verified commit, the author has nothing to do with the verified status.

Vigilant Mode
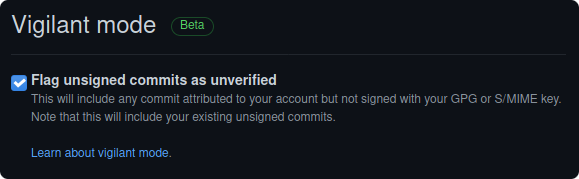
As a bonus, on GitHub specifically there is a setting called vigilant mode.
You can optionally enable this if you want all unsigned commits to explicitly say "Unverified". This can be enabled in your settings, under "SSH and GPG keys", then tick "Flag unsigned commits as unverified".
Now the commit that Jen did with my email address shows "Unverified" next to it, to indicate that it wasn't signed with a key associated with my account.
