By Anna Skoulikari
Git is a version control system that developers use all over the world. It helps you track different versions of your code and collaborate with other developers.
If you are working on a project over time, you may want to keep track of which changes were made, by whom, and when those changes were made. This becomes increasingly important if you end up having a bug in your code! Git can help you with this.
But Git can also be a bit scary and confusing when you first start learning it, so in this article I will introduce Git in a humanly understandable way. We'll cover topics such as repositories, commits, branches and much more, so let's get started!
Here's what we'll go over in this article:
- What is Git?
- What is GitHub?
- How to get started using Git
- How does Git track changes?
- A typical Git workflow
- Online course to learn Git version control
What is Git?
Git is a version control system that you download onto your computer. It is essential that you use Git if you want to collaborate with other developers on a coding project or work on your own project.
In order to check if you already have Git installed on your computer you can type the command git --version in the terminal.
If you already have Git installed then you will see what version you have. If you don’t have Git installed you can visit the Git website and easily follow the download instructions to install the correct version for your operating system.
What is GitHub?
GitHub is a product that allows you to host your Git projects on a remote server somewhere (or in other words, in the cloud).
It's important to remember that GitHub is not Git. GitHub is just a hosting service. There are other companies who offer hosting services that do the same thing as GitHub, such as Bitbucket and GitLab.
 The difference between GitHub and Git
How to Get Started with Git
Terminal vs GUI
You can either use Git by typing commands in the terminal or you can use a graphical user interface (GUI) such as Sourcetree or GitKraken.
If you choose the terminal, you will have to look up which Git commands you will need.
Luckily you don’t have to learn these by heart. Other than a handful of commands that you will use most often, the rest you can look up whenever you need them (this is what most developers do, even those with decades of experience). Git offers in-depth documentation on their website.
If you choose to use a GUI, then the various actions you need to take will be displayed in a more visual manner.
Whether you choose to use the terminal or a GUI, you will need to understand the basics of how Git works in order to use it confidently.
For the rest of this article, we will share examples using Git in the terminal. But the steps we share are very similar if you are using a GUI.
How to Prepare your Project Folder in Git
To use Git we need to have a project that we want to version control. This can either be a new project or an existing project.
If it is a new project, then we need to create a new project folder (hint: we can use the mkdir command) and then navigate into that project folder in the terminal.
If we were to choose an existing project then we simply navigate into that project folder in the terminal.
In our example, we will create a new project folder called novel.
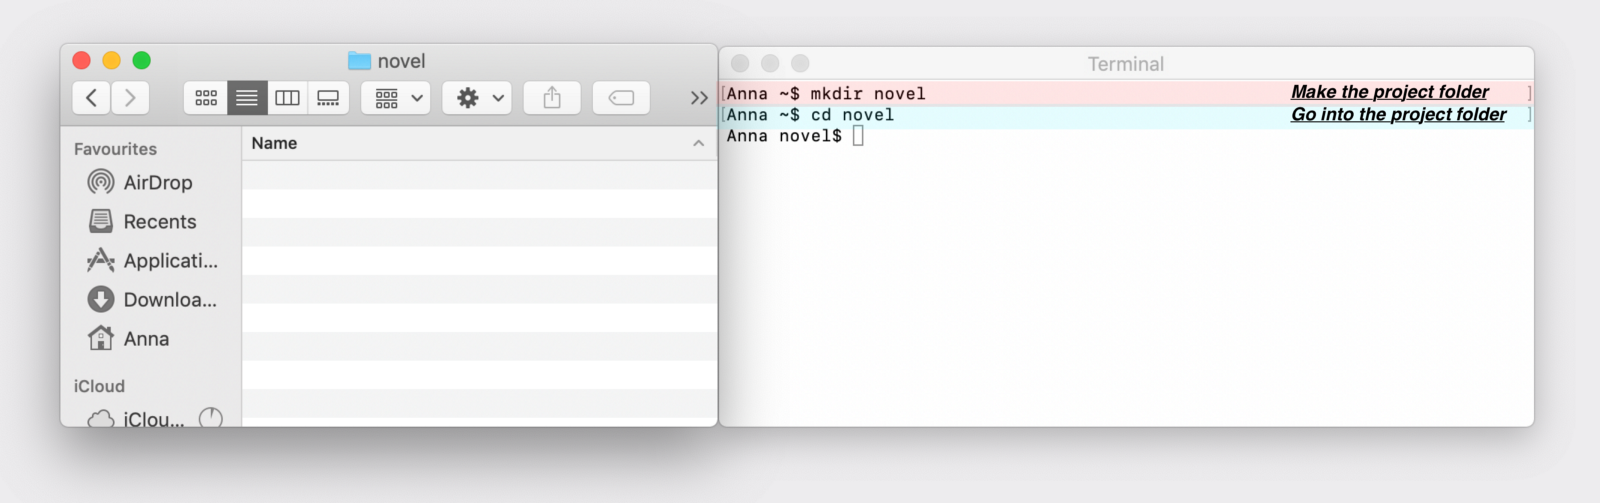 Creating our project folder
How to Create a Git Repository
Once we are in our project folder, in order to start using Git we will need to create (or initialize) a repository using the git init command.
Once we execute the command by typing it in the terminal and pressing enter, it will probably seem like not much happened. But don’t be deceived, Git can be sneaky sometimes and it carries out a lot of actions behind the scenes.
In order to see what Git did behind the scenes we will have to view our hidden files. Make sure to open your project folder in your file system. Then, if you are on a mac you can select Command + Shift + Dot in order to see hidden files in your file system. If you are on a windows OS then you can change your view settings in order to view hidden files in your file system.
In order to view hidden files in the terminal we can use the command ls -a.
What we should see now is a .git folder inside our project folder. This is generally what represents our repository.
 Creating our repository
What is a Git Repository?
The repository is the .git folder inside our project folder. It will track all the changes made to the files in our project and record that history over time.
The repository that we have on our computer is referred to as the local repository.
Earlier we mentioned hosting services such as GitHub, GitLab and Bitbucket. When we push (in other words upload) our local repository to one of these services, then the repository that resides in these service in the cloud is referred to as the remote repository.
It is important to use a remote repository in order to be able to collaborate with other people as well as to backup our projects in case something happens to our laptop or computer.
How to Collaborate with Other Developers Using Git
If another developer wants to collaborate with us on our project then they can clone (or in other words download) the remote repository from the hosting service you uploaded it to their computer.
This allows them to have the project on their computer as well. The project on their computer is then also referred to as a local repository.
In a project with multiple developers, each one has a local repository on their computer. And there is one remote repository that they all contribute to and they use it to share their work.
 Remote repository and local repositories
How Does Git Track Changes?
In order to save different versions of our project in Git we will make commits.
What is a Git Commit?
A commit is a version of your project. It represents a standalone version of your project and has a reference to all the files and folders that are a part of that version.
How Do I Make a Commit in Git?
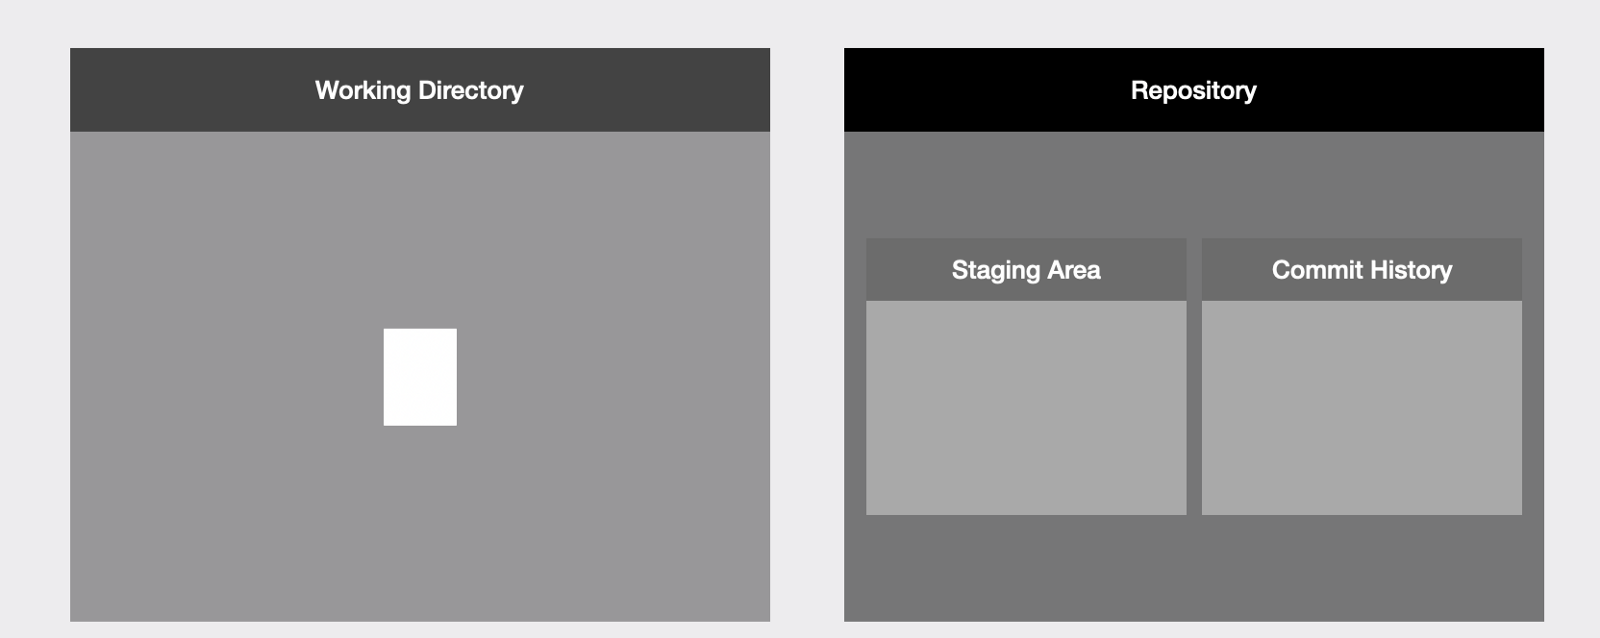
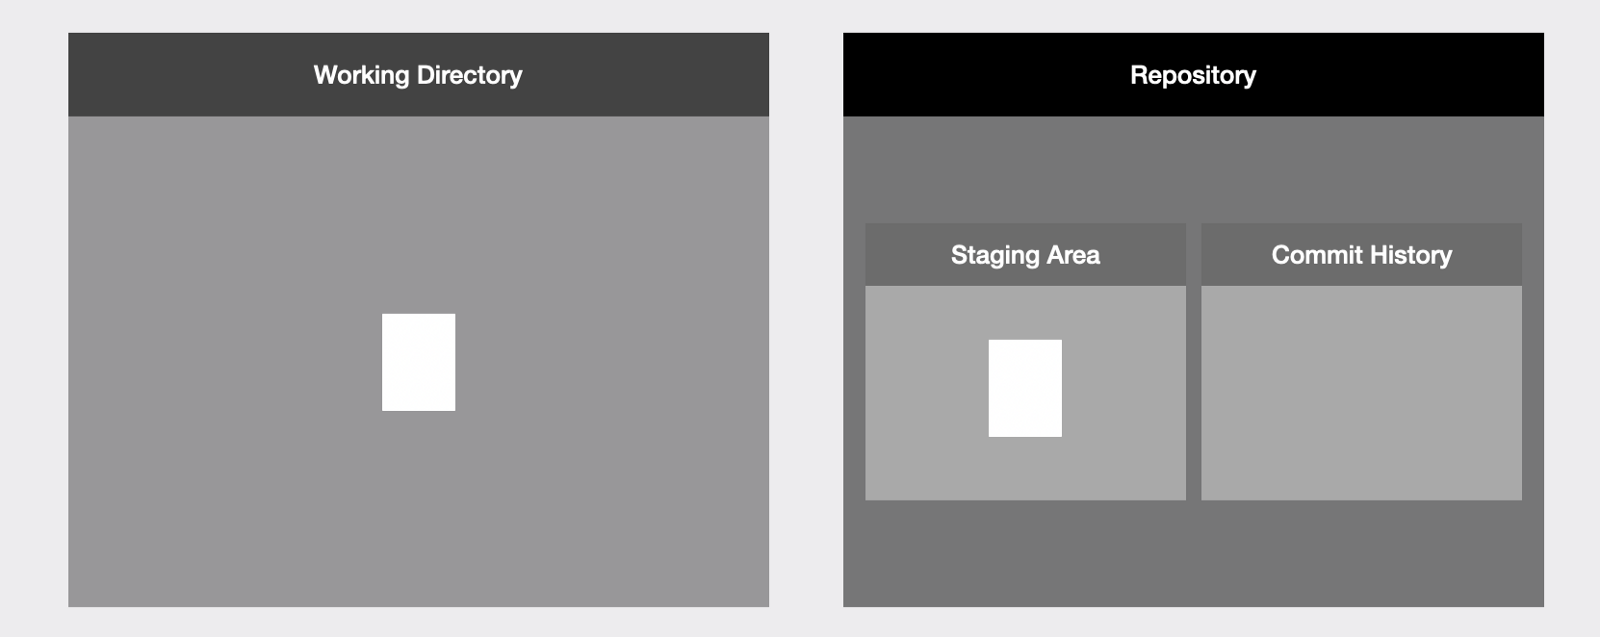
In order to understand how we make a commit we need to learn about three different spaces inside Git — the working directory, staging area, and commit history.
The working directory is basically represented by the contents of our project folder (hint: a directory is the same thing as a folder). It is sort of like a work bench, where we can add, edit, and delete files in our project.
The staging area and commit history are part of our repository.
The staging area is sort of like a rough draft space. It is where we can add updated versions of files or remove files in order to choose what we want to include in our next commit (version of our project). In the .git folder the staging area is represented by a file called index.
And finally the commit history is basically where our commits live after they’ve been made. In the .git folder the commit history is represented by a folder called objects.
 Working directory, repository, staging area, and commit history
A Typical Git Workflow
Step 1 — Edit Files
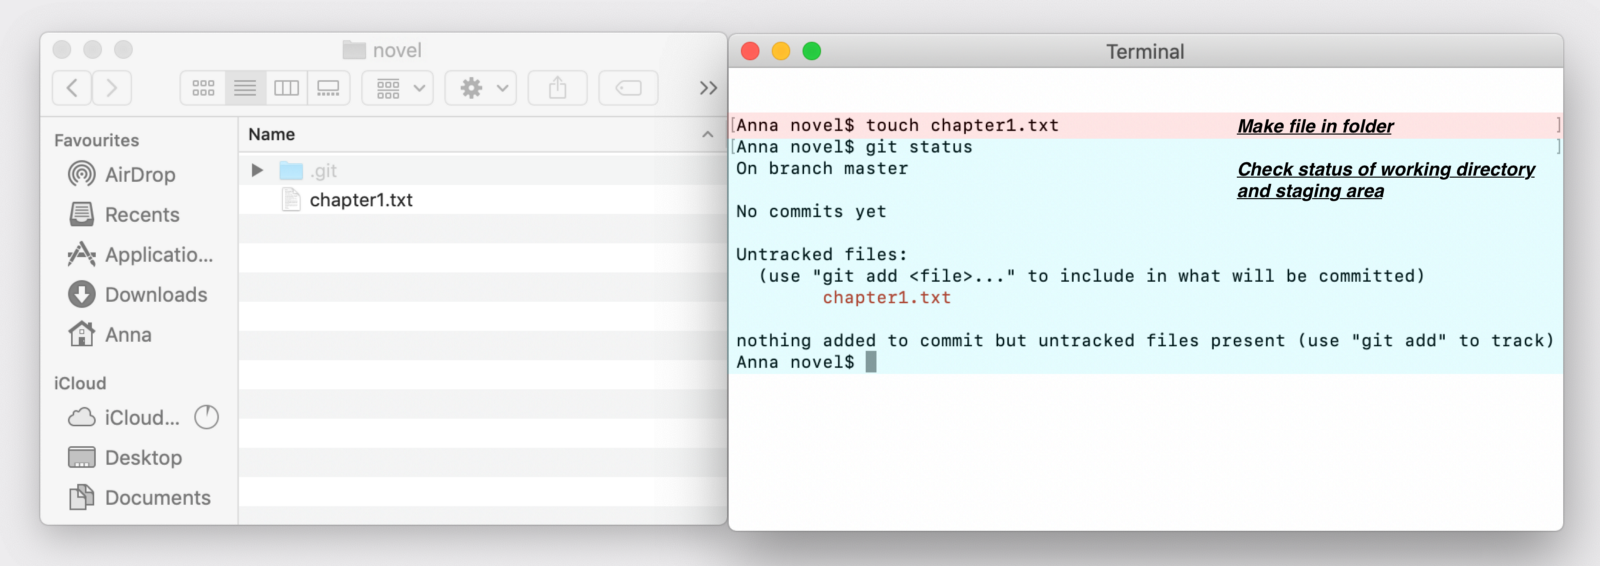
If you have a new project, you will create the very first file in your new project. In our novel project folder we will make a simple text file called chapter1. We can either do this using a text editor or directly in the terminal. In our example we do it directly in the terminal by typing touch chapter1.txt.
If you have an existing project then you will edit some of your existing files, add new files, or delete files.
Next, we can use the git status command. This command will tell us the state of our working directory and staging area and will tell us if there are any differences between the two.
 Adding a file to our project
In our example, we added just one new file to our new project. When we use the git status command, Git tells us that we have an untracked file in our working directory and that we need to use the git add command to include it in what will be committed. Which takes us to step 2.
 Our file is in the working directory
Step 2 — Add Files to the Staging Area
We can use the git add command in order to add new or updated files to the staging area. If we decide we don’t want to include some of the files we changed in our next commit then we simply make sure not to add those particular files to the staging area.
 Adding a file to the staging area
In our example, we add the only file we have in our project to the staging area using the git add command and passing in the name of the file. Then if we use the git status command we will see that Git will tell us that we have added our file to the staging area.
 Our file is in the staging area
It is also important to note that files do not move from the working directory to the staging area. Files are copied over from the working directory to the staging area.
Step 3 — Make the Commit
Finally, to make the commit we use the git commit command with -m option and pass in a commit message, for example git commit -m "this is the first commit".
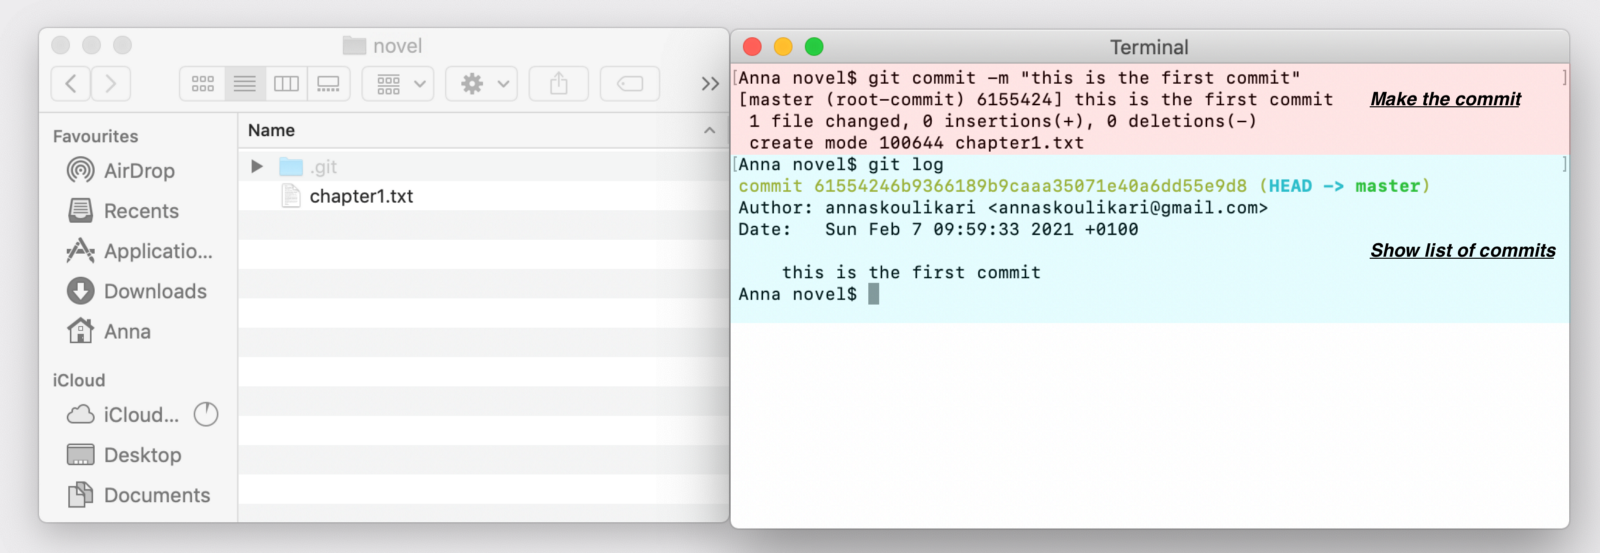 Making our first commit
We can then use the git log command in order to list all the commits we have in our project in reverse chronological order. In our example we only have one commit.
 We have made our first commit
Now we have made our first commit in our project! In other words we have saved the first version of our project.
The commit has a 40 character commit hash. A commit hash is 40 letters and numbers that act as a name for the commit or a way to refer to it.
We can also see information such as who made the commit, when the commit was made, and the commit message.
What is a Commit History in Git?
A repository consists of multiple commits, and in the simplest case each commit has one parent commit which is the commit that came before it. That is why one commit points back to the commit that came before it in the image below.
There are more complex cases when we get into the realm of multiple branches and merges, but that is out of the scope of this article.
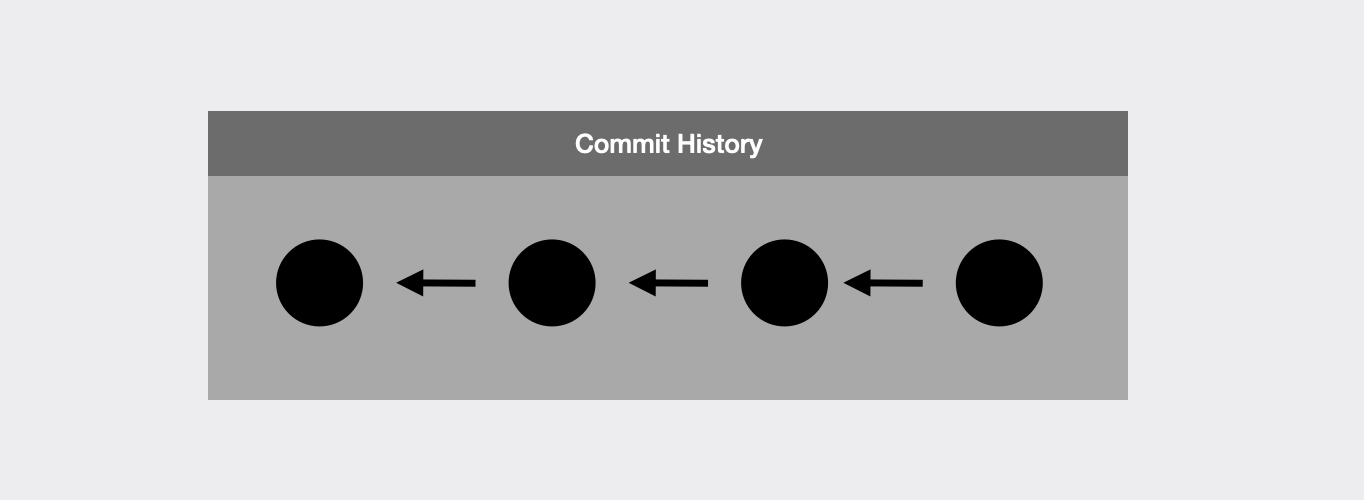 A simple commit history
Finally, What is a Branch in Git?
A branch is a pointer to a commit. The default branch in Git is called master or main.
We can see that a branch is a pointer to a commit by going into the .git folder and then opening the refs folder, opening the heads folder, and finally opening the file called master. Inside this file we will find that there is a hash. This is the hash of the commit that our master branch is pointing to.
We can once again use the git log command to list all the commits in our repository and we will find that that hash lines up with the commit that has the master label next to it in parentheses.
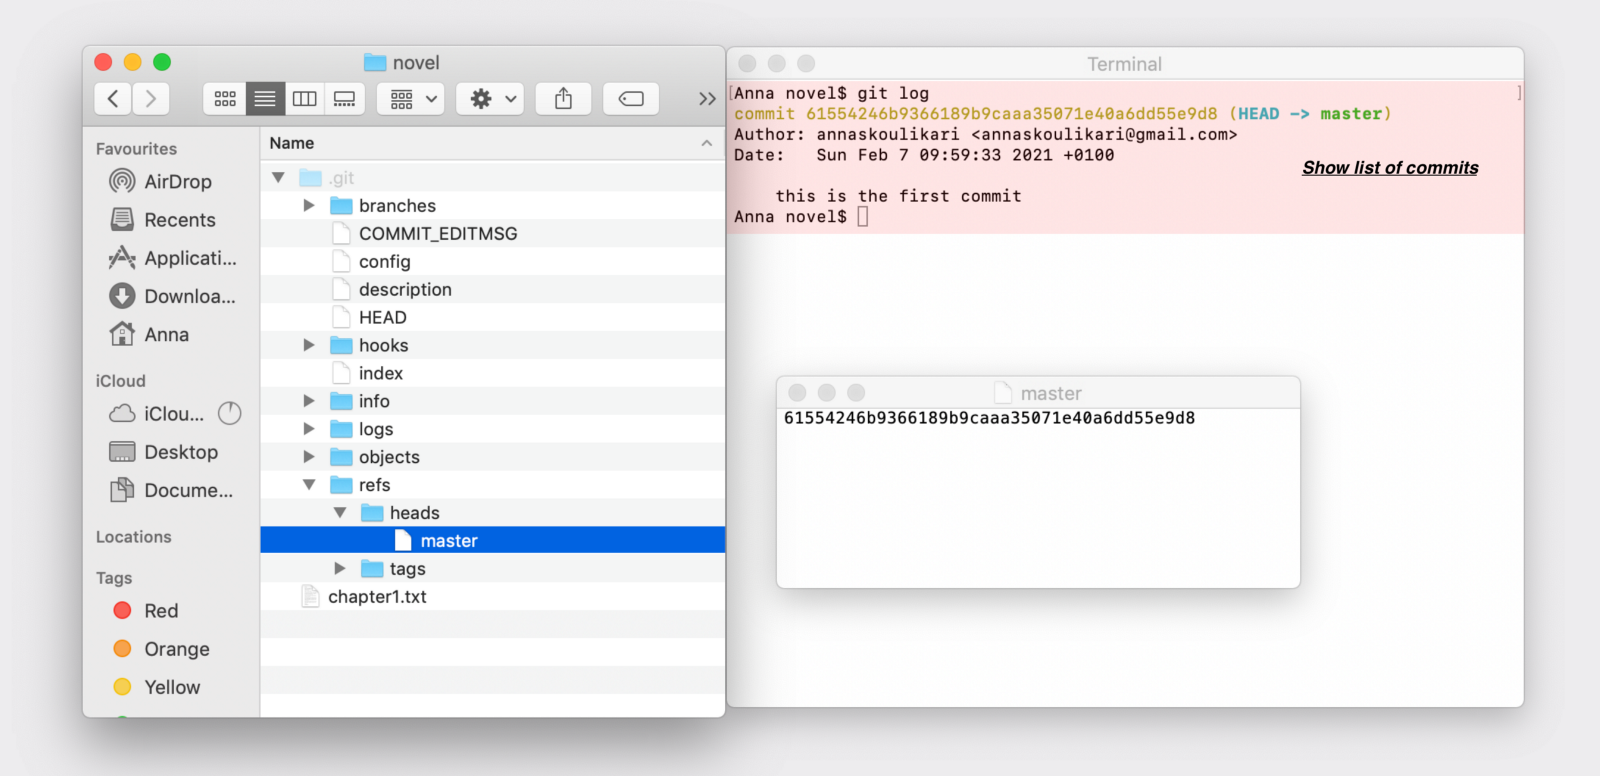 Showing the master branch in our .git folder
In the terminal, we can see a list of all the branches by typing in the command git branch.
 Showing the master branch pointing to our commit
Branches are really important because they make it a lot easier to collaborate with other people and to work on multiple features or different parts of your project at the same time.
As we make more commits, the branch we are on will update to point to our latest commit.
 Showing our commit history and the master branch pointing to our latest commit
Conclusion
If you’ve made it this far, congratulations! There is a whole bunch more to learn about Git, and in this article we only scratched the surface. Feel free to check out some more resources to learn Git down below!
Online course to learn Git version control
This article is based on an online course I created that teaches Git version control called Git Learning Journey. It teaches the basics of Git version control which covers all of the above in much more depth and much more, including working with remote repositories, merging and rebasing.
It is specifically designed for people transitioning into tech from non-technical backgrounds and it has become a highest rated course on Udemy with a 4.8 star ⭐️ rating and more than 600 satisfied students (check out the student review, they speak for themselves). And the first eight lessons are a free preview so feel free to take a peek!
 Git Learning Journey, online course teaching Git version control by Anna Skoulikari