

PostCSS is a Node.js tool that transforms your styles using JavaScript plugins.
It generates more downloads per week on NPM than other CSS preprocessors like Sass, Less, and Stylus combined.
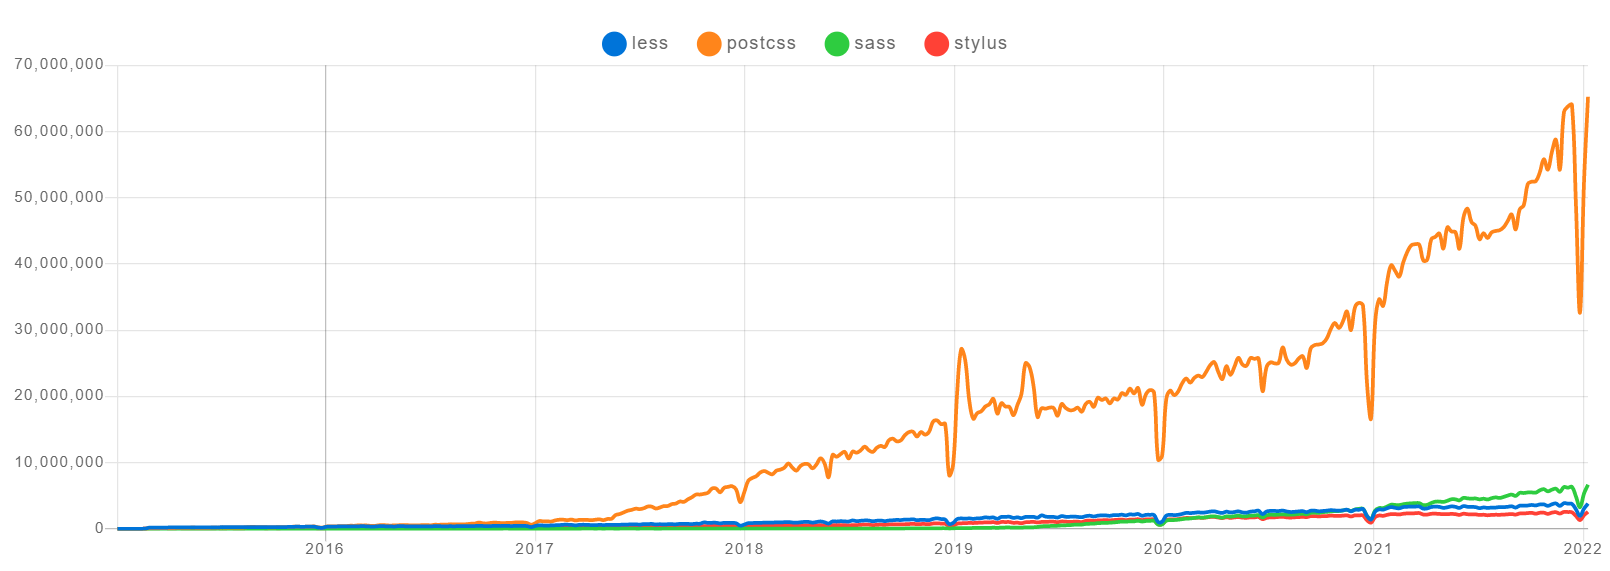 PostCSS download trends comparing to other CSS preprocessors
In this article we will discuss:
- What is PostCSS?
- PostCSS features and advantages
- Some popular PostCSS plugins
- How to setup PostCSS configurations
What is PostCSS?
PostCSS is a JavaScript tool that transforms your CSS code into an abstract syntax tree (AST) and then provides an API (application programming interface) for analyzing and modifying it using JavaScript plugins.
PostCSS provides a large ecosystem of plugins to perform different functionalities like linting, minifying, inserting vendor prefixes, and many other things.
Despite its name, it is neither a post-processor nor a pre-processor, it is just a transpiler that turns a special PostCSS plugin syntax into a Vanilla CSS. You can think of it as the Babel tool for CSS.
You can use PostCSS in conjunction with existing preprocessors like Sass, Less, and Stylus. Or you can use it as an alternative to all of them since it has all the required functionalities to be used alone.
You may have already been using PostCSS without knowing it. It's used in the popular Autoprefixer plugin which is used to automatically prepend vendor prefixes to CSS properties that require them.
PostCSS is also used by other technologies like Vite and Next.js, as well as the CSS framework TailwindCSS which is a PostCSS plugin.
PostCSS Features and Benefits
- PostCSS is fully customizable so you can use only the plugins and features you need for your application.
- It also produces fast build times compared with other preprocessors.
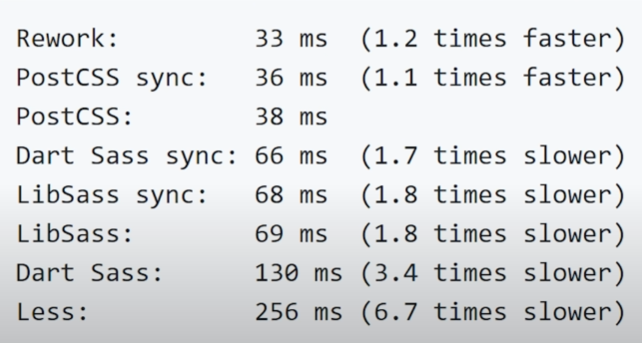 Different build times for different CSS preprocessors comparing to PostCSS
- If you want, you can write your own custom plugins. And you can use it with regular CSS as well as alongside other preprocessors like Sass.
PostCSS is all about plugins (on its own, it is simply an API). It has an ecosystem of 356 plugins (as of writing this article). Each plugin was created for a specific task.
You can navigate through the plugins using the plugin directory on the official PostCSS GitHub page, or using this searchable catalog of PostCSS plugins.
Before starting with the code, I highly recommend that you follow these steps:
- Download or fork the following postcss-tutorial repository to your machine and try to follow along. (Make sure to read the README.md file.)
- Install the PostCSS Language Support plugin if you are using the Visual Studio Code editor, so your editor can recognize any new syntax and stop giving you errors (skip this step if you are using other code editors).
Popular PostCSS Plugins
PostCSS Import
One of the basic and most important plugins to use is postcss-import. It lets us import CSS files into other files.
To check how to use this plugin go to src/style.css in the postcss-tutorial repository.
@import './components/comp1.css';
@import './components/comp2.css';
You can see that it is very similar to the way that we use the @import method in Sass.
Note: postcss-import is different than the import rule in native CSS. You should avoid the import rule in native CSS, since it can prevent stylesheets from being downloaded concurrently which affects the loading speed and performance.
The browser has to wait for every imported file to be loaded instead of being able to load all the CSS files at once.
Autoprefixer
This is one of the most popular PostCSS plugins. You use it to parse and add vendor prefixes like -webkit, -moz, and -ms to CSS rules using values from the Can I Use website.
We use the Can I Use website to see which browsers support a CSS feature with their versions. This helps us determine whether we need to add a prefix or not.
Autoprefixer uses Browserslist, so you can specify the browsers you want to target in your project with queries.
We can configure our Browserslist in the package.json file using a “browserslist” key:
 "browserslist": [
     "defaults"
 ]
The defaults query above is a short version of:
> 0.5%browsers that have at least 0.5% global usage.last 2 versionsthe last 2 versions for each browser,Firefox ESRthe latest Firefox Extended Support Release.,not deadbrowsers that received official support or updates for the last 24 months.
Or we can use a .browserslistrc file in the root directory, and inside it we type our configurations.
defaults
To test this plugin, we have added some CSS rules that need some prefixes in the src/components/comp2.css file:
label {
  user-select: none;
}

::selection {
  color: white;
  background: blue;
}

::placeholder {
  color: gray;
}
Based on our previous "browserslist" settings, the final output will be:
label {
  -webkit-user-select: none;
     -moz-user-select: none;
      -ms-user-select: none;
          user-select: none;
}

::-moz-selection {
  color: white;
  background: blue;
}

::selection {
  color: white;
  background: blue;
}

::-moz-placeholder {
  color: gray;
}

:-ms-input-placeholder {
  color: gray;
}

::placeholder {
  color: gray;
}
PostCSS Preset Env
This plugin enables us to use modern CSS (like nesting and custom media queries) in our code, by converting it to Vanilla CSS which can be understood by browsers.
It has a stage option which determines which CSS features to polyfill based upon their stability in the process of becoming implemented as a web standard.
The stage can be 0 (experimental) to 4 (stable), or false. Stage 2 is the default.
For nesting, we need to use stage 1.
module.exports = {
    plugins: [
        require('postcss-preset-env')({ stage: 1 })
    ],
}
Also, the preset-env plugin includes by default the Autoprefixer plugin and the [browsers](https://github.com/csstools/postcss-preset-env#browsers) option will be passed to it automatically.
In the src/components/comp1.css we have used the nesting feature pretty similarly to what we have in the Sass preprocessor:
article {
    background: purple;

    & .title {
        font-size: 6rem;
    }

    & li {
        list-style-type: none;
    }
}
Since nesting is not supported in today's CSS, we need to convert the code above so that web browsers can understand it.
The following code is the final result:
article {
    background: purple
}

article .title {
        font-size: 6rem;
    }

article li {
        list-style-type: none;
    }
PostCSS Nested
If we want only to use the nesting feature, then this plugin is the perfect choice as it produce the same result as the previous plugin.
PostCSS Mixins
Mixins allow you to define styles that can be re-used throughout your code.
In our code we used some mixins in the src/components/comp1.css file.
We first define the mixin using the keyword @defin-mixin followed by the mixin name. Then we use it by writing the name after the @mixin keyword.
@define-mixin reset-list {
  margin: 0;
  padding: 0;
  list-style: none;
}

nav ul {
  @mixin reset-list;
}
Mixins are not supported in today's CSS, so they need to be compiled to Vanilla CSS.
The final code will be:
nav ul {
  margin: 0;
  padding: 0;
  list-style: none;
}
Stylelint
This is a CSS linter that helps us avoid errors in our code before they break our User Interface (UI).
It can be configured in multiple ways. One of them through using a stylelint property in package.json as follows:
"stylelint": {
    "rules": {
      "color-no-invalid-hex": true
    }
  }
Inside the stylelint we have multiple options to configure. Here we will only cover the "rules" option which lets you define are the rules that the linter should looks for and gives errors when they are not followed.
The "color-no-invalid-hex": true rules give an error in the terminal if an invalid hex value is provided as a color for a given CSS property.
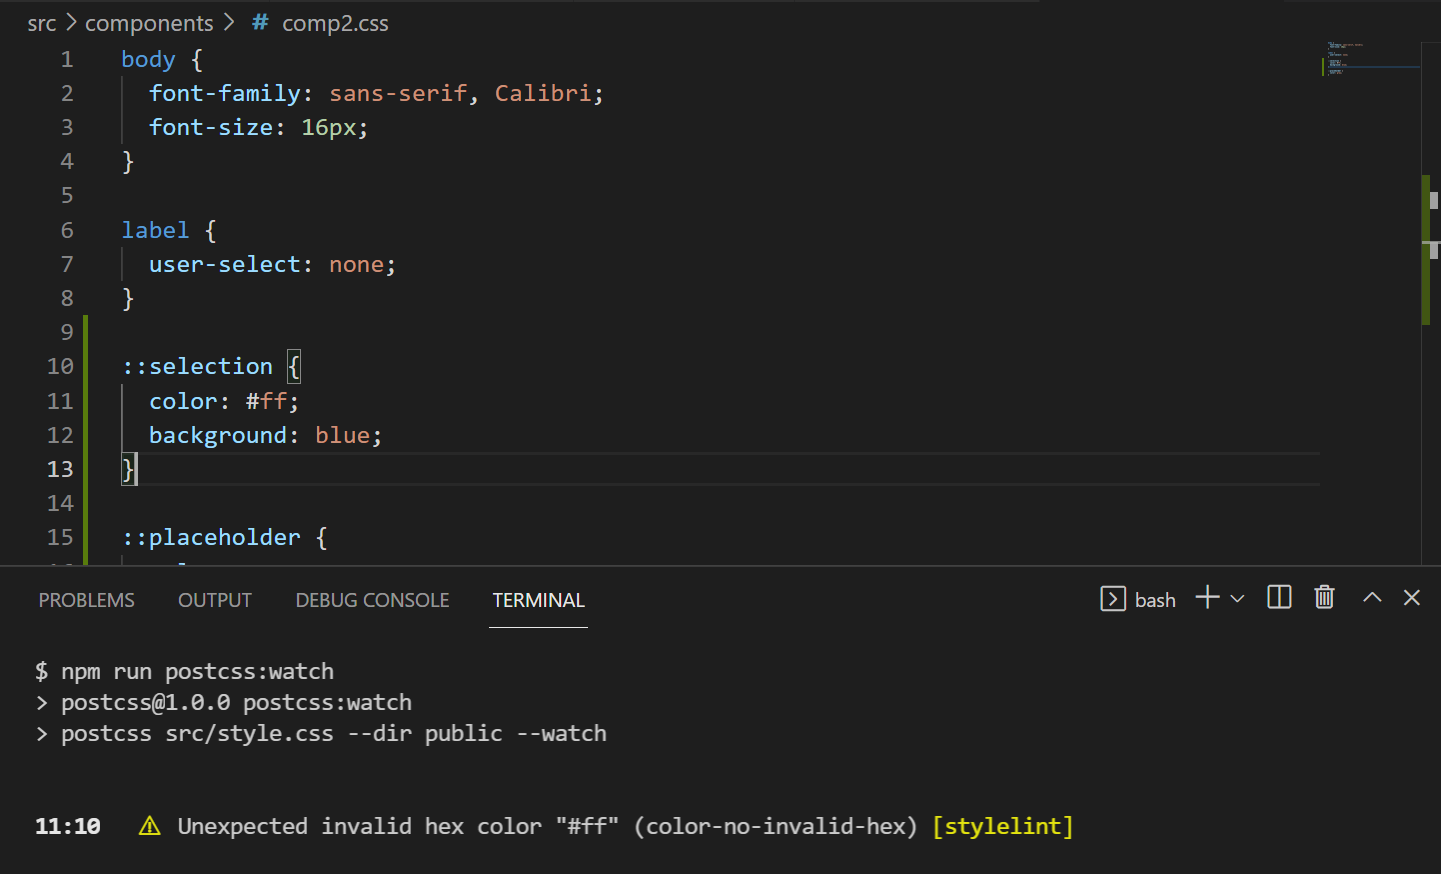 Styleint linter gives an error as an invalid hex value provided as color at line 11.
Note: No rules are turned on by default and there are no default values. You must explicitly configure each rule to turn it on.
Cssnano
This is a minifier used to reduce the final CSS file size as much as possible so your code is ready for a production environment.
Some parts will be altered to reduce the size as much as possible, like removing unnecessary spaces, new lines, renaming values and variables, selectors merged together, and so on.
So here is our final CSS code before the minification process:
* {
  padding: 0;
  margin: 0;
}

article {
    background: purple
}

article .title {
        font-size: 6rem;
    }

article li {
        list-style-type: none;
    }

nav ul {
  margin: 0;
  padding: 0;
  list-style: none;
}

body {
  font-family: sans-serif, Calibri;
  font-size: 16px;
}

label {
  -webkit-user-select: none;
     -moz-user-select: none;
      -ms-user-select: none;
          user-select: none;
}

::-moz-selection {
  color: white;
  background: blue;
}

::selection {
  color: white;
  background: blue;
}

::-moz-placeholder {
  color: gray;
}

:-ms-input-placeholder {
  color: gray;
}

::placeholder {
  color: gray;
}
After the minification process, our final CSS code that is ready for the production environment will be like this:
*{margin:0;padding:0}article{background:purple}article .title{font-size:6rem}article li{list-style-type:none}nav ul{list-style:none;margin:0;padding:0}body{font-family:sans-serif,Calibri;font-size:16px}label{-webkit-user-select:none;-moz-user-select:none;-ms-user-select:none;user-select:none}::-moz-selection{background:blue;color:#fff}::selection{background:blue;color:#fff}::-moz-placeholder{color:gray}:-ms-input-placeholder{color:gray}::placeholder{color:gray}
PostCSS Normalize
This plugin lets you use some parts of the popular library normalize.css or sanitize.css.
These CSS libraries provide consistent, cross-browser default styling of HTML elements, also they correct bugs and common browser inconsistencies.
This plugin depends on the values you provides for the "**browserslist"** to show the correct styles for the HTML elements. Here is an example of that.
How to Set Up PostCSS
To start using PostCSS, we need first to install it and its command-line interface (CLI) globally using this command:
npm i -g postcss-cli
-gto download it globally.
Then install PostCSS locally using the following command:
npm i -D postcss
-Dis short for--save-devto save the installed packages as dev dependencies.
To begin using PostCSS, we need to have at least one plugin downloaded.
If you are following along using the postcss-tutorial repo, you can simply run npm install to download all the packages and dependencies.
Setup PostCSS Using the PostCSS CLI
The General Syntax for the command that needs to be run in the terminal is:
 postcss [input.css] [OPTIONS] [-o|--output output.css] [--watch|-w]
 postcss <input.css> [OPTIONS] --dir <output-directory> [--watch|-w]
We can run the following command directly in the terminal:
postcss src/style.css --use postcss-import --dir public --watch
The --use option lists the plugins we're using.
The --watch option watches the files for any changes and recompiles them.
Setup PostCSS Through NPM scripts in the package.json File
Inside the package.json file in the "scripts", we need to type the following:
"postcss:watch": "postcss src/style.css --use postcss-import
--dir public --watch"
The above command will create a new directory called 'public' which contains our final Vanilla CSS file, which has the same name as the source file (style.css).
If we want the output file to have a different name than the source file name, we need to replace --dir public with -o public/<file-name>.
Like for example: -o public/main.css.
We can configure our command to run in PostCSS CLI with different options to get our desired result.
Now to run the command above, we type npm run <command name> in our terminal. (our <command name> is postcss:watch, you can pick any name you want).
As our project gets bigger, we are more likely to add more plugins. For every plugin used, we need to write its name down after the --use keyword in the command above which makes it incredibly long and not a good practice.
The alternative solution is to create a postcss.config.js file.
Setup PostCSS by Setting Up a PostCSS Config File
In the root directory of your project, create a file and name it postcss.config.js.
The code inside it will look like this:
module.exports = {
    plugins: [
         require('postcss-import'),
        require('postcss-mixins'),
        require("stylelint"),
        require('postcss-preset-env')({ stage: 1 }),
        require('cssnano'),
    ],
}
Inside the plugins array, we add our plugins.
Note: It is very important to add the postcss-import plugin at the top of our list since it is required by the documentation.
The command that runs PostCSS in our package.json file needs to be changed to:
"postcss:watch": "postcss src/style.css --dir public --watch"
As you can see, the only change required is to remove the --use option since the list of our plugins is mentioned is a separate file now.
Setup PostCSS by Using Task Runners (or Module Bundlers)
PostCSS can be set to work with various task runners like Gulp, Grunt, and module bundlers like Rollup and Webpack.
In this section, we'll see how to set up Grunt for PostCSS.
First, we need to install grunt locally into the “dev” dependencies:
npm i -D grunt
And then install grunt-cli globally:
npm install -g grunt-cli
Now we need to create a file in the root of our project and name it Gruntfile.js.
Then we need to install a specific plugin @lodder/grunt-postcss to let us run PostCSS using Grunt through the following command:
npm i -D @lodder/grunt-postcss
Inside the initCnfig function we set up our PostCSS configuration.
module.exports = function(grunt) {

    grunt.initConfig({
        postcss: {
            options: {
                processors: [
                    require('postcss-import')(),
                    require('postcss-mixins'),
                    require("stylelint"),
                    require('postcss-preset-env')({ stage: 1 }),
                    require('cssnano')(),
                ]
            },
            dist: {
                src: 'src/style.css',
                dest: 'public/style.css'
            }
        }
    })

    grunt.loadNpmTasks('@lodder/grunt-postcss');
}
Here we will stick to the basic minimum to run PostCSS, which is:
- Calling our plugins inside the
processorsarray. - Setting up the source file and destination file in the
distobject.
For more configuration, you can always check out the official documentation for the @lodder/grunt-postcss.
To finish our configuration, we need to load our plugin using the grunt.loadNpmTasks method.
Finally to run our Grunt task we type:
grunt postcss
Conclusion
PostCSS has been out there since 2015, and it is very popular among CSS preprocessors.
You can use it as a stand-alone tool or in conjunction with other existing preprocessors.
When you use it and how (stand-alone or in conjunction) depends on your project needs.
Now it is your time to go and discover the wide variety of plugins it offers and start playing around with it. Happy Coding :)