By Bret Cameron
A beginner’s guide to using Gatsby.js and GraphQL for image optimisation
 _Image Credit: [Ryan Searle / Unsplash](https://unsplash.com/photos/BnTRzW95mnw" rel="noopener" target="blank" title=")
Like so many developers, my first fully-functioning site was a blog. I built it as a custom WordPress theme, and I had grand plans for a homepage filled with high-quality images of the articles.
When a pushed the site live for the first time, I typed in the URL and… waited. It was a major anti-climax. Far too many seconds passed by as the images slowly juddered into life.
Up until this point, I hadn’t done any significant image optimisations. It was an important lesson for a relatively new developer, and I set about learning how to make as many optimisations as possible. But optimising the image sizes, configuring different sizes and resolutions of each image for different displays, and setting up lazy-loading with a nice “fade in” animation was a lot of work. Trying to solve these manually was good for learning, but it was certainly not something I wanted to do again and again.
Thankfully, there is a better way. Now, as a React developer, I have encountered lots of different image-processing systems and modules that make image optimisation straightforward. But — so far — nothing I’ve encountered comes close to Gatsby.js.
Using several Gatsby components, you can easily optimise your delivery of images — complete with “blur up” animations or traced SVG placeholders — plus added optimisations, like using WebP image formats for browsers that support them. They load quickly, in a way that looks really smooth, at the ideal resolution.
 A powerful combination: React, GraphQL and Gatsby
Introducing Gatsby Image Optimisation
Gatsby.js makes image optimisation easy, except for one thing: if you’ve never used GraphQL before, the process might take a little while to get used too. It took me a few goes to get to grips with Gatsby image, mainly because of not jumping into GraphQL.
I also felt that many tutorials (including the official ones) fell short when it came to explaining how to deal with more than one image. The official Gatsby starter contains an image component, and this would work fine if your site only had a handful of images. But what if it had tens or hundreds?
That’s what this article intends to answer. In it, we’ll take a step-by-step approach to combining the powers of Gatsby and GraphQL for image optimisation. We’ll start by rendering three images, and in the final section, I’ll discuss a few ways to scale up.
Step-by-Step Walkthrough
Step 1: Install Dependencies
Gatsby has two main image components: gatsby-image and gatsby-background-image .
To use either of them, you’ll need several additional components to your Gatsby project. (If you’re new to Gatsby, you can find out how to start a project here). Once your Gatsby project is set up, you can install all the necessary image-related plugins via npm, by typing:
npm i gatsby-image gatsby-background-image gatsby-source-filesystem gatsby-plugin-sharp gatsby-transformer-sharp -s
This may look like a lot, but each plugin more-or-less does a single job:
gatsby-imageis used to display imagesgatsby-background-imageis used to display background imagesgatsby-source-filesystemallows you to query files in your site’s file system using GraphQLgatsby-transformer-sharpis the plugin that enables you to create multiples images of the right sizes and resolutions via queries- and
gatsby-plugin-sharpconnects the Sharp and Gatsby plugins together
Step 2: Configure Gatsby
Once installed, you should make sure that certain of the above plugins are present in your gatsby-config.js file in the root directory of your web app.
In the example below, I have identified two directories, images and pages , where I’d like to be able to query my file system. In this article, we’ll only be focusing on images , but it’s common to query your pages directory as well!
module.exports = { plugins: [ `gatsby-transformer-sharp`, `gatsby-plugin-sharp`, { resolve: `gatsby-source-filesystem`, options: { name: `images`, path: `${__dirname}/src/images`, }, }, { resolve: `gatsby-source-filesystem`, options: { name: `pages`, path: `${__dirname}/src/pages`, }, }, ],}
If you’re used to installing and importing npm packages, so far this may be feeling pretty straightforward. At this point, things begin to look a little more unusual.
Step 3A: Test Queries in GraphQL
Now, we’re going to access the GraphiQL interface. By default, Gatsby app’s run on localhost:8000 . We can access the GraphiQL interface by adding /___graphql to the end of the domain (that’s 3 underscores in a row).
In here, we can try out different queries on our data before committing them into our code. It’ll save us time debugging later, because we know the queries are picking up the data we want.
First, let’s check that our gatsby-config.js file is working correctly. Type the following code into the GraphiQL interface and press the play icon (or CTRL/CMD + ENTER ):
{ allDirectory { edges { node { name } } }}
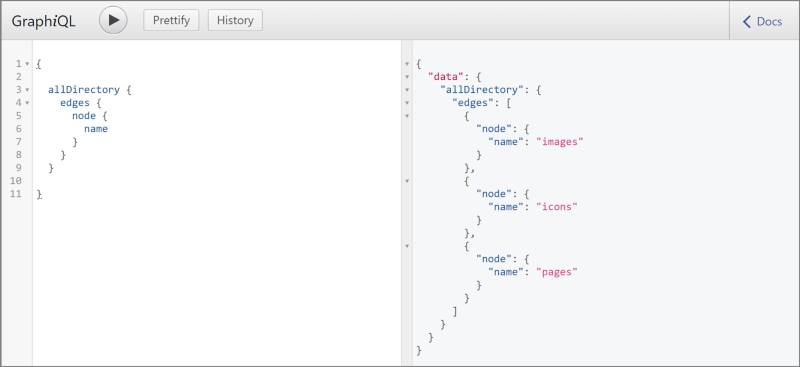 I also have an “icons” subdirectory in my images folder, so that’s been returned as well.
If you see something similar to the image above, it’s working. Now, let’s query the contents of our images folder, by typing:
{ allFile(filter:{ sourceInstanceName:{eq: "images"} }){ edges{ node{ relativePath childImageSharp { id } } } }}
If the “childImageSharp” property returns an ID, then that means that we can use Gatsby’s image optimisations on it. This will return null on files such as SVGs, because they cannot be further optimised, but it should give you a string for every jpg and png .
Step 3B: Prepare our Specific Image Queries
Now let’s grab a handful of specific images. When performing queries on an image, you need to tell Gatsby whether that image is fixed or fluid . fixed images have known dimensions, and they require fewer processes to optimise. fluid images have dimensions that change based on viewport size and other contextual factors.
I’m building a portfolio and I have images for each of my services. So let’s say we want to grab three images called webdev.jpg , design.jpg and writing.jpg , and we know that their dimensions are fluid.
{ webdev:file(relativePath:{eq:"webdev.jpg"}) { childImageSharp { fluid(maxWidth: 1600) { base64 } } } design:file(relativePath:{eq:"design.jpg"}) { childImageSharp { fluid(maxWidth: 1600) { base64 } } } writing:file(relativePath:{eq:"writing.jpg"}) { childImageSharp { fluid(maxWidth: 1600) { base64 } } } }
Note that the terms before each colon can be anything we want. Here, it makes sense to stick to the file name. We’re also setting a max-width property of 1600 pixels, so Gatsby knows it doesn’t need to prepare versions of each image larger than this.
base64 is the property that contains a tiny, blurry version of our image that will load almost immediately, and then get smoothly replaced by a high-resolution version. If our query returns a value for base64 , then everything’s working. We’re ready to include this query in our code!
Step 4: Import Components and Render
Navigate to any component where you’d like to display the images. First, you need to import the StaticQuery and graphql components from "gatsby" at the top of your file, as well as Img or BackgroundImage , like this:
import { StaticQuery, graphql } from "gatsby"import Img from "gatsby-image"import BackgroundImage from "gatsby-background-image"
Our React component should return a <StaticQuery> tag, which is a query property and a render property.
<StaticQuery query={ graphql`{ # our GraphQL queries go here `} render={(data) => ( <> {/* our JSX goes here */} </> )}/>
We can paste our image queries above into the query property, but this time we’ll replace base64 with the fragment we want to render our images. In this case, we’ll use ...GatsbyImageSharpFluid .
But let’s say we later decided we wanted the traced SVG effect, and that we wanted to use the WebP format where possible. We can simply swap out our fragment with ...GatsbyImageSharpFluid_withWebp_tracedSVG .
Our code should now look like this:
<StaticQuery query={ graphql`{ webdev:file(relativePath:{eq:"webdev.jpg"}) { childImageSharp { fluid(maxWidth: 1600) { ...GatsbyImageSharpFluid } } } design:file(relativePath:{eq:"design.jpg"}) { childImageSharp { fluid(maxWidth: 1600) { ...GatsbyImageSharpFluid } } } writing:file(relativePath:{eq:"writing.jpg"}) { childImageSharp { fluid(maxWidth: 1600) { ...GatsbyImageSharpFluid } } } `} render={(data) => ( <> {/* our JSX goes here */} </> )}/>
Last, we simply need to include the image in our JSX.
The Img component takes a fluid property (where you put reference the query data) and an alt property.
<Img fluid={data.webdev.childImageSharp.fluid} alt=""/>
The BackgroundImage component takes a tag property (if left blank, it renders a div ), a fluid property, and a backgroundColor property.
<BackgroundImage tag="section" fluid={data.webdev.childImageSharp.fluid} backgroundColor={`#000`}> {/* the child elements that go above the background */}</BackgroundImage>
Bringing It All Together
Here’s a complete Gatsby component that takes three images for our images folder and renders them:
Strategies for Scaling Up
So, how do we make this work when we need to process larger numbers of images? Here are a few ideas to get you started.
Looping Through a Folder
Let’s say we had a list of icons we wanted to display. Rather than querying them all separately, we could put them in their own directory, and use a loop to iterate through the results of the query. For example, we could query the entire “icons” directory:
{ icons:allFile(filter:{ relativeDirectory:{eq: "icons"} }){ edges{ node{ name relativePath childImageSharp { id } } } }}
Then, if we log data.icons.edges to the console, we can see an array of items which we could iterate through. Here’s an example of what that might look like.
data.icons.edges.map(item => ( <Img fluid={item.node.childImageSharp.fluid} alt={item.node.name} />))
Passing in Dynamic Data
One important method is adding dynamic variables to our queries. GraphQL has a specific syntax for this.
To do this, let’s give our query a name, findFile , by using the query keyword. Then, in parentheses, we can name any number of new variables.
In GraphQL, all variables must be preceded by $ . After the variable name, we use a colon and then specify the type: here, a String . Finally, we can use = to pass in a default fallback value, and this will allow us to test the query in GraphiQL.
query findFile($relativePath: String = "webdev.jpg") { file(relativePath: {eq: $relativePath}) { id relativePath publicURL }}
It’s possible to add further logic to these queries by using the directives @include(if: Boolean) and @skip(if: Boolean) .
GraphQL variables are particularly useful if we want our users to be able to dynamically filter data. But they also come in handy for any reason we might want to separate certain data from our actual query, for example, if we need to modify it in some way first.
Creating Custom Fragments
Remember ...GatsbyImageSharpFluid above? That’s a fragment, which is essentially shorthand for a reusable set of query fields. We can also define our own fragments.
Even if we’re only calling three query fields — id , relativePath and publicURL —that can add up to many lines of code extra code if we’re using them repeatedly. Instead, we could define a custom fragment, allowing us to reuse query fields. Rather than repeating the official documentation’s description of how to do this, I recommend you check it out.
Conclusion
Overall, I hope this article has opened your eyes to the powerful image optimisation tools that come with Gatsby.js, and has given you some ideas for how to apply them to larger-scale projects.
In order to fully understand and maximise these powerful tools, you need to get to grips with both React and GraphQL. When I first started using Gatsby, I skipped over GraphQL, not realising that an understanding of it — at least to a basic level — was essential for making the most of Gatsby’s image optimisation features.