By Andrej Gajdos
In this blog post, I will show you which free WordPress plugins you should use and how to configure them to significantly improve your WordPress website's performance.
Web performance is an essential SEO factor, and you shouldn’t underestimate it. Each second your website takes to load can hurt your business and ROI.
Fortunately, WordPress provides a lot of options and plugins that can help you improve performance without deeper knowledge of software development.
Best WordPress Plugins for Website Performance
In this article, I am going to introduce 5 plugins that can help you to fix the performance of your website. They work together without any compatibility issues if you configure them correctly.
I work as an SEO specialist and I use these plugins for my projects. Just keep in mind that some plugins or their settings can affect the functionality of your website. Each time you change or install a new plugin it's necessary to test your website if everything works as expected.
1. W3 Total Cache WordPress Plugin
This plugin is one of the most advanced plugins for website performance optimization and provides plenty of options.
W3 Total Cache improves performance by caching your sites, improving server performance, and reducing loading time. Be careful if you use another plugin for caching, though – in that case, you should disable or uninstall it. Otherwise, there will be issues when you activate this one.
How to setup W3 Total Cache
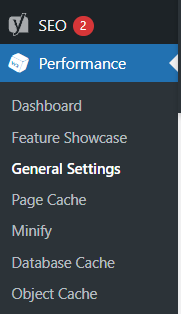
First of all, install the W3 Total Cache to your WordPress. After you've successfully installed the plugin, find the Performance item in your WordPress settings and choose the item "General Settings".
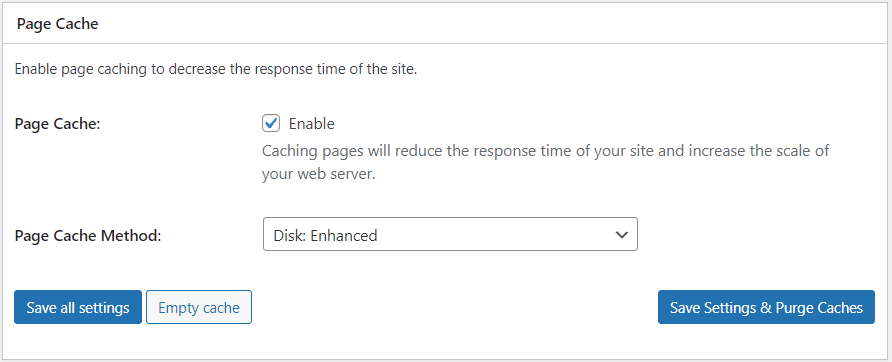
In General Settings, enable Page Cache. Page Cache creates static cache pages each time a page is loaded so the page is not dynamically loaded. If you are not changing your content daily, then you need this! With enabled caching you can significantly decrease your load time.
In the Page Cache Method use Disk: Enhanced. This is the same for everyone who uses shared hosting.
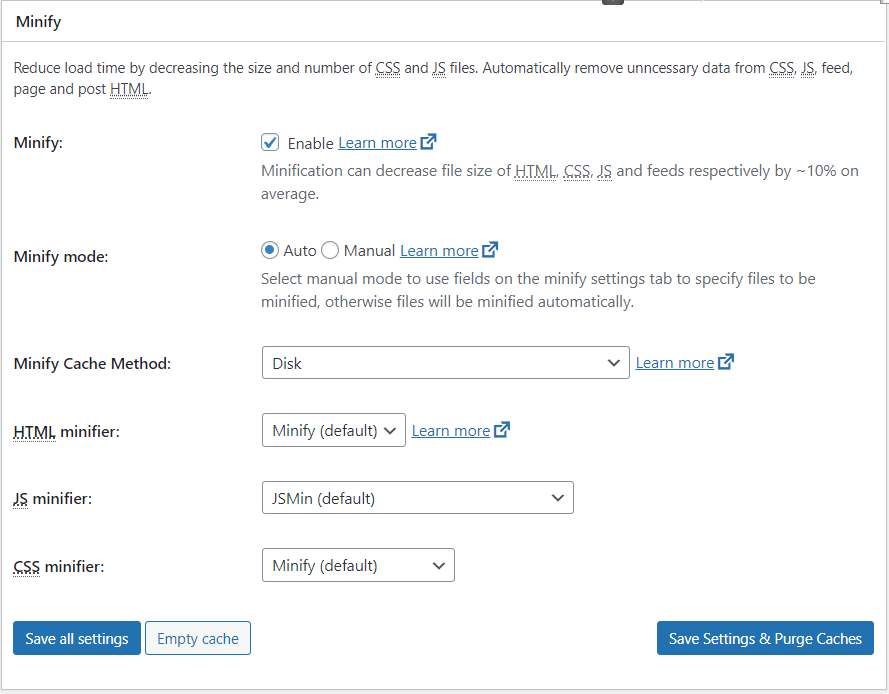
Minification is one of the most fundamental performance optimizations. Minification is a process of minimizing HTML, CSS and JavaScript files by removing any characters which are not necessary from the code (line breaks, extra whitespace, and so on). It will decrease the size of these files and reduce load times.
You can use various WordPress plugins for minification. W3 Total Cache provides this option as well. If you use Cloudflare, you can enable minification there instead of using W3 Total Cache.
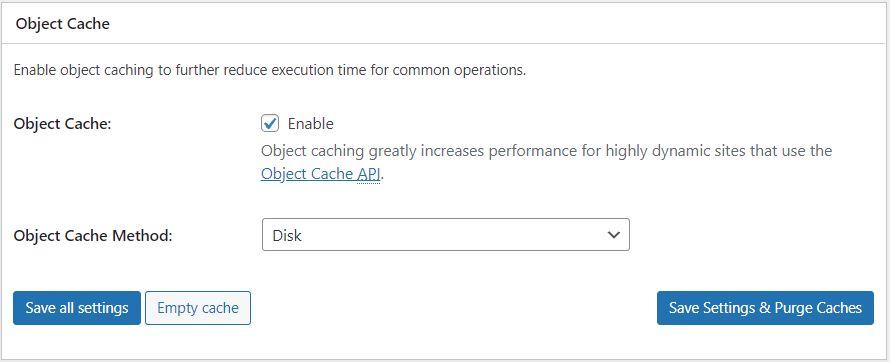
Next, you can enable Object Caching. Object Caching means storing database query results. Thus, when you need a result next time, it's served by a cache without the need to repeatedly query the database.
Object caching helps ease the load on your database and server, and it delivers queries faster.
The Object Cache Method in the case of shared hosting is Disk. Test your speed before and after you enable Object Cache – in some cases it may slow down your website.
Then you can enable Browser Caching. This means that images, HTML, CSS and JS (static assets) are stored in your browser. Browser Caching will load your website faster for your users when they visit your website again.
In my case, I have not enabled Browser Caching, because I am using the Polylang plugin and there is a compatibility issue. The Polylang plugin is one of the most popular plugins that allows you to create bilingual or multilingual websites. There is also a customizable language switcher, but switching languages doesn’t work if browser caching is enabled.
 W3 Total Cache - enable Browser Cache.
Another important setting in the W3 Total Cache is to enable Lazy Load Images in the User Experience. This means that your page will only show images above the fold and the rest will load when a user scrolls the page.
This will improve the loading time of your site, decrease the number of HTTP requests during first-page loading, and save data (especially for mobile).

Do not forget to save each setting. These are just some general settings for W3 Total Cache that will really help you with your page speed and loading time.
2. Speed Booster Pack WordPress Plugin
The Speed Booster Pack has some similar settings to W3 Total Cache but it offers additional features as well.
In Assets, you have an option to add a Preload asset. This means that a certain resource will fetch sooner than the browser would discover it otherwise because it is important for the current page. In case there are assets you need to preload, you can just add a URL to this asset.
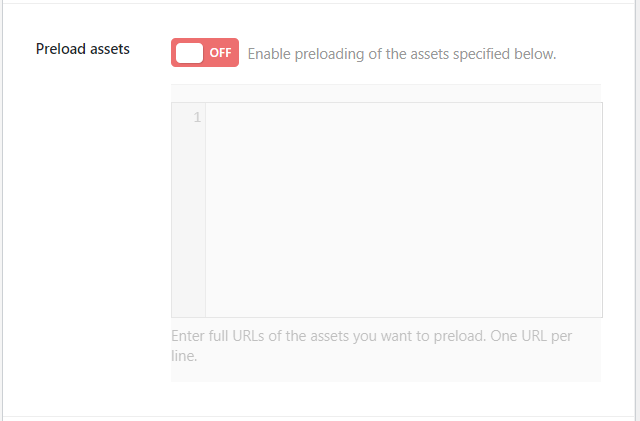
In the menu item Special, you can enable Localize Google Analytics & Google Tag Manager (GTM). It means that scripts for Google analytics and GTM will be replaced with locally saved scripts.
 Speed Booster Pack - enable Google Analytics and Google Tag Manager.
3. Asset CleanUp: Page Speed Booster WordPress Plugin
The Asset CleanUp plugin is useful for cutting out or disabling certain CSS and JavaScript files. Most WordPress themes have a lot of CSS and JavaScript files, like various elements, animations, or other effects that you probably won't need or use. But even if you are not using them, they are still loaded for the user.
If you edit a page, you can find the Asset CleanUP section at the bottom of that page. You can see all CSS and JS files loaded for the page. Then you can choose to disable this specific file and you can disable its loading for the whole website.
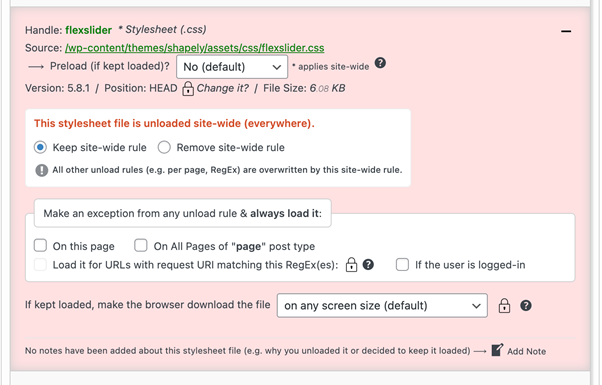 Asset CleanUp - disable CSS and JS files so they don't load.
4. Async JavaScript WordPress plugin
If JavaScript files are not loaded asynchronously, load times slow down because JavaScript code is executed while building the DOM.
The Async JavaScript plugin allows you to define which JavaScript files should be loaded async or defer.
Async means the file is downloaded asynchronously in the background and runs when ready. The DOM and other scripts don’t wait for them. Defer means that the file is downloaded also asynchronously but executed only when the DOM is fully built.
How to setup the Async JavaScript plugin
First of all, click on Settings and enable Async JavaScript.

The second step is to choose the Async JS Method. Here choose Async first. After enabling async, you need to test your whole website to see if it works correctly. You should also check errors in the Chrome web console.
If everything works well, you can try to enable defer. Then, you should test your whole website again and if there are some issues you should revert this setting to async.

In the Scripts to Defer section, you can choose specific scripts that you want to defer. You should defer only JavaScript files that don’t have any dependencies on each other or other JavaScript code. You should know the purpose of these JavaScript files and where they are used to decide whether you can defer them.

5. Allow Webp/AVIF image WordPress Plugin
If you are looking for faster loading images, the WebP and AVIF formats are right for you.
WebP and AVIF are modern formats that have superior lossless and lossy compression images on the web. These formats are used because they deliver smaller, richer images that make websites faster.
For example, WebP lossless compression is 26% smaller than PNGs. AVIF has the most optimal compression – even better than WebP. It delivers high-quality images and is up to 10 times smaller than other known formats.
But keep in mind that WebP is not supported in all web browsers and the AVIF format is only supported in Chrome, Firefox, and Opera. This is not an issue, because nowadays there are ways to define an image in different formats and browsers only load the supported format.
<picture>
   <source srcset="/images/image.avif" type="image/avif">
   <source srcset="/images/image.webp" type="image/webp">
   <img src="/images/image.jpg" width="740" height="251" alt="image title" loading="lazy">
</picture>
In the code above, the browser goes through a set of images and stops at the first supported format. Chrome stops at the first image because it supports AVIF. Edge stops at the second image because it doesn’t support AVIF but it supports WebP.
Before July 2021, WordPress wasn't supporting Webp images. But now it's possible to add them in your media even without an additional plugin (update 5.8).
It took quite a long time for WordPress to enable this type of format and we already have the AVIF format that's not supported yet. Fortunately, there is a plugin Mime Types Plus that allows you to add supported MIME types in your media files.
Conclusion
In this article, you learned which plugins you can use to improve your website's performance.
Just remember that it is important to test your website after each setup, as there could be compatibility issues with other plugins. The WordPress platform offers plugins that can completely take care of website performance without additional coding.
But if your website is running on a different platform than WordPress, then you will need to use other tools for web developers and you'll probably need to do some coding.
Do you know other WordPress plugins that are useful for website performance? Let me know, as I would like to know more.
