
DOM Manipulation is one of the most exciting topics to learn about in JavaScript. This is because one of JavaScript's main uses is to make web pages interactive – and the Document Object Model (DOM) plays a major role in this.
The DOM is a powerful tool that allows you to interact with and manipulate the elements on a web page. And this handbook will help you understanding and become confident in working with it.
You will begin by learning what the DOM is and what you can do with it. Then we'll dive into how to select, modyfy, and style DOM elements. You will also learn how to create new elements and add them to your web page.
The handbook also cover topics like how to traverse the DOM what DOM events are, and includes some project ideas for practice.
Let's get started!
Table of Contents
- What is the DOM?
- How to Select DOM Elements
- How to Change the Content of DOM Elements
- How to Work with Attributes of DOM Elements
- How to Change the Styles on DOM Elements
- How to Traverse the DOM
- DOM Events and Event Listeners
- Event Flow in JavaScript
- JS DOM Manipulation Projects Ideas
- Conclusion
What is the DOM?
DOM stands for Document Object Model. But what does that mean? Let's break it down.
The Document part refers to the webpage you see in the browser. Specifically, the HTML Document which handles the structure of the page's content. This includes the text, images, links, and other elements that make up the page.
Object means the elements like images, headers, and paragraphs are treated like objects. Each object has its properties (like id, class, style) and methods. Using these properties and methods, you can manipulate the elements.
The Model in DOM means it's a representation or copy of the HTML document as a hierarchical tree. This tree includes all the elements. And it captures the parent-child relationships between them.
The DOM is always identical to the HTML document. Browsers ensure that they are in sync. So if something changes in the HTML, the DOM changes too, and vice versa.
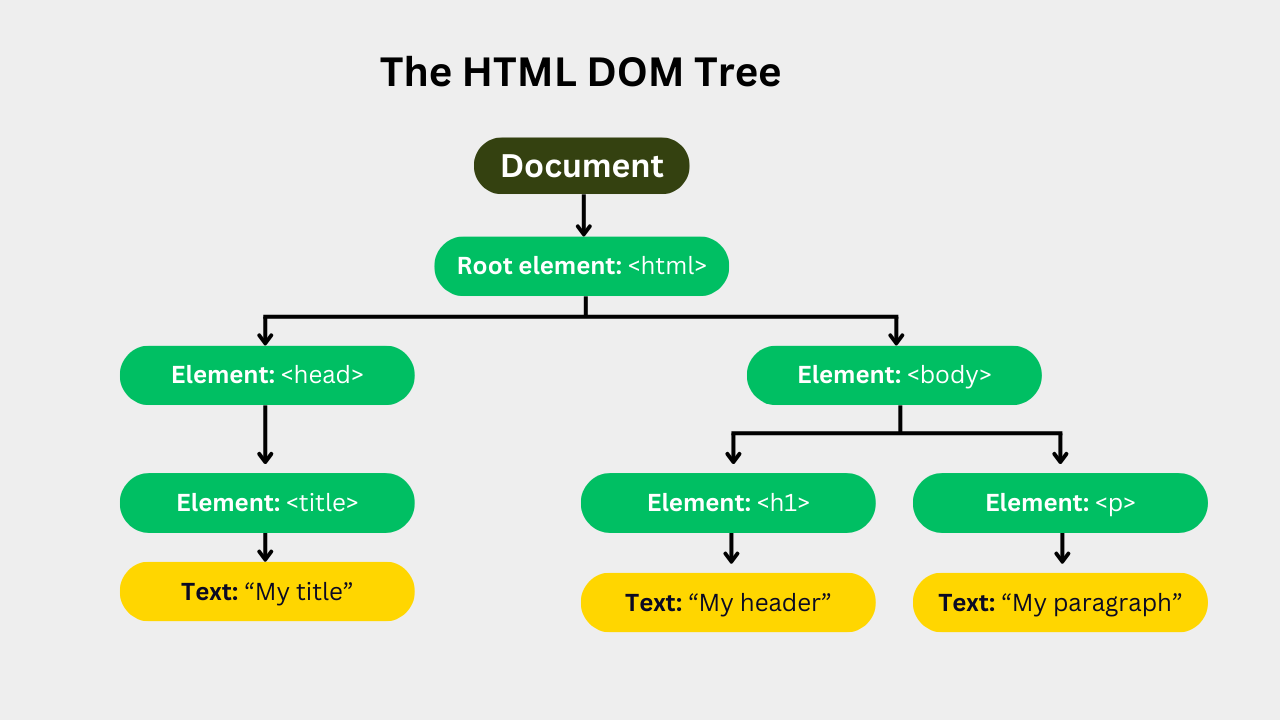
At the top of the hierarchy is the Document object. It has only one child – the html element. The html element, also known as the root element, has two children, the head and body elements. And each of them also have their own children elements.
The parent-child relationship between the elements is what allows you to traverse or move between and select them. More on that later.
What You Can Do With the DOM
DOM manipulation allows developers to interact with the structure, style, and content of web pages. The following are some of the things you can do with the DOM:
- Change and remove existing elements in the DOM.
- Create and add new elements to the page.
- Change the styles for elements.
- Add event listeners to the elements to make them interactive.
How to Select DOM Elements
To do something with DOM elements, you first have to select or access the element in question. In this section, you will learn some common methods for selecting DOM elements.
Let's use the following phonebook markup to show how the various DOM selector methods work.
  <h1 id="page-title">Phonebook</h1>

  <p class="family">Marie</p>
  <p class="family">Jose</p>
  <p class="work">Anne</p>
<p class="work">Joan</p>The markup includes a header with an id of page-title and four paragraphs. The first two paragraphs both have a class of family, and the last two have a class of work.
1. getElementById
You use this method to select elements with an id attribute. Ids are unique identifiers. For example, if a header element has an id attribute with a value of "page-title", no other element on the page should also have an id with the same value.
This means anytime you use the getElementById method, you are going to select only one element from the DOM.
Let's look at an example:
The h1 header has an id value of page-title. Here is how you can select it using the getElementById method:
const titleElement = document.getElementById("page-title")
console.log(titleElement)
The example selects the header element and assigns it to the titleElement variable.

If there's no element in the DOM with the given id, the getElementById() method will return null.
2. getElementsByClassName
You can use this method to select more than one object. This method takes in the value of a class attribute as an argument and selects all elements in the DOM that has the given class. Unlike ids, you can give the same class value for different HTML elements.
Here's an example:
const famContacts = document.getElementsByClassName("family")
console.log(famContacts)
This returns an HTML collection of all elements with the given class. The log statement will print the following in the console:

getElementsByClassName() method returns an HTML collection.Note: The HTML collection looks like an array, but it is not. You can access the elements using bracket notation just as you would with an array – but you cannot apply array methods like map, filter, and forEach on it.
console.log(famContacts[0]) This will get the first element in the HTML collection, which is the paragraph with the name Marie.

But what if you wanted to loop through all the elements in the famContacts HTML collection? You'd first need to convert the HTML collection into an array. Then you could use any of the array methods.
A simple way to create an array from the HTML collection is to use the spread operator, like this:
let famContactsArray = [...famContacts]

famContactsArray.forEach(element => console.log(element))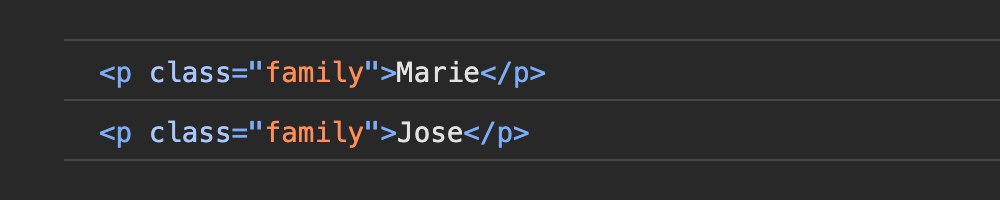
Using the forEach method, you can access each of the items in the famContactsArray. The browser will throw an error if you try to apply an array method like map to the HTML collection without first creating an array from it.

3. getElementsByTagName
This method will select elements using their tag name. For example, getElementByTagName('p') will select all paragraphs on the page.
Like getElementsByClassName, this method also returns an HTML collection of the selected elements.
Here's an example:
const allContacts = document.getElementsByTagName('p')
console.log(allContacts)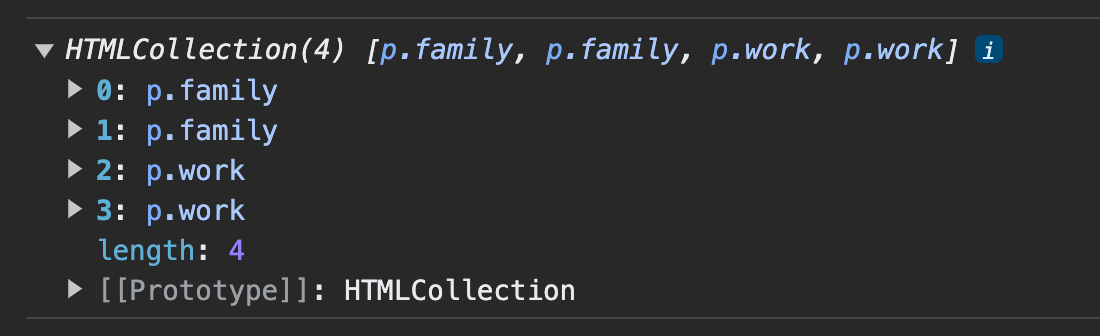
You can create an array from the HTML collection and use any of the array methods on it.
let allContactsArray = [...allContacts]

allContactsArray.map(element => console.log(element))
allContactsArray.4. querySelector
You can use this method to select any HTML element in the DOM. It returns only one element: the first element that matches the given selector.
The querySelector method works like how CSS selectors work.
For example, what do you do when you want to select an element with an id? You use the hash # symbol. How about when you want to select elements with a class? You put a dot . in front of the class name.
Here's an example:
const firstWorkContact = document.querySelector('.work')
console.log(firstWorkContact)
querySelector method.The example above returns only the first element with a class of work and ignores the rest.
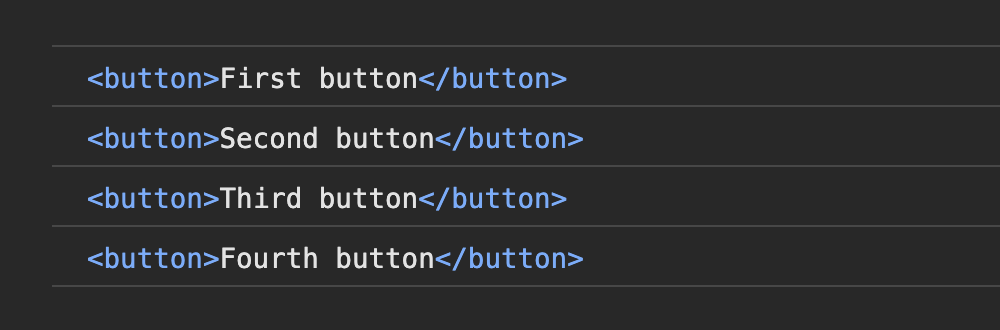
Let's see another example to show how querySelector works like CSS selectors. The following is a div element with four buttons:
<div>
    <button>First button</button>
    <button>Second button</button>
    <button>Third button</button>
    <button>Fourth button</button>
</div>
Assuming you wanted to select the third button, you could use querySelector like the one below. The code uses the CSS nth-child selector to get the third button inside the div.
const thirdBtn = document.querySelector('div button:nth-child(3)')
console.log(thirdBtn)
querySelector method.But what if you want to select all four button elements and not only the first one? Then you could use the querySelectorAll method instead.
5. querySelectorAll
Like the querySelector method, querySelectorAll also selects HTML elements using CSS selectors. The difference is that it returns all elements that match the selector instead of returning only the first one.
Using the previous example, let's select all the buttons with querySelectorAll.
const allBtns = document.querySelectorAll('button')
console.log(allBtns)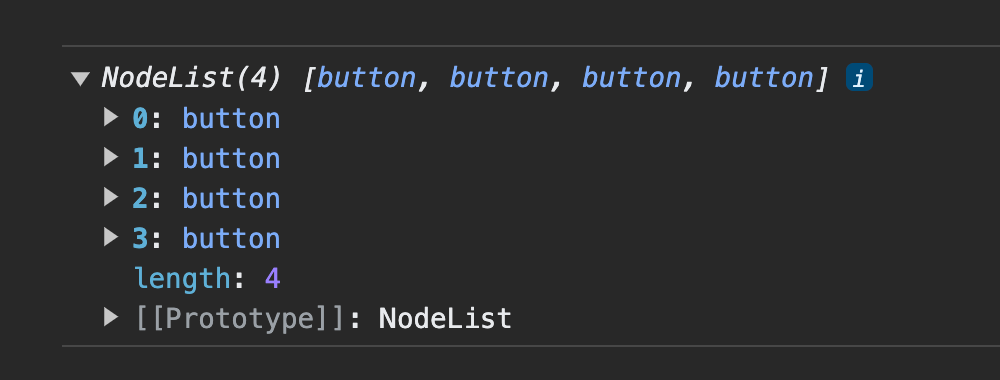
querySelectorAll method returns a NodeList of selected elements.Note: querySelectorAll returns a NodeList. A NodeList is slightly different from an HTML collection. You don't need to convert it to an array to apply a method like forEach on it.
allBtns.forEach(btn => console.log(btn))
forEach method on the NodeList.But you still cannot apply array methods like map, filter, and others on a NodeList. You will need to first create an array from it.
You can read this freeCodeCamp article on the difference between HTML collection and NodeList to learn more.
How to Change the Content of DOM Elements
So far you've learned about different ways to select DOM elements. But that is only the beginning. Now, let's see how you can manipulate the DOM to change the content of a webpage.
The first thing you need to do is to select the element. You can do that using any of the methods you learned from the previous section.
After selecting the element, there are several methods you can use to add or update the content.
The innerHTML Property
This is a method that allows you to read or update both the structure and content and structure of elements. Let's see an example of how you can use the innerHTML method.
The following is some markup of three paragraphs, each with an id.
  <p id="topic">JS array methods</p>
  <p id="first-method">map</p>
  <p id="second-method">filter</p>
You can read or get the content of the any of the paragraphs using innerHTML. For example, let's get the content of the first paragraph.
const topicElement = document.querySelector('#topic')
console.log(topicElement.innerHTML)
innerHTML of the topicElementNow, let's say you want to update the topic from "JS array methods" to "JavaScript array methods". You can do that by assigning the new text to the innerHTML of the element.
const topicElement = document.querySelector('#topic')
topicElement.innerHTML = "JavaScript array methods"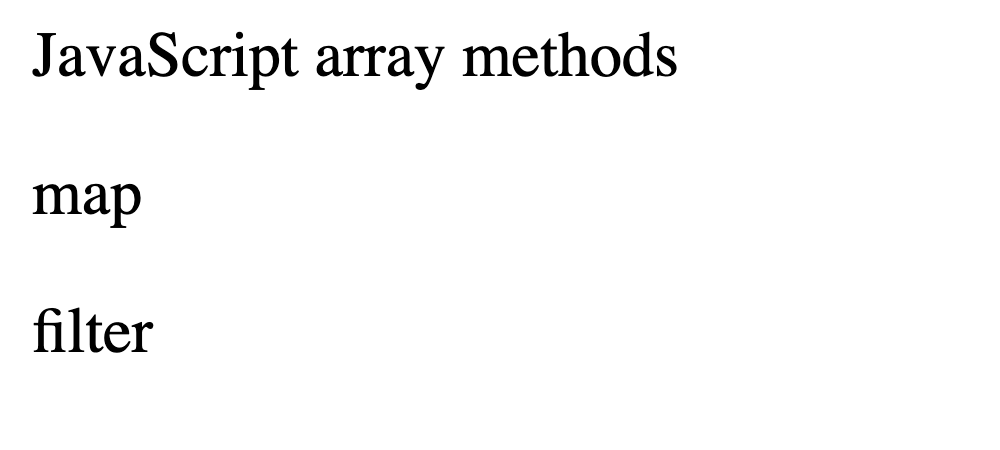
With innerHTML, you can change more than just the content. You can also change the HTML structure of the element. For example, if you want to make the word "JavaScript" bold, you could do this:
topicElement.innerHTML = "<b>JavaScript</b> array methods"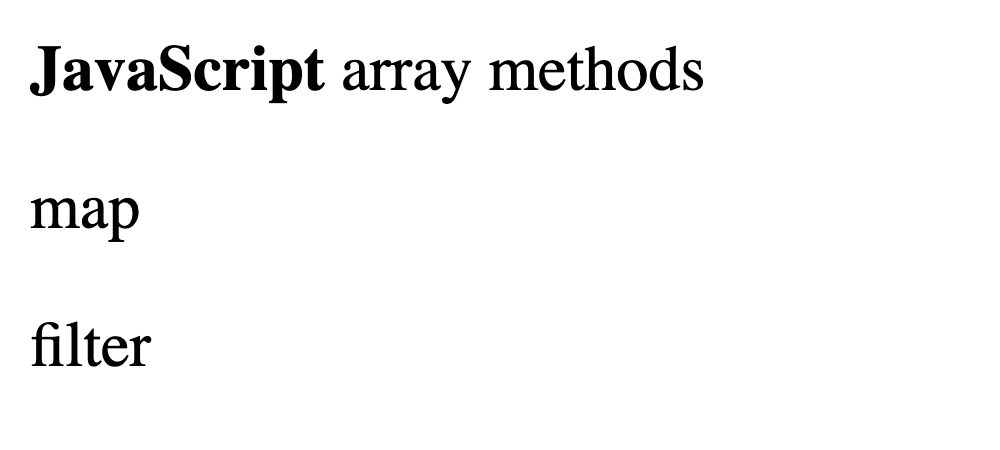
Security Risks With innerHTML
Using the innerHTML poses potential security risks. An example is cross-site scripting (XSS) attacks.
If the content you're inserting comes from user input or any untrusted source, be sure to validate and sanitize it before using innerHTML to prevent XSS attacks. You can use a library like DOMPurify to do this.
Also, if you are working with plain text content, consider using methods like innerText and textContent.
The innerText and textContent Properties
Both innerText and textContent ignore HTML tags and treat them as part of a string. You can use both methods to read or update the text of DOM elements.
A key difference between the two is in how they treat the text. Using innerText returns the text as it appears on the screen. And using textContent returns text as it appears in the markup. Let's see an example below.
<p>Key =<span style="display: none;"> ABC123<span></p>
The example includes a paragraph element. Inside the paragraph is a span that contains a key. The key does not appear on screen because its inline style is set to a display of none.
Now, let's select the paragraph and print both the innerText value and textContent value to see the difference.
const paragraph = document.querySelector('p');

console.log("innerText: ", paragraph.innerText)
console.log("textContent: ", paragraph.textContent)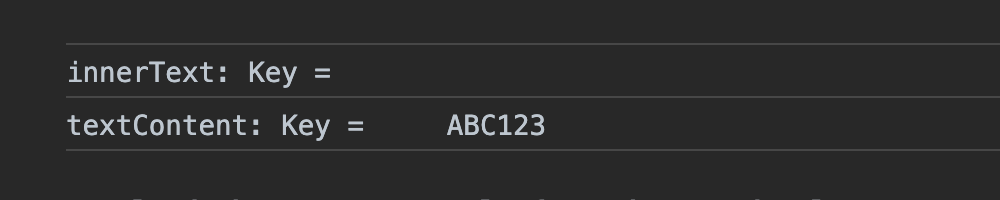
innerText and textContent.Note how innerText returns the text as it appears on the screen (without the value of the key which is hidden with CSS). And note how textContent returns the text including hidden elements and whitespaces.
Let's see another example for adding text to an element. The following code includes two paragraphs, each with bold text and an empty span, as well as a horizontal line between them.
  <p>
    <b>innerText Example</b>
    <span id="inner-text"></span>
  </p>

  <hr>

  <p>
    <b>textContent Example</b>
    <span id="textContent"></span>
  </p>
innerText and textContent propertiesNow, let's select the two span elements and add the same text to them. This will help you better understand the difference between innerText and textContent.
const example1 = document.querySelector('#inner-text');
const example2 = document.querySelector('#text-content');

let address = `
  ABC Street,
  Spintex Road,
  Accra,
  Ghana.
`;

example1.innerText = address;
example2.textContent = address;
The code gives the same variable address to the two examples. The first uses innerText and the second uses textContent. See the results below:
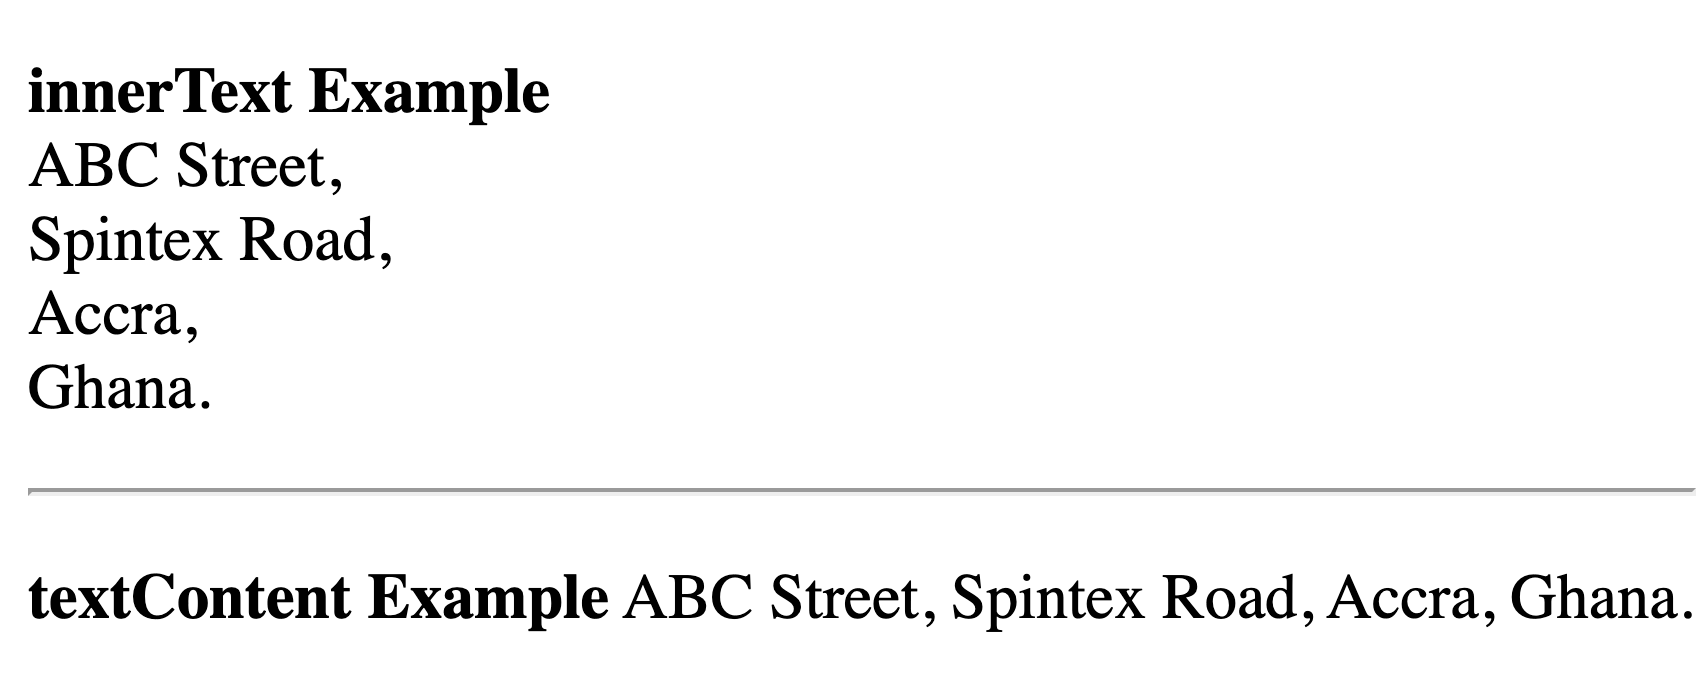
innerText and textContent.Notice how innerText uses the line breaks but the textContent example doesn't.
Another key difference between the two methods is how they behave when used inside loops. innerText can be slower than textContent when dealing with bulk operations or frequent updates in a loop.
Read this freeCodeCamp article to learn more about the difference between innerHTML, innerText, and textContent.
How to Work with Attributes of DOM Elements
HTML attributes provide useful information about HTML elements. These attributes are always included in the opening tag of the element. An attribute is made up of a name and a value (though there are exceptions where only a name is present).
As the browser generates the DOM based on the HTML structure, it translates these attributes into dynamic properties of the DOM objects.
Here's an example:
Assume there's a button in the HTML document with the following attributes:
<button id="myBtn" type="submit">Click Here</button>For this example, the browser will create an HTMLButtonElement object in the DOM. And the object will have properties matching the attributes.
HTMLButtonElement.idwith a value ofmyBtn.HTMLButtonElement.typewith a value ofsubmit.
To interact with and manipulate these attributes using JavaScript, you can use methods like getAttribute and setAttribute to directly access the properties.
The getAttribute Method
Like the name suggests, you can use this method to get the value of an existing attribute on an element.
It accepts an argument (the name of the attribute) and returns the value of the attribute. If the attribute you passed to it as an argument does not exist on the element, the method will return null.
Here's an example:
<img src="image.jpg" alt="An example image">const imageElement = document.querySelector('img')
console.log(imageElement.getAttribute('src'))
getAttribute method is used to get the value of the src attribute.Using the getAttribute method is the above example, you can get the value of the src attribute for the image element.
The setAttribute Method
This is used to set or change the attribute of an element. The method takes in two arguments. The first argument is the name of attribute you want to change, and the second is the new value you want to give the attribute.
Here's an example:
<img src="image.jpg" alt="An example image">const imageElement = document.querySelector('img')
console.log("BEFORE:", imageElement.getAttribute('src'))
imageElement.setAttribute('src', 'new-image.jpg')
console.log("AFTER:", imageElement.getAttribute('src'))
setAttribute method is used to update the value of the src attribute.This code example logs the value of the src attribute before and after using setAttribute to change it from image.jpg to new-image.jpg.
When you pass an argument to the setAttribute method and that attribute doesn't exit on the element, it will create a new attribute. For example, you can add a height property to the image element like so:
const imageElement = document.querySelector('img')

console.log("BEFORE:", imageElement.getAttribute('height'))
imageElement.setAttribute('height', '200')
console.log("AFTER:", imageElement.getAttribute('height'))
The first log statement returns null because the height attribute was non-existent. But after setting it with the setAttribute method, the second log statement returns the correct value of the height.
The removeAttribute Method
In the previous section, you learned how to add a new attribute using the setAttribute method. What if you wanted to remove an existing attribute?
You can use the removeAttribute method. You pass in the name of the attribute you want to remove from the element as arguments to the method.
Here's an example:
<img src="image.jpg" alt="An example image" height="200">Let's use the removeAttribute method to remove the height attribute from the image element.
const imageElement = document.querySelector('img')

console.log("BEFORE:", imageElement.getAttribute('height'))
imageElement.removeAttribute('height', '200')
console.log("AFTER:", imageElement.getAttribute('height'))
removeAttribute method.Before using removeAttribute, the first log statement prints the value of the height attribute, 200. But after using the removeAttribute method, the second log statement prints null, confirming the removal of the height attribute from the image element.
The hasAttribute Method
Another method for working with attributes in the DOM is the hasAttribute method. You can use this method to check whether or not an element has a specific attribute.
The hasAttribute method returns true if the specified attribute exists and returns false if it doesn't.
Here's an example:
<img src="image.jpg" alt="An example image" height="200">Let's use the hasAttribute to check for the presence of height and width values on the image element.
const imageElement = document.querySelector('img')

console.log("HEIGHT", imageElement.hasAttribute('height'))
console.log("WIDTH", imageElement.hasAttribute('width'))
hasAttribute method to check if an attribute exists.The check for height returns true because it's an existing attribute while the check for width returns false because it doesn't exist.
How to Change the Styles on DOM Elements
There are two main ways of styling elements when working with the DOM in JavaScript. You can use the .style property or you can use classes. Each has its benefits and situations it's best situated for.
Setting Styles With the .style Property
You use the .style property when you want to make specific changes to a single element. The .style property allows you to set styles directly as inline styles for elements. This means it overrides the styles you have in your CSS stylesheet.
Using the .style property, you get access to all the individual CSS properties. See the demo below:
<h1>Styling elements with JavaScript</h1>const header = document.querySelector('h1')
console.log(header.style)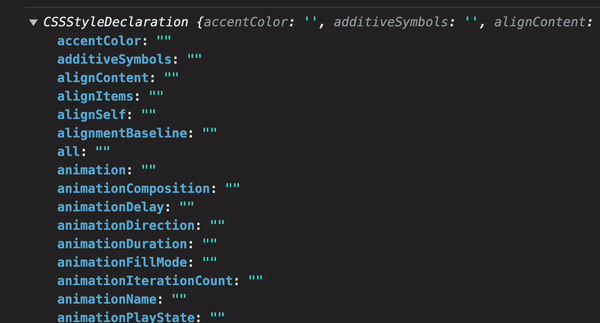
h1 element logged to the console.The console.log prints the CSS style declarations with all the CSS properties for that element.
Now, let's see an example of how to use the .style property.
<h1>I love JavaScript</h1>
h1 header elementHere is an h1 header. Now, let's add style to it using the .style property.
const paragraph = document.querySelector('h1')

paragraph.style.color = 'white'
paragraph.style.backgroundColor = 'green'
h1 element.NOTE: Because this is JavaScript, you cannot use the hyphen if the CSS property name includes two or more words. For example, in CSS you would write background-color. But in your JavaScript code, you need to use camel case. So background-color becomes backgroundColor.
You can also delete a style on an element by setting the value of the property to an empty string.
element.style.propertyName = ""Setting Styles with Classes
With classes, you can create styles once and apply it to different elements. This helps make your code become more maintainable.
The className Property
The className property represent the class attribute of a DOM element. And you can use it to get or set the value of the class attribute.
Here's an example:
<p class="food rice-dish">Jollof rice</p>const jollofParagraph = document.querySelector('p')
console.log(jollofParagraph.className)
jollofParagraph.className = 'favorite'
console.log(jollofParagraph.className)
className property.The className also reads or replace the current class. In the example above, the first log statement prints the original value of the class. And after updating the className, the second log statement prints the new value for class.
But there is a more flexible property. For example, what if instead of replacing the old class with the new class, you wanted to add another class? That's where the classList property comes in.
The classList Property
With the classList property, you can add and remove classes. You can also toggle classes, replace existing class values with new ones, and even check if the class contains a specific value.
Here's an example:
<p class="food">Jollof rice</p>const jollofParagraph = document.querySelector('p')
console.log(jollofParagraph.classList)
Adding Classes with classList.add()
jollofParagraph.classList.add('fav', 'tasty')

console.log(jollofParagraph.classList)
classList.add.The code adds two new classes fav and tasty to the class list.
Removing Classes With classList.remove()
jollofParagraph.classList.remove('tasty')

console.log(jollofParagraph.classList)
classList.remove.The code removes the class tasty from the class list.
Replacing Classes with classList.replace()
jollofParagraph.classList.replace('fav', 'favorite')

console.log(jollofParagraph.classList)
The code replaces the class fav with favorite

classList.replace.Check the Presence of a Class with classList.contains()
const isFavorite = jollofParagraph.classList.contains('favorite')
const isSoup = jollofParagraph.classList.contains('soup')

console.log("Contains favorite: ", isFavorite)
console.log("Contains soup: ", isSoup)
classList.contains.The code checks if the class passed to it is contained in the class list.
It returns true if it is included in the class list (for example favorite) and false if it is not included in the class list (for example soup)
Toggling a Class with the classList.toggle()
When you use the toggle property, it first checks if the class exists. If it exists, it will remove it. And if it doesn't exist, it will add it.
jollofParagraph.classList.toggle('favorite')
console.log(jollofParagraph.classList)

jollofParagraph.classList.toggle('favorite')
console.log(jollofParagraph.classList)

jollofParagraph.classList.toggle('favorite')
console.log(jollofParagraph.classList)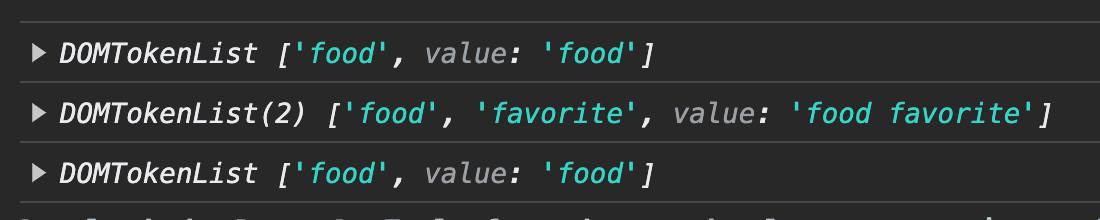
classList.toggle.The first time the toggle runs, favorite exists in the class list. So, the toggle removes it.
The second time the toggle runs, favorite doesn't exist so the toggle adds favorite to the class list.
The next time the toggle runs, favorite now exists again. So it removes it from the class list.
The toggle keeps adding or removing the value from the class list depending on whether it's present or absent.
How to Traverse the DOM
To traverse the DOM means to move between the different elements/nodes within the HTML document. This may includes selecting or accessing parent, child, or sibling elements (or nodes). You do this to get information or manipulate the document structure.
But before we get into how to traverse the DOM, you need to understand the difference between nodes and elements.
Difference Between a Node and an Element
Nodes are the building blocks of the DOM. They represents different components in the HTML structure.
Elements are a specific type of node, but not all nodes are elements. Other types of content like attributes of elements, text content, and comments within the code are nodes too. But they are not elements.
An element is a specific type of node that defines the structure of the document's content. Think of elements as the familiar HTML tags you use. Examples include <div>, <p>, and <ul>. Each element can consist of attributes, text content, and other nested elements.
Selecting a Parent with parentNode vs parentElement
When it comes to selecting the parent of a DOM element, you can use either the parentNode or parentElement. Both will get the parent of the element you pass to it.
From a practical viewpoint, the parent of an element or a node will always be an element. So it doesn't matter which one you use, you will get the right parent of the selected element.
Let's see an example of selecting the parent of an element.
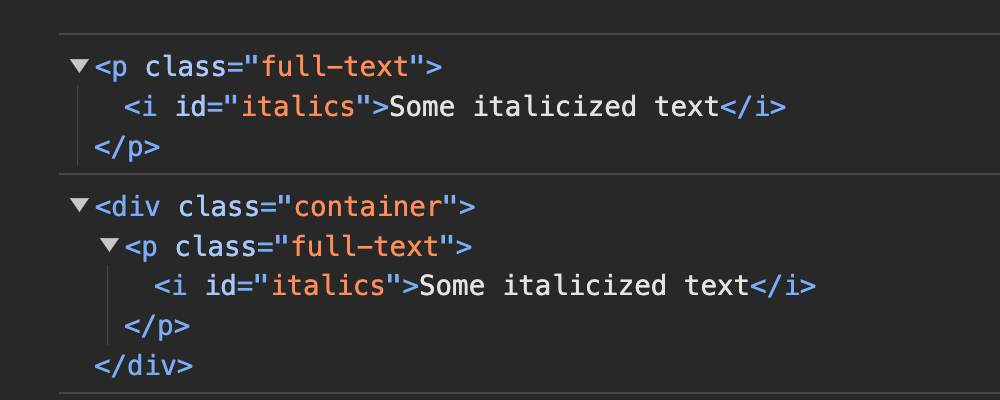
  <div class="container">
    <p class="full-text">
        <i id="italics">Some italicized text</i>
    </p>
  </div>
const italicizedText = document.getElementById('italics')
console.log(italicizedText.parentNode)
console.log(italicizedText.parentNode.parentNode)First, you select the element. Then, you chain the parentNode method to it to get the parent. You can also chain another parentNode property to get the parent of a parent element like the second log statement.
The screenshot below shows the output of the two log statements.
Selecting Elements with childNodes vs children
You can select the contents of an element using both the .childNodes and .children properties. But they work differently.
childNodes: returns a NodeList of all the child nodes within the selected elements. It will include elements and non-element nodes like text nodes, comment nodes, and so on.
.children: returns an HTML collection of only the child elements (element nodes) of the selected objects. It will not include any non-element nodes like texts or comments.
Let's see an example that shows the difference:
  <div id="container">
    A text node
    <p>Some paragraph</p>
    <!-- This is a comment -->
    <span>Span Element</span>
  </div>
The code above has only 2 child elements (element nodes): the paragraph and the span. But there are other elements too – a text node and a comment:
const container = document.getElementById('container');

const containerChildNodes = container.childNodes;
const containerChildren = container.children;

console.log(containerChildNodes);
console.log(containerChildren);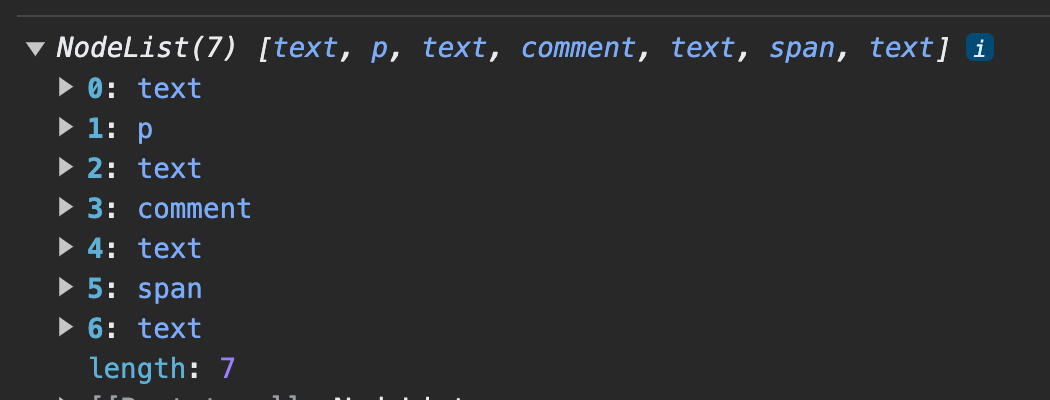
The childNodes will return all the child nodes (both elements and non-elements). It also includes the whitespaces between elements as text nodes.
This can be confusing to work with. So, unless you have a good reason not to, you should stick with the .children property.
The children will only return the child elements (the paragraph and the span).

.children propertySelecting the First or Last Child/Element
If you need to select only the first/last child or element, you can use these four properties.
firstChild: Selects only the first child node of the parent element.lastChild: Selects only the last child node of the parent element.firstElementChild: Selects only the first child element of the parent.lastElementChild: Selects only the last child element of the parent.
Let's use the same example from the previous section to see how each works:
  <div id="container">
    A text node
    <p>Some paragraph</p>
    <!-- This is a comment -->
    <span>Span Element</span>
  </div>
const container = document.getElementById('container');
console.log("FIRST CHILD:", container.firstChild)
console.log("LAST CHILD:", container.lastChild)
console.log("FIRST ELEMENT: ", container.firstElementChild)
console.log("LAST ELEMENT:", container.lastElementChild)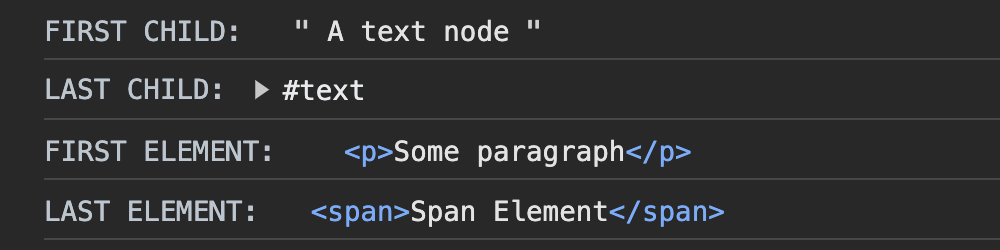
Note how firstChild returns the first text node but the firstElementChild returns the first paragraph instead. This means it ignored the text node which comes before the paragraph.
And also note how the lastChild returns a text node – even though from the markup, it looks like there's nothing after the span. That is because the lastChild property considers the linebreak/whitespace between the closing tag of the span and the closing tag of the div elements as a node.
That's why it's generally safer to stick to firstElementChild and lastElementChild.
Selecting a Sibling of Nodes in the DOM
You've learned how to select a parent or a child of an element. You can also select a sibling of an element. You do that using the following properties:
nextSibling: Selects the next node within the same parent element.nextElementSibling: Selects the next element, and ignores any non-element nodes.previousSibling: Selects the previous node within the same parent element.previousElementSibling: Selects the previous element, and ignores any non-element nodes.
Here's an example:
  <div>
    <p id="one">First paragraph</p>
    text node
    <p id="two">Second paragraph</p>
    another text node
    <p id="three">Third paragraph</p>
    <p id="four">Fourth paragraph</p>
  </div>
const paragraphTwo = document.getElementById('two')
console.log("nextSibling: ", paragraphTwo.nextSibling)
console.log("nextElementSibling: ", paragraphTwo.nextElementSibling)
console.log("previousSibling: ", paragraphTwo.previousSibling)
console.log("previousElementSibling: ", paragraphTwo.previousElementSibling)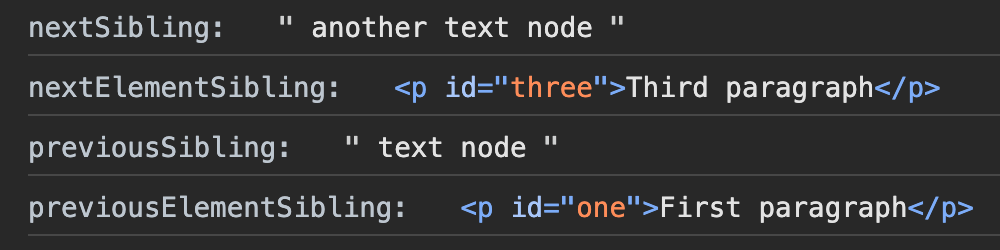
nextSibling and previousSibling select the text nodes because they consider all nodes within the parent. While nextElementSibling and previousElementSibling select only the paragraph elements because they ignore non-element nodes like text.
DOM Events and Event Listeners
DOM events are actions that take place in the browser. These events are what allows you to make websites interactive.
Some DOM events are user-initiated like clicking, moving the mouse, or typing on the keyboard. Others are browser-initiated like when a page finishes loading.
Difference Between Event Listener and Event Handler
An event listener is a method that lets you know when an event has taken place. It allows you to "listen" or keep an eye out for DOM events. That way, when an event happens, you can do something.
An event handler is a response to the event. It's a function that runs when an event occurs.
For example, you can attach an event listener to a button that lets you know when a user clicks that button. Then you can write an event handler (a function) that prints something on screen anytime a click event occurs.
In this case, the event listener is what informs your app when a click occurs and then trigger a response. And the response (the function that runs when the click occurs) is an example of an event handler.
Three Ways to Register Events in JavaScript
The following are three different ways you can listen to and respond to DOM events using JavaScript.
- Using inline event handlers: This is when you add the event listener as an attribute to HTML elements. In the early days of JavaScript, this was the only way to use events. See the example below:
// Example of using an inline event handler

<button onclick="alert('Hello')">Click me!</button>- Using on-event handlers: You use this when an element has only one event handler. When you add more than one event handler using this method, only the last event handler will run, as it will override others before it.
<!-- An example of using an on-event handler -->

<button>Click me!</button>

<script>
  const myButton = document.querySelector('button')

  myButton.onclick = function() {
    console.log("Run first handler")
  }

  myButton.onclick = function() {
    console.log("Run second handler")
  }
</script>
As you can see from the result in the console, the browser runs the code for only the second event handler.
- Using the
addEventListenermethod: This method allows you to attach more than one event handlers to an element. And it will execute them in the order in which they were added.
As a general rule, you should stick with the addEventListener, unless you have a compelling reason not to.
The addEventListener method takes two arguments. The first is the event you want to listen to, and the second is the event handler which is the function you want to run when the event occurs.
<!-- An example of using the addEventListener method -->

<button>Click me!</button>

<script>
  const myButton = document.querySelector('button')

  myButton.addEventListener('click', function() {
    console.log("Run first handler")
  })

  myButton.addEventListener('click', function() {
    console.log("Run second handler")
  })
</script>
addEventListener method executes both event handlers.Practice Challenge
Here is a challenge for you before you move on. Try solving it on your own before you take a look at the solution.
Consider the HTML and CSS code below.
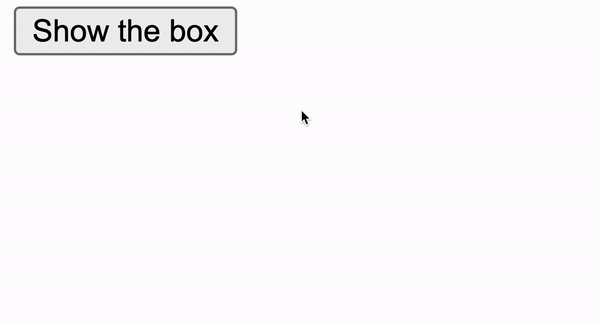
The challenge includes two elements. A #gift-box div and a #click-btn button. The gift box is hidden with the .hide class.
Your task is write JavaScript code that listens to a click event on the button, and display the hidden box when the user clicks the button.
<!DOCTYPE html>
<html lang="en">
  <head></head>
  <body>

      <div id="gift-box" class="hide">🎁</div>
      <button id="click-btn">Show the box</button>

  </body>
</html>
.hide {
display: none;
}
#gift-box {
font-size: 5em;
}
Solution to Practice Challenge
Congratulations if you were able to solve the challenge. If you were not, that's okay. The solution and explanation is provided below:
const giftBoxElement = document.getElementById('gift-box')
const buttonElement = document.getElementById('click-btn')

buttonElement.addEventListener('click', function() {
  giftBoxElement.classList.remove('hide')
})
To solve this challenge, first you need to select both the #gift-box and #click-btn element.
Then, you add an event listener to the button. As mentioned earlier, the addEventListener method takes in two arguments.
In this case, the first argument is the 'click' event, and the second argument is a function.
The goal is to display the box. The box has a class hide which sets display to none in the CSS. One way to display the box using JavaScript is to remove hide from the classList.
The Event Object
This is a JavaScript object the browser passes as an argument to the event handler function anytime an event occurs. The object includes some useful properties and methods like the following:
type: the type of event that occurred (like click, mouseover, keydown, and so on)target: the element on which the event occurredclientXandclientY: the horizontal and vertical coordinates of the mouse pointer at the time the event occurred.preventDefault(): prevents default actions associated with the events like preventing a form submission on the submit event.stopPropagation(): prevents the event from propagating through the DOM. More on that later.
You can see a full list of the properties and methods on the MDN web docs.
Types of Events
There are many different kinds of DOM events the browsers lets you listen to. The following are few of the common ones.
Mouse events:
click: when the element is clicked.dbclick: when the element is double clicked.mouseover: when the mouse pointer enters the element.mouseleave: when the mouse pointer leaves the element.mousedown: when the mouse is pressed down over an element.mouseup: when the mouse is released over an element.
Keyboard events:
keydown: when a key on the keyboard is pressed down.keyup: when a key on the keyboard is released.keypress: when a key is pressed and shows the actual key that was pressed. Note that this event is not fired for all keys, especially non-printable keys.
Form events:
submit: when a form is submitted.input: when the value of an input field changes.change: when the value of a form element changes and loses focus.
Window events:
load: when the browser finishes loading the page.unload: when the user leaves the page.resize: when the browser window is resized.scroll: when the user scrolls through the document.
You can see a comprehensive list of DOM events here.
Event Flow in JavaScript
When a JavaScript event occurs, the event is propagated or travels either from the target where the event occurred to the outermost element in the DOM or vice versa.
For example, let's say you click a button on a page. By clicking the button, you've also clicked its parent element and any element the button is inside within the DOM hierarchy.
Event Bubbling
This is when the event is first registered on the target (or specified element) on which the event happened, and then registered outwards to the parent and onwards to the outermost element.
Here's an example:
<!DOCTYPE html>
<html>
    <head>
        <title>Event bubbling DEMO</title>
    </head>
    <body>
        <div id="outer">
            <div id="inner">
              <button id='btn'>Click Here</button>
            </div>
        </div>
    </body>
</html>
The example here contains a button #btn. With event bubbling, when an event occurs (say a click) on the button, the event goes through the following sequence.

The event starts to bubble up from the target element back to the outermost ancestor.
Event Capturing
Event capturing is the opposite of event bubbling. The event starts from the outermost ancestor element and travels down the DOM tree to the target element.

During the capturing phase, event listeners attached to elements are executed in the order of the hierarchy from the topmost ancestor to the target element.
In case you're wondering why this matters, let's see a practical example using the same HTML markup example from above:
<!DOCTYPE html>
<html>
    <head>
        <title>Event bubbling DEMO</title>
    </head>
    <body>
        <div id="outer">
            <div id="inner">
              <button id='btn'>Click Here</button>
            </div>
        </div>
    </body>
</html>
Let's add event listeners to the button, the #inner div, and the #outer div:
const button = document.getElementById('btn')
const innerDiv = document.getElementById('inner')
const outerDiv = document.getElementById('outer')
button.addEventListener('click', function() {
console.log('Click on button')
})
innerDiv.addEventListener('click', function() {
console.log('Click on inner Div')
})
outerDiv.addEventListener('click', function() {
console.log('Click on outer Div')
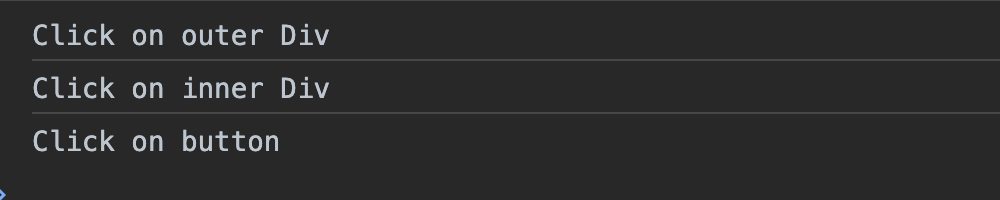
})By default, browsers use the event bubbling approach. So there is no need to add any argument to the event listener. This is the order in which the event handlers will run in response to a click on the button:
-
button #innerDiv#outerDiv

To use the event capturing model, you need to pass a third argument true to the event listener.
const button = document.getElementById('btn')
const innerDiv = document.getElementById('inner')
const outerDiv = document.getElementById('outer')

button.addEventListener('click', function() {
  console.log('Click on button')
}, true)

innerDiv.addEventListener('click', function() {
  console.log('Click on inner Div')
}, true)

outerDiv.addEventListener('click', function() {
  console.log('Click on outer Div')
}, true)
The order for executing the event handlers will now run in the opposite direction, like this:
#outerDiv#innerDivbutton
The Event stopPropagation() Method
You've learned about how the event bubbling registers an event on an element and continues registering the event all the way to the outermost ancestor element. You've also seen how event capturing does the opposite.
But what if you don't want the event to register on all the ancestors? That's where the stopPropagation method comes in. You can use this method to prevent the event from propagating through the whole DOM.
Let's use the stopPropagation method on the same example from before:
button.addEventListener('click', function(event) {
  event.stopPropagation()
  console.log('Click on button')
})

innerDiv.addEventListener('click', function() {
  console.log('Click on inner Div')
})

outerDiv.addEventListener('click', function() {
  console.log('Click on outer Div')
})
stopPropagation method allows the execution of only the first event listener.Now, only the event handler on the button is fired. The ones on the innerDiv and outerDiv are not because of the stopPropagation method on the button.
Also, note that to get the event object, you need to pass it as an argument to the event handler function.
JS DOM Manipulation Project Ideas
Building projects is an excellent way to improve your understanding of coding concepts. So roll up your sleeves and get ready to work!
Here are five JS DOM manipulation project ideas to help you practice and solidify your skills.
Toggle Switch
Design a toggle switch that changes its state (on/off) when clicked. Update the DOM (for example with a background color) that reflects the current state of the toggle switch.
Random Color Picker
Create a simple app where users can click a button to generate a random color. Include a shape on the screen that gets filled with the chosen color. Also display the color code on screen.
Countdown Timer
Build a timer that starts from a specified time. The app updates in real time and shows the remaining time on the screen.
Word Counter
Develop an app that provides an input field or text area for the user to type. Display the number of words in real time on the screen as the user types.
An Interactive To-Do List
Create an app that allows users to add, delete, or edit tasks. You can have fun with this one and add as many advanced features as you want. For example, adding features like marking tasks as completed, filtering tasks, or sorting them.
Conclusion
If you've come this far, then you now have a good understanding of JavaScript DOM manipulation. With practice, you'll be confident enough to tackle advanced projects that require knowledge of these DOM manipulation concepts.
A good foundation of Vanilla JS DOM manipulation concepts will also come in handy when picking JavaScript libraries/frameworks like React, Angular, Vue, Svelte, and so on.
Thank you for reading, and happy coding! For more in-depth tutorials, feel free to subscribe to my YouTube channel.