By Jared Wolff
This post is originally from my blog on www.jaredwolff.com.
Writing an app takes time. It takes even more time to write one that works with hardware.
Luckily there's a solution to this problem.
Enter Blynk.
It's an app that connects to your hardware. It has a drag and drop interface with pre built widgets. That means you can build an app in seconds. Then upload your device sensors readings within minutes.
Blynk does work with Argon, Boron or ethernet connected Xenon. Unfortunately it doesn't work over a Particle Mesh network. In this article you'll learn some of the workarounds to get your mesh based projects up an running.
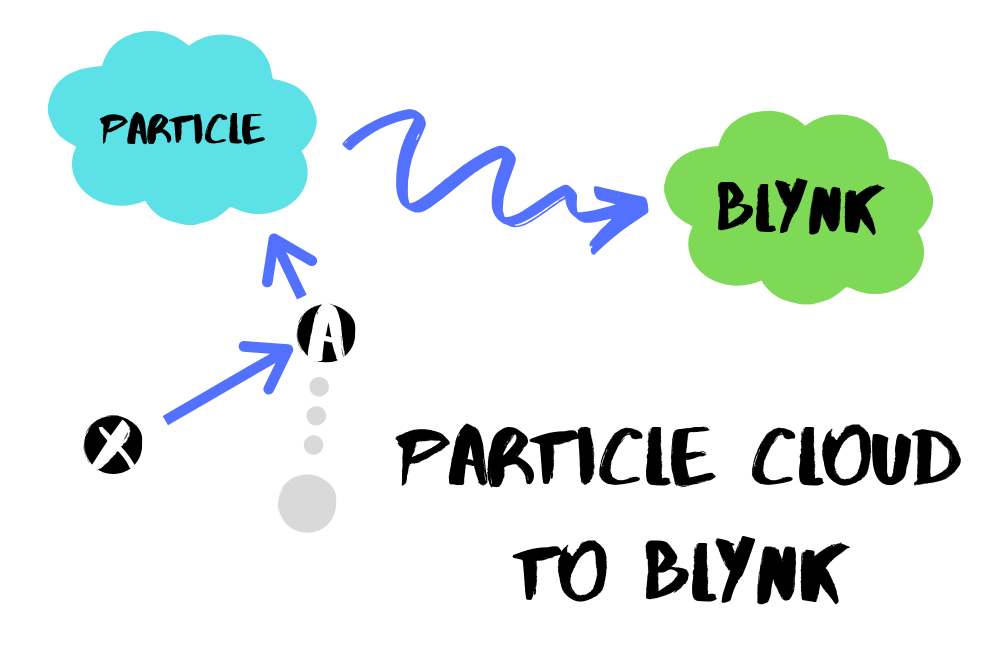
From Particle Cloud to Blynk
Let's start with the most simple use case: getting data from any Particle Device to Blynk.
The Air Quality data from Particle Squared is perfect for this example. So, i'll be using that.
First let's create a new Blynk Project
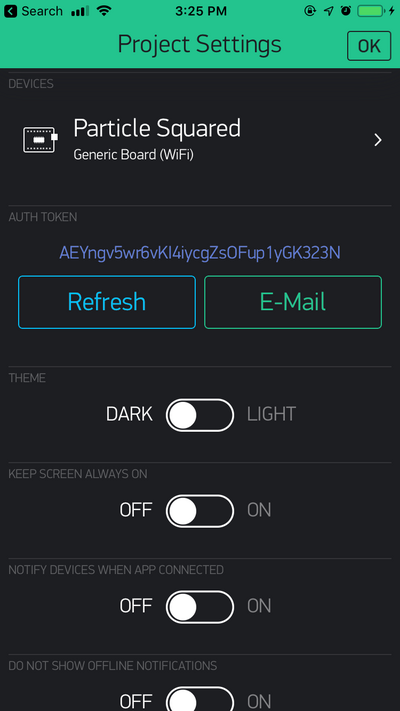
Grab the Auth Token we'll need that in a bit. You can tap the Auth Token to copy it to your clipboard.
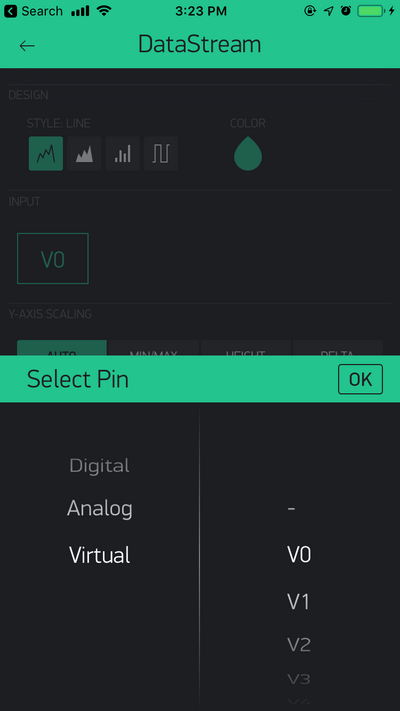
Next, let's add a SuperChart for this example.
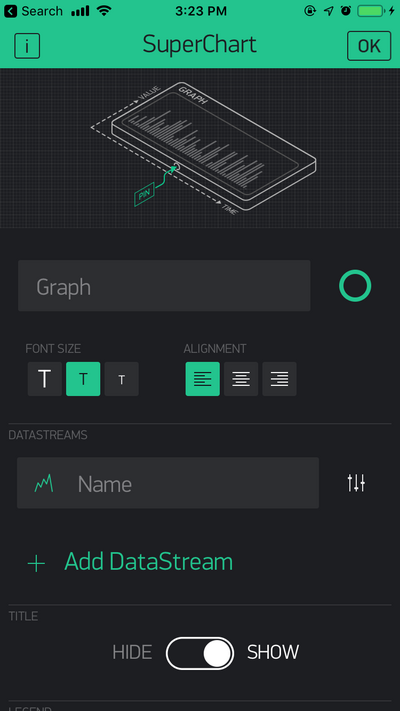
Configure the SuperChart to use a Virtual Pin. We don't have access to the actual hardware pins on the device. V0 is a good choice.
To update values in Blynk, we'll have to connect somehow. The best way is to use an Integration in the Particle Console.
In Particle Console, click the icon below the terminal icon. Then click on New Integration.
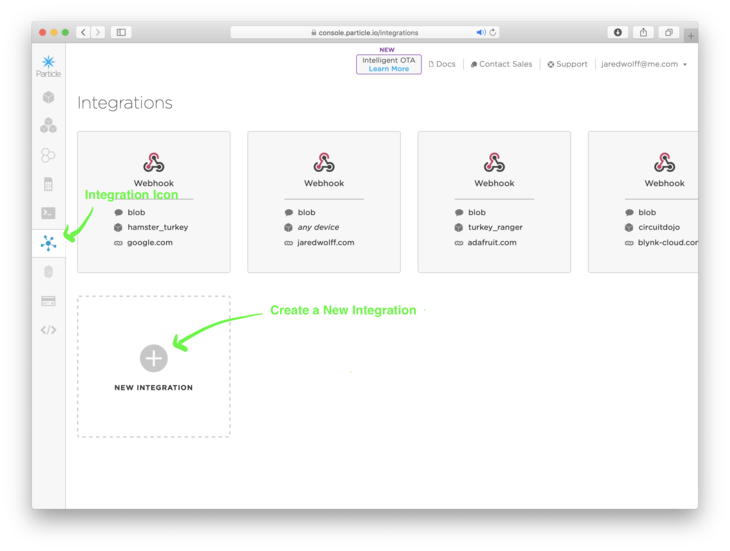
Look at the example below to see how I filled everything out.
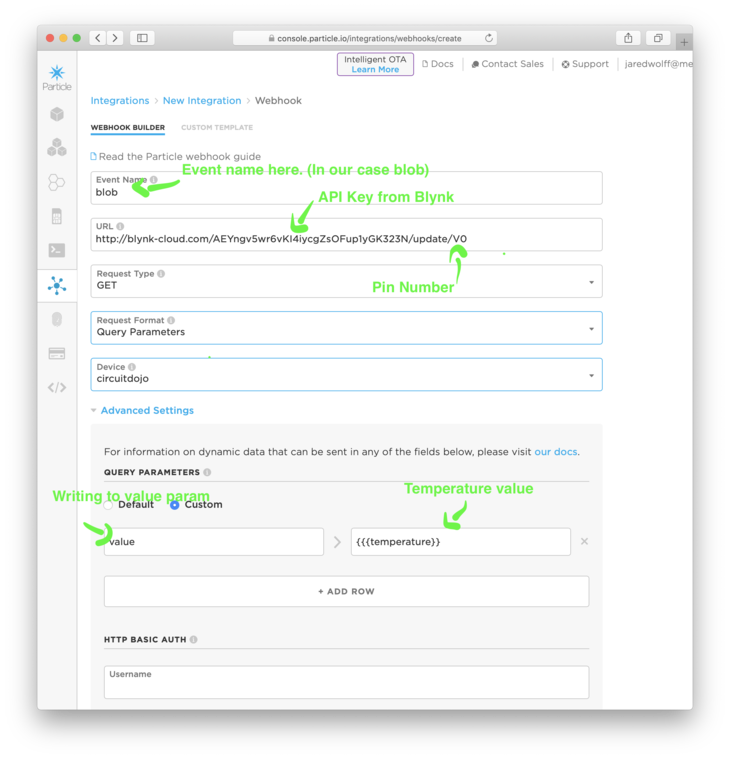
Particle Squared uses the Event Name as **blob. For other projects this may be different. Remember:** your event name is the same as from Particle.publish(eventName, data).
The URL is set to use the blink-cloud.com address. According to their API a sample URL looks like:
I'll also include it here so it's easier to copy
http://blynk-cloud.com/auth_token/update/pin?value=value
Replace auth_token with the Auth Token we got earlier.
Replace pin with the virtual pin we want to modify. In this case V0
Replace the value with the value you want to use.
We'll reference one of the values in the Particle Squared blob. It's organized like this:
{
  "temperature": 28.60,
  "humidity": 45.00,
  "sgp30_tvoc": 18,
  "sgp30_c02": 400,
  "bme680_temp": 27.36,
  "bme680_pres": 1012.43,
  "bme680_hum": 43.80,
  "bme680_iaq": 43.90,
  "bme680_temp_calc": 27.30,
  "bme680_hum_calc": 43.97
}
Particle uses mustache templates. As you can see in the screenshot above, you can set value to {{{temperature}}}.
Note: If you're working on your own project, it's important to publish with JSON. As a reference the Particle.publish command looks like:
// Publish data
Particle.publish("blob", String::format("{\"temperature\":%.2f,\"humidity\":%.2f}",si7021_data.temperature, si7021_data.humidity) , PRIVATE, WITH_ACK);
Click the big blue Save button at the bottom of the screen. Then we can move on to the next step!
Testing
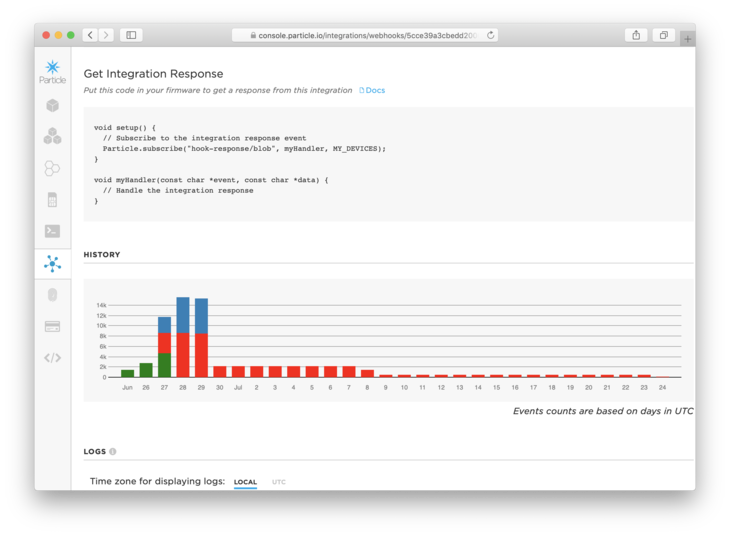
Since creating our Particle Webhook Integration, it's been publishing data to Blynk. Let's go see if it's working.
First, let's go back to the Blynk app. Hit the Play Button in the top Right in Blynk screen.
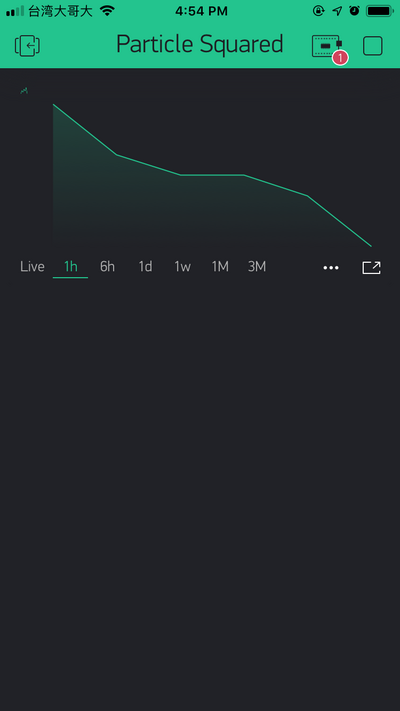
If your integration has been running for a while, you should see the graph populate with data! In the case you don't see anything, let's check the logs.
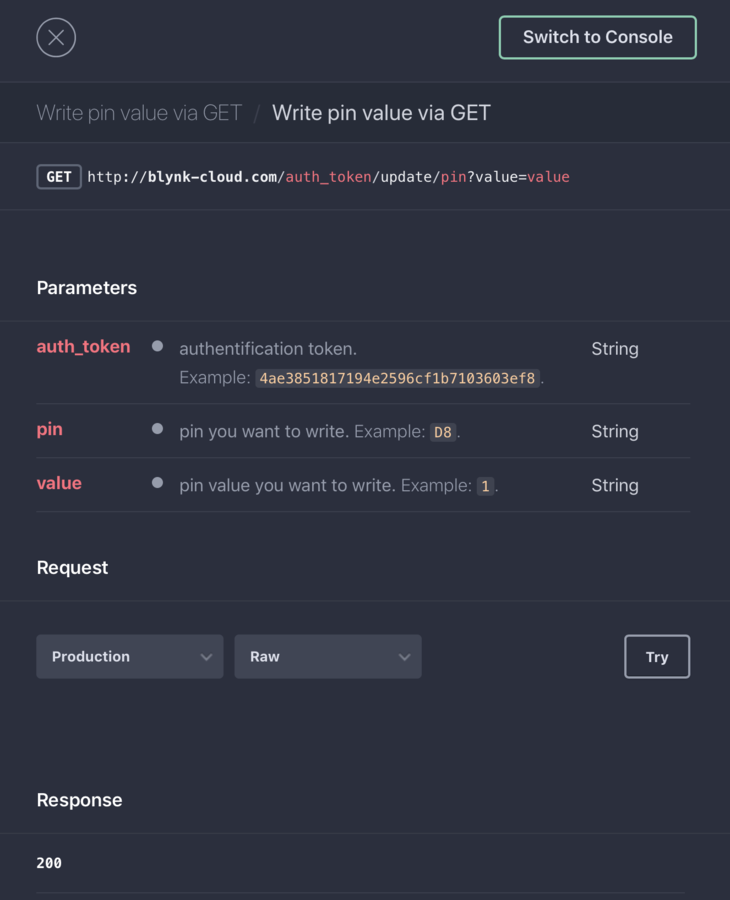
Go back to your integration and scroll towards the bottom. We want to see if there are any errors.
Not sure what that looks like? Here's an example of an integration with errors:
You can scroll further down to investigate why the error has occurred.
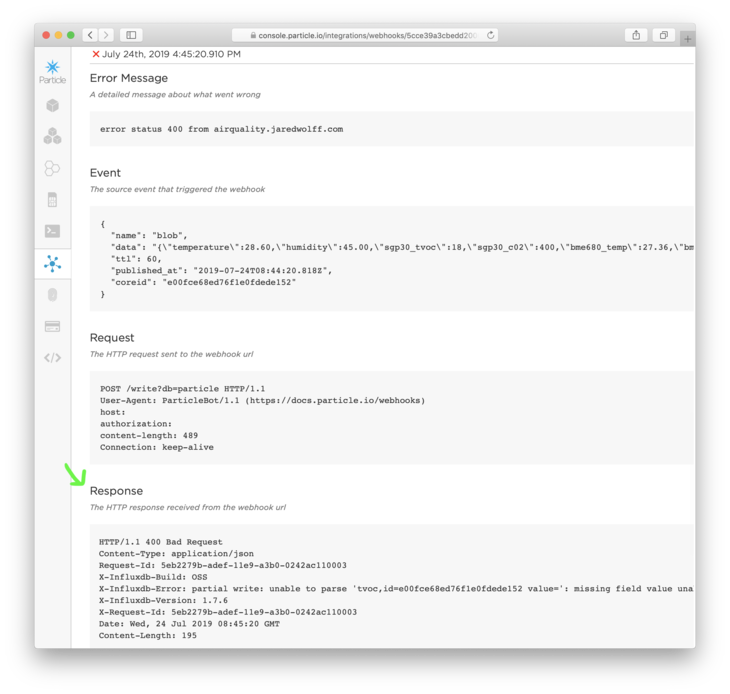
All the way at the bottom shows the response from the server. Depending on the service, they'll give you information why your API call failed. In my case, I was missing values for two fields.
Particle to Blynk is working!
You now have a basic way of publishing to a virtual pin in Blynk. There are drawbacks though. Most importantly, you'll have to create an integration for every signal virtual pin. If you have eight readings, that means eight integrations.
Bummer.
In the next section, you'll learn a different way to configure Blynk. Let's go!
Local Mesh Using Blynk Library

Unlike the first method, we'll be focusing on changing firmware only.
We’ll use a Argon, Boron or Ethernet Connected Xenon and one regular Xenon. For the rest of this tutorial, we'll call these devices an “edge router”.
The Xenon will run the Particle Squared code. Instead of using Particle.publish we'll be using Mesh.publish. This allows us to publish only to the local mesh network.
Meanwhile the edge router is listening for the message. It collects the values and then uses the Blynk API to publish to the app.
Here are the steps:
Setup our Edge Router
Pull up the menu by pressing Cmd+Shift+P. Type Install Library.
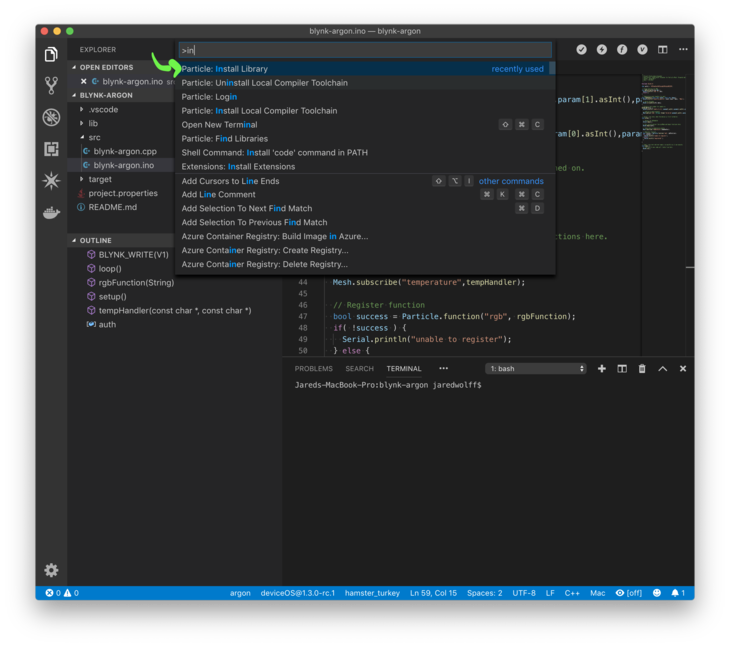
Then enter blynk. The library should download if you haven't already.
Once installed you can include the library at the top of your .ino file like so:
#include <blynk.h>
In our setup() function let's init the Blynk library:
// Put initialization like pinMode and begin functions here.
Blynk.begin(auth);
In our setup() function, subscribe to the temperature event. The connected Xenon will generate this event.
// Subscribe to temperature events
Mesh.subscribe("temperature",tempHandler);
Define tempHandler like this for now:
// Temperature event handler for mesh
void tempHandler(const char *event, const char *data){
}
In the loop() function make sure we have Blynk.run();
// loop() runs over and over again, as quickly as it can execute.
void loop() {
  // The core of your code will likely live here.
  Blynk.run();
}
Finally, for tempHandler we can add a debug print to monitor events. I've used something like this:
Serial.printlnf("event=%s data=%s", event, data ? data : "NULL");
Particle uses this in some of their examples. It's perfect for our purposes as well!
Note: make sure you have Serial.begin() called in your Setup() function!
So now we have tempHandler to receive data from the Xenon. The edge router can now take that data and upload it to Blynk. Let's use the Blynk.virtualWrite function for this:
// Write the data
Blynk.virtualWrite(V0, data);
This will write the temperature value from a Xenon to the V0 pin. If you used something other than V0, be sure to change that value here. (This is the same setup as the previous Particle Cloud to Blynk example)
The final code for the edge router should look something like this. Compile a flash it to your device when you're ready!
/*
 * Project blynk-argon-forwarder
 * Description: Argon Blynk forwarder for Particle Mesh. Forwards data from mesh connected devices to Blynk.
 * Author: Jared Wolff
 * Date: 7/25/2019
 */

#include <blynk.h>

char auth[] = "<ENTER YOUR AUTH KEY>";

// Temperature event handler for mesh
void tempHandler(const char *event, const char *data){
  Serial.printlnf("event=%s data=%s", event, data ? data : "NULL");

  // Write the data
  Blynk.virtualWrite(V0, data);
}

// setup() runs once, when the device is first turned on.
void setup() {

  // Serial for debugging
  Serial.begin();

  // Put initialization like pinMode and begin functions here.
  Blynk.begin(auth);

  // Subscribe to temperature events
  Mesh.subscribe("temperature",tempHandler);

}

// loop() runs over and over again, as quickly as it can execute.
void loop() {
  // The core of your code will likely live here.
  Blynk.run();

}
Remember to set auth using the AUTH TOKEN in the Blynk app!
Setting up a Xenon

Create a new project. This time it will be for the Xenon capturing "temperature data."
Let's add a variable called time_millis to the top of the file. The type is system_tick_t. We'll use it to create a simple delay timer for the temperature readings.
// Global variable to track time (used for temp sensor readings)
system_tick_t time_millis;
For the interval, let's use a preprocessor define
#define INTERVAL_MS 2000
Now let's tie those together in the loop() function. We'll use an if statement to compare our current system time with that of the last event plus offset. If you ever need a simple timer, this is one of the best ways to do it!
// Check if our interval > 2000ms
  if( millis() - time_millis > INTERVAL_MS ) {
  }
Once we're inside, make sure you reset timer_millis:
        //Set time to the 'current time' in millis
    time_millis = millis();
Then, we'll generate the temperature value using the random() function. We'll use the two parameter variant. That way we can set the minimum value and the maximum value:
    // Create a random number
    int rand = random(20,30);
Finally we'll Mesh.publish the value:
    // Publish our "temperature" value
    Mesh.publish("temperature",String::format("%d",rand));
When this example runs, the temperature is broadcast to the mesh network. Then, the edge router receives it and forwards it on to Blynk!
You can flash this firmware whenever you're ready. Here's the full code for the Xenon so you can cross compare:
/*
 * Project blynk-xenon-rgb
 * Description: Recieve RGB level from connected Edge Router. Sends simiulated temperature values via mesh to the Blynk cloud.
 * Author: Jared Wolff
 * Date: 7/25/2019
 */

// How often we update the temperature
#define INTERVAL_MS 2000

// Global variable to track time (used for temp sensor readings)
system_tick_t time_millis;
// setup() runs once, when the device is first turned on.
void setup() {

  // Set time to 0
  time_millis = 0;

}

// loop() runs over and over again, as quickly as it can execute.
void loop() {

  // Check if our interval > 2000ms
  if( millis() - time_millis > INTERVAL_MS ) {
    //Set time to the 'current time' in millis
    time_millis = millis();

    // Create a random number
    int rand = random(20,30);

    // Publish our "temperature" value
    Mesh.publish("temperature",String::format("%d",rand));

  }

}
Give it a test!
Now that we've programmed both devices let's get them talking to each other.
I've already set up the Argon with a mesh network called 8f-9. I'll explain how to get the Xenon connected with the CLI. You can also used the Particle App.
First, let's connect the Xenon to USB and get it into Listening Mode. After connect, hold the Mode button until blinking blue.
Then use the CLI to set up the mesh network. First let's get the device ID:
Jareds-MacBook-Pro:nrfjprog.sh jaredwolff$ particle identify
? Which device did you mean?
  /dev/tty.usbmodem146401 - Argon
❯ /dev/tty.usbmodem146101 - Xenon
If you have multiple devices connect, make sure you select the right one! If prompted, select a device. Your output should look something like:
Your device id is e00fce682d9285fbf4412345
Your system firmware version is 1.3.0-rc.1
We'll need the id for the next step. Now, let's run the particle mesh command.
particle mesh add <xenon id> <id of your argon, boron, etc>
Here's an example below:
particle mesh add e00fce682d9285fbf4412345 hamster_turkey
? Enter the network password [hidden]
▄ Adding the device to the network...
At the end of it you'll see:
Done! The device should now connect to the cloud.
This process is not perfect. During the Adding the device to the network... stage, I had to remove the Xenon using particle mesh remove. Then re-run the particle mesh add command after resetting the Argon.
Now here comes to finale.
Connect the two devices to serial using particle serial monitor --follow
If you have the two devices connected, particle serial monitor will prompt you to select:
Jareds-MacBook-Pro:blynk-xenon-rgb jaredwolff$ particle serial monitor --follow
Polling for available serial device...
? Which device did you mean? /dev/tty.usbmodem146101 - Xenon
Opening serial monitor for com port: "/dev/tty.usbmodem146101"
Serial monitor opened successfully:
Remember: You have to run particle serial monitor for each device you want to connect to.
If all is working, you'll likely see some output from the edge router!
Serial monitor opened successfully:
event=temperature data=21
event=temperature data=28
event=temperature data=21
event=temperature data=27
event=temperature data=28
event=temperature data=26
event=temperature data=23
event=temperature data=26
event=temperature data=21
Looking at the app, the Super Chart should be reacting to this new data.
Compare the last value in the command line to the last on the chart? Do they match? If so, you made it to the end of this example!
Conclusion
In this tutorial you've learned how to forward Particle Cloud data to Blynk. You've also learned how to do the same using a Particle Argon, Boron or ethernet connected Xenon. Awe yea. ??
Now that you have the tools to Blink-ify your Particle Mesh powered projects, it's time to get to work!
Like this post?
This post is an excerpt from my upcoming Ultimate Guide to Particle Mesh. I'll be sharing more exclusive content with my mailing list as it get's closer to launch. You can sign up here for updates.
Still have questions?
Leave a comment or shoot me a line.