

Introduction to Swift
The Swift programming language was created by Apple in 2014. It's the official language that works with the whole Apple Operating Systems lineup: iOS, iPadOS, watchOS, macOS, and tvOS.
Swift is an open source, general purpose, compiled programming language that's statically typed.
Every value has a type assigned. The type of a value is always checked when used as an argument or returned, at compile time. If there is a mismatch, the program will not compile.
Swift's compiler is LLVM, and it is included within Xcode, the standard IDE you use for Apple software development.
Swift is a modern programming language that was designed to "fit" in an ecosystem that was previously designed for a different programming language called Objective-C.
Most of the software running on the iPhone and Mac today is based on Objective-C code, even for official Apple apps. But Swift usage is gaining traction year after year. While Objective-C will be used for years to maintain and improve existing apps, new applications are likely going to be created with Swift.
Before Apple introduced Swift, Objective-C was heavily developed to introduce new capabilities and features. But in the recent years this effort has decreased a lot in favor of Swift development.
This does not mean Objective-C is dead or not worth learning: Objective-C is still an essential tool for any Apple developer.
That said, I am not going to cover Objective-C here, because we're focusing on Swift – the present and future of the Apple platform.
In just 6 years, Swift has gone through 5 major versions, and we're now (at the time of writing) at version 5.
Swift is famously Apple's products language, but it is not an Apple-only language. You can use it on several other platforms.
It is open source, so porting the language to other platforms does not require any permission or licensing, and you can find Swift projects to create Web servers and APIs (https://github.com/vapor/vapor) as well as projects to interact with microcontrollers.
Swift is a general-purpose language, built with modern concepts, and it has a bright future.
What We'll Cover Here
The goal of this book is to get you up and running with Swift, starting from zero.
If you have a Mac or an iPad, I recommend you to download the Playgrounds application made by Apple from the App Store.
This app lets you run snippets of Swift code without having to create a full app first. It's a very handy way to test your code, not just when you start learning, but whenever you need to try some code.
It also contains a series of awesome examples and tutorials to expand your Swift and iOS knowledge.
Note: You can get a PDF and ePub version of this Swift Beginner's Handbook
- Introduction to Swift
- Variables in Swift
- Objects in Swift
- Operators in Swift
- Conditionals in Swift
- Loops in Swift
- How to Write Comments in Swift
- Semicolons in Swift
- Numbers in Swift
- Strings in Swift
- Booleans in Swift
- Arrays in Swift
- Sets in Swift
- Dictionaries in Swift
- Tuples in Swift
- Optionals and
nilin Swift - Enumerations in Swift
- Structures in Swift
- Classes in Swift
- Functions in Swift
- Protocols in Swift
- Where to Go From Here
Variables in Swift
Variables let us assign a value to a label. We define them using the var keyword:
var name = "Roger"
var age = 8
Once a variable is defined, we can change its value:
age = 9
Variables that you do not want to change can be defined as constants, using the let keyword:
let name = "Roger"
let age = 8
Changing the value of a constant is forbidden.
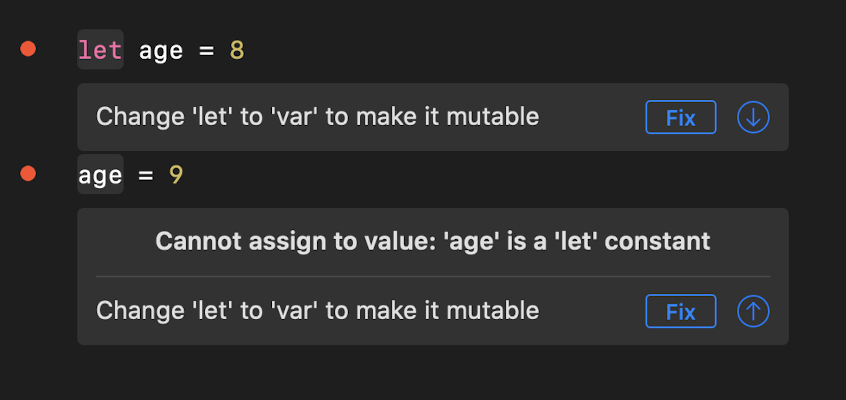 You can't change the value of a constant or you'll get this error
When you define a variable and you assign it a value, Swift implicitly infers the type of it.
8 is an Int value.
"Roger" is a String value.
A decimal number like 3.14 is a Double value.
You can also specify the type at initialization time:
let age: Int = 8
But it's typical to let Swift infer it, and it's mostly done when you declare a variable without initializing it.
You can declare a constant, and initialize it later:
let age : Int

age = 8
Once a variable is defined, it is bound to that type. You cannot assign to it a different type, unless you explicitly convert it.
You can't do this:
var age = 8
age = "nine"
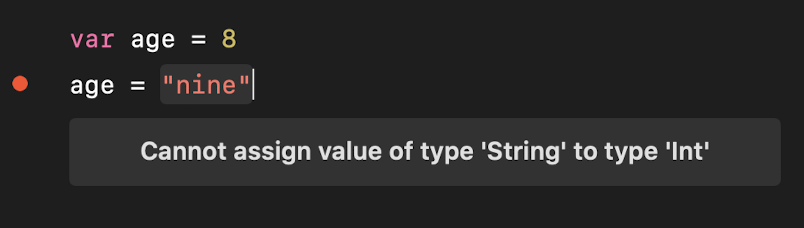 Cannot assign value of type 'String' to type 'Int' error
Int and String are just two of the built-in data types provided by Swift.
Objects in Swift
In Swift, everything is an object. Even the 8 value we assigned to the age variable is an object.
In some languages, objects are a special type. But in Swift, everything is an object and this leads to one particular feature: every value can receive messages.
Each type can have multiple functions associated to it, which we call methods.
For example, talking about the 8 number value, we can call its isMultiple method, to check if the number is a multiple of another number:
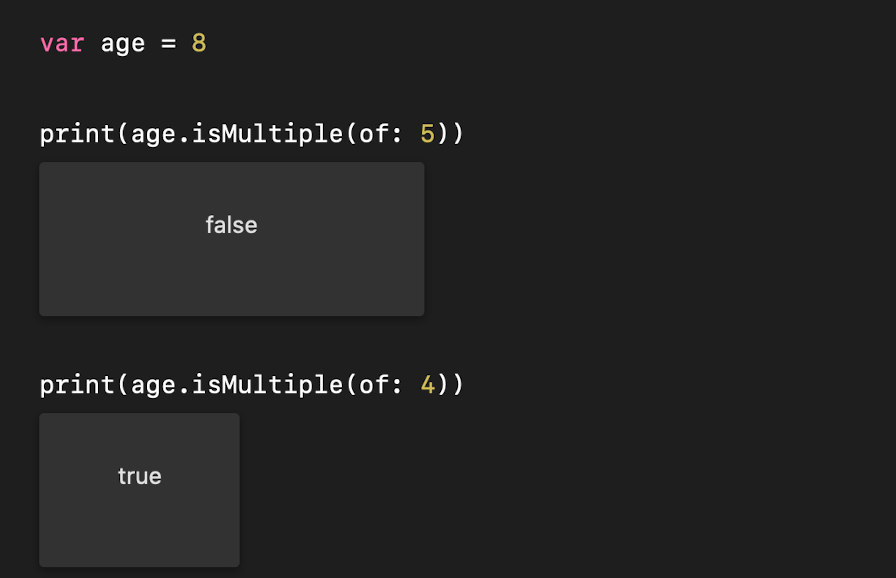
isMultiple method
A String value has another set of methods.
A type also has instance variables. For example the String type has the instance variable count, which gives you the number of characters in a string:
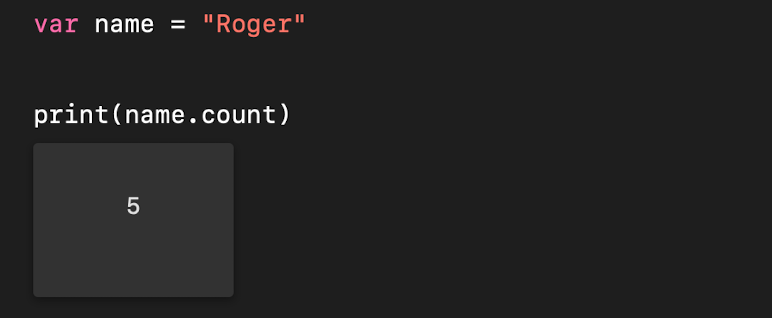 instance variable
 count
Swift has 3 different object types, which we'll see more in details later on: classes, structs and enums.
Those are very different, but they have one thing in common: to object type, we can add methods, and to any value, of any object type, we can send messages.
Operators in Swift
We can use a wide set of operators to operate on values.
We can divide operators in many categories. The first is the number of targets: 1 for unary operators, 2 for binary operators or 3 for the one and only ternary operator.
Then we can divide operators based on the kind of operation they perform:
- assignment operator
- arithmetic operators
- compound assignment operators
- comparison operators
- range operators
- logical operators
plus some more advanced ones, including nil-coalescing, ternary conditional, overflow, bitwise and pointwise operators.
Note: Swift allows you to create your own operators and define how operators work on your types you define.
Assignment operator in Swift
You use the assignment operator to assign a value to a variable:
var age = 8
Or to assign a variable value to another variable:
var age = 8
var another = age
Arithmetic operators in Swift
Swift has a number of binary arithmetic operators: +, -, *, / (division), % (remainder):
1 + 1 //2
2 - 1 //1
2 * 2 //4
4 / 2 //2
4 % 3 //1
4 % 2 //0
- also works as a unary minus operator:
let hotTemperature = 20
let freezingTemperature = -20
You can also use + to concatenate String values:
"Roger" + " is a good dog"
Compound assignment operators in Swift
The compound assignment operators combine the assignment operator with arithmetic operators:
+=-=*=/=%=
Example:
var age = 8
age += 1
Comparison operators in Swift
Swift defines a few comparison operators:
==!=><>=<=
You can use those operators to get a boolean value (true or false) depending on the result:
let a = 1
let b = 2

a == b //false
a != b //true
a > b // false
a <= b //true
Range operators in Swift
Range operators are used in loops. They allow us to define a range:
0...3 //4 times
0..<3 //3 times

0...count //"count" times
0..<count //"count-1" times
Here's a sample usage:
let count = 3
for i in 0...count {
  //loop body
}
Logical operators in Swift
Swift gives us the following logical operators:
!, the unary operator NOT&&, the binary operator AND||, the binary operator OR
Sample usage:
let condition1 = true
let condition2 = false

!condition1 //false

condition1 && condition2 //false
condition1 || condition2 //true
Those are mostly used in the if conditional expression evaluation:
if condition1 && condition2 {
  //if body
}
Conditionals in Swift
if statements in Swift
if statements are the most popular way to perform a conditional check. We use the if keyword followed by a boolean expression, followed by a block containing code that is run if the condition is true:
let condition = true
if condition == true {
    // code executed if the condition is true
}
An else block is executed if the condition is false:
let condition = true
if condition == true {
    // code executed if the condition is true
} else {
    // code executed if the condition is false
}
You can optionally wrap the condition validation into parentheses if you prefer:
if (condition == true) {
    // ...
}
And you can also just write:
if condition {
    // runs if `condition` is `true`
}
or
if !condition {
    // runs if `condition` is `false`
}
One thing that separates Swift from many other languages is that it prevents bugs caused by erroneously doing an assignment instead of a comparison. This means you can't do this:
if condition = true {
    // The program does not compile
}
The reason is that the assignment operator does not return anything, but the if conditional must be a boolean expression.
switch statements in Swift
Switch statements are a handy way to create a conditional with multiple options:
var name = "Roger"

switch name {
case "Roger":
    print("Hello, mr. Roger!")
default:
    print("Hello, \(name)")
}
When the code of a case ends, the switch exits automatically.
A switch in Swift needs to cover all cases. If the tag, name in this case, is a string that can have any value, we need to add a default case, mandatory.
Otherwise with an enumeration, you can simply list all the options:
enum Animal {
    case dog
    case cat
}

var animal: Animal = .dog

switch animal {
case .dog:
    print("Hello, dog!")
case .cat:
    print("Hello, cat!")
}
A case can be a Range:
var age = 20

switch age {
case 0..<18:
    print("You can't drive!!")
default:
    print("You can drive")
}
Ternary conditional operator in Swift
The ternary conditional operator is a shorter version of an if expression. It allows us to execute an expression if a condition is true, and another expression if the condition is false.
Here is the syntax:
`condition` ? `value if true` : `value if false`
Example:
let num1 = 1
let num2 = 2

let smallerNumber = num1 < num2 ? num1 : num2

// smallerNumber == 1
The syntax is shorter than an if statement, and sometimes it might make more sense to use it.
Loops in Swift
for-in loops in Swift
You can use for-in loops to iterate a specific amount of times, using a range operator:
for index in 0...3 {
  //iterate 4 times, `index` is: 0, 1, 2, 3
}
You can iterate over the elements of an array or set:
let list = ["a", "b", "c"]
for item in list {
  // `item` contains the element value
}
And on the elements of a dictionary:
let list = ["a": 1, "b": 2, "c": 2]
for (key, value) in list {
  // `key` contains the item key
  // `value` contains the item value
}
while loops in Swift
A while loop can be used to iterate on anything, and will run while the condition is true:
while [condition] {
    //statements...
}
The condition is checked at the start, before the loop block is executed.
Example:
var item = 0
while item <= 3 { //repeats 3 times
    print(item)
    item += 1
}
repeat-while loops in Swift
A repeat-while loop in Swift is similar to the while loop. But in this case the condition is checked at the end, after the loop block, so the loop block is executed at least once. Then the condition is checked, and if it is evaluated as true, the loop block is repeated:
repeat {
    //statements...
} while [condition]
Example:
var item = 0
repeat { //repeats 3 times
    print(item)
    item += 1
} while item < 3
continue and break statements in Swift
Swift provides you 2 statements that you can use to control the flow inside a loop: continue and break.
You use continue to stop the current iteration, and run the next iteration of the loop.
break ends the loop, not executing any other iteration.
Example:
let list = ["a", "b", "c"]
for item in list {
  if (item == "b") {
    break
  }
  //do something
}
How to Write Comments in Swift
A comment in Swift can take 2 forms: a single-line comment, and a multi-line comment.
A single-line comment looks like this:
//this is a comment
and and you can put it at the end of a line of code:
let a = 1 //this is a comment
A multi-line comment is written using this syntax:
/* this
 is
    a multi-line
 comment
*/
Swift allows you to nest multi-line comments:
/* this
 is
    a /* nested */ multi-line
 comment
*/
This is handy especially when commenting out large portions of code that already contain multi-line comments.
Semicolons in Swift
In Swift, semicolons are generally optional.
You can write statements on separate lines, and you don't need to add a semicolon:
let list = ["a", "b", "c"]
var a = 2
You can add a semicolon, but it adds nothing meaningful in this case:
let list = ["a", "b", "c"];
var a = 2;
But if you want to write more than one statement on the same line, then you need to add a semicolon:
var a = 2; let b = 3
Numbers in Swift
In Swift, numbers have 2 main types: Int and Double.
An Int is a number without decimal point. A Double is a number with decimal point.
Both use 64 bits, on modern computers that work with 64 bits, and 32 bit on 32-bit platforms.
The range of values they can store depends on the platform used, and can be retrieved using the int property of each type:
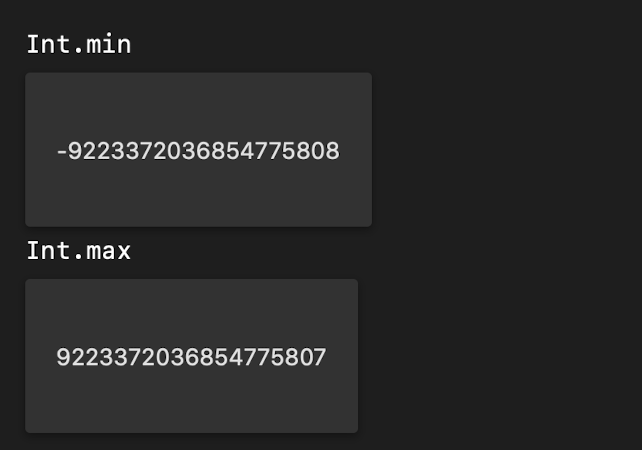 Range of int values
Then, in addition to Int and Double, we have lots of other numeric types. These were mostly used to interact with APIs built in the past and that needed to interact with C or Objective-C, and you must be aware that we have them:
Int8is an integer with 8 bitsInt16is an integer with 16 bitsInt32is an integer with 32 bitsInt64is an integer with 64 bitsUInt8is an unsigned integer with 8 bitsUInt16is an unsigned integer with 16 bitsUInt32is an unsigned integer with 32 bitsUInt64is an unsigned integer with 64 bitsUIntis likeInt, but unsigned, and it ranges from 0 toInt.max * 2.Floatis a decimal number with 32 bits.
Then using Cocoa APIs you might use other numeric types like CLong, CGFloat, and more.
You will always use Int or Double in your code, and use those specific types only in particular cases.
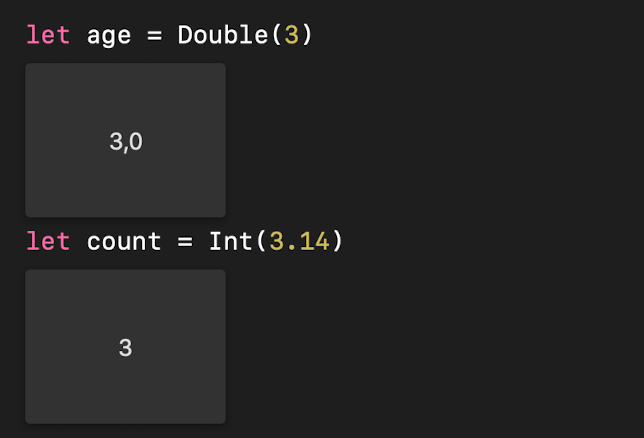
Remember that you can always convert any of those types to Int and Double types, instantiating a number passing the value inside parentheses to Double() or Int():
let age : UInt8 = 3
let intAge = Int(age)
You can also convert a number from Double to Int:
let age = Double(3)
let count = Int(3.14)
 How to convert a number from
 Double to Int
Strings in Swift
Strings are one of the most popular tools in programming.
In Swift, you can define a string using the string literal syntax:
let name = "Roger"
We use double quotes. Single quotes are not valid string delimiters.
A string can span over multiple lines using 3 double quotes:
let description = """
    a long
      long
          long description
    """
You can use string interpolation to embed an expression in a string:
let age = 8

let name = """
    Roger, age \(age)
    Next year he will be \(age + 1)
    """
You can concatenate two strings with the + operator:
var name = "Roger"
name = name + " The Dog"
And you can append text to a string with the += operator:
var name = "Roger"
name += " The Dog"
Or using the append(_:) method:
var name = "Roger"
name.append(" The Dog")
You can count the characters in a string using the count string property:
let name = "Roger"
name.count //5
Any string comes with a set of useful methods, for example:
removeFirst()to remove the first characterremoveLast()to remove the last characterlowercased()to get a new string, lowercaseduppercased()to get a new string, uppercasedstarts(with:)which returns true if the string starts with a specific substringcontains()which returns true if the string contains a specific character
and many, many more.
When you need to reference an item in the string, since strings in Swift are unicode, we can't simply reference the letter o in let name = "Roger" using name[1]. You need to work with indexes.
Any string provides the starting index with the startIndex property:
let name = "Roger"
name.startIndex //0
To calculate a specific index in the string, you calculate it using the index(i:offsetBy:) method:
let name = "Roger"
let i = name.index(name.startIndex, offsetBy: 2)
name[i] //"g"
You can also use the index to get a substring:
let name = "Roger"
let i = name.index(name.startIndex, offsetBy: 2)
name.suffix(from: i) //"ger"

//Or using the subscript:

name[i...] //"ger"
When you get a substring from a string, the type of the result is Substring, not String.
let name = "Roger"
let i = name.index(name.startIndex, offsetBy: 2)
print(type(of: name.suffix(from: i)))
//Substring
Substrings are more memory efficient, because you do not get a new string, but the same memory structure is used behind the scenes. But you need to be careful when you deal with strings a lot, as there are optimizations you can implement.
Strings are collections, and they can be iterated over in loops.
Booleans in Swift
Swift provides the Bool type, which can have two values: true and false.
var done = false
done = true
Booleans are especially useful with conditional control structures like if statements or the ternary conditional operator:
var done = true

if done == true {
    //code
}
Arrays in Swift
We use arrays to create a collection of items.
In this example we create an array holding 3 integers:
var list = [1, 2, 3]
We can access the first item using the syntax list[0], the second using list[1], and so on.
Elements in an array in Swift must have the same type.
The type can be inferred if you initialize the array at declaration time, like in the case above.
Otherwise the type of values an array can include must be declared, in this way:
var list: [Int] = []
Another shorthand syntax is:
var list = [Int]()
You can also explicitly declare the type at initialization, like this:
var list: [Int] = [1, 2, 3]
A quick way to initialize an array is to use the range operator:
var list = Array(1...4) //[1, 2, 3, 4]
To get the number of items in the array, use the count property:
var list = [1, 2, 3]
list.count //3
If an array is empty, its isEmpty property is true.
var list = [1, 2, 3]
list.isEmpty //false
You can append an item at the end of the array using the append() method:
var list: [Int] = [1, 2, 3]
list.append(4)
or you can insert an item at any position of the array using insert(newElement: <Type> at: Int):
var list: [Int] = [1, 2, 3]
list.insert(17, at: 2)
//list is [1, 2, 17, 3]
An array must be declared as var to be modified. If it's declared with let, you cannot modify it by adding or removing elements.
To remove one item from the array, use remove(at:) passing the index of the element to remove:
var list: [Int] = [1, 2, 3]
list.remove(1)
//list is [1, 3]
removeLast() and removeFirst() are two handy ways to remove the last and first element.
To remove all items from the array, you can use removeAll() or you can assign an empty array:
var list: [Int] = [1, 2, 3]
list.removeAll()
//or
list = []
The sort() method sorts the array:
var list = [3, 1, 2]
list.sort()
//list is [1, 2, 3]
There are a lot more methods, but those are the basic ones.
Arrays are equal when they contain the same elements, of the same type:
[1, 2, 3] == [1, 2, 3] //true
Arrays are passed by value, which means if you pass an array to a function, or return it from a function, the array is copied.
Arrays are collections, and they can be iterated over in loops.
Sets in Swift
You use sets to create collections of non-repeated items.
While an array can contain many times the same item, you only have unique items in a set.
You can declare a set of Int values in this way:
let set: Set<Int> = [1, 2, 3]
or you can initialize it from an array:
let set = Set([1, 2, 3])
You can add items to the set using insert():
var set = Set([1, 2, 3])
set.insert(17)
Unlike arrays, there is no order or position in a set. Items are retrieved and inserted randomly.
The way to print the content of a set so it's ordered is to transform it into an array using the sorted() method:
var set = Set([2, 1, 3])
let orderedList = set.sorted()
To check if a set contains an element, use the contains() method:
var set = Set([1, 2, 3])
set.contains(2) //true
To get the number of items in the set, use the count property:
let set = Set([1, 2, 3])
set.count //3
If a set is empty, its isEmpty property is true.
let set = Set([1, 2, 3])
set.isEmpty //false
To remove one item from the array, use remove() passing the value of the element:
var set = Set([1, 2, 3])
set.remove(1)
//set is [2, 3]
To remove all items from the set, you can use removeAll():
set.removeAll()
Sets, like arrays, are passed by value. This means that if you pass it to a function, or return it from a function, the set is copied.
Sets are great to perform set math operations like intersection, union, subtracting, and more.
These methods help with this:
intersection(_:)symmetricDifference(_:)union(_:)subtracting(_:)isSubset(of:)isSuperset(of:)isStrictSubset(of:)isStrictSuperset(of:)isDisjoint(with:)
Sets are collections, and they can be iterated over in loops.
Dictionaries in Swift
We use dictionaries to create a collection of key-value pairs.
Here is how to create a dictionary with 1 key-value pair, where the key is a String and the value is an Int:
var dict = ["Roger": 8, "Syd": 7]
In this case the type is inferred. You can also explicitly set the type at declaration time:
var dict: [String: Int] = ["Roger": 8, "Syd": 7]
In this example we create an empty dictionary of Int keys and String values:
var dict = [String: Int]()

//or

var dict: [String: Int] = [:]
You can access the value assigned to a key using this syntax:
var dict = ["Roger": 8, "Syd": 7]

dict["Roger"] //8
dict["Syd"] //7
You can change the value assigned to a key in this way:
dict["Roger"] = 9
A dictionary must be declared as var to be modified. If it's declared with let, you cannot modify it by adding or removing elements.
Use the same syntax to add a new key/value pair:
dict["Tina"] = 4
To remove a key/value pair, assign the value to nil:
dict["Tina"] = nil
Or call the removeValue(forKey:) method:
dict.removeValue(forKey: "Tina")
To get the number of items in the dictionary, use the count property:
var dict = ["Roger": 8, "Syd": 7]
dict.count //2
If a dictionary is empty, its isEmpty property is true.
var dict = [String: Int]()
dict.isEmpty //true
There are a lot of methods related to dictionaries, but those are the basic ones.
Dictionaries are passed by value, which means if you pass it to a function, or return it from a function, the dictionary is copied.
Dictionaries are collections, and they can be iterated over in loops.
Tuples in Swift
You use tuples to group multiple values into a single collection. For example you can declare a variable dog containing a String and an Int value:
let dog : (String, Int)
And you can initialize them with a name and an age
let dog : (String, Int) = ("Roger", 8)
But as with any other variable, the type can be inferred during initialization:
let dog = ("Roger", 8)
You can use named elements:
let dog = (name: "Roger", age: 8)

dog.name //"Roger"
dog.age //8
Once a tuple is defined, you can decompose it to individual variables in this way:
let dog = ("Roger", 8)
let (name, age) = dog
and if you need to just get one of the values, you can use the special underscore keyword to ignore the other ones:
let dog = ("Roger", 8)
let (name, _) = dog
Tuples are an awesome tool for various needs.
The most obvious one is that they're a short way to group similar data.
Another one of those needs is returning multiple items from a function. A function can only return a single item, so a tuple is a convenient structure for that.
Another handy functionality allowed by tuples is swapping elements:
var a = 1
var b = 2

(a, b) = (b, a)

//a == 2
//b == 1
Optionals and nil in Swift
Optionals are one key feature of Swift.
When you don't know if a value will be present or absent, you declare the type as an optional.
The optional wraps another value with its own type. Or maybe not.
We declare an optional by adding a question mark after its type, like this:
var value: Int? = 10
Now value is not an Int value. It's an optional wrapping an Int value.
To find out if the optional wraps a value, you must unwrap it.
You do so using an exclamation mark:
var value: Int? = 10
print(value!) //10
Swift methods often return an optional. For example the Int type initializer accepts a string, and returns an Int optional:
 Int type initializer takes in a string and returns an int optional
This is because it does not know if the string can be converted to a number.
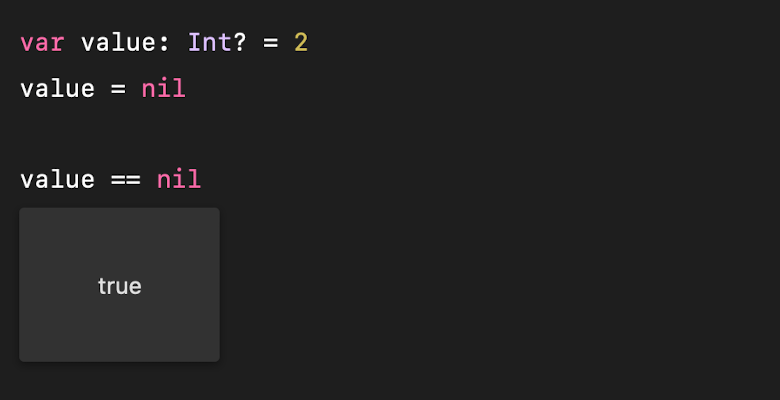
If the optional does not contain a value, it evaluates as nil, and you cannot unwrap it:
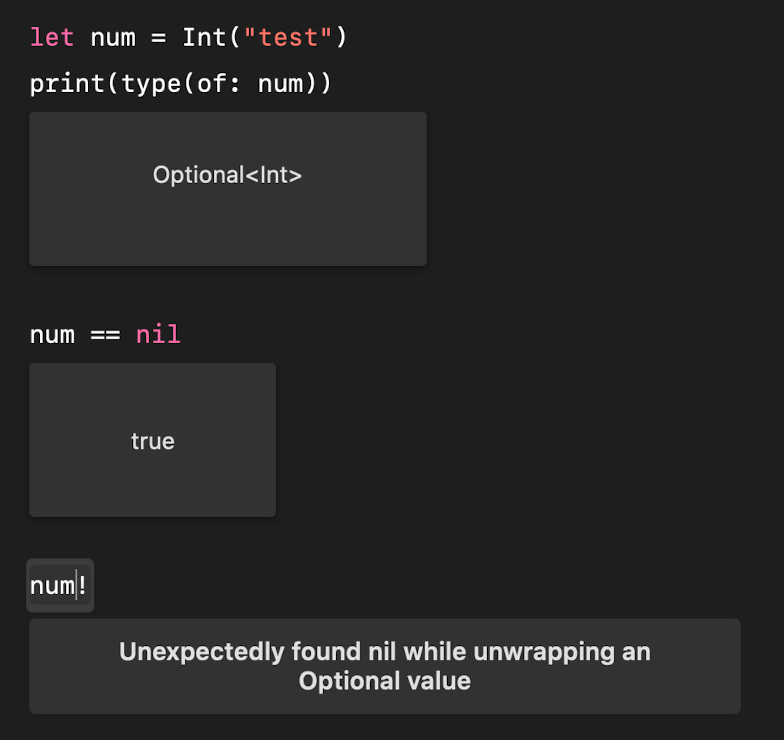 Evaluating to
 nil
nil is a special value that cannot be assigned to a variable. Only to an optional:
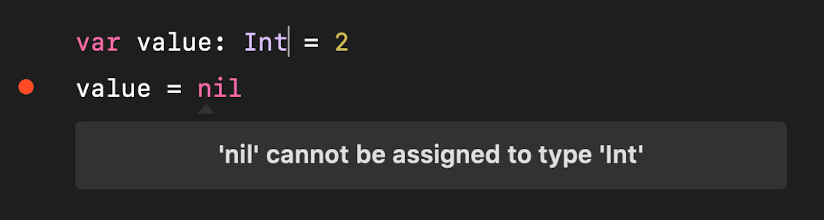 You can only assign
 nil to an optional (not an int)
You typically use if statements to unwrap values in your code, like this:
var value: Int? = 2

if let age = value {
    print(age)
}
Enumerations in Swift
Enumerations are a way to group a set of different options under a common name.
Example:
enum Animal {
    case dog
    case cat
    case mouse
    case horse
}
This Animal enum is now a type.
A type whose value can only be one of the cases listed.
If you define a variable of type Animal:
var animal: Animal
you can later decide which value to assign it using this syntax:
var animal: Animal
animal = .dog
We can use enumerations in control structures like switches:
enum Animal {
    case dog
    case cat
    case mouse
    case horse
}

let animal = Animal.dog

switch animal {
case .dog: print("dog")
case .cat: print("cat")
default: print("another animal")
}
Enumeration values can be strings, characters, or numbers.
You can also define an enum on a single line:
enum Animal {
    case dog, cat, mouse, horse
}
And you can also add type declaration to the enumeration, and each case has a value of that type assigned:
enum Animal: Int {
    case dog = 1
    case cat = 2
    case mouse = 3
    case horse = 4
}
Once you have a variable, you can get this value using its rawValue property:
enum Animal: Int {
    case dog = 1
    case cat = 2
    case mouse = 3
    case horse = 4
}

var animal: Animal
animal = .dog

animal.rawValue //1
Enumerations are a value type. This means they are copied when passed to a function, or when returned from a function. And when we assign a variable pointing to an enumeration to another variable.
Structures in Swift
Structures are an essential Swift concept.
Structures are everywhere in Swift. Even the built-in types are structures.
We can create instances of structures, which we call objects.
In most languages, objects can only be created from classes. Swift has classes, too, but you can create objects also from structures. The official documentation actually advises that you should prefer structures because they are easier to use.
Structures are a light versions of classes.
A struct can:
- have properties
- have methods (functions)
- define subscripts
- define initializers
- conform to protocols
- be extended
One important thing classes allow is inheritance, so if you need that, you have classes.
A struct is defined using this syntax:
struct Dog {

}
Inside a structure you can define stored properties:
struct Dog {
    var age = 8
    var name = "Roger"
}
This structure definition defines a type. To create a new instance with this type, we use this syntax:
let roger = Dog()
Once you have an instance, you can access its properties using the dot syntax:
let roger = Dog()
roger.age
roger.name
The same dot syntax is used to update a property value:
roger.age = 9
You can also create a struct instance by passing the values of the properties:
let syd = Dog(age: 7, name: "Syd")
syd.age
syd.name
To do so, properties must be defined variables with var, not as constants (with let). It's also important to respect the order those properties are defined.
Structures can have instance methods: functions that belong to an instance of a structure.
struct Dog {
    var age = 8
    var name = "Roger"
    func bark() {
        print("\(name): wof!")
    }
}
And we also have type methods:
struct Dog {
    var age = 8
    var name = "Roger"
    func bark() {
        print("\(name): wof!")
    }
    static func hello() {
        print("Hello I am the Dog struct")
    }
}
This is invoked as Dog.hello().
Structures are a value type. This means they are copied when passed to a function, or when returned from a function. And when we assign a variable pointing to a structure to another variable.
This also means that if we want to update the properties of a structure we must define it using var and not let.
All types in Swift are defined as structures: Int, Double, String, arrays and dictionaries, and more are structures.
Classes in Swift
Classes are a bit similar to structures, but they have some key differences.
A class is defined using this syntax:
class Dog {

}
Inside a class you can define stored properties:
class Dog {
    var age = 0
}
A class definition defines a type. To create a new instance with this type, we use this syntax:
let roger = Dog()
Once you have an instance, you can access its properties using the dot syntax:
let roger = Dog()
roger.age
You use the same dot syntax to update a property value:
roger.age = 9
One big difference is that classes are reference types. Structures (and enumerations) are value types.
This means that assigning a class instance to another variable does not copy the instance. Both variables point to the same instance:
class Dog {
    var age = 0
}

let roger = Dog()
let syd = roger

roger.age = 9
//syd.age == 9
This also means we can define a reference to a class using let, and we can change its properties, as you saw in the example above.
We can create instances of classes, and we call them objects.
As with structs, classes can have properties, methods, and more.
Contrary to structs, we must define an initializer in order to initialize the values when we create an instance:
class Dog {
    var age : Int

    init(age: Int) {
        self.age = age
    }
}

let roger = Dog(age: 9)
You can only declare properties without initializing them if you have an initializer.
See the use of self. We need it because age is both an instance property and the init(age:) method parameter. self.age references the age instance property.
Classes can have instance methods: functions that belong to an instance of a class.
class Dog {
    var age = 8
    var name = "Roger"

    func bark() {
      print("\(name): wof!")
    }
}
And we also have type methods:
class Dog {
    var age = 8
    var name = "Roger"

    func bark() {
        print("\(name): wof!")
    }
    static func hello() {
        print("Hello I am the Dog struct")
    }
}
Invoked as Dog.hello().
One important thing classes allow is inheritance.
A class can inherit all the properties and methods from another class.
Say we have a class Animal. Every animal has an age:
class Animal {
    var age: Int
}
Not every animal has a name. Dogs have a name. So we create a Dog class extending from Animal:
class Dog: Animal {
    var name: String
}
Now we must add an initializer for both classes. In the Dog case, after we do the class-specific initialization, we can call the parent class initializer using super.init():
class Animal {
    var age: Int

    init(age: Int) {
        self.age = age
    }
}

class Dog: Animal {
    var name: String

    init(age: Int, name: String) {
        self.name = name
        super.init(age: age)
    }
}

var horse = Animal(age: 8)
var roger = Dog(age: 8, name: "Roger")
Animal is now a superclass, and Dog is a subclass.
There's more to say about classes, but this is a good introduction.
Functions in Swift
Your program's code is organized into functions.
You can declare a function using the func keyword:
func bark() {
    print("woof!")
}
Functions can be assigned to structures, classes and enumerations, and in this case we call them methods.
A function is invoked using its name:
bark()
A function can return a value:
func bark() -> String {
    print("woof!")
      return "barked successfully"
}
And you can assign it to a variable:
let result = bark()
A function can accept parameters. Each parameter has a name and a type:
func bark(times: Int) {
    for index in 0..<times {
        print("woof!")
    }
}
The name of a parameter is internal to the function.
We use the name of the parameter when we call the function to pass in its value:
bark(times: 3)
When we call the function we must pass all the parameters defined.
Here is a function that accepts multiple parameters:
func bark(times: Int, repeatBark: Bool) {
    for index in 0..<times {
        if repeatBark == true {
            print("woof woof!")
        } else {
            print("woof!")
        }
    }
}
In this case you call it in this way:
bark(times: 3, repeat: true)
When we talk about this function, we don't call it bark(). We call it bark(times:repeat:).
This is because we can have multiple functions with the same name, but different set of parameters.
You can avoid using labels by using the _ keyword:
func bark(_ times: Int, repeatBark: Bool) {
    //...the function body
}
So you can invoke it in this way:
bark(3, repeat: true)
It's common in Swift and iOS APIs to have the first parameter with no label, and the other parameters labeled.
It makes for a nice and expressive API, when you design the names of the function and the parameters nicely.
You can only return one value from a function. If you need to return multiple values, it's common to return a tuple:
func bark() -> (String, Int) {
    print("woof!")
      return ("barked successfully", 1)
}
And you can assign the result to a tuple:
let (result, num) = bark()

print(result) //"barked successfully"
print(num) //1
You can nest functions inside other functions. When this happens, the inner function is invisible to outside the outer function.
Protocols in Swift
A protocol is a way to have different objects, of different types, have a common set of functionalities.
You define a protocol like this:
protocol Mammal {

}
Structs and classes can adopt a protocol in this way:
struct Dog: Mammal {

}

class Cat: Mammal {

}
A protocol can define properties and methods, without providing values and implementations, and a struct/class must implement them:
protocol Mammal {
    var age: Int { get set }
    func walk()
}
The property can be defined as get or get set. If it's get, the property must be implemented as read only, with a getter.
Any type that adopts the protocol must conform to the protocol by implementing those methods or providing those properties:
struct Dog: Mammal {
    var age: Int = 0
    func walk() {
        print("The dog is walking")
    }
}

class Cat: Mammal {
    var age: Int = 0
    func walk() {
        print("The cat is walking")
    }
}
Structs and classes can adopt multiple protocols:
struct Dog: Mammal, Animal {

}

class Cat: Mammal, Animal {

}
Notice that for classes, this is the same syntax used to define a superclass. If there is a superclass, list it as the first item in the list, after the colon.
Where to Go From Here
I hope this little handbook was useful in shining a light on how to get started with Swift. And I hope you are now interested to learn more about it!
I can now point you to a few places to learn more:
You can get a PDF and ePub version of this Swift Beginner's Handbook here.