
Modules and Module Bundlers are essential components of modern web development. But understanding how they work can quickly become overwhelming.
This article will show you all you need to know about ES Modules and Module Bundlers in plain English.
Table of Contents
- What Exactly Is a JavaScript Module?
- Why Use Modules?
- Common Types of Module Systems in JavaScript
- How to Convert a JavaScript File into a Module
- How to Use an ES Module
- How to Export a Module's Code
- How to Import Exported Code
- How to Use a Module's Imported Code
- How to Rename Exports and Imports in ES Modules
- Why Rename a Module's Code?
- How to Rename Multiple Exports in an ES Module
- How to Rename Multiple Imports in an ES Module
- How to Import All Exportable Items from an ES Module in One Go
- How to Export Anonymously to an ES Module
- What Exactly Is an Aggregator File?
- Project: How to Use an Aggregator File
- How to Use the
import()Syntax to Load a Module Dynamically - What Exactly Is
import.metain ES Modules? - Quick Review of Modules So Far
- What Is a Module Bundler?
- Why Do You Need a Module Bundler?
- How Does a Module Bundler Work?
- How to Use Webpack
- How to Make Webpack Auto-Generate Your App's HTML File
- How to Make
HtmlWebpackPluginUse Your Source File as a Template to Auto-Generate a New HTML Page - Important Stuff to Know about Updating Your App
- How to Rerun Webpack Automatically
- How to Reload the Browser Automatically
- What Exactly Is Webpack's Configuration File?
- Common Webpack Configuration Options
- Overview
So, without any further ado, let's get started with modules.
What Exactly Is a JavaScript Module?
A JavaScript module is a file that allows you to export its code. This allows other JavaScript files to import and use the exported code as their dependencies.
Specifically, a module is simply a JavaScript file that allows you to share its code with other files within your project (or with the world through package managers like Yarn and NPM).
Why Use Modules?
In its early days, people used JavaScript mainly for trivial scripting tasks like providing bits and pieces of interactivity to web pages where needed. In other words, developers predominately used JavaScript to write small scripts—not large ones.
Today, however, JavaScript has grown into a vast scripting tool capable of doing a lot more than just making web pages interactive.
It is now the norm to have large JavaScript code used for diverse functions like server-side website development, game development, and mobile app development.
Since JavaScript can be used for virtually any programming task, a need arose to share scripts between a project's files and the world.
So the JavaScript community developed the module system to allow developers to share their scripts on demand.
Common Types of Module Systems in JavaScript
Below are some of the popular module systems in JavaScript:
Note: ES modules are sometimes called "JS modules" or "ECMAScript modules".
Amongst the module systems listed above, the ES module system is the official standard for JavaScript.
The remaining three (AMD, CommonJS, and UMD) were created by various developers when JavaScript did not have a standardized module system.
However, since ES module's appearance in the 2015 ECMAScript standard, the previous module systems have gradually become part of JavaScript's history.
Therefore, this article will focus on showing you how ES modules work.
First, though, it is essential to know how to convert a JavaScript file into a module. So, let's discuss that below.
How to Convert a JavaScript File into a Module
To convert a JavaScript file to an ES module, do the following:
Step 1: Create a project directory
Create a project folder—where this project's HTML and JavaScript files will reside.
Step 2: Create your code files
Create the following files inside your project folder:
index.htmlindex.js
Step 3: Add your JavaScript file to your HTML document
Open your index.html file and replicate the code below:
<!DOCTYPE html>
<html>
  <head>
    <meta charset="UTF-8">
    <meta name="viewport" content="width=device-width, initial-scale=1.0">
    <title>ES Module - CodeSweetly</title>
  </head>
  <body>
    <h1>ES Module Tutorial</h1>

    <!-- Add the "index.js" JavaScript file to this HTML document -->
    <script type="module" src="index.js"></script>
  </body>
</html>
In the HTML snippet above, we used the <script>'s type="module" attribute to convert the index.js JavaScript file to an ES module.
So, now that we know how to convert a JavaScript file into a module, let's see how to use one.
How to Use an ES Module
Follow the steps below to learn how to use an ES module.
Step 1: Create a project directory
Create a project folder—where this project's HTML and module files will reside.
Step 2: Create your code files
Create the following files inside your project folder:
index.htmlmodule-1.jsmodule-2.js
Step 3: Add the modules to your HTML document
Open your index.html file and replicate the code below:
<!DOCTYPE html>
<html>
  <head>
    <meta charset="UTF-8">
    <meta name="viewport" content="width=device-width, initial-scale=1.0">
    <title>ES Module - CodeSweetly</title>
  </head>
  <body>
    <h1>ES Module Tutorial</h1>
    <h2>Check the console</h2>

    <script type="module" src="module-1.js"></script>
    <script type="module" src="module-2.js"></script>
  </body>
</html>
Here are the main things we did in the HTML snippet above:
- We added the two JavaScript files to our HTML document.
- We used the
type="module"attribute to convert the regular JavaScript files to ES module files.
Note that JavaScript defers ES modules automatically. So, you do not need to use a defer attribute in your module's <script> element.
Also, the computer will execute a module only once—regardless of the number of <script> tags you use to reference it.
Step 4: View your app
Open your index.html file in any browser to see the current state of your app.
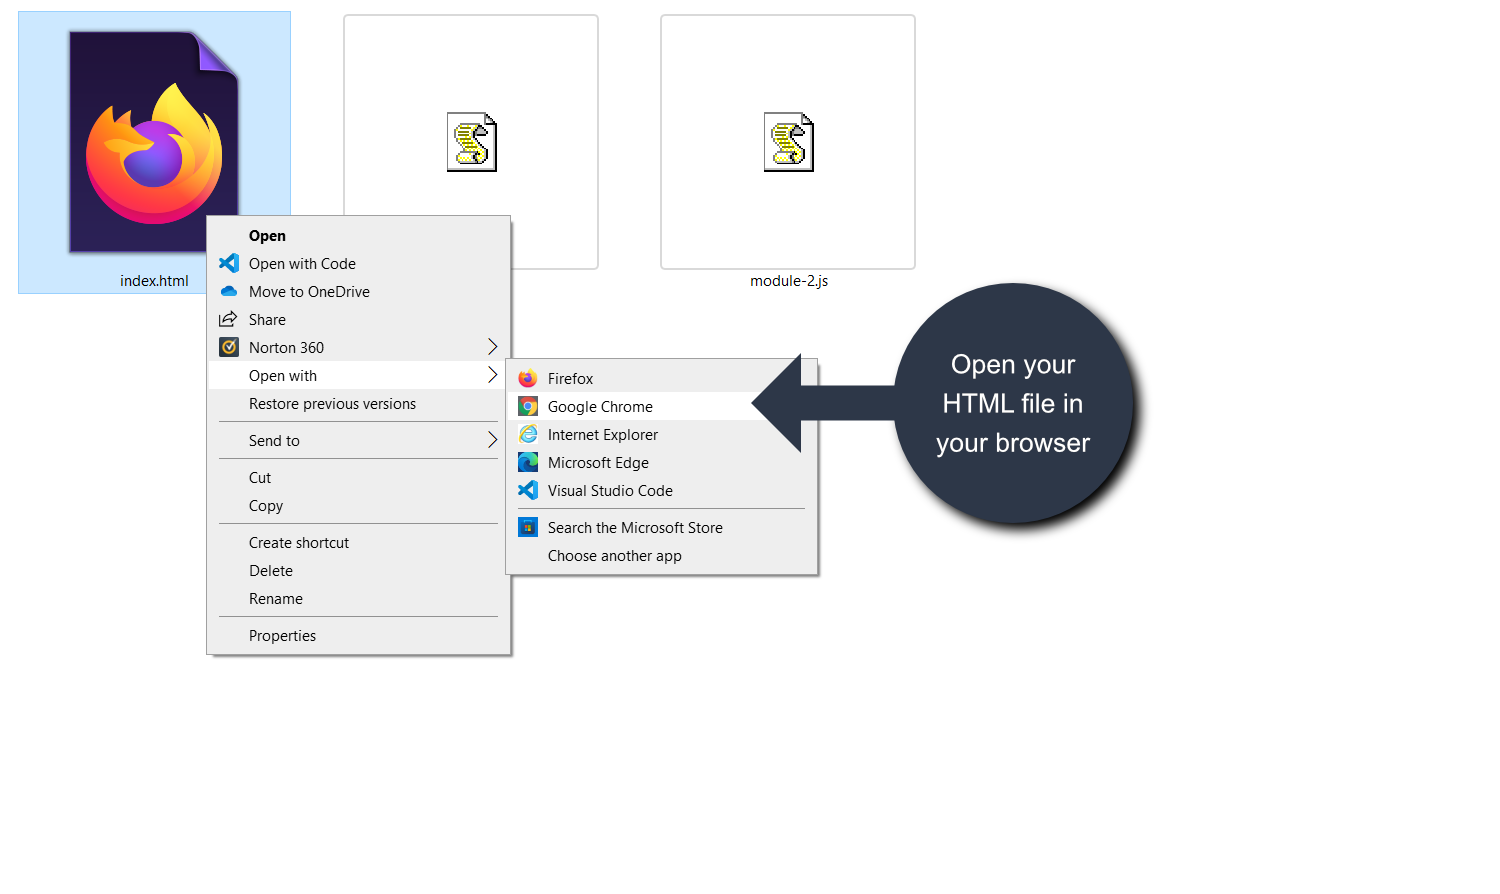 Opening an index.html file in a Chrome browser
Once opened, if you inspect your browser's console, you will see some error messages.
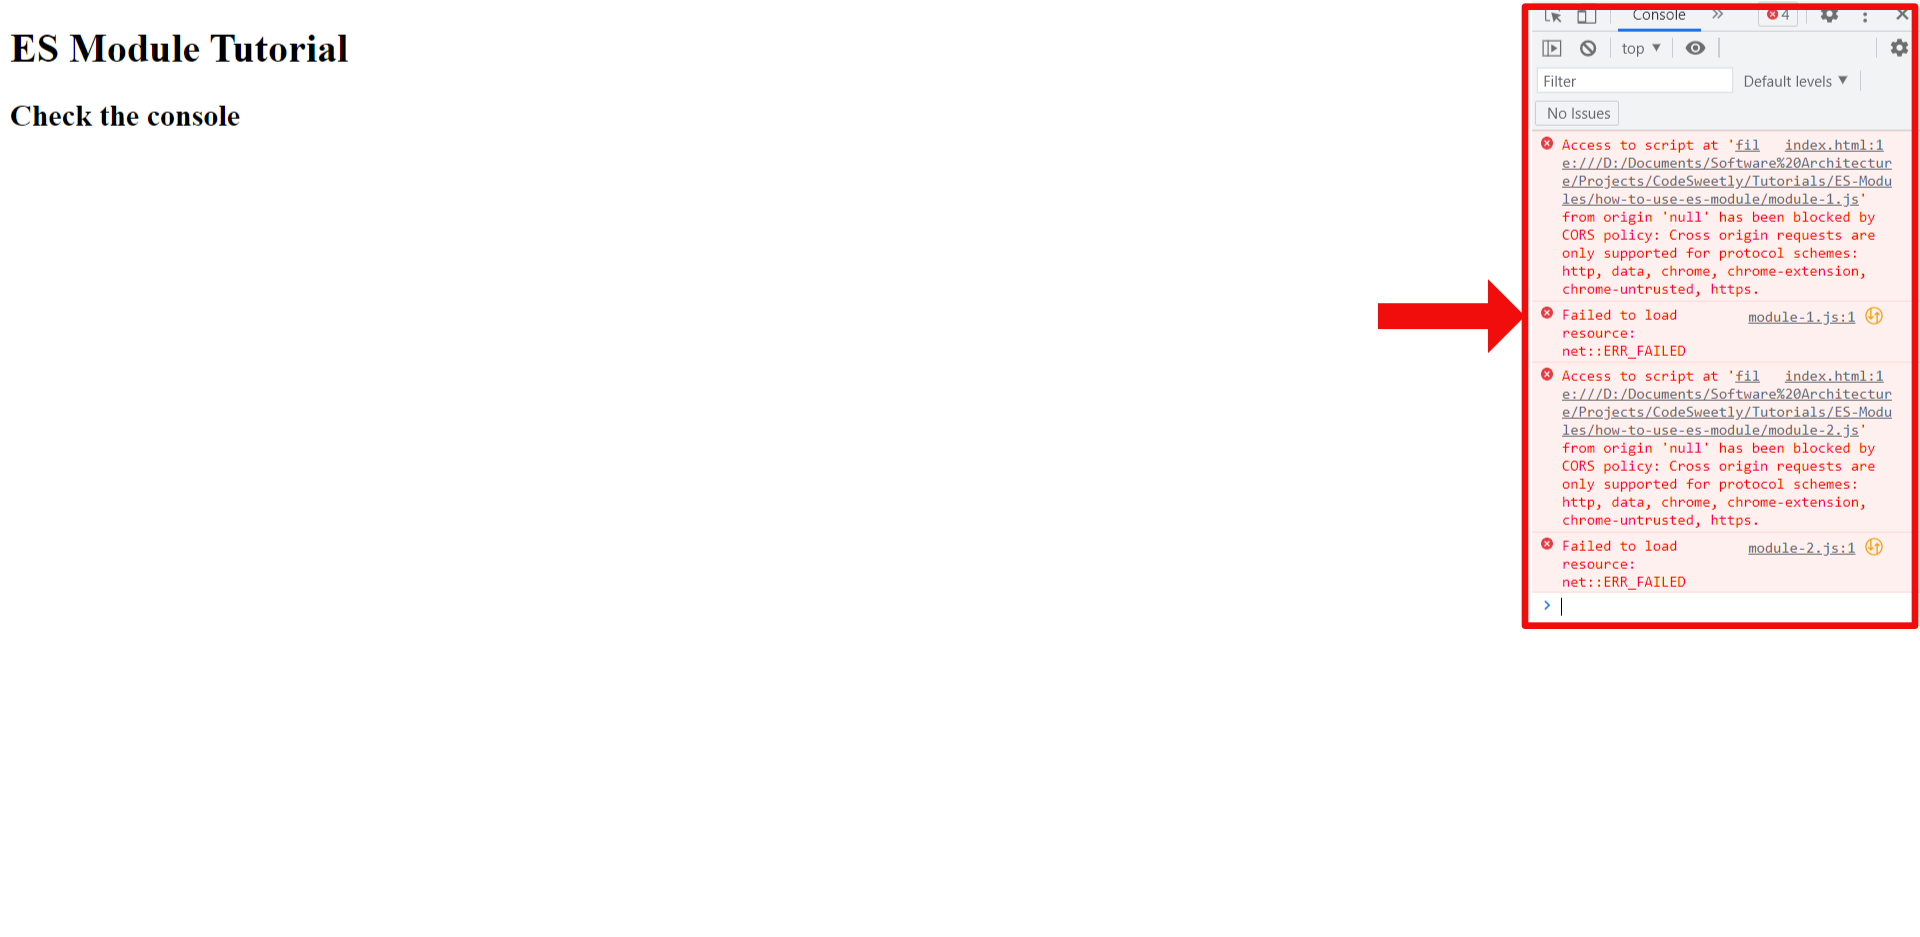 Inspecting a Chrome browser's console
The browser threw a CORS policy error because ES modules only work through http:// and https:// URLs—not locally via a file:// URL.
In other words, since our HTML file contains two ES modules, we need to load the document via an http:// scheme.
The two typical ways to load an HTML document via an http:// scheme are:
- By using a Local Server, or
- Through the use of a Module Bundler
We will discuss Module Bundlers in detail later on in this article. For now, though, let's see how to use a local server to load the index.html file via an http:// scheme.
How to run an HTML file through a local server
The steps below will show you how to use a VS Code local server extension to run your HTML file.
Note: Suppose your code editor is Atom or Sublime Text. In that case, follow the links below to learn how to install a local server plugin.
1. Add your project folder to VSCode's workspace
 Adding a project folder to VSCode's workspace
2. Install a local server (Live Server by Ritwick Dey)
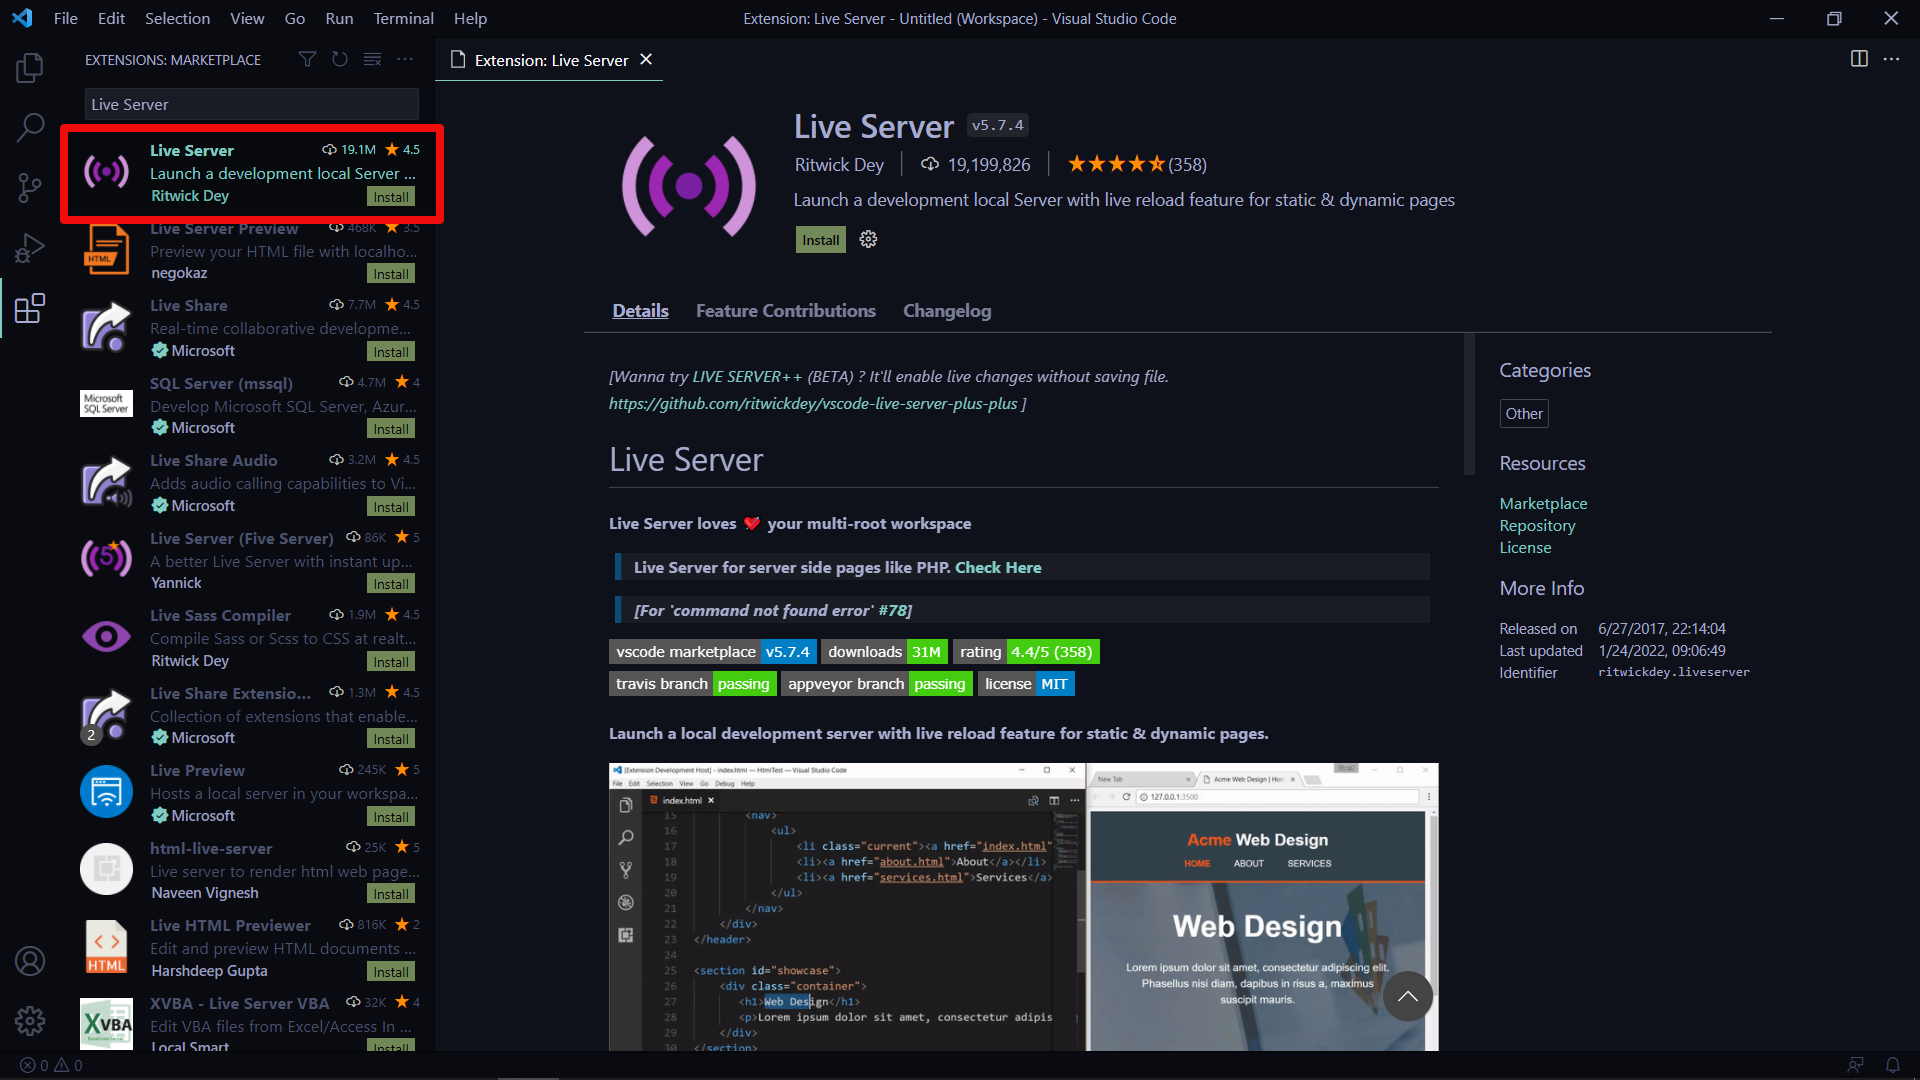 Installing the VSCode Live Server by Ritwick Dey
3. Open your HTML file in the code editor
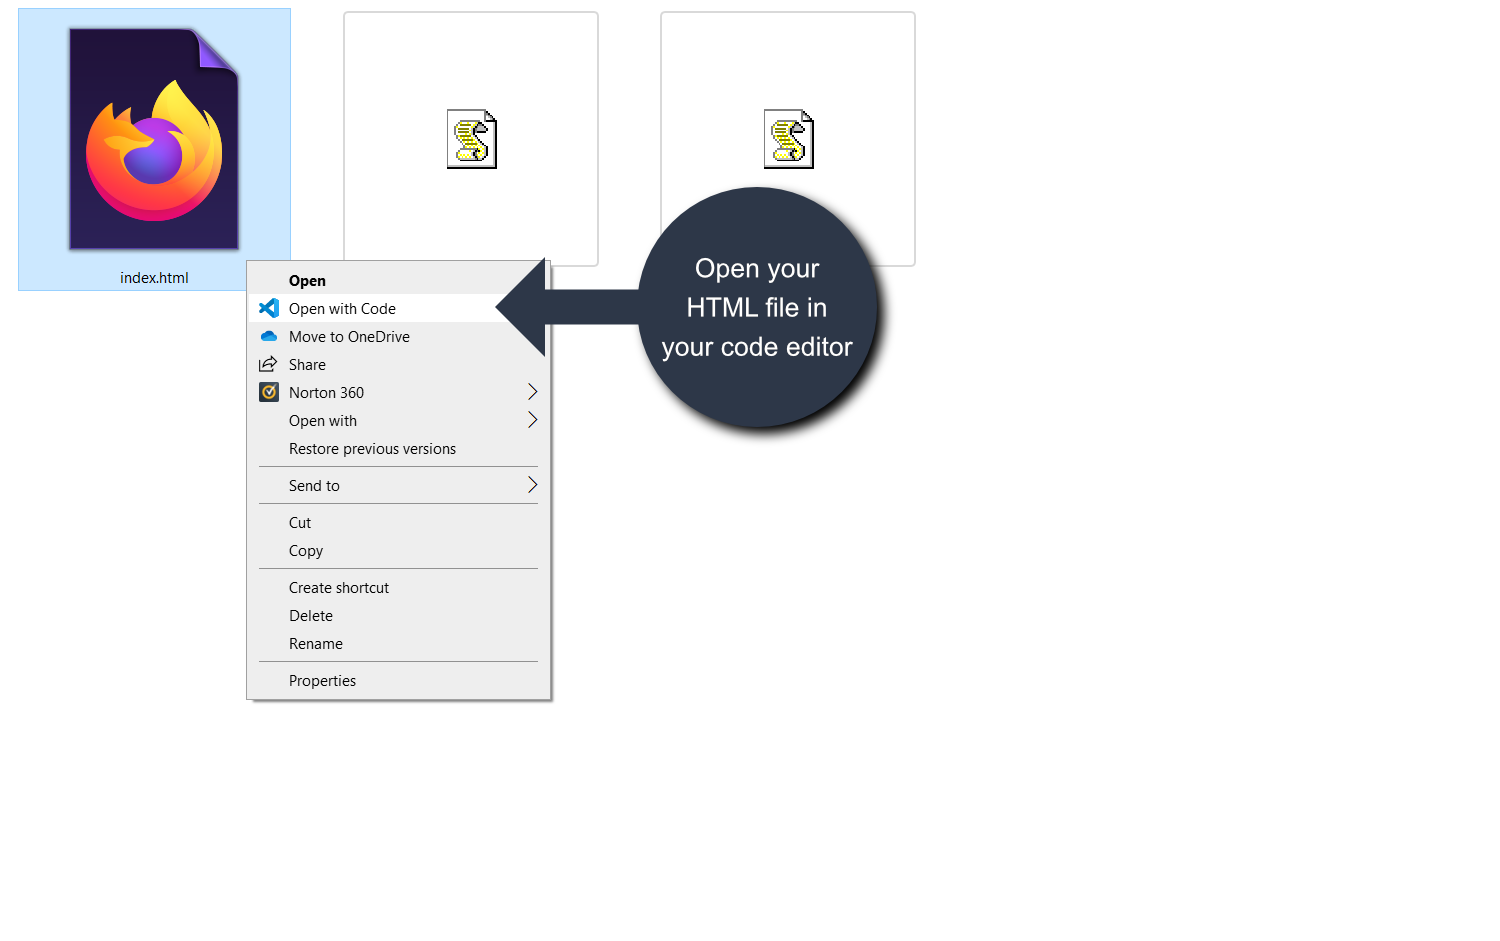 Opening HTML file in VSCode editor
4. Use Live Server to run the HTML file in your default browser
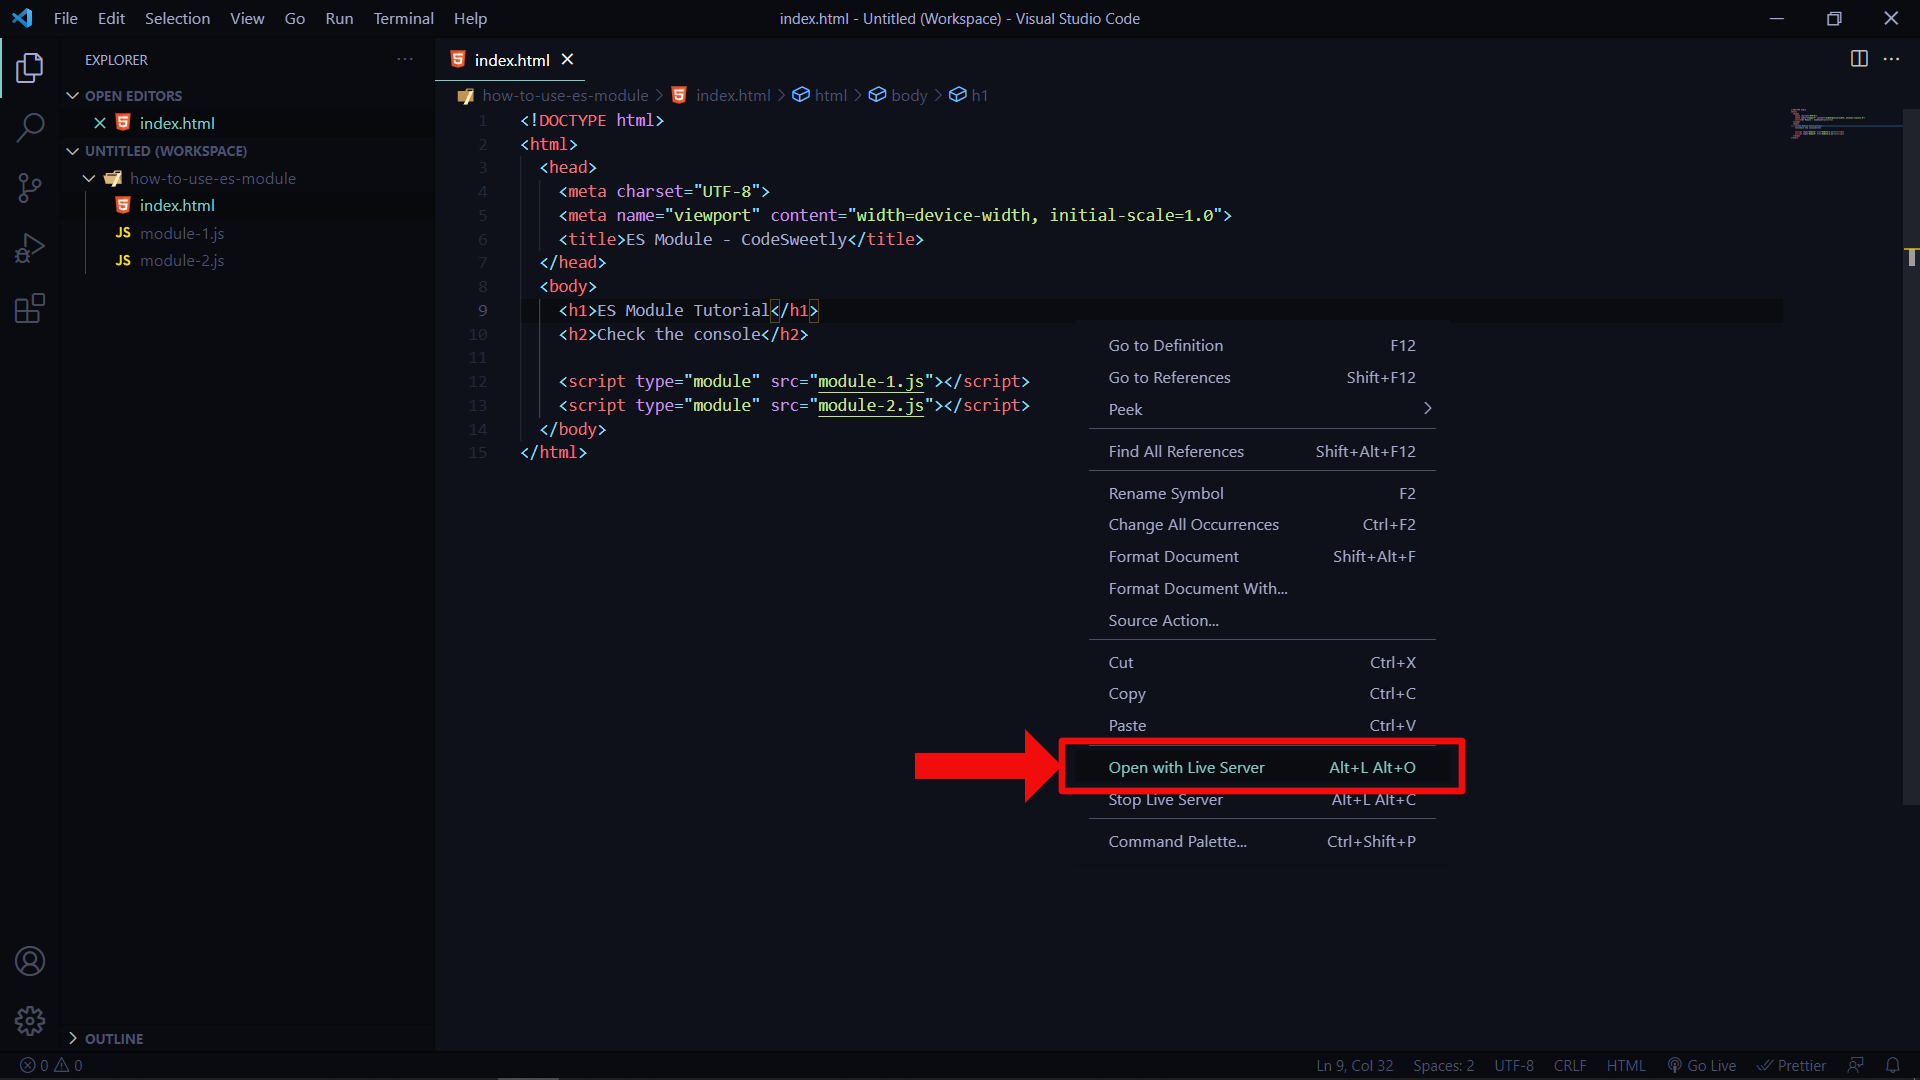 Opening the project's HTML file with Live Server
Your app should now load with the http:// scheme—without any CORS error in your browser's console.
Some things to note:
- Suppose you did not add your project folder to VSCode's workspace (step 1). In that case, the Live Server might not load your file correctly.
- Live Server will auto-reload your browser whenever you save any changes to your HTML file.
- Suppose you wish to stop the Live Server. In that case, right-click on the HTML editor page and click on "Stop Live Server".
- JavaScript modules operate in strict mode by default. As such, you must abide by JavaScript's strict syntax rules. Otherwise, your program might malfunction.
So, now that you've converted your JavaScript file to an ES module, you can begin to use the export and import keywords to share your modules' code. Let's discuss how below.
How to Export a Module's Code
There are two equivalent ways to export a module's item.
- Place an
exportkeyword before your code - Create an export statement
Let's discuss both ways below.
How to share a module's code by placing an export keyword before the code
One way to export an item is to place an export keyword before the code you wish to share with other modules.
For instance, open your module-1.js file and replicate the code below:
// module-1.js

// Export the "bestClub" variable:
export const bestClub = "Your Club";
You can see how we place the export keyword before the const variable statement in the snippet above.
We prepended the const variable with the export keyword to tell the computer to share the bestClub variable with other modules that request it.
Note: The export keyword highlights the code you wish to share with other modules.
Here's another example:
// Export the "multiply" function:
export function multiply(x, y) {
  return x * y;
}
The statement above instructs the computer to export multiply() to the modules that request it.
Let's now see the second way to export a module's code.
How to share a module's code by creating an export statement
An alternate way to share a module's code is to use the export keyword as a standalone statement. You can do so by prepending a single export keyword to a block ({...}) of comma-separated names of code you wish to share.
Here's an example:
// Create a variable named "bestClub":
const bestClub = "Your Club";

// Create a function named "multiply":
function multiply(x, y) {
  return x * y;
}

// Create an array named "fruits":
const fruits = ["Mango", "Apple", "Orange", "Lemon"];

// Export the three statements above:
export { bestClub, multiply, fruits };
The snippet above used an export statement to indicate that the computer can share bestClub, multiply, and fruits with other modules that request any of them.
Keep in mind that export works only as a top-level item. So, it would not work in a function, for example.
Therefore, the snippet below will throw an error because we used the export keyword inside the function.
function wrong() {
  export let bestClub = "Your Club";
  return bestClub;
}
Note:
- The
exportkeyword works only inside modules—not inside regular JavaScript programs. - JavaScript hoists
exportstatements. So, you can define them anywhere in your module. - Exported modules operate in strict mode by default—regardless of whether you specified the
strictstatement.
Let's now see how to import the exported code.
How to Import Exported Code
To import exported code, use ES module's import statement.
For instance, open your module-2.js file and replicate the code below:
// module-2.js

import { bestClub } from "./module-1.js";
In the snippet above, we used an import statement to bring in the bestClub variable from the module-1.js file.
So, module-2.js is a top-level module because it contains another script.
On the other hand, module-1.js is a submodule because it is a script used inside another file.
Note:
- We use the
importstatement to import items from other modules. - It is mandatory to wrap your named exports in curly braces while importing them.
Keep in mind that an import statement can only get another module's code if exported with the export keyword.
For instance, the import statement below will import the bestClub, multiply, and fruits items if they got marked for exportation in the module-1.js file.
// Import three items from the module-1.js file:
import { bestClub, multiply, fruits } from "./module-1.js";
Suppose you did not use the export keyword to mark the three items as exportable features. In that case, the import statement will throw an Uncaught SyntaxError.
Note:
- "Module specifier" and the "import specifier" are other names people call the
"./module-1.js"file path string in the snippet above. - The dot (
.) mark in the"./module-1.js"module specifier means "same directory". In other words, the dot mark tells the computer to find themodule-1.jsfile in the same folder where the current module is. - The current module referred to in the snippet above is the file where the
importstatement got defined.
An alternative to the import specifier's dot (.) syntax is to write out the entire relative path to a module's location.
Here's an example:
// Import three items from the module-1.js file:
import { bestClub, multiply, fruits } from "/codesweetly/blog/notes/modular-javascript/es-modules/module-1.js";
You can see how long the import statement above is. We often use the dot syntax because of its short and portable length.
Suppose you choose to use the dot syntax. In that case, keep in mind that some module systems (such as Node.js and module bundlers) permit you to omit the dot mark and the file extension like so:
// Import three items from the module-1.js file:
import { bestClub, multiply, fruits } from "module-1";
However, other module systems, such as ES modules, do not permit such omissions.
Note:
- A module specifier with no dot mark and file extension is called a "bare" module specifier.
- A module's imported item is a read-only view of the exported feature. So, you can modify the code only inside the module that exported it—not in the module that imported it.
- JavaScript imports a module's code as live binding. So, suppose you update the imported code's value in the exportation module. In that case, your changes will also reflect in the importation module.
Let's now discuss how to use the imported code.
How to Use a Module's Imported Code
Once you've imported your code, you can use it as if it was defined in the module into which you've imported it.
Here's an example:
// module-2.js

import { bestClub } from "./module-1.js";

const myBestClub = bestClub + " " + "is my best club.";

console.log(myBestClub);
Note:
- The
importkeyword works only inside modules—not inside regular JavaScript programs. - An imported module's features are not available in the global scope. Therefore, you can access imported items only in the script you have imported them into—not in other places like the JavaScript console.
- JavaScript hoists
importstatements. So, you can define them anywhere in your module. - Imported modules operate in strict mode by default—regardless of whether you specified the
strictstatement.
So, now that we know how to use an ES module, let's discuss how to rename the code you wish to export (or import).
How to Rename Exports and Imports in ES Modules
Suppose you wish to rename the code you are exporting (or importing). In such a case, use the as keyword.
Here's an example:
// module-1.js

// Create a variable named "bestClub":
const bestClub = "Your Club";

// Export the bestClub variable as "favoriteTeam":
export { bestClub as favoriteTeam };
In the snippet above, we told the computer to export the bestClub variable as favoriteTeam.
Therefore, when importing the variable, you will use the name favoriteTeam—not bestClub.
Here's an example:
// module-2.js

import { favoriteTeam } from "./module-1.js";

const myBestClub = favoriteTeam + " " + "is my best club.";

console.log(myBestClub);
We renamed the bestClub variable in the example above while exporting it. However, you can also rename it during its importation.
Here's an example:
// module-1.js

// Create a variable named "bestClub":
const bestClub = "Your Club";

// Export the bestClub variable:
export { bestClub };
// module-2.js

import { bestClub as favoriteTeam } from "./module-1.js";

const myBestClub = favoriteTeam + " " + "is my best club.";

console.log(myBestClub);
The choice of whether to rename your code during exportation or importation is totally up to you.
However, many developers prefer to rename during importation because you don't always have control over a code's source file, especially when importing from a third party's module.
Why Rename a Module's Code?
Renaming can help prevent browsers from throwing errors due to name conflicts. For instance, consider these snippets:
// module-1.js

// Create a variable named "bestClub":
const bestClub = "Your Club";

// Export the bestClub variable:
export { bestClub };
// module-2.js

import { bestClub } from "./module-1.js";

const bestClub = bestClub + " " + "is my best club.";

console.log(bestClub);
When you run the snippets above, the browser will throw an error similar to:
"SyntaxError: Identifier 'bestClub' has already been declared"
The browser threw the error because the imported code's name conflicts with module-2.js' bestClub variable.
However, you can rectify the error by simply renaming the imported code like so:
// module-2.js

import { bestClub as favoriteTeam } from "./module-1.js";

const bestClub = favoriteTeam + " " + "is my best club.";

console.log(bestClub);
Keep in mind that you can also rename multiple exports. Let's see how below.
How to Rename Multiple Exports in an ES Module
You can rename multiple exports by separating each as statement with a comma.
Here's an example:
// module-1.js

const bestClub = "Your Club";
const fruits = ["Grape", "Apple", "Pineapple", "Lemon"];

function multiply(x, y) {
  return x * y;
}

// Export the three statements above:
export {
  bestClub as favoriteTeam,
  fruits as crops,
  multiply as product
};
// module-2.js

import { favoriteTeam, crops, product } from "./module-1.js";

const bestClub = `I bought ${product(2, 11)} ${crops[2]}s at ${favoriteTeam}.`;

console.log(bestClub);
You can also rename multiple imports. Let's see how.
How to Rename Multiple Imports in an ES Module
You can rename multiple imports by separating each as statement with a comma.
Here's an example:
// module-1.js

const bestClub = "Your Club";
const fruits = ["Grape", "Apple", "Pineapple", "Lemon"];
function multiply(x, y) {
  return x * y;
}

// Export the three statements above:
export { bestClub, fruits, multiply };
// module-2.js

import {
  bestClub as favoriteTeam,
  fruits as crops,
  multiply as product
} from "./module-1.js";

const bestClub = `I bought ${product(2, 11)} ${crops[2]}s at ${favoriteTeam}.`;

console.log(bestClub);
Suppose you wish to import all exportable content from module-1.js without specifying each import's name. How can you do this? Let's find out.
How to Import All Exportable Items from an ES Module in One Go
Suppose you wish to import all exportable items from a specific module without specifying each import's name. In such a case, use the import * as syntax to bring in the items through a module object.
Here's an example:
// Import all exportable features from the "countries.js" module:
import * as allCountries from "./countries.js";
The statement above instructs the computer to import all exportable content of the ./countries.js module and encase the imports in a module object named allCountries.
After the importation, you can use the imported items just as before. However, you now need to access them through the module object's name.
Here's an example:
// module-1.js

const bestClub = "Your Club";
const fruits = ["Grape", "Apple", "Pineapple", "Lemon"];
function multiply(x, y) {
  return x * y;
}

// Export the three statements above:
export { bestClub, fruits, multiply };
// module-2.js

import * as firstModule from "./module-1.js";

const bestClub = `I bought ${firstModule.multiply(2, 11)} ${firstModule.fruits[2]}s at ${firstModule.bestClub}.`;

console.log(bestClub);
So, what if you prefer to export a module's content anonymously? Let's discuss the technique you can use.
How to Export Anonymously to an ES Module
So far, we have exported items by explicitly stating the name of the specific code we wish to share—for instance, export { bestClub }.
Such exportation technique is called the named export.
You can also export anonymously by using the default export technique. But what exactly is a default export? Let's find out.
What Exactly Is a Default Export in ES Modules?
Default export is a technique developers use to export code anonymously (namelessly).
You can implement a default export by prepending the keyword default to the code you wish to export. By so doing, the computer will share the code as a default export.
In other words, the code will get exported with the special name, default—instead of its original name (if it had one).
So, during the code's importation, you will have the options to import it with the name default, a custom name of choice, or without any name.
Here's an example:
// module-1.js

const bestClub = "Your Club";

// Export the bestClub variable as a default export:
export default bestClub;
We did not use curly braces in the default export statement above because you can have only one default export in a module.
Alternatively, you can also rewrite the code above like so:
// module-1.js

// Export the string value as a default export:
export default "Your Club";
Keep in mind that you can use the default export technique to share a function, variable, string, class, or object literal.
However, you cannot prepend the export default keyword to a var, let, or const keyword.
In other words, the snippet below will throw a SyntaxError.
export default const bestClub = "Your Club";
Let's now discuss how to import a default export.
How to Import a Default Export into an ES Module
There are two equivalent ways to import a default export:
- Use the
default assyntax - Specify the imported code's name only
Let's discuss the two importation techniques.
How to use the default as syntax to import a default export
One way to import a default export is to use the default as syntax like so:
import { default as newName } from "./module-relative-path.js";
Here's an example:
// module-1.js

// Export the string value as a default export:
export default "Your Club";
// module-2.js

import { default as favoriteTeam } from "./module-1.js";

const bestClub = favoriteTeam + " " + "is my best club.";

console.log(bestClub);
Notice that we didn't need to specify the name of the code we imported from the module-1.js file. Instead, we used the default keyword to import the code anonymously.
Afterward, we renamed the imported code as favoriteTeam.
Let's now see the second way to import a default export.
How to import a default export by specifying the imported code's name only
An alternate way to import a default export is to ignore the curly braces ({...}), the default keyword, and the as keyword.
Instead, simply specify the name you wish to use to reference the imported code like so:
import newName from "./module-relative-path.js";
Here's an example:
// module-1.js

// Export the string value as a default export:
export default "Your Club";
// module-2.js

import favoriteTeam from "./module-1.js";

const bestClub = favoriteTeam + " " + "is my best club.";

console.log(bestClub);
You can see that the shortened importation technique above is neater than the previous option.
Note:
- The
export defaultstatement makes it possible for a JavaScript module to interpolate (work reliable) with existing CommonJS and AMD module systems. - See the "Default exports" section of ES6 In Depth: Modules to learn more about interpolation.
Before we wrap up our discussion on ES modules, you should be aware that you can use an aggregator file to collate your project's import statements.
But what exactly is an aggregator file, I hear you ask? Let's find out below.
What Exactly Is an Aggregator File?
An aggregator file is a script used solely to import and re-export the items you've exported from other modules.
In other words, instead of congesting your top-level module with multiple import statements from various files, you can create a single parent script (the aggregator file).
The parent script's sole purpose will be to import and re-export items from other modules.
Then, in your top-level module, you can simply import any required code from the aggregator file alone—not from numerous other scripts.
By so doing, you will make your top-level module neater.
So, what exactly does all this mean? Let's see with a mini-project.
Project: How to Use an Aggregator File
Follow the steps below to learn how to use an aggregator file.
Step 1: Create a project directory
Create a project folder—where this project's HTML and module files will reside.
Step 2: Create your code files
Create the following files inside your project folder:
index.htmlindex.jspreferences.jscalculation.jsbio.js
Step 3: Add the modules to your HTML document
Open your index.html file and replicate the code below:
<!DOCTYPE html>
<html>
  <head>
    <meta charset="UTF-8">
    <meta name="viewport" content="width=device-width, initial-scale=1.0">
    <title>ES Module - CodeSweetly</title>
  </head>
  <body>
    <h1>How to use an aggregator file - ES Module Tutorial</h1>
    <h2>Check the console</h2>

    <script type="module" src="index.js"></script>
    <script type="module" src="preferences.js"></script>
    <script type="module" src="calculation.js"></script>
    <script type="module" src="bio.js"></script>
  </body>
</html>
Here are the main things we did in the HTML snippet above:
- We added the four JavaScript files to our HTML document.
- We used the
type="module"attribute to convert the regular JavaScript files to ES module files.
Step 4: Export items from your preference module
Open your preferences.js module and export some items from it like so:
const bestFruits = ["Grape", "Apple", "Pineapple", "Lemon"];
const bestColor = "White";
const bestNumber = 111;
const bestClub = "Your Club";
const bestTime = "Now";

export { bestClub, bestFruits };
Step 5: Export items from your calculation module
Open your calculation.js module and export some items from it like so:
function add(x, y) {
  return x + y;
}

function subtract(x, y) {
  return x - y;
}

export function multiply(x, y) {
  return x * y;
}

function divide(x, y) {
  return x / y;
}
Step 6: Export items from your bio module
Open your bio.js module and export some items from it like so:
const aboutMe = {
  firstName: "Oluwatobi",
  lastName: "Sofela",
  companyName: "CodeSweetly",
  profession: "Web Developer",
  gender: "Male",
};

export default aboutMe;
Step 7: Import the exported features
To import the exported items into your top-level module, you have two options:
- Import directly from the exporting modules to your top-level script.
- Import from an aggregator file to your top-level module.
Let's see the difference between the two options.
Import directly from the exporting modules to your top-level script
One way to import your code is to import it directly from the exporting scripts to your top-level module.
For instance, open your index.js file and import the exported content of the preferences.js, calculation.js, and bio.js modules like so:
// index.js

import { bestFruits } from "./preferences.js";
import { multiply } from "./calculation.js";
import aboutMe from "./bio.js";

const news = `All ${aboutMe.companyName}'s staff gave Tom ${multiply(7, 129)} ${bestFruits[2]}s.`;

console.log(news);
You can see that we imported items directly from three exporting scripts into the index.js module.
The above importation technique works OK. However, a cleaner alternative is to use an aggregator file. Let's see how.
Import from an aggregator file to your top-level module
An alternate way to bring in your code is to import it from an aggregator file to your top-level module.
Follow the steps below to see how you can create and use an aggregator file.
1. Create the aggregator file
You can name the file aggregator.js or any other name you prefer.
 A highlight of the project's aggregator file
2. Add the aggregator script to your HTML file
<!DOCTYPE html>
<html>
  <head>
    <meta charset="UTF-8">
    <meta name="viewport" content="width=device-width, initial-scale=1.0">
    <title>ES Module - CodeSweetly</title>
  </head>
  <body>
    <h1>How to use an aggregator file - ES Module Tutorial</h1>
    <h2>Check the console</h2>

    <script type="module" src="index.js"></script>
    <script type="module" src="preferences.js"></script>
    <script type="module" src="calculation.js"></script>
    <script type="module" src="bio.js"></script>
    <script type="module" src="aggregator.js"></script>
  </body>
</html>
Note the following:
index.jsis the top-level module because it is the file where we imported and usedpreferences.js,calculation.js, andbio.js.preferences.js,calculation.js, andbio.jsare the submodules because they are the files we imported into the top-level module.aggregator.jsis the parent module because it is the script for aggregating and re-exporting the three submodules.
Technically, you can indicate just the top-level module in your project's HTML file like so:
<!DOCTYPE html>
<html>
  <head>
    <meta charset="UTF-8">
    <meta name="viewport" content="width=device-width, initial-scale=1.0">
    <title>ES Module - CodeSweetly</title>
  </head>
  <body>
    <h1>How to use an aggregator file - ES Module Tutorial</h1>
    <h2>Check the console</h2>

    <script type="module" src="index.js"></script>
  </body>
</html>
By so doing, you avoid cluttering your HTML page with the submodules and parent module.
Let's now see how to use the aggregator module.
3. Use the aggregator module to aggregate the submodules
Here's how to use the aggregator module to import and re-export all your project's exported items:
// aggregator.js

import { bestFruits } from "./preferences.js";
import { multiply } from "./calculation.js";
import aboutMe from "./bio.js";

export { bestFruits, multiply, aboutMe };
You can see that we used the aggregator file only to import and re-export our project's exported features.
The shorthand way to write the import/export statements above is like so:
// aggregator.js

export { bestFruits } from "./preferences.js";
export { multiply } from "./calculation.js";
export { default as aboutMe } from "./bio.js";
Keep in mind that the following syntax is invalid:
export aboutMe from "./bio.js";
In other words, whenever you use the export...from syntax to re-export a default export, make sure that you rename the re-exportation like so:
export { default as aboutMe } from "./bio.js";
Let's now see how to import the re-exported features from an aggregator file.
4. Import your exports from the aggregator file
Once you've aggregated all your submodules into the aggregator module, go to your top-level script (index.js in this case) and import the exported items.
Here's an example:
// index.js

import { bestFruits, multiply, aboutMe } from "./aggregator.js";

const news = `All ${aboutMe.companyName}'s staff gave Tom ${multiply(7, 129)} ${bestFruits[2]}s.`;

console.log(news);
You see, like magic, we've cleaned up our code by replacing three import statements with a single line!
Using an aggregator file to collate your project's exports helps separate concerns and makes your top-level module neater.
Up till now, we've used the static import syntax to instruct the computer to evaluate our imported modules' code at load time.
But suppose you prefer to load your modules conditionally or on-demand. In that case, you can use the dynamic import() syntax. Let's see exactly how it works below.
How to Use the import() Syntax to Load a Module Dynamically
To load your module conditionally or on-demand, use the import() syntax like so:
import("./module/relative-path.js").then(function (module) { });
The import() syntax does two main things:
- It loads its module specifier argument (
"./module/relative-path.js"in this case). - It returns a promise object that resolves to a module object containing the import specifier's exports.
So, since the import() syntax returns a promise, you can also use the await keyword with it.
Here's an example:
const module = await import("./module/relative-path.js");
Note: Although import() resembles a function call, it is not. Instead, the import() code is a special ES modules syntax that uses parentheses (similar to the super() syntax).
Therefore, you cannot call, apply, or bind the import() syntax because it does not inherit Function.prototype's properties.
To see precisely how import() works in practice, let's update our previous project by following the steps below.
1. Update your HTML file
Open your index.html file and do the following:
- Update your
<h1>'s content to "The Latest News". - Substitute the
<h2>element with an empty<p>element. - Create a
<button>element.
In other words, your index.html file should look like this:
<!DOCTYPE html>
<html>
  <head>
    <meta charset="UTF-8">
    <meta name="viewport" content="width=device-width, initial-scale=1.0">
    <title>ES Module - CodeSweetly</title>
  </head>
  <body>
    <h1>The Latest News</h1>
    <p id="news-paragraph"></p>
    <button id="news-button">Get the News</button>

    <script type="module" src="index.js"></script>
  </body>
</html>
2. Update your index.js module
Open your index.js file and replicate the code below:
// index.js

const paragraphElement = document.getElementById("news-paragraph");
const buttonElement = document.getElementById("news-button");

async function displayNews() {
  let news = null;
  // highlight-next-line
  const aggregatorModule = await import("./aggregator.js");

  news = `All ${aggregatorModule.aboutMe.companyName}'s staff gave Tom ${aggregatorModule.multiply(7, 129)} ${aggregatorModule.bestFruits[2]}s.`;

  paragraphElement.innerText = news;
}

buttonElement.addEventListener("click", displayNews);
You can see how we used the import() method to load the aggregator module on demand (when a user clicks the button)—rather than upfront.
Although dynamic importation can improve your program's initial load-time performance, it's best to use it only when needed.
Note: The import() method does not require its argument to have a <script> of type="module". Therefore, you can use it in a regular JavaScript file.
Now, suppose you wish to get metadata about your current module. In that case, you can use the import.meta syntax.
What Exactly Is import.meta in ES Modules?
The import.meta code is an object containing information about your current module.
Here's an example:
<!DOCTYPE html>
<html>
  <head>
    <meta charset="UTF-8">
    <meta name="viewport" content="width=device-width, initial-scale=1.0">
    <title>ES Module - CodeSweetly</title>
  </head>
  <body>
    <h1>About import.meta</h1>
    <h2>Check the console ⬇⬇⬇</h2>

    <script type="module">
      console.log(import.meta);
      console.log(import.meta.url);
    </script>
  </body>
</html>
The import.meta code in the snippet above will return some information about the module in which it got used.
Quick Review of Modules So Far
We've learned that a JavaScript module is simply a file with an add-on capability to share its code with other modules within a project—or with the world through package managers like Yarn and NPM.
We also used a local server to load our HTML documents via an http:// scheme—which made browsers load our apps without throwing any CORS error.
However, live servers are limited to local developments and testing purposes.
In other words, you cannot use a live server in production to serve your HTML document via an http:// scheme. Instead, it would be best if you used a module bundler.
But what exactly is a module bundler, I hear you ask? Let's find out below.
What Is a Module Bundler?
A module bundler is a tool developers use to bundle an app's modules and dependencies into a single browser-compatible JavaScript file.
Why Do You Need a Module Bundler?
Module bundlers allow browsers to access the file you specified in a require() or import statement.
In other words, suppose a browser runs a JavaScript file with a require("./node_module/test/sample/app.js") statement. In such a case, the browser will throw an error that says Uncaught ReferenceError: require is not defined.
The computer will throw such an error because browsers cannot access files specified in a JavaScript program.
However, you can use a module bundler to create a new JavaScript file containing code browsers can read.
How Does a Module Bundler Work?
A module bundler does its bundling work as follows:
First, it creates an output script file
The module bundler will first create an "output script file" in your project's dist folder.
Note:
- The bundler uses the output script file to save the bundled code.
- An output file is the compiled version of an entry file. In other words, an output script file refers to the JavaScript file a bundler generates automatically for your project.
- An entry point is a file that a bundler uses to start building a dependency graph of all the project's modules it needs to combine into a single browser-compatible module.
- An entry point is the most critical file of a build step that links (directly or indirectly) to every other module in a project.
Next, the module bundler compiles your code
Secondly, the bundler will check the build step's entry point for any occurrence of some require() or import statements.
Suppose the module bundler finds a require() or import statement. In such a case, the bundler will compile (combine) the content of each dependency specified in the statements with the entry point's content.
Note:
- A build step is a process through which a module bundler builds a new browser compatible JavaScript file.
- A build step's output file is sometimes called a distribution code. In other words, distribution code is the minified and optimized source code version.
- A dependency is a file your script requires to work as intended. So, in
import { variable } from "./path/to/module.js",module.jsis the dependency file because it is a script our app depends on to function as designed.
Let's now discuss the last thing a module bundler does.
Finally, it saves the compiled code
A module bundler's last step is to save the compiled code into step 1's output script file.
As a result, step 1's script file (the build step's output) will contain the content of the entry point and its dependencies—but no require() or import statements.
Note: Typical examples of module bundlers are webpack, browserify, rollup, and parcel.
So, now that we know how a module bundler works, let's discuss how to use a popular one—Webpack.
How to Use Webpack
Follow the steps below to learn how to use Webpack to bundle your project's JavaScript file and its dependencies into a single output script file.
Step 1: Create a project directory
Create a project folder—where this project's files will reside.
Step 2: Go to the project's root folder
Using the command line, navigate to the root directory of your project like so:
cd path/to/project/root-directory
Note: A root directory is a folder containing all other files and sub-folders of a specific project.
In other words, the folder you created in step 1 is your root folder because it will house everything concerning this particular project.
Step 3: Create a package.json file
Create a package.json file in your project's root directory like so:
npm init -y
Alternatively, you can use Yarn like this:
yarn init -y
Note:
- The
-yflag instructs NPM (or Yarn) to create a defaultpackage.jsonfile. - You must have Node and NPM installed on your system for the initialization code above to work. You can get both by installing the latest LTS version from the Node.js website.
Step 4: Install the Webpack module bundler
Install webpack and webpack-cli locally into your project as development dependency libraries:
npm install webpack webpack-cli --save-dev
Or, if your package manager is Yarn, run:
yarn add webpack webpack-cli --dev
Note: The webpack-cli package makes running webpack on the command line possible.
Step 5: Create your project's directories
Create a "source" code folder (./src) and a "distribution" code folder (./dist).
mkdir src dist
Note: Although src and dist are the names typically given to the source and distribution code's folders, you are free to choose any other name you prefer.
Step 6: Create your source code files
Create the following files inside the newly created source code directory:
index.htmlindex.js
Note:
- Webpack recommends saving source code in a
./srcdirectory and distribution code in a./distdirectory. - Webpack does not alter any other code apart from the
require(),import, andexportstatements.
Step 7: Add the JavaScript file to your HTML document
Open your index.html file and replicate the code below:
<!DOCTYPE html>
<html>
  <head>
    <meta charset="UTF-8">
    <meta name="viewport" content="width=device-width, initial-scale=1.0">
    <title>ES Module - CodeSweetly</title>
  </head>
  <body id="body">
    <h1>Module Bundler Tutorial</h1>
    <button id="button">Click Me to Change Color!</button>

    <script src="./index.js"></script>
  </body>
</html>
Here are the main things we did in the HTML snippet above:
- We created a
<h1>and<button>element. - We added step 6's JavaScript file to our HTML document.
Note: When using a bundler, you do not need to add the type="module" attribute to your project's <script> element. Instead, the bundler will automatically treat all scripts containing import and export statements as modules.
Step 8: Install some dependencies
Using your text editor, install your project's dependencies locally.
For instance, here's how you can install the randomColor package as a local dependency:
npm install randomcolor --save
Note:
- Use the
npm install package-name --savecommand for dependencies your app needs in production. - Use the
npm install package-name --save-devcommand for dependencies your app only needs for its local development and testing purposes.
Alternatively, you can use Yarn like so:
yarn add randomcolor
Note: Use the yarn add package-name --dev command for dependencies your app only needs for its local development and testing purposes.
Step 9: Import your dependencies
Import your dependencies into your JavaScript source code with the require() method or the import statement.
For instance, here's how to use the import statement to bring in step 8's randomColor dependency into your index.js script file:
// index.js

import randomColor from "randomcolor";
The require() method equivalence of the snippet above is like so:
// index.js

const randomColor = require("randomcolor");
Note:
- The
importstatement is JavaScript's native way of importing modules. - The
require()function is the CommonJS syntax for importing modules into a script. - An alternative way to import your project's dependencies is to implicitly load them with your HTML document's
<script>tag. However, such a technique pollutes the global scope. So, using theimportorrequire()syntax is better.
Step 10: Use the dependencies
Use the dependencies you imported in step 9 to do as you desire.
For instance, here's how you may use the randomColor dependency:
// index.js

import randomColor from "randomcolor";

const bodyElement = document.getElementById("body");
const buttonElement = document.getElementById("button");

function changeBodyColor() {
  const color = randomColor();
  bodyElement.style.backgroundColor = color;
}

buttonElement.addEventListener("click", changeBodyColor);
In the snippet above, we told the computer that whenever a user clicks the buttonElement, it should:
- Invoke the
changeBodyColorfunction. - Initialize the function's
colorvariable withrandomColor's invocation output. - Use the
colorvariable's value to style thebodyElement's background color.
Let's now bundle up our entry point (the index.js file) and the randomColor dependency into a single JavaScript file.
Step 11: Start the build step
Using your terminal, create your bundle by running webpack like so:
npx webpack
After running the command above, webpack will do the following:
- It will use your
index.jsas its entry point. - It will create a bundle (the output file) in your project's
distfolder containing the content of the entry point and its dependencies.
Note:
- By default, Webpack generates its bundle as a
main.jsfile—which it will save in the distribution folder you created in step 5. However, you can change the default setting by creating a configuration file—which Webpack will use automatically. We will discuss creating and using a configuration file later in this guide. - NPX is Node's package runner that will automatically find and execute Webpack.
Our next step is to tell browsers to use the newly created bundle. Let's do that below.
Step 12: Refer browsers to the newly created bundle
So, now that you have created a browser-compatible bundle file, you need to tell browsers to use it instead of the index.js source code file.
Therefore, go to your HTML file and substitute the reference to your JavaScript source code with Webpack's distribution bundle.
For instance, instead of using "./index.js" in the <script> tag of your HTML file, you would use "../dist/main.js" like so:
<!DOCTYPE html>
<html>
  <head>
    <meta charset="UTF-8">
    <meta name="viewport" content="width=device-width, initial-scale=1.0">
    <title>ES Module - CodeSweetly</title>
  </head>
  <body id="body">
    <h1>Module Bundler Tutorial</h1>
    <button id="button">Click Me to Change Color!</button>

    <script src="../dist/main.js"></script>
  </body>
</html>
Let's now see our app!
Step 13: Check your app in the browser
Open your HTML file in the browser to confirm that the browser can successfully read your app and its dependencies.
Remember that you created your HTML file manually in step 6. However, Webpack can also auto-generate one for you. Let's find out how.
How to Make Webpack Auto-Generate Your App's HTML File
Suppose your app is now outputting multiple bundles, or you've started using hashes to create unique filenames. In that case, you may find it increasingly difficult to manage your HTML file manually.
Therefore, Webpack allows you to use the HtmlWebpackPlugin to auto-generate and manage your project's index.html file.
Follow the steps below to learn how to use HtmlWebpackPlugin to auto-generate and manage your project's HTML file.
Step 1: Install HtmlWebpackPlugin
Install the HtmlWebpackPlugin like so:
npm install html-webpack-plugin --save-dev
Or, if your package manager is Yarn, use:
yarn add html-webpack-plugin --dev
Step 2: Create a configuration file
Create a Webpack configuration file in your project's root folder like so:
touch webpack.config.js
Step 3: Add the plugin to webpack's configuration
Open your webpack.config.js file and add the HtmlWebpackPlugin plugin to it like so:
// webpack.config.js

const HtmlWebpackPlugin = require("html-webpack-plugin");

module.exports = {
  plugins: [new HtmlWebpackPlugin()]
}
Note: We will discuss how to use a configuration file later in this guide.
Step 4: Run the build step
Once you've installed and added HtmlWebpackPlug into your project, recompile your modules like so:
npx webpack
After running the build step, HtmlWebpackPlugin will do the following:
- It will auto-generate a new
index.htmlfile. - The plugin will automatically insert the bundles that Webpack generated into the newly created HTML document.
- It will auto-save the new HTML file inside your project's distribution folder.
In other words, after running a build, the new HtmlWebpackPlugin()'s invocation (in the configuration file) will auto-generate a dist/index.html file with the following content:
<!doctype html>
<html>
  <head>
    <meta charset="utf-8">
    <title>Webpack App</title>
    <meta name="viewport" content="width=device-width,initial-scale=1">
    <script defer src="main.js"></script>
  </head>
  <body>
  </body>
</html>
Notice that the HTML document generated by HtmlWebpackPlugin does not contain your source file's <h1> and <button> elements.
In other words, suppose you open the dist/index.html file in the browser. In that case, the browser will open an empty HTML page.
The HtmlWebpackPlugin omitted the content of the source code's <body> element because it did not create the new file from the original document. Instead, it automatically created a brand-new HTML page that includes only the bundles Webpack generated.
However, you can also tell HtmlWebpackPlugin to use your source file as a template. Let's see how below.
How to Make HtmlWebpackPlugin Use Your Source File as a Template to Auto-Generate a New HTML Page
To make HtmlWebpackPlugin use your HTML source file as a template, do the following:
1. Update your HTML file
Open your index.html source code file and delete the <script> tag you previously used to reference Webpack's distribution bundle.
So, your HTML source code should look like this:
<!DOCTYPE html>
<html>
  <head>
    <meta charset="UTF-8">
    <meta name="viewport" content="width=device-width, initial-scale=1.0">
    <title>ES Module - CodeSweetly</title>
  </head>
  <body id="body">
    <h1>Module Bundler Tutorial</h1>
    <button id="button">Click Me to Change Color!</button>
  </body>
</html>
We deleted the distribution bundle's script because HtmlWebpackPlugin will automatically insert one while it auto-generates the new HTML file.
Remember: The plugin will use your source code as a template to create the new file. Therefore, deleting the hand-coded bundle's reference helps avoid conflicting scripts.
Now, let's configure the plugin to use your source code as a template.
2. Update your configuration file
Open your project's webpack.config.js file and update HtmlWebpackPlugin's settings like so:
// webpack.config.js

const HtmlWebpackPlugin = require("html-webpack-plugin");

module.exports = {
  plugins: [new HtmlWebpackPlugin({
    template: "./src/index.html"
  })]
}
In the configuration snippet above, we did the following:
- We passed an object argument containing a
templateproperty to theHtmlWebpackPluginfunction. - We initialized the
templateproperty with the path to our HTML source code.
So, if you now run the npx webpack command, HtmlWebpackPlugin will use ./src/index.html as a template to generate the new dist/index.html file.
Therefore, the newly created HTML distribution file will look like so:
<!doctype html>
<html>
  <head>
    <meta charset="UTF-8">
    <meta name="viewport" content="width=device-width, initial-scale=1.0">
    <title>ES Module - CodeSweetly</title>
    <script defer="defer" src="main.js"></script>
  </head>
  <body id="body">
    <h1>Module Bundler Tutorial</h1>
    <button id="button">Click Me to Change Color!</button>
  </body>
</html>
Suppose an index.html file already exists in your output (dist) directory. In that case, the new one generated by HtmlWebpackPlugin will replace the existing HTML file.
3. Check your app in the browser
Open the newly generated dist/index.html file in the browser to confirm that the browser can successfully read your app and its dependencies.
Note:
HtmlWebpackPluginallows you to specify how and where you want it to generate your HTML file by providing specific configuration options. For instance,new HtmlWebpackPlugin({ title: "A CodeSweetly Project" })tells the plugin to use"A CodeSweetly Project"as the title of the generated HTML file.- Suppose you get an error message (for instance,
ReferenceError: __webpack_base_uri__ is not defined). In that case, you likely need to update your Webpack dependency. You can do so by runningnpm update webpack webpack-clion your terminal.
Important Stuff to Know about Updating Your App
Whenever you make changes to your source code, make sure you do the following for your updates to reflect in the browser:
- Rerun the build step.
- Refresh your browser.
Repeating the manual process of running the build step and refreshing your browser can be burdensome. Luckily, Webpack provides a way to automate the two tasks. Let's find out how.
How to Rerun Webpack Automatically
Suppose you wish to automate the process of rerunning the build step. In that case, you can add a watch property to your package.json's scripts field.
For instance, do the following:
1. Add watch to the scripts fields
Open your project's package.json file and add a watch property to its scripts field like so:
{
  "name": "your_package",
  "version": "1.0.0",
  "scripts": {
    "test": "echo \"Error: no test specified\" && exit 1",
    "watch": "webpack --progress --watch"
  }
}
The snippet above added a "watch" property—with the value "webpack --progress --watch"—to the "scripts" field of our package.json file.
2. Run the watch script
Using your terminal, invoke your package.json's watch script like so:
npm run watch
Alternatively, you can use Yarn like this:
yarn run watch
Once you've invoked the watch script, NPM will execute "webpack --progress --watch".
What is "webpack --progress --watch"?
The "webpack --progress --watch" command instructs NPM to:
- Run Webpack.
- Pass the
--progressand--watchoptions to Webpack's configuration.
The --progress option will make NPM show the percentage progress of Webpack's compilation.
The --watch option activates Webpack's watch mode.
In other words, --watch instructs Webpack to watch and automatically recompile your modules each time you save changes to files within your dependency graph.
As an example, go to your index.js file and add a console.log statement to the changeBodyColor() function like so:
// index.js

import randomColor from "randomcolor";

const bodyElement = document.getElementById("body");
const buttonElement = document.getElementById("button");

function changeBodyColor() {
  const color = randomColor();
  bodyElement.style.backgroundColor = color;
  console.log(color);
}

buttonElement.addEventListener("click", changeBodyColor);
Afterward, save your changes. Then refresh your browser.
After the refresh, do the following:
- Open your browser's console.
- Click your app's
"Click Me to Change Color!"button.
You can see that the --watch flag automatically recompiled your modules when you saved your source code's changes.
Therefore, you no longer need to run the npx webpack command manually again. Instead, the --watch flag will watch and automatically recompile your modules whenever you save changes.
Note:
- After running
npm run watch, your currently opened terminal will continue to process thewatchcommand's activities. So, you won't be able to input any command on that terminal until you stopwatch's execution. However, you can open a new terminal window to use simultaneously with the one processingwatch. In other words, use one terminal to runwatchand another to input commands. - To stop
watch's execution, usectrl + con windows orcmd + con mac. - You can rename the
"watch"key (or any other scripts' key) to any other name you prefer. - You can ignore watching huge folders like
node_modulesby adding them to the watchOptions.ignored field of your project's configuration file.
So, now that we know how to automate Webpack's execution, let's discuss how to reload the browser automatically.
How to Reload the Browser Automatically
Suppose you wish to automate the process of reloading your browser. In that case, you can use Webpack's dev server package.
The following steps will show you how to configure and use the package.
Step 1: Install webpack's web server
Using your terminal, install the webpack-dev-server package like so:
npm install webpack-dev-server --save-dev
Or, if your package manager is Yarn, run:
yarn add webpack-dev-server --dev
Note: The webpack-dev-server package enables watch mode by default. Therefore, you do not need to enable a watch script manually whenever you use the dev server.
In other words, once you've decided to use Webpack's dev server, do the following:
- Use
ctrl + con windows orcmd + con mac to stopwatch's execution (if the script is still running). - Delete the
watchproperty you previously added to yourpackage.jsonfile.
Step 2: Specify your files' location
Tell the web server where it should get the files that Webpack did not generate by adding a devServer option to the configuration file you created previously:
// webpack.config.js

const HtmlWebpackPlugin = require("html-webpack-plugin");

module.exports = {
  plugins: [new HtmlWebpackPlugin({
    template: "./src/index.html"
  })],
  devServer: {
    static: "./dist"
  }
}
The configuration snippet above tells the dev server to serve contents Webpack did not build from the project's dist folder.
Note that the dev server serves files on localhost:8080 by default. However, you can specify the port you wish to use by adding a port property to the devServer option like so:
// webpack.config.js

const HtmlWebpackPlugin = require("html-webpack-plugin");

module.exports = {
  plugins: [new HtmlWebpackPlugin({
    template: "./src/index.html"
  })],
  devServer: {
    static: "./dist",
    port: 5001
  }
}
Note:
webpack-dev-serveruses output.path's directory to serve bundled files.
In other words, the dev server will usehttp://[devServer.host]:[devServer.port]/[output.publicPath]/[output.filename]to generate the bundled file's URL.- We will discuss how to use a configuration file later in this guide.
Let's now see how to run the dev server.
Step 3: Run the dev server
There are two ways to run the dev server.
- Use NPX on your CLI
- Use
package.json's scripts field
Let's discuss both ways below.
How to run Webpack's dev server by using NPX on your CLI
Using the terminal, navigate to your project's root directory—where the webpack.config.js file is—then use NPX to run the dev server like this:
npx webpack serve --mode development --open
The snippet above uses NPX to do the following:
- Run the build step by executing Webpack.
- Serve the build step's output file from memory, not your hard disk.
Note:
- The dev server requires an HTML document (usually an
index.htmlfile) to serve the build step's output. - The
--mode developmentflag tells Webpack to run the build step in development mode. - The
--openflag tells the dev server to open your default browser.
Keep in mind that the dev server does not save the build step's output file to any of your project's directories. Instead, it does the following:
- It keeps the build step's output files in memory (your system's RAM).
- It serves the output files from memory, not your system's hard drive.
Using your system's memory to build and serve the output file makes the dev server fast at serving your bundle.
However, when your app is ready for production, remember to run the npx webpack compilation command to save your bundle in your project's distribution folder—rather than in memory.
Let's now discuss the second way to run the dev server.
How to run Webpack's dev server by using package.json's scripts field
An alternate way to run the dev server is to add the "webpack serve --mode development --open" command to your package.json's scripts field like so:
{
  "name": "your_package",
  "version": "1.0.0",
  "scripts": {
    "test": "echo \"Error: no test specified\" && exit 1",
    "start": "webpack serve --mode development --open"
  }
}
Afterward, you can use npm run start on your terminal to execute the webpack serve --mode development --open command.
Once you've started the dev server—via either option 1 or 2, your default browser will automatically open with your project's HTML page.
Then, anytime you save changes to your source code, the dev server will automatically reload your browser to reflect the recent updates.
Note:
- After running
npm run start, your currently opened terminal will continue to process the dev server's activities. So, you won't be able to input any command on that terminal until you stop the server. However, you can open a new terminal window while using the current one to process the server. In other words, use one terminal to run the dev server and another to input commands. - To stop the dev server's execution, use
ctrl + con windows orcmd + con mac. - You can rename the
"start"key (or any other scripts' key) to any other name you prefer. - Check out Webpack's documentation for more ways to configure the dev server.
Remember that we used a configuration file in step 2. Let's talk more about what the file does.
What Exactly Is Webpack's Configuration File?
Webpack's configuration file is a JavaScript file that allows you to modify or extend Webpack's default settings.
For instance, Webpack's default setting assumes your project's entry point is src/index.js.
Also, by default, Webpack will minimize, optimize, and output the result of its build step into a dist/main.js file.
However, suppose you wish to change those default settings (or add more configurations). In such a case, you would need to create a configuration file—which Webpack will use automatically.
The following steps will show you how to create and use a Webpack configuration file.
Note: You can skip steps 1 and 2 if your project already has a configuration file.
Step 1: Go to the project's root folder
Navigate to your project's root directory like so:
cd path/to/project/root-directory
Step 2: Create your project's configuration file
Create a configuration file in your project's root folder like so:
touch webpack.config.js
Step 3: Specify your configurations
Open your project's webpack.config.js file and specify the configuration options you wish to change (or add).
Here's an example:
// webpack.config.js

const HtmlWebpackPlugin = require("html-webpack-plugin");

module.exports = {
  plugins: [new HtmlWebpackPlugin()]
};
Here's what we did in the configuration file above:
- We initialized the
HtmlWebpackPluginvariable with the"html-webpack-plugin"package. - We exported an object containing the
pluginsconfiguration we want Webpack to use.
So, whenever you run the build step, Webpack will automatically use the settings you've specified in the configuration file—rather than its default settings.
Let's now run the build step.
Step 4: Run the module bundler
Using your terminal, create your bundle by running Webpack like so:
npx webpack --config webpack.config.js
The --config webpack.config.js code used in the snippet above is optional. We used it above to illustrate that it is possible to pass a configuration of any name—which you may need for complex configurations that requires a split into multiple files.
However, Webpack will use the webpack.config.js file by default if it is present in your project's root directory.
Keep in mind that plugins is only one of the numerous options you can use in a configuration file.
Let's discuss other configuration options developers use.
Common Webpack Configuration Options
Below are popular configuration options you can use to alter (or extend) Webpack's default settings.
entry
The entry field specifies the file or files you want Webpack to use to begin the application's bundling process.
Here's an example:
// webpack.config.js

module.exports = {
  entry: "./src/index.js",
};
The snippet above instructs Webpack to start its bundling process from "./src/index.js".
Suppose you used an array (or an object) as the entry field's value. In that case, Webpack will process all the array's (or object's) items as the application's entry points.
Here's an example:
// webpack.config.js

module.exports = {
  entry: [
    "./src/index.js",
    "./src/index-two.js",
    "./src/index-three.js"
  ]
}
The code above instructs Webpack to start its bundling process from the three files specified in the entry array (that is, "./src/index.js", "./src/index-two.js", and "./src/index-three.js").
Here's another example:
// webpack.config.js

module.exports = {
  entry: {
    index: "./src/index.js",
    indexTwo: "./src/index-two.js",
    indexThree: "./src/index-three.js"
  }
}
The code above instructs Webpack to start its bundling process from the three files specified in the entry object (that is, "./src/index.js", "./src/index-two.js", and "./src/index-three.js").
Note:
- If
entry's value is a string or an array, Webpack will create a chunk (bundle)—which it will namemainby default. - If
entry's value is an object, Webpack will create one or more chunks. The specific number of chucks created will depend on the total properties of the object. - Supposing
entry's value is an object. In that case, Webpack will use each key to name each chunk. For instance, inentry: { home: './home-module.js' }, Webpack will create a chunk (bundle) namedhome.
context
The context field points Webpack to the directory containing your entry files.
Here's an example:
// webpack.config.js

const path = require("path");

module.exports = {
  entry: "index.js",
  context: path.resolve(__dirname, "src")
}
The snippet above tells Webpack to locate the index.js entry file in the project's src directory.
output
The output field specifies how and where Webpack should output the bundles and assets it processed.
The three options commonly used with the output field are path, filename, and clean.
output.path
The output.path option specifies the output directory you want Webpack to place the bundled file.
Here's an example:
// webpack.config.js

const path = require("path");

module.exports = {
  entry: "./src/index.js",
  output: {
    path: path.resolve(__dirname, "dist")
  }
}
The snippet above used the output.path option to tell Webpack to use the project's "./dist" folder as the output directory.
output.filename
The output.filename option specifies how Webpack should name each bundle it creates.
Suppose you are creating only a single bundle via one entry point. In that case, you can specify a static name as the bundle's filename.
Here's an example:
// webpack.config.js

const path = require("path");

module.exports = {
  entry: "./src/index.js",
  output: {
    filename: "codesweetly.js",
    path: path.resolve(__dirname, "dist")
  }
}
The output.filename option tells Webpack to use "codesweetly.js" as the filename of the bundle created after processing "./src/index.js".
Suppose you wish to create multiple bundles through two or more entry points, code splitting, or various plugins. In such a case, it is better to dynamically generate each bundle's filename via any of Webpack's substitutions techniques.
Note: Substitutions—in Webpack—refer to using bracketed strings to create templates for filenames.
Let's now discuss the three commonly used substitution techniques.
Substitutions technique 1: Entry name
The "entry name" substitutions naming technique makes Webpack create each bundle's name by concatenating a bundle's entry point's name with a given string.
Here's an example:
// webpack.config.js

const path = require("path");

module.exports = {
  entry: {
    home: "./src/home-module.js",
    promo: "./src/promo-module.js",
    music: "./src/music-module.js"
  },
  output: {
    filename: "[name].bundle.js",
    path: path.resolve(__dirname, "dist")
  }
}
The output.filename option tells Webpack to create each bundle's filename by concatenating each entry point's name with the ".bundle.js" string value.
So, for instance, suppose Webpack has finished processing the promo entry point (that is, "./src/promo-module.js"). In that case, the final bundle's name will be "promo.bundle.js".
Let's now discuss the second substitutions technique.
Substitutions technique 2: Internal chunk id
The "internal chunk id" substitutions naming technique makes Webpack create each bundle's name by concatenating a bundle's entry point's id with a given string.
Here's an example:
// webpack.config.js

const path = require("path");

module.exports = {
  entry: {
    home: "./src/home-module.js",
    promo: "./src/promo-module.js",
    music: "./src/music-module.js"
  },
  output: {
    filename: "[id].bundle.js",
    path: path.resolve(__dirname, "dist")
  }
}
The output.filename option tells Webpack to create each bundle's filename by concatenating each entry point's internal chuck id with the ".bundle.js" string value.
Let's now discuss the third substitutions technique.
Substitutions technique 3: Content hash
The "content hash" substitutions naming technique makes Webpack create each bundle's name by concatenating the generated content's hashes with a given string.
Here's an example:
// webpack.config.js

const path = require("path");

module.exports = {
  entry: {
    home: "./src/home-module.js",
    promo: "./src/promo-module.js",
    music: "./src/music-module.js"
  },
  output: {
    filename: "[contenthash].bundle.js",
    path: path.resolve(__dirname, "dist")
  }
}
The output.filename option tells Webpack to create each bundle's filename by concatenating each chunk's content hash with the ".bundle.js" string value.
Keep in mind that Webpack allows you to combine different substitutions—for instance, filename: "[name].[contenthash].bundle.js".
You can also use a function to return a filename like so:
filename: (pathData) => {
  return pathData.chunk.name === "main" ? "[name].js" : "[name].bundle.js";
}
Webpack also permits you to initialize the filename property with a folder structure like so:
filename: "codesweetly/[name]/bundle.js"
Now, let's discuss the third property developers commonly use within the output field.
output.clean
As Webpack increasingly generates and saves files into your output directory, it is common to clutter a project's /dist folder with unused files.
So, a good practice is to clean your output directory before each build step. By so doing, your /dist folder will contain used files only.
Let's see how to do the cleanup below:
// webpack.config.js

const path = require("path");

module.exports = {
  entry: "./src/index.js",
  output: {
    filename: "codesweetly.js",
    path: path.resolve(__dirname, "dist"),
    clean: true
  }
}
The clean option in the snippet above tells Webpack to clean the project's output directory before each build step.
In other words, Webpack will empty the output directory before it begins each build step.
Therefore, the output directory will contain only the files generated from the compilation process—not any of the old files that Webpack previously saved there.
Let's now discuss another popular configuration option that you can use to alter (or extend) Webpack's default settings.
module
The module field makes Webpack process assets—like CSS files and fonts—as modules in the dependency graph.
So, suppose you want Webpack to bundle non-JavaScript assets such as images, CSS files, fonts, and so on. In such a case, you can use the module option to specify how Webpack should manage those assets before adding them to the dependency graph.
Below are some common ways to use the module option.
How to use Webpack's module option to load CSS stylesheets
Here's how you can use Webpack's module option to load CSS stylesheets:
// webpack.config.js

const path = require("path");

module.exports = {
  entry: "./src/index.js",
  output: {
    filename: "main.js",
    path: path.resolve(__dirname, "dist")
  },
  module: {
    rule: [
      {
        test: /\.css$/i,
        use: ["style-loader", "css-loader"]
      }
    ]
  }
}
The configuration snippet above used the module property to tell Webpack to use "style-loader" and "css-loader" to load CSS files.
Keep in mind that the loaders' order matters.
In other words, Webpack reads the loaders from right to left. Therefore, it will first execute the "css-loader" before the "style-loader".
So, "css-loader" will pass its result (that is, the processed resource) to the "style-loader". Then, "style-loader" will insert the final CSS resource into the <head> element of your HTML page.
It is necessary to install the loaders you want Webpack to use in loading your CSS assets.
So, for instance, before Webpack can use the previous configuration file to load ".css" assets, you need to install "style-loader" and the "css-loader".
Here's how to install the two loaders:
npm install style-loader css-loader --save-dev
Alternatively, if your package manager is Yarn, run:
yarn add style-loader css-loader --dev
Note:
"css-loader"helps to interpret and resolve@importandurl()items such asimport,require(), andurl('./my-image.png')."style-loader"helps to inject a<style>tag and the styles derived from"css-loader"to your project's HTML file.
Let's now see how to use the module option to load images.
How to use Webpack's module option to load images
Here's how you can use Webpack's module option to load images:
// webpack.config.js

const path = require("path");

module.exports = {
  entry: "./src/index.js",
  output: {
    filename: "main.js",
    path: path.resolve(__dirname, "dist")
  },
  module: {
    rule: [
      {
        test: /\.(png|svg|jpg|jpeg|gif)$/i,
        type: "asset/resource"
      }
    ]
  }
}
The configuration snippet above used the module property to tell webpack to load ".png", ".svg", ".jpg", ".jpeg", and ".gif" files as resource asset modules.
So, suppose the following import statement is in your script file:
import anyImage from "./your-image.png";
In such a case, here's how Webpack will load the image:
- Webpack will process
your-image.png. - It will add the processed image to your output directory.
- Webpack will initialize the
anyImagevariable with the processed image's URL.
Note: While processing and adding your-image.png to the output folder, Webpack will change the image's filename to something like 150b55a1bf7461efb720.png.
Let's now see how to use the module option to load fonts.
How to use Webpack's module option to load fonts
Here's how you can use Webpack's module option to load fonts:
// webpack.config.js

const path = require("path");

module.exports = {
  entry: "./src/index.js",
  output: {
    filename: "main.js",
    path: path.resolve(__dirname, "dist")
  },
  module: {
    rule: [
      {
        test: /\.(woff|woff2|eot|ttf|otf)$/i,
        type: "asset/resource"
      }
    ]
  }
}
The configuration snippet above used the module property to tell Webpack to load ".woff", ".woff2", ".eot", ".ttf", and ".otf" files as resource asset modules.
Once you've configured the loader, you can incorporate your fonts via the @font-face CSS declaration.
Here's an example:
/* styles.css */

@font-face {
  font-family: "Digital7";
  src: url("./digital-7.regular.woff") format("woff"),
       url("./digital-7.regular.ttf") format("truetype");
  font-weight: 600;
  font-style: italic;
}

div {
  color: red;
  font-family: "Digital7";
}
Whenever css-loader loads the stylesheet above, it will process the specified fonts and add the processed copies to your project's output directory.
Note:
- Webpack will change the processed fonts' filename to something similar to
93911ab167c943140756.ttf. - See Webpack's documentation to learn how to load JSON, CSV, TSV, and XML files.
Let's now discuss another popular configuration option that you can use to alter (or extend) Webpack's default settings.
devtool
The devtool field tells Webpack to convert a compiled file to the source code format. Therefore, making it easier for you to debug the exact file (and line) where an error occurred in your source code.
Here's an example:
// webpack.config.js

const path = require("path");

module.exports = {
  entry: "./src/index.js",
  output: {
    filename: "main.js",
    path: path.resolve(__dirname, "dist")
  },
  devtool: "source-map"
}
At compilation time, if Webpack sees a devtool property in your configuration script, it will generate a .js.map file that the browser will use instead of the .js file.
Note: There are different devtool options for specifying if and how Webpack should generate the source maps.
Let's now discuss another popular configuration option that you can use to alter (or extend) Webpack's default settings.
mode
The mode field tells Webpack the specific built-in optimization configuration you want it to use to build your output file.
You can specify whether Webpack should use production, development, or no (none) configuration to optimize your bundle. Let's discuss each of the three optimization settings below.
Development mode
A mode: "development" setting tells Webpack to build an output file for use in the development environment.
Here's an example:
// webpack.config.js

const path = require("path");

module.exports = {
  entry: "./src/index.js",
  output: {
    filename: "main.js",
    path: path.resolve(__dirname, "dist")
  },
  devtool: "source-map",
  mode: "development"
}
Setting a mode: "development" configuration will make Webpack create a bundle that:
- is fast to build
- is less optimized
- includes comments
- is not minified
- produces helpful error messages
- is easy to debug
Here's an example of a mode: "development" bundle:
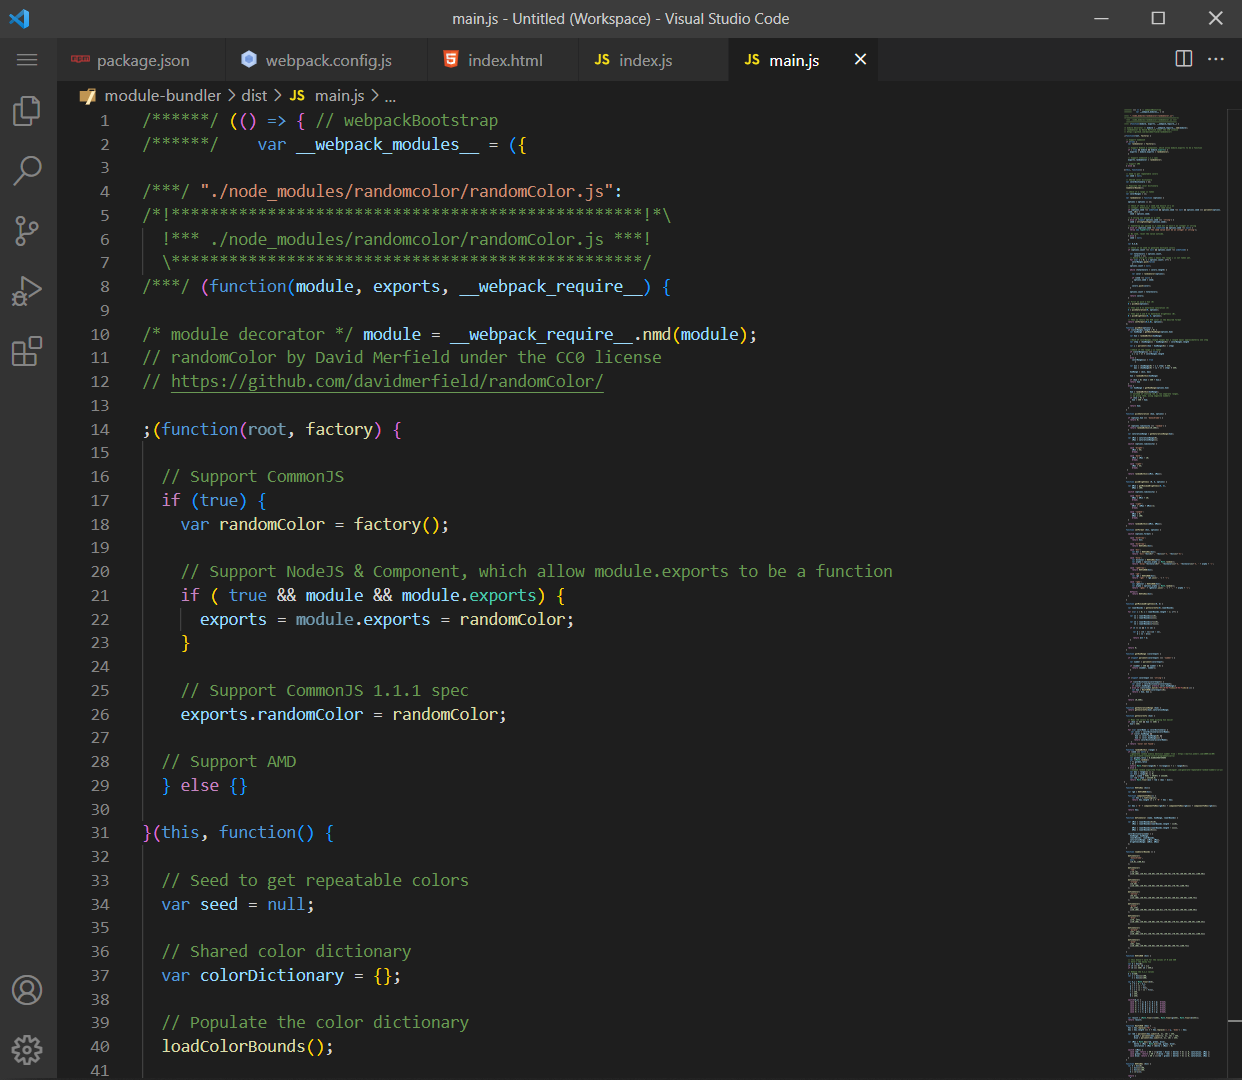 Image of a development mode bundle compiled with webpack
To make a non-minified output file readable, ensure Webpack's devtool field is not eval.
Whenever you set the mode to development, Webpack may default devtool's value to eval. So, ensure to select a different devtool—like source-map or disable it by setting its value to "false"—whenever you wish to make your output file readable.
Suppose you choose to run Webpack in development mode. In that case, remember to change your configuration to production mode when you are ready to deploy your app.
Now, let's discuss configuring Webpack to build your output file in production mode.
Production mode
A mode: "production" setting tells Webpack to build an output file for use in the production environment.
Here's an example:
// webpack.config.js

const path = require("path");

module.exports = {
  entry: "./src/index.js",
  output: {
    filename: "main.js",
    path: path.resolve(__dirname, "dist")
  },
  devtool: "source-map",
  mode: "production"
}
Setting a mode: "production" configuration will make Webpack create a bundle that:
- is slow to build
- is more optimized
- excludes comments
- is minified
- does not produce detailed error messages
- is difficult to debug
Here's an example of a mode: "production" bundle:
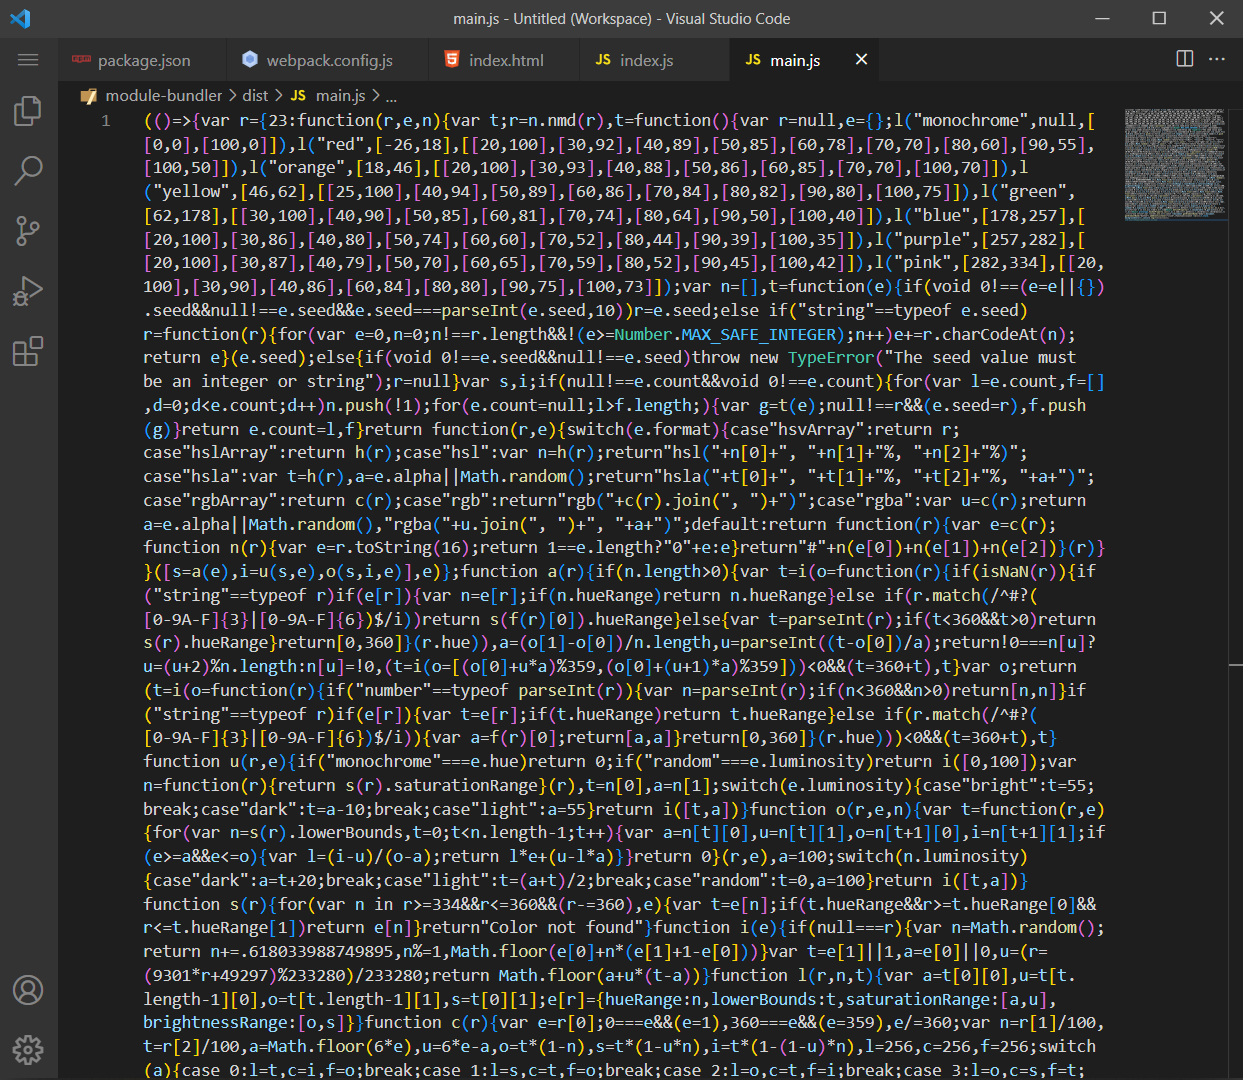 Image of a production mode bundle compiled with webpack
Note: Webpack recommends having source maps—like source-map—enabled in production.
Now, let's discuss configuring Webpack to build your output file without any optimization settings.
None mode
A mode: "none" setting tells Webpack to build an output file without optimizing it for development or production.
Here's an example:
// webpack.config.js

const path = require("path");

module.exports = {
  entry: "./src/index.js",
  output: {
    filename: "main.js",
    path: path.resolve(__dirname, "dist")
  },
  mode: "none"
}
Here's an example of a mode: "none" bundle:
 Image of a none mode bundle compiled with webpack
Important stuff to know about the mode option
To make switching between development and production mode easy, you can store the mode configurations in the "scripts" field of your package.json file.
Here's an example:
{
  "name": "your-app-name",
  "version": "1.0.0",
  "scripts": {
    "test": "echo \"Error: no test specified\" && exit 1",
    "dev": "webpack --mode development",
    "build": "webpack --mode production"
  }
}
The snippet above initialized the scripts' "dev" property with Webpack's development mode command.
Likewise, we initialized the scripts' "build" property with Webpack's production mode command.
Therefore, suppose you execute npm run dev on your terminal. In that case, Webpack will execute the build step in development mode.
Overview
This article discussed what a JavaScript module is and how it works. We also discussed how to use a popular module bundler (Webpack) to bundle a project's JavaScript file and its dependencies into a single output file.
And there we have it. I hope you have found this article helpful.
Thanks for reading!
And here's a useful ReactJS resource:
I wrote a book about React!
- It's beginners friendly ✔
- It has live code snippets ✔
- It contains scalable projects ✔
- It has plenty of easy-to-grasp examples ✔
The React Explained Clearly book is all you need to understand ReactJS.