

In this article, we will go through the basics of Azure Cosmos DB and understand the configuration options available with it.
We will cover resource management concepts, data model, APIs, and configuration options.
1. What is Azure Cosmos DB?
Azure Cosmos DB is a document database service that enables us to store, query, and index our data in a highly available, globally consistent, and scalable cloud-based NoSQL database.
It is fully managed which means availability, reliability, and security are all handled for us.
Cosmos DB APIs
The standout feature of Cosmos DB is that you can configure it to use either SQL or NoSQL to interact with your data. It does so by providing different APIs for each type of data you want to store.
The APIs are:
- SQL API – for storing and querying data using an SQL-like syntax. This is the default and recommended API.
- Gremlin API – if we want to interact with data using a graph database-like syntax.
- Table API – for applications migrating from Azure Table Storage to Cosmos DB.
- Cassandra API – for working with data designed for the Cassandra database.
- MongoDB API – for working with data designed for the MongoDB database.
By providing these APIs, Cosmos DB makes it easy for us to migrate from an existing data store to Cosmos DB. More on this when we explore how to connect to Cosmos DB programmatically.
Note that the APIs do not determine how the data is stored. The data is stored in a NoSQL database.
Why Choose Cosmos DB?
Since there are other cloud-based databases which you can use to store data, it is important to understand why you might want to migrate to Cosmos DB.
Cosmos DB provides some premium capabilities that may not be available in other cloud-based databases:
- Easy global distribution of data – which increases availability and speed with multi-region write and read operations.
- Dedicated throughput
- Single digit millisecond latency.
- Guaranteed availability
- Advanced indexing and partitioning
and more.
In addition to this, the APIs make it easier to switch between different database approaches without physically migrating data.
2. Basic Azure Cosmos DB Concepts
Let's look at some basic concepts of Azure Cosmos DB.
Resource Hierarchy
Below is the resource hierarchy of Azure Cosmos DB.
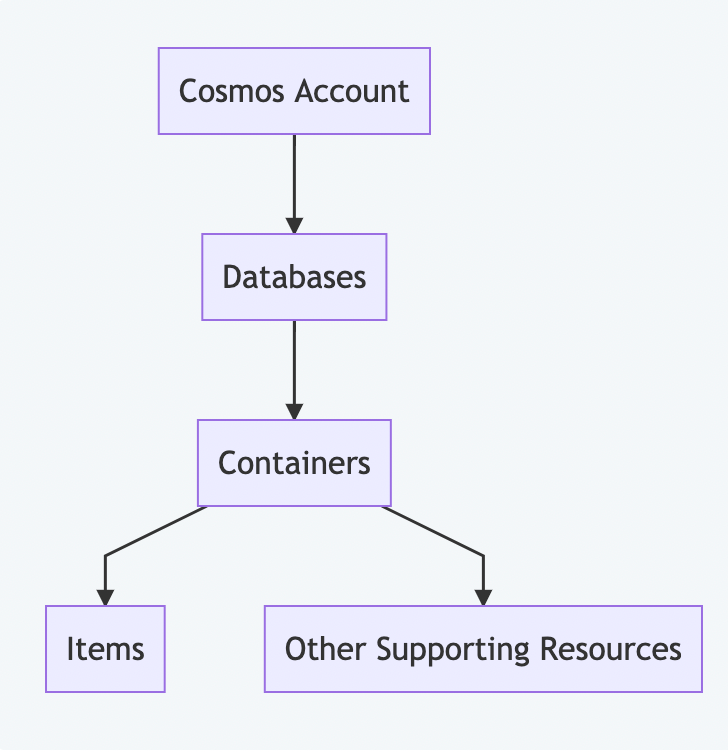 Cosmos DB resource Hierarchy
Let's understand each level and the configurations available at the different levels of the hierarchy.
Cosmos Account
A Cosmos Account is the top level resource in Azure Cosmos DB. It is the entry point to our Cosmos DB instances.
The following features are defined at the Cosmos Account level:
- A unique DNS name used to connect with database instances like https://{account}.documents.azure.com/
- Global distribution capabilities – you can define how many regions you want to distribute your data across.
- The default consistency level for all resources in the account. You can override this for individual resources.
Databases and Containers
An account can contain multiple databases which have the same distribution needs. Each database can contain multiple containers. You can also use databases to manage users, permissions, and throughput for underlying containers.
Each container is analogous to a table in SQL, collection in MongoDB, graph in Gremlin, and so on. Containers are fundamental units of scalability for storage and throughput. They are horizontally partitioned and replicated across multiple regions as defined by the account.
The throughput of a container can be defined in two ways:
- Dedicated provisioned throughput mode – Each container instance can be assigned a fixed throughput. Costlier and backed by SLAs.
- Shared provisioned throughput mode – The total throughput of all container instances running in shared mode remains the same while individual containers can have different real-time throughputs.
At the container level, we also have the option to configure the indexing policy and default TTL.
Contents of a Container
Similar to an SQL table, a container can contain multiple resources. The most important resource is the Item(s).
An item is a single unit of record. For example, a row in a table, a document in a collection, a node in a graph, and so on.
Some other resources include JavaScript based:
- Stored procedures
- User-defined functions
- Triggers
Consistency levels
Data can be replicated across multiple regions and writes can be allowed. In such scenarios, determining the consistency requirements of the data is important.
Let's look at the different consistency levels available in Azure Cosmos DB and what they mean:
- Strong – Data remains exactly the same across all regions. This means that the write operation is expensive and does not complete until all regions have the data.
- Bounded Staleness – The delay in the write operation is bounded by a fixed time interval between the regions. For example, after a write operation is performed, the data is guaranteed to be available in the next t seconds.
- Session – Data written in a session will be available to read when a read is performed in the same session. This is good when for a user session, all reads and writes are taken care of by a single region.
- Consistent Prefix – Data will be read in the same sequence in which it is written. For example, if in region 1 we write data A and then B, then in region 2, A will be available before B.
- Eventual – Both order and staleness do not matter, the only thing important is that data will be eventually available in all regions. Works fast but has the least consistency.
Explore – Scenarios that require different consistency levels.
Request Units (RUs)
According to the definition on Microsoft Learn:
The cost to do a point read, which is fetching a single item by its ID and partition key value, for a 1KB item is 1RU.
The cost is based on system resources such as CPU, IOPS, and memory that are required to perform the database operations. RUs consumed by our application are eventually billed to the account. There are different modes in which the Cosmos account can be set up which will affect billing:
- Provisioned throughput mode – Set up the expected throughput in terms of RUs per second. The mode is chosen at the account level but the RUs can be provisioned at the database or container level.
- Serverless mode – Pay for actual consumed units.
- Autoscale mode – The account is set up to scale automatically based on the usage. This is good for applications with variable or unpredictable usage.
Database Partitioning
As mentioned earlier in the container section, a container can be partitioned into multiple partitions. You do this by setting the partition key.
Partitions and Indexes
- Logical Partitions
A logical partition is a collection of items that share the same partition key value. For example, if a container called "Users" is partitioned by a key "State", then a logical partition is a collection of items that share the same "State" value.
- Index
Indexes are used to improve the performance of queries. In a regular SQL database, an index is created by default based on a primary key. Cosmos DB items also contain a unique field called Item ID.
The default index in Cosmos DB is a combination of the partition key and the item ID. Partition key is used to locate the logical partition and the item ID is used to locate the specific item. Thus, for faster access, it is important to choose a good partition key which distributes the data evenly across the partitions.
- Physical Partitions
The role of physical partitions is to provide horizontal scalability. A physical partition is a collection of one or more logical partitions. Data from a single logical partition cannot exist across more than one physical partition.
The user does not have any control over how the data is distributed across the physical partitions. Cosmos DB is a managed service and the system will automatically distribute the data across the physical partitions when scalability is needed.
This forms the basis of another guideline that partitioning keys should lead to smaller logical partitions. If logical partitions are too large, it will affect the limit to which the system can scale.
How to Choose a Partition Key
By now, we know what a partition key is. But how do we choose a good partition key? Here are a few guidelines:
- Immutable – The partition key cannot be changed after the data is created.
- High Cardinality – A large number of possible values for the partition key will lead to a large number of small logical partitions. Good for indexing and scalability.
- Even Distribution – Apart from high cardinality, it is also important that each possible value is equally likely. This is good for even distribution of data across the partitions.
- Read heavy containers – For read heavy containers, it's important to choose a partition key that appears frequently in the read queries. Otherwise, the benefit of partition key based index will be lost. It is also beneficial that most queries can read data from a single partition and cross-partition queries are minimized.
- Using Item ID as a Partition Key – Cosmos DB supports a unique field called Item ID. This field is automatically generated and is guaranteed to be unique. This is a good choice for partition keys.
Explore – Why not use Item ID as a partition key?
Here's some more info on choosing a partition key.
Synthetic Partition Keys
- Concatenate multiple fields together to create a partition key.
- Use a hash function to create a partition key suffix.
- Use a random string to create a partition key suffix.
3. Cosmos DB Data Model
As mentioned earlier, all data in CosmosDB is store in a NoSQL way. Let's look at some aspects of the data model.
Document Data Model
In a document data model, each entry is called a document. In Cosmos DB terminology, documents can be referred to as items.
A document-oriented database will have the below characteristics:
- Non-relational – Each item is an individual entity.
- Easy to scale out – It is possible to create physical partitions for the data to improve performance and to scale storage.
- No schema – The database in itself won't enforce any schema. This gives the flexibility to store entities of different data formats. It also helps the structure evolve over time.
Items
Each item in Cosmos DB is a JSON document. Write operations on these documents are atomic. Items contain a unique Item ID and a partition key which is used to partition the data across multiple logical partitions.
Partition keys can also be nested fields. For example, in the below JSON, city field can be used as a partition key even if it is not at the root level.
{
    "id": "1",
    "name": "John",
    "address": {
        "street": "1 Main St",
        "city": "New York"
    }
}
While creating containers, it is mandatory to provide the partition key path. In the above example, the path will be /address/city.
4. How to Configure Cosmos DB
In Cosmos DB, the SQL API is a query language that allows us to query data in a document database using SQL-like syntax. There are many reasons to choose the SQL API over other APIs:
- Low latency
- Automatic scaling
- 99.999% availability backed by SLAs
It is well suited for high-performance applications like:
- Collecting and querying data from IoT devices – which generates a lot of data and needs to be processed quickly.
- Retail applications – which have varied usage patterns and can benefit from elastic scaling.
- Multi-platform applications – which can benefit from flexibility in document structure.
Throughput Provisioning
When configuring Azure Cosmos DB, we can provision throughput at either or both the database and container levels.
Container Level Throughput
A throughput provisioned at container level applies only to the container. It does not impact other containers of the database. For example, in the below image, each container has a different throughput.
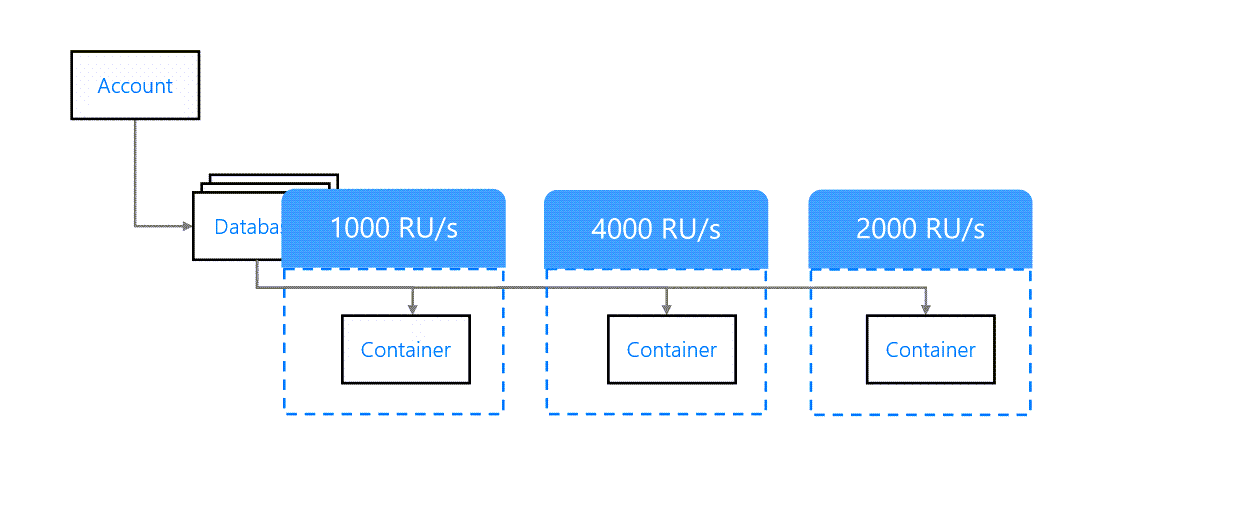 Container-level throughput provisioning
This is the recommended way to provision throughput. If each container is mapped to a separate application function, then it makes sense to provision throughput at container level.
Database Level Throughput
We can also provision throughput at the database level. This will be shared across all containers in the database.
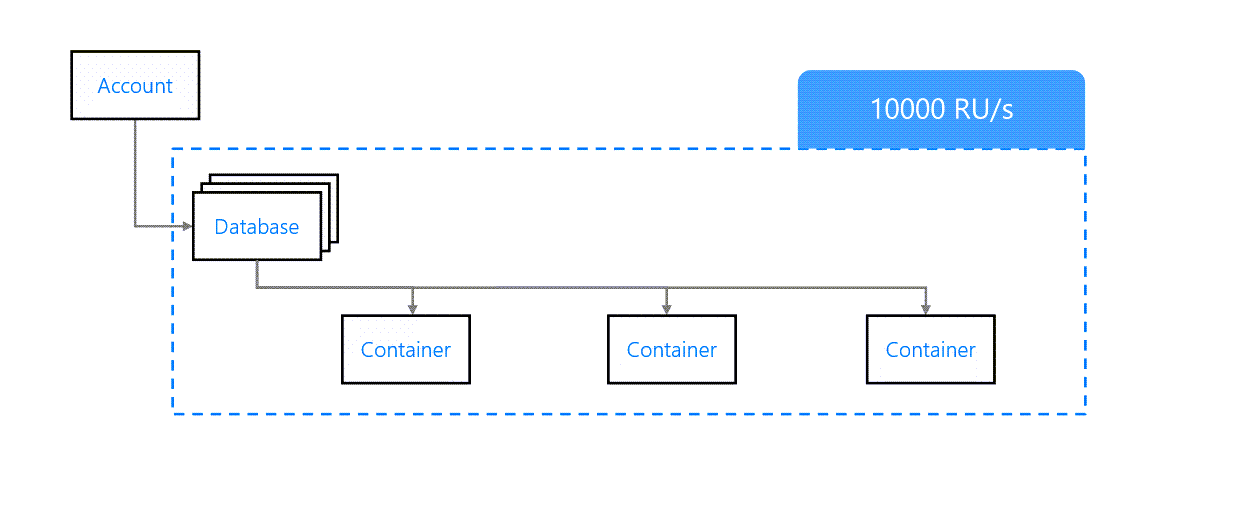 Database Level Throughput Provisioning
This is fine if all containers are expected to have similar load patterns but in most cases, it'll lead to unpredictable results.
Mixed Throughput
It is possible to mix container and database level throughput provisioning. To do so, we first define a throughput at the database level. Then, while creating a container, we can specify which throughput mode to use.
Containers configured in shared throughput mode will share the throughput provisioned at the database level. Containers configured in dedicated throughput mode will have their own throughput provisioned at the container level.
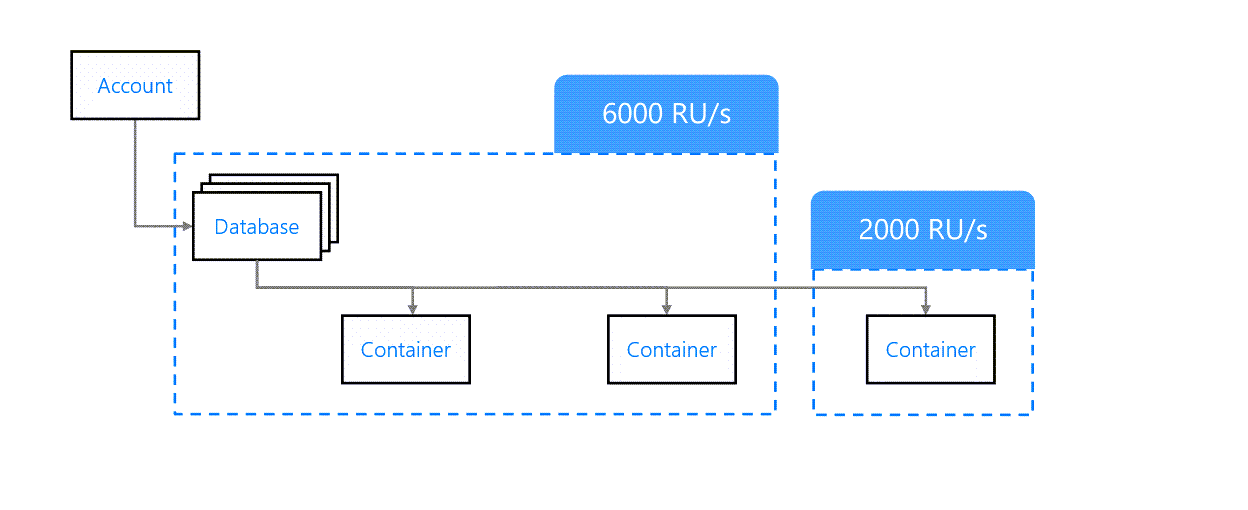 Mixed throughput provisioning
Note that we cannot convert a container from shared to dedicated throughput mode or vice versa. To change this, we need to delete the container and create a new one.
Storage
To estimate storage requirements, we can use the Azure Cosmos DB Capacity Calculator.
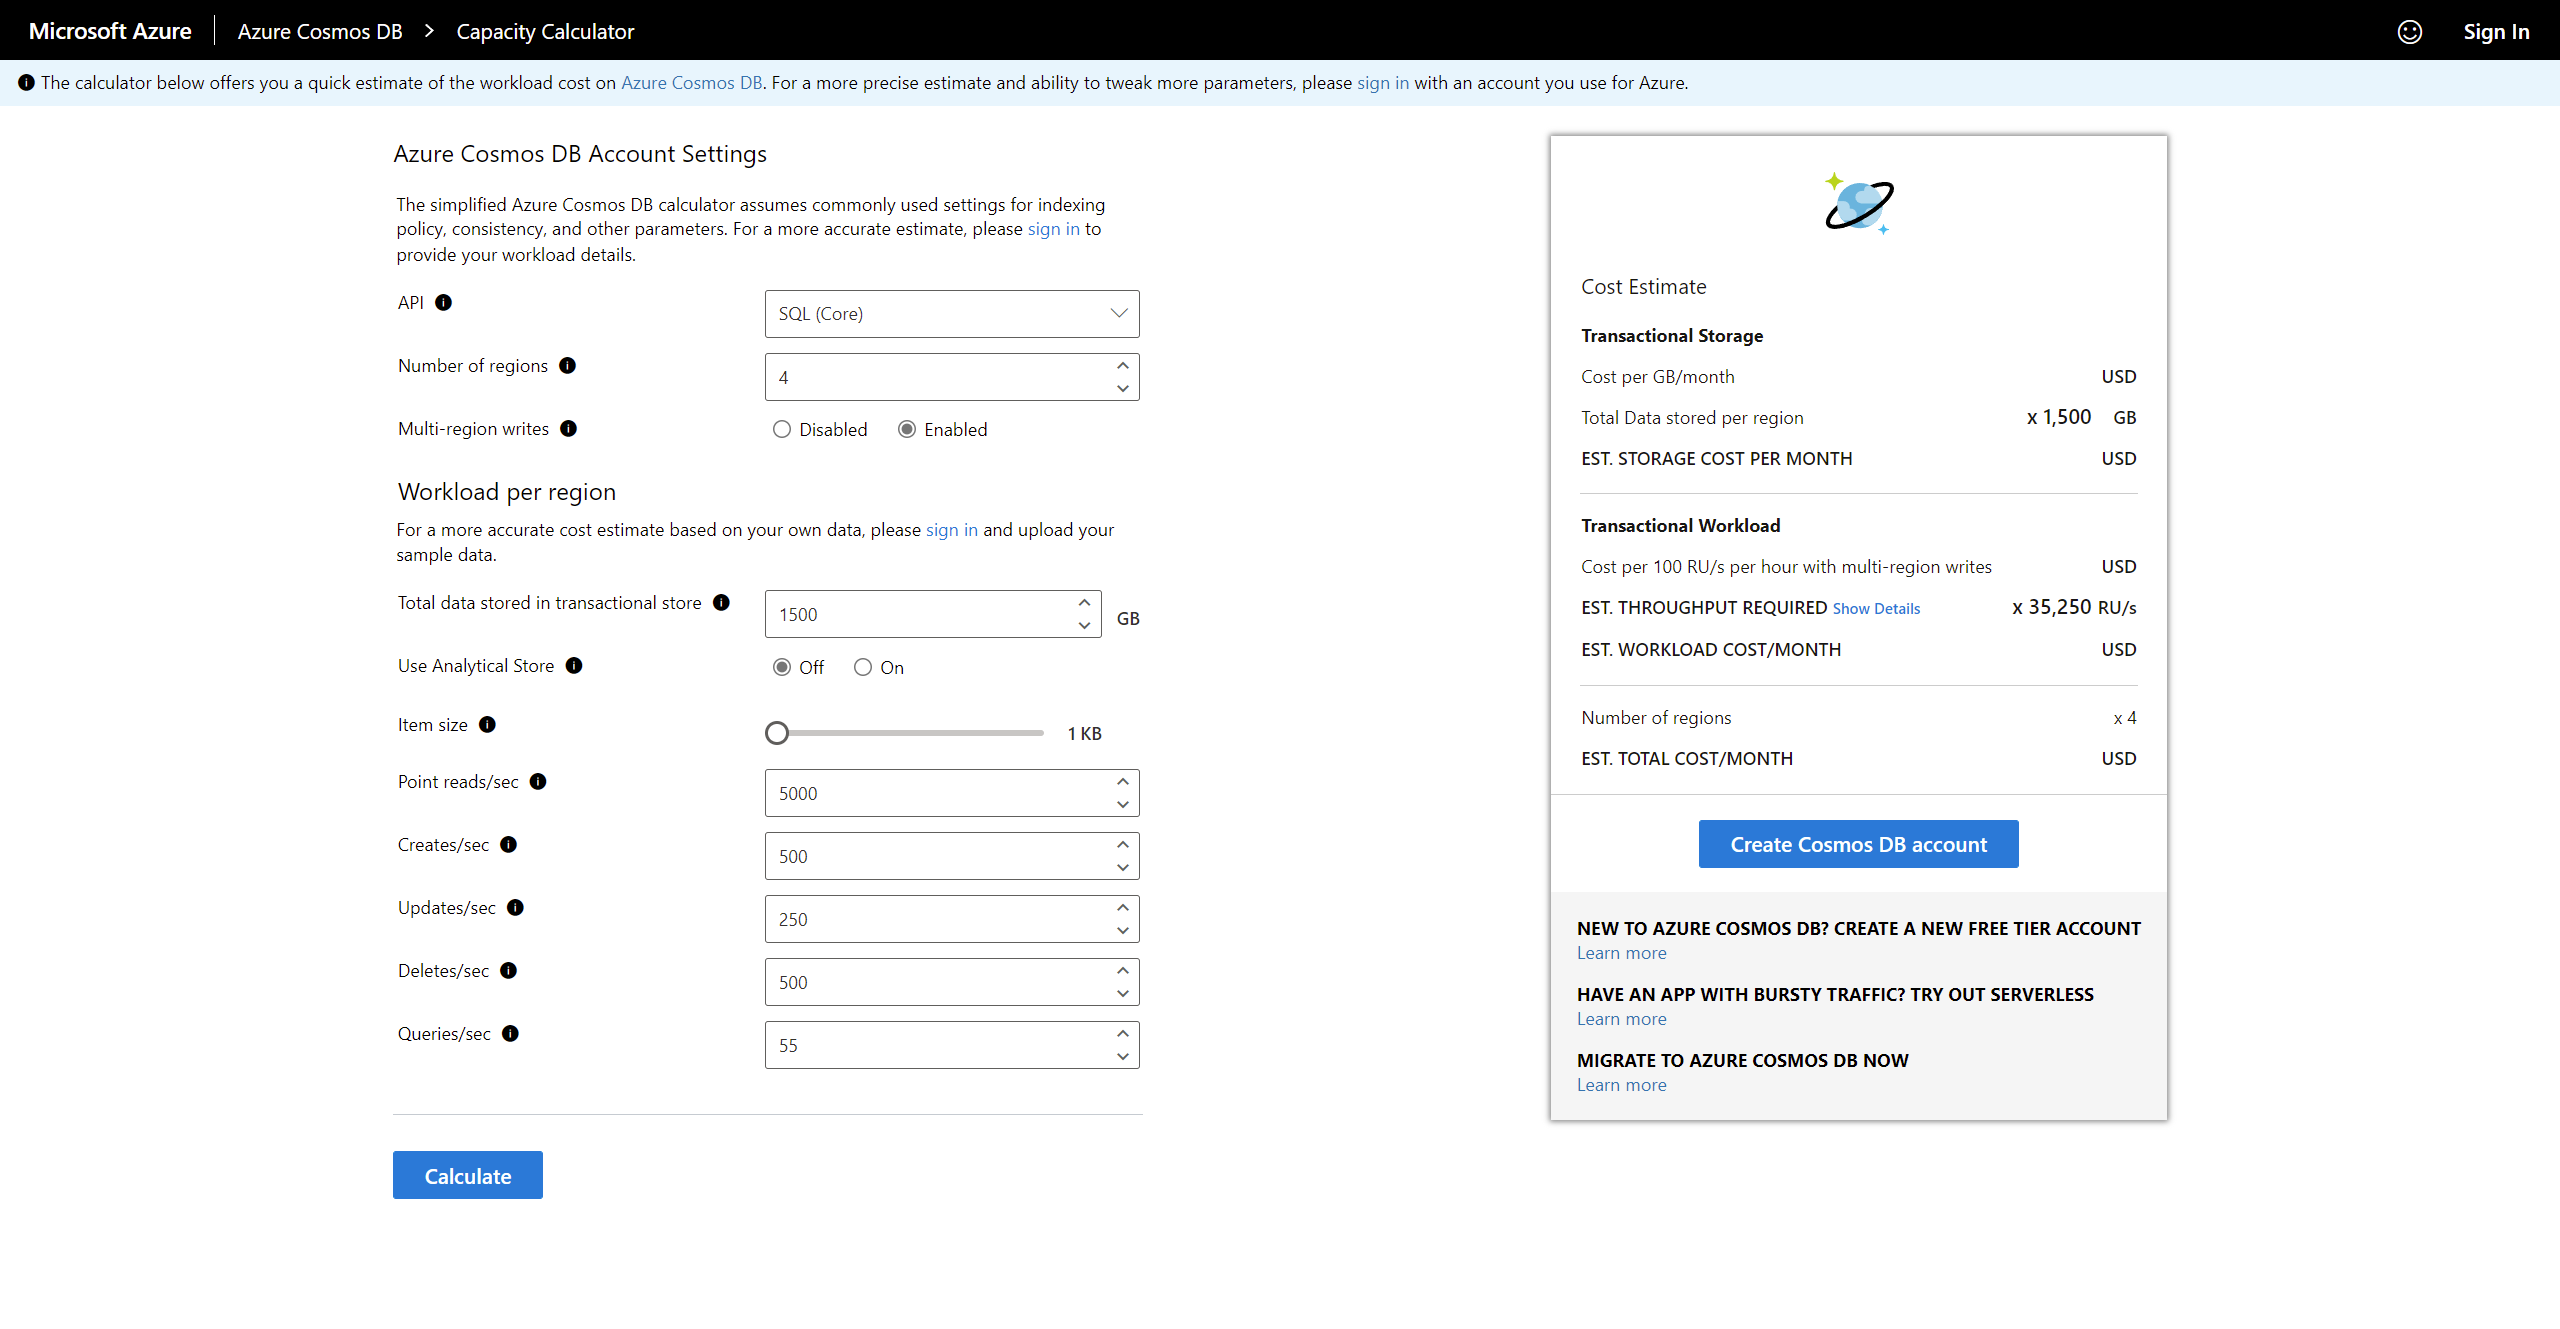 Cosmos DB Capacity Calculator
After entering the estimated load, replication strategy, and storage requirements, the calculator can provide an estimated cost of such a setup.
Time to Live (TTL)
It is possible to set a time-to-live (TTL) on documents in a container. This is useful for documents that are expected to be deleted in a short period of time. It can be configured at the container level and can be overridden at the document level. The maximum TTL value is 2147483647.
At the container level, TTL needs to be set to one of the below values:
- Does Not Exist – No TTL and no expiration even if trying to set TTL on a document.
- -1 – No TTL by default but can be added at the document level.
- Number of seconds – Default TTL is the provided number of seconds. This can be overridden at the document level.
Expiring documents and optimizing the storage consumed can result in better performance and lower costs. So it's important to decide which TTL value to use and which items to expire.
Some solutions may require Cosmos DB as an intermediate storage to perform queries and pass the results to the final storage. In this case, you should use TTLs to expire documents as soon as possible to minimize cost.
Cosmos DB Consumption Models
Let's take a look at the different consumption models in detail.
Serverless
In Serverless model, the service is billed according to the actual number of RUs consumed. This is great when the consumption pattern is unpredictable and can depend of factors like campaigns, feature releases, time of the day, seasonal sales, holidays, and so on.
It is also great in situations when:
- A new application is launched and we don't have much load to start with. We also don't know how the load will grow.
- The DB supports a serverless application hosted on Azure Functions. As the application gets more users, the DB will also get more requests.
- Getting started with Cosmos DB and not having a lot of experience with provisioning and cost.
- The service is not expected to scale and will likely consume less than the minimum configurable RUs.
Provisioned vs Serverless
Deciding between Serverless and Provisioned consumption model is a trade-off between cost and performance. Use the below points to help you decide:
- The workload – predictable and sufficiently large workload favours provisioned consumption model.
- RU limiting – Provisioned throughput will not exceed the maximum decided RU while Serverless can scale up to the maximum possible RUs/s allowed in Cosmos DB. When expecting burst situations, you can use Serverless.
- Global Distribution – This is an important factor. Serverless models are not distributed across regions and so can be used for a single region. Provisioned models are distributed across regions and can be used for multiple regions.
- Storage Limits – Serverless only stores 50 GB of data per container while Provisioned can store unlimited data per container.
Auto-Scale Model
Auto-Scale model finds the balance between provisioned and serverless consumption models. It works by dynamically provisioning resources as needed but within a specified range.
Let's look at a comparison between auto-scale and provisioned throughput:
- The workload – Auto-scale throughput oscillates between the minimum acceptable performance and the maximum cost we want to incur. Provisioned is still better if the workload is predictable because we neither want to lose out on performance nor incur more costs in the long run.
- RU consumption – With auto-scale, we can set an RU limit same as with provisioned. The difference is that provisioned billing is always done on the RUs specified but auto-scale billing is based on – the RUs consumed in real-time or 10% of the provisioned RUs – whichever is higher. Keeping this in mind, it's recommended to use provisioned consumption model only if the actual consumption is close to the provisioned limit for more than 66% of the time.
It is also possible to migrate containers from auto-scale to provisioned throughput and vice versa. During the migration, a RU value is automatically chosen by the system and must be verified or manually set after the migration.
Wrapping Up
Thanks for reading. This should give you some idea of how Azure's CosmosDB service works and how to configure it. If you want to connect with me, you can find me on Twitter.