
By Faizan Bashir
Kubernetes is one of the most exciting technologies in the world of DevOps these days. It has attracted a lot of attention over the last few years. The reason for its instantaneous fame is the mighty containers.
Docker Inc. brought containers to the lime light with their impeccable marketing of an amazing product. Docker laid the foundation for the wide-spread use of containers, although container technology outdates it. Yet because of Docker, the use of Linux containers has become more prevalent, cementing the foundation for container orchestration engines.
Enter Kubernetes — developed by Google using years of experience running a world class infrastructure on billions of containers. Kubernetes was an instant hit, and starting this year, Docker Inc. has packaged Kubernetes as an additional orchestration engine alongside Docker Swarm.
From now on, Kubernetes will be a part of the Docker community and Docker Enterprise Edition. Sounds pretty cool, huh? The best of both worlds packaged together as a single binary.
Bird’s Eye Overview
Kubernetes, k8s, or kube, is an open source platform that automates container operations. It eliminates most of the existing manual processes, which involve the deploying, scaling, and managing of containerized applications. Phew! thats a lot of work.
With Kubernetes, you can cluster groups of hosts running containers together. Kubernetes helps you manage those clusters. These clusters can span the public, private, and hybrid clouds — and who knows, the Star War universe one day.
Kubernetes was developed and designed by the engineering team at Google. Google has long been a contributor to container technology. Alongside being vocal about its use of container technology, Kubernetes is the technology behind Google’s cloud service offerings.
Google deploys more than 2 billion containers a week. All powered by an internal platform called Borg (sounds more like some Orc warlord from Mordor, but no). Borg was the predecessor to Kubernetes. The lessons learned by Google working with Borg over the years became the guiding force behind Kubernetes.
Kubernetes makes everything associated with deploying and managing containerised applications a joy. Kubernetes automates rollouts, rollbacks, and monitors the health of deployed services. This prevents bad rollouts before things actually go bad.
Additionally, Kubernetes can scale services up or down based on utilisation, ensuring you’re only running what you need, when you need it, wherever you need it. Like containers, Kubernetes allows us to manage clusters, enabling the setup to be version controlled and replicated.
This was a birds eye view, but don’t stop here. There’s more to Kubernetes than meets the eye (and that’s why I am writing this in the first place).
How does Kubernetes work?
Kubernetes is a very complex system as compared to Docker’s orchestration solution, Docker Swarm. To understand how Kubernetes works, we need to understand its underlying concepts and principles.
The Desired State
Desired state is one of the core concepts of Kubernetes. You are free to define a state for the execution of containers inside Pods. If, due to some failure, the container stops running, Kubernetes recreates the Pod based on the lines of the desired state.
Kubernetes strictly ensures that all the containers running across the cluster are always in the desired state. This is enforced by Kubernetes Master which is a part of the Kubernetes Control Plane. You can use the **kubectl** which interacts directly with the cluster to set or modify the desired state through the Kubernetes API.
Kubernetes Objects
As defined in the Kubernetes Documentation:
A Kubernetes object is a “record of intent”–once you create the object, the Kubernetes system will constantly work to ensure that object exists. By creating an object, you’re effectively telling the Kubernetes system what you want your cluster’s workload to look like; this is your cluster’s desired state.
The state of the entities in the system at any given point of time is represented by Kubernetes Objects. Kubernetes Objects also act as an additional layer of abstraction over the container interface. You can now directly interact with instances of Kubernetes Objects instead of interacting with containers. The basic Kubernetes objects are as follows:
- Pod is the smallest deployable unit on a Node. It’s a group of containers which must run together. Quite often, but not necessarily, a Pod usually contains one container.
- Service is used to define a logical set of Pods and related policies used to access them.
- Volume is essentially a directory accessible to all containers running in a Pod.
- Namespaces are virtual clusters backed by the physical cluster.
There are a number of Controllers provided by Kubernetes. These Controllers are built upon the basic Kubernetes Objects and provide additional features. The Kubernetes Controllers include:
- ReplicaSet ensures that a specified number of Pod replicas are running at any given time.
- Deployment is used to change the current state to the desired state.
- StatefulSet is used to ensure control over the deployment ordering and access to volumes, etc.
- DaemonSet is used to run a copy of a Pod on all the nodes of a cluster or on specified nodes.
- Job is used to perform some task and exit after successfully completing their work or after a given period of time.
Kubernetes Control Plane
The Kubernetes Control Plane works to make the cluster’s current state match your desired state. To do so, Kubernetes performs a variety of tasks automatically — for instance, starting or restarting containers, scaling the number of replicas of a given application, and much more.
As defined in the Kubernetes Documentation:
The various parts of the Kubernetes Control Plane, such as the Kubernetes Master and kubelet processes, govern how Kubernetes communicates with your cluster. The Control Plane maintains a record of all of the Kubernetes Objects in the system, and runs continuous control loops to manage the object’s state. At any given time, the Control Plane’s control loops will respond to changes in the cluster and work to make the actual state of all the objects in the system match the desired state that you defined.
The Kubernetes Control Plane performs the task of maintaining the desired state across the cluster. It records the object state and continuously runs a control loop to check if the current state of the object matches the desired state. You can think of it as the Government running the state.
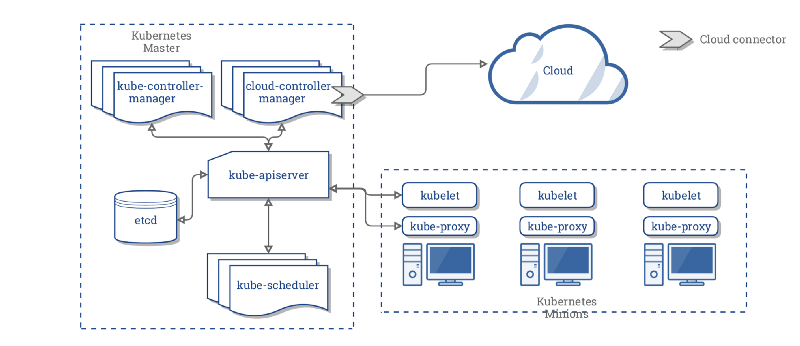
Kubernetes Master
As a part of the Kubernetes Control Plane, the Kubernetes master works towards continuously maintaining the desired state throughout your cluster. The **kubectl** command is an interface to communicate with the cluster’s Kubernetes master through the Kubernetes API. Think of it as the police force responsible for maintaining law and order.
As defined in the Kubernetes Documentation:
The “master” refers to a collection of processes managing the cluster state. Typically these processes are all run on a single node in the cluster, and this node is also referred to as the master. The master can also be replicated for availability and redundancy.
The Kubernetes Master controls and coordinates all the nodes in the cluster with the help of three processes that run on one or more master nodes in the cluster. Each Kubernetes master in your cluster runs these three processes:
- kube-apiserver: the single point of management for the entire cluster. The API server implements a RESTful interface for communication with tools and libraries. The
**kubectl**command directly interacts with the API server. - kube-controller-manager: regulates the state of the cluster by managing the different kinds of controllers.
- kube-scheduler: schedules the workloads across the available nodes in the cluster.
Kubernetes Nodes
The Kubernetes nodes are basically worker machines (VMs, physical, bare metal servers, etc) in a cluster running your workloads. The nodes are controlled by Kubernetes master and are continuously monitored to maintain the desired state of the application. Previously they were known as minions (not the tiny hilarious yellow loyal army of Gru). Similar to the master, each Kubernetes node in your cluster runs two processes:
- kubelet is a communication interface between the node and the Kubernetes Master.
- kube-proxy is a network proxy that reflects services as defined in the Kubernetes API on each node. It can also perform simple TCP and UDP stream forwarding.
The Voting App
Let’s get you up to speed by actually running an application on Kubernetes. But, before you can move a step further in the amazing world of Kubernetes, first you’ll need to install and run Kubernetes locally. So, let’s start with that. Skip this if you have Kubernetes and MiniKube installed.
Installing Kubernetes
Kubernetes now comes out of the box with Docker Community Edition for version 17.12.+. In case you don’t have the Community Edition installed, you can download it here.
Installing MiniKube
To run Kubernetes locally you will need to install MiniKube. It creates a local VM and runs a single node cluster. Don’t even think of running your production cluster on it. It’s best used for development and testing purposes only.
The Single Node Cluster
To run a single node cluster, we just need to run the **minikube start** command. Voilà, a VM, a Cluster and Kubernetes are running.
$ minikube start
Starting local Kubernetes v1.10.0 cluster...
Starting VM...
Getting VM IP address...
Moving files into cluster...
Setting up certs...
Connecting to cluster...
Setting up kubeconfig...
Starting cluster components...
Kubectl is now configured to use the cluster.
Loading cached images from config file.
To verify that your setup was successful, run kubectl version to check for the Kubernetes version running on your machine.
$ kubectl version
Client Version: version.Info{Major:"1", Minor:"9", GitVersion:"v1.9.1", GitCommit:"3a1c9449a956b6026f075fa3134ff92f7d55f812", GitTreeState:"clean", BuildDate:"2018-01-04T20:00:41Z", GoVersion:"go1.9.2", Compiler:"gc", Platform:"darwin/amd64"}
Server Version: version.Info{Major:"1", Minor:"10", GitVersion:"v1.10.0", GitCommit:"fc32d2f3698e36b93322a3465f63a14e9f0eaead", GitTreeState:"clean", BuildDate:"2018-03-26T16:44:10Z", GoVersion:"go1.9.3", Compiler:"gc", Platform:"linux/amd64"}
The Voting App Finally
Fast forward to the Voting App now that you have installed Kubernetes on your local machine. This is a simple application based on micro-services architecture, consisting of 5 simple services.
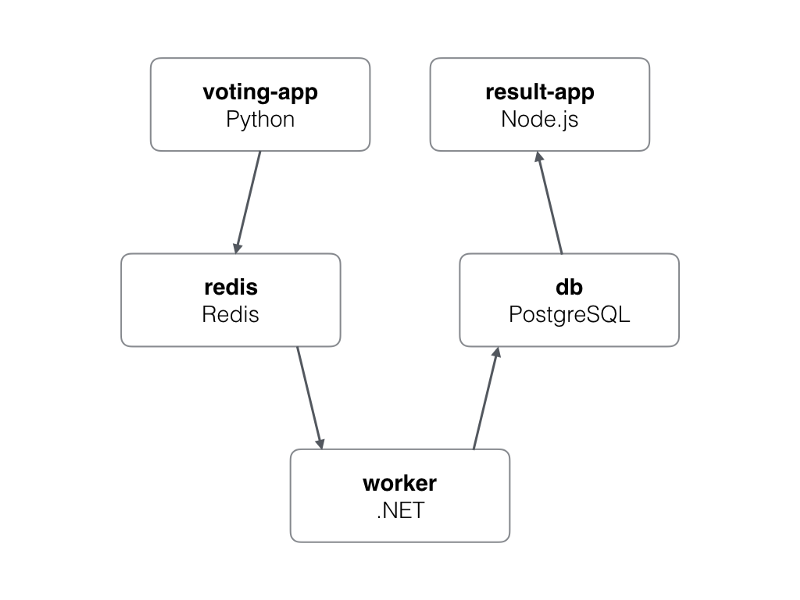
- Voting-App: Frontend of the application written in Python, used by users to cast their votes.
- Redis: In-memory database, used as intermediate storage.
- Worker: .Net service, used to fetch votes from Redis and store in Postgres database.
- DB: PostgreSQL database, used as database.
- Result-App: Frontend of the application written in Node.js, displays the voting results.
Git clone and cd into the voting app repo.
dockersamples/example-voting-app
_example-voting-app — Example Docker Compose app_github.com
The folder “k8s-specifications” contains the Kubernetes yaml specifications of the Voting App’s services. For each service it has two yaml files: a service file and a deployment file. The service file defines a logical set of pods and the policies around them. Below is the resulting service file from the voting app.
apiVersion: v1
kind: Service
metadata:
  name: result
spec:
  type: NodePort
  ports:
  - name: "result-service"
    port: 5001
    targetPort: 80
    nodePort: 31001
  selector:
    app: result
A Deployment file is used to define the desired state of your application, such as the number of replicas that should be running at any given point of time. Below is the resulting deployment file from the voting app.
apiVersion: extensions/v1beta1
kind: Deployment
metadata:
  name: result
spec:
  replicas: 1
  template:
    metadata:
      labels:
        app: result
    spec:
      containers:
      - image: dockersamples/examplevotingapp_result:before
        name: result
Time to create the service and deployment objects — piece of cake.
$ kubectl create -f k8s-specifications/
deployment "db" created
service "db" created
deployment "redis" created
service "redis" created
deployment "result" created
service "result" created
deployment "vote" created
service "vote" created
deployment "worker" created
There you go! Your app has successfully been deployed to the single node cluster, and you can list the running pods and services.
$ kubectl get pods
NAME READY STATUS RESTARTS AGE
db-86b99d968f-s5pv7 1/1 Running 0 1m
redis-659469b86b-hrxqs 1/1 Running 0 1m
result-59f4f867b8-cthvc 1/1 Running 0 1m
vote-54f5f76b95-zgwrm 1/1 Running 0 1m
worker-56578c48f8-h7zvs 1/1 Running 0 1m
$ kubectl get svc
NAME TYPE CLUSTER-IP EXTERNAL-IP PORT(S) AGE
db ClusterIP 10.109.241.59 <none> 5432/TCP 2m
kubernetes ClusterIP 10.96.0.1 <none> 443/TCP 23m
redis ClusterIP 10.102.242.148 <none> 6379/TCP 2m
result NodePort 10.106.7.255 <none> 5001:31001/TCP 2m
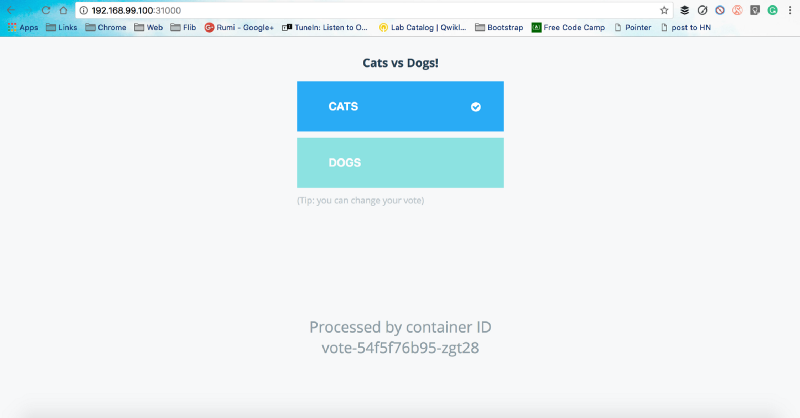
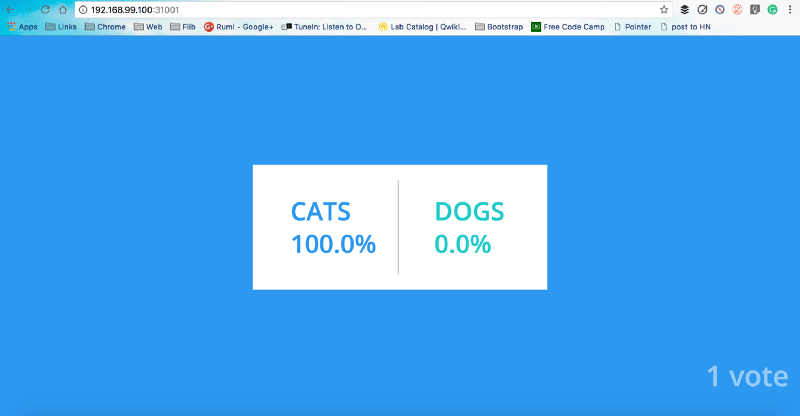
vote NodePort 10.103.28.96 <none> 5000:31000/TCP 2m
Behold the cats vs dogs war, which the cats always win. Cats are cute by design and their IDC attitude is a big win. But this is a discussion for another time.
Back to the moment, your voting app is exposed on port 30001, and the results app is exposed on port 31001. You can access it using localhost:port or, using the IP on which minikube is running, you can get that using **minikube ip** command.
Kubernetes Cheat Sheet
Since you all have shown a lot of patience going through these blocks of text, let me now present to you the Kubernetes Cheat Sheet (which could have been a whole new article in itself, but whatever!):
Minikube command:
# Start Minikube server
$ minikube start
# Get the Minikube IP
$ minikube ip
Version Info:
$ kubectl version             #Get kubectl version
$ kubectl cluster-info        #Get cluster info
Creating Objects:
$ kubectl create -f ./file.yml
$ kubectl create -f ./file1.yml -f ./file2.yaml
$ kubectl create -f ./dir
$ kubectl create -f http://www.fpaste.org/279276/48569091/raw/
Viewing and finding resources:
# List all services in the namespace
$ kubectl get services
# List all pods in all namespaces
$ kubectl get pods --all-namespaces
# List all pods in the namespace, with more details
$ kubectl get pods -o wide
# List a particular replication controller
$ kubectl get rc <rc-name>
# List all pods with a label env=production
$ kubectl get pods -l env=production
List services sorted by name:
$ kubectl get services --sort-by=.metadata.name
Modifying and Deleting resources:
$ kubectl label pods <pod-name> new-label=awesome
$ kubectl annotate pods <pod-name> icon-url=http://goo.gl/XXBTWq
$ kubectl delete pod pingredis-XXXXX
Scaling up and down:
$ kubectl scale --replicas=3 deployment nginx
Interacting with running Pods:
$ kubectl logs <pod-name>
# Runs a tailf log output
$ kubectl logs -f <pod-name>
# Run pod as interactive shell
$ kubectl run -i --tty busybox --image=busybox -- sh
# Attach to Running Container
$ kubectl attach <podname> -i
# Forward port of Pod to your local machine
$ kubectl port-forward <podname> <local-and-remote-port>
# Forward port to service
$ kubectl port-forward <servicename> <port>
# Run command in existing pod (1 container case)
$ kubectl exec <pod-name> -- ls /
# Run command in existing pod (multi-container case)
$ kubectl exec <pod-name> -c <container-name> -- ls /
DNS Lookups:
$ kubectl exec busybox -- nslookup kubernetes
$ kubectl exec busybox -- nslookup kubernetes.default
$ kubectl exec busybox -- nslookup kubernetes.default.svc.cluster.local
Create and expose a deployment:
$ kubectl run nginx --image=nginx:1.9.12
$ kubectl expose deployment nginx --port=80 --type=LoadBalancer
Summary
Kubernetes is super exciting, cool, and most likely the future of container orchestration. The tech is great, and it is worth investing your time in if you are interested in containers or simply a fan like me. Kubernetes is a very powerful container orchestration engine, it can be used to amplify cloud containerisation strategy as it is designed to automate deploying, scaling, and operating containers.
The sunny side is that Kubernetes readily integrates with any cloud portfolio, be it public, private, hybrid or multi-cloud. Cloud vendors like AWS and Google provide managed Kubernetes services like Elastic Container Service for Kubernetes (EKS) and Google Kubernetes Engine (GKE). The dark side is that Kubernetes is significantly more complex than Docker’s very own container orchestration engine Docker Swarm.
All the information here was just for wetting your feet. If you feel like taking a dive in the awesome Kubernetes ocean, here you go.
ramitsurana/awesome-kubernetes
_awesome-kubernetes - A curated list for awesome kubernetes sources :ship::tada:_github.com
After you emerge from the deep dive, you might as well want to get hands on Kubernetes. Take Kubernetes for a ride or let it take you for one, in the Play with Kubernetes labs.
Play with Kubernetes
_Play with Kubernetes is a labs site provided by Docker and created by Tutorius. Play with Kubernetes is a playground…_labs.play-with-k8s.com
I hope this article helped in the understanding of Kubernetes. I’d love to hear about how you use Kubernetes in your projects. Clap if it increased your knowledge, and help it reach more people.