
Interested in learning JavaScript? Get my ebook at jshandbook.com
The Push API allows a web app to receive messages pushed by a server, even if the web app is not currently open in the browser or not running on the device.
The Push API is a recent addition to browser APIs, and it’s currently supported by Chrome (Desktop and Mobile), Firefox, and Opera since 2016.
IE and Edge do not support it yet, and Safari has its own implementation of it. Since Chrome and Firefox support it, approximately 60% of users browsing on their desktops have access to it, so it’s quite safe to use.
What can you do with it
You can send messages to your users, pushing them from the server to the client, even when the user is not browsing the site.
This lets you deliver notifications and content updates, giving you the ability to engage more with your audience.
This is huge, because one of the missing pillars of the mobile web, compared to native apps, used to be the ability to receive notifications, along with offline support.
How it works
When a user visits your web app, you can trigger a panel asking permission to send updates. A Service Worker is installed, and operates in the background listening for a Push Event.
Push and Notifications are two separate concepts and APIs. They’re sometimes mixed up because of the push notifications term used in iOS. Basically, the Notifications API is invoked when a push event is received using the Push API.
Your server sends the notification to the client, and the Service Worker, if given permission, receives a push event. The Service Worker reacts to this event by triggering a notification.
Getting the user’s permission
The first step in working with the Push API is getting the user’s permission to receive data from you.
Many sites implement this panel badly, showing it on the first page load. The user is not yet convinced your content is good, and they will deny the permission. So do it wisely.
There are six steps to getting permission from your user:
- Check if Service Workers are supported
- Check if the Push API is supported
- Register a Service Worker
- Request permission from the user
- Subscribe the user and get the PushSubscription object
- Send the PushSubscription object to your server
Let’s go through them one by one.
Check if Service Workers are supported
if (!('serviceWorker' in navigator)) { // Service Workers are not supported. Return return}
Check if the Push API is supported
if (!('PushManager' in window)) { // The Push API is not supported. Return return}
Register a Service Worker
This code registers the Service Worker located in the worker.js file placed in the domain root:
window.addEventListener('load', () => { navigator.serviceWorker.register('/worker.js') .then((registration) => { console.log('Service Worker registration completed with scope: ', registration.scope) }, (err) => { console.log('Service Worker registration failed', err) })})
To know more about how Service Workers work in detail, check out the Service Workers guide.
Request permission from the user
Now that the Service worker is registered, you can request the permission.
The API to do this has changed over time, and it went from accepting a callback function as a parameter to returning a Promise, breaking the backward and forward compatibility. And note that we need to do both, as we don’t know which approach is implemented by the user’s browser.
The code is the following, calling Notification.requestPermission().
const askPermission = () => { return new Promise((resolve, reject) => { const permissionResult = Notification.requestPermission( (result) => { resolve(result) } ) if (permissionResult) { permissionResult.then(resolve, reject) } }) .then((permissionResult) => { if (permissionResult !== 'granted') { throw new Error('Permission denied') } })}
The permissionResult value is a string, that can have the value of: - granted - default - denied
This code causes the browser to show the permission dialogue:
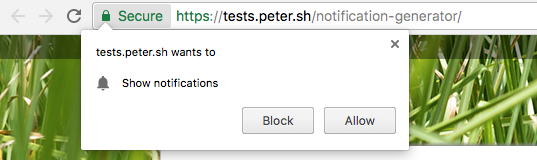
If the user clicks Block, you won’t be able to ask for the user’s permission any more, unless they manually go and unblock the site in an advanced settings panel in the browser (very unlikely to happen).
If the user gave us permission, we can subscribe them by calling registration.pushManager.subscribe().
const APP_SERVER_KEY = 'XXX'window.addEventListener('load', () => { navigator.serviceWorker.register('/worker.js') .then((registration) => { askPermission().then(() => { const options = { userVisibleOnly: true, applicationServerKey: urlBase64ToUint8Array(APP_SERVER_KEY) } return registration.pushManager.subscribe(options) }).then((pushSubscription) => { // we got the pushSubscription object } }, (err) => { console.log('Service Worker registration failed', err) })})
APP_SERVER_KEY is a string — called Application Server Key or VAPID key — that identifies the applications’s public key, part of a public / private key pair.
It will be used as part of the validation that, for security reasons, comes up to make sure you (and only you, not someone else) can send a push message back to the user.
Send the PushSubscription object to your server
In the previous snippet we got the pushSubscription object, which contains all we need to send a push message to the user. We need to send this information to our server so we’re able to send notifications later on.
We first create a JSON representation of the object
const subscription = JSON.stringify(pushSubscription)
and we can post it to our server using the Fetch API:
const sendToServer = (subscription) => { return fetch('/api/subscription', { method: 'POST', headers: { 'Content-Type': 'application/json' }, body: JSON.stringify(subscription) }) .then((res) => { if (!res.ok) { throw new Error('An error occurred') } return res.json() }) .then((resData) => { if (!(resData.data && resData.data.success)) { throw new Error('An error occurred') } })}sendToServer(subscription)
Server-side, the /api/subscription endpoint receives the POST request and can store the subscription information into its storage.
How the Server side works
So far we only talked about the client-side part: getting a user’s permission to be notified in the future.
What about the server? What should it do, and how should it interact with the client?
These server-side examples use Express.js as the base HTTP framework, but you can write a server-side Push API handler in any language or framework
Registering a new client subscription
When the client sends a new subscription, remember that we used the /api/subscription HTTP POST endpoint, sending the PushSubscription object details in JSON format, in the body.
We initialize Express.js:
const express = require('express')const app = express()
This utility function makes sure the request is valid and has a body and an endpoint property, otherwise it returns an error to the client:
const isValidSaveRequest = (req, res) => { if (!req.body || !req.body.endpoint) { res.status(400) res.setHeader('Content-Type', 'application/json') res.send(JSON.stringify({ error: { id: 'no-endpoint', message: 'Subscription must have an endpoint' } })) return false } return true}
The next utility function saves the subscription to the database, returning a promise resolved when the insertion completed (or failed). The insertToDatabase function is a placeholder — we’re not going into those details here:
const saveSubscriptionToDatabase = (subscription) => { return new Promise((resolve, reject) => { insertToDatabase(subscription, (err, id) => { if (err) { reject(err) return } resolve(id) }) })}
We use those functions in the POST request handler below. We check if the request is valid, then we save the request and return a data.success: true response back to the client, or an error:
app.post('/api/subscription', (req, res) => { if (!isValidSaveRequest(req, res)) { return } saveSubscriptionToDatabase(req, res.body) .then((subscriptionId) => { res.setHeader('Content-Type', 'application/json') res.send(JSON.stringify({ data: { success: true } })) }) .catch((err) => { res.status(500) res.setHeader('Content-Type', 'application/json') res.send(JSON.stringify({ error: { id: 'unable-to-save-subscription', message: 'Subscription received but failed to save it' } })) })})app.listen(3000, () => { console.log('App listening on port 3000')})
Sending a Push message
Now that the server has registered the client in its list, we can send it Push messages. Let’s see how that works by creating an example code snippet that fetches all subscriptions and sends a Push message to all of them at the same time.
We use a library because the Web Push protocol is complex, and a lib allows us to abstract away a lot of low level code that makes sure we can work safely and can correctly handle any edge case.
This example uses the
web-pushNode.js library to handle sending the Push message.
We first initialize the web-push lib, and we generate a tuple of private and public keys, and set them as the VAPID details:
const webpush = require('web-push')const vapidKeys = webpush.generateVAPIDKeys()const PUBLIC_KEY = 'XXX'const PRIVATE_KEY = 'YYY'const vapidKeys = { publicKey: PUBLIC_KEY, privateKey: PRIVATE_KEY}webpush.setVapidDetails( 'mailto:my@email.com', vapidKeys.publicKey, vapidKeys.privateKey)
Then we set up a triggerPush() method, responsible for sending the push event to a client. It just calls webpush.sendNotification() and catches any error. If the return error HTTP status code is 410, which means gone, we delete that subscriber from the database.
const triggerPush = (subscription, dataToSend) => { return webpush.sendNotification(subscription, dataToSend) .catch((err) => { if (err.statusCode === 410) { return deleteSubscriptionFromDatabase(subscription._id) } else { console.log('Subscription is no longer valid: ', err) } })}
We don’t implement getting the subscriptions from the database, but we leave it as a stub:
const getSubscriptionsFromDatabase = () => { //stub}
The meat of the code is the callback of the POST request to the /api/push endpoint:
app.post('/api/push', (req, res) => { return getSubscriptionsFromDatabase() .then((subscriptions) => { let promiseChain = Promise.resolve() for (let i = 0; i < subscriptions.length; i++) { const subscription = subscriptions[i] promiseChain = promiseChain.then(() => { return triggerPush(subscription, dataToSend) }) } return promiseChain }) .then(() => { res.setHeader('Content-Type', 'application/json') res.send(JSON.stringify({ data: { success: true } })) }) .catch((err) => { res.status(500) res.setHeader('Content-Type', 'application/json') res.send(JSON.stringify({ error: { id: 'unable-to-send-messages', message: `Failed to send the push ${err.message}` } })) })})
The above code gets all the subscriptions from the database, then it iterates on them, and it calls the triggerPush() function we explained before.
Once the subscriptions are done, we return a successful JSON response. Unless an error occurred, and then we return a 500 error.
In the real world…
It’s unlikely that you’ll set up your own Push server unless you have a very special use case, or you just want to learn the tech or you like to DIY.
Instead, you’ll usually want to use platforms such as OneSignal which transparently handle Push events to all kind of platforms, Safari and iOS included, for free.
Receive a Push event
When a Push event is sent from the server, how does the client get it?
It’s a normal JavaScript event listener, on the push event, which runs inside a Service Worker:
self.addEventListener('push', (event) => { // data is available in event.data})
event.data contains the [PushMessageData](https://developer.mozilla.org/docs/Web/API/PushMessageData) object which exposes methods to retrieve the push data sent by the server, in the format you want:
- arrayBuffer() : as an ArrayBuffer object
- blob(): as a Blob object
- json(): parsed as JSON
- text(): plain text
You’ll normally use event.data.json().
Displaying a notification
Here we intersect a bit with the Notifications API, but for a good reason, as one of the main use cases of the Push API is to display notifications.
Inside our push event listener in the Service Worker, we need to display the notification to the user. We also need to tell the event to wait until the browser has shown it before the function can terminate. We extend the event lifetime until the browser has finished displaying the notification (until the promise has been resolved), otherwise the Service Worker could be stopped in the middle of your processing:
self.addEventListener('push', (event) => { const promiseChain = self.registration.showNotification('Hey!') event.waitUntil(promiseChain)})
Interested in learning JavaScript? Get my ebook at jshandbook.com