

I love the number of awesome tutorials there are on how to make different web apps. As great as these are, though, I often felt stuck when it came to starting my own web apps.
So I wrote this article to walk you through my thought process. This is how I plan and develop my own projects.
A quick note before we start: this article is not a "silver bullet" guide on how to create ANY project. This is just how I personally approach my projects. It may work for you, it may not.
There is no "right" way to create any app. Remember: there are many roads that will get you to the end of your journey. (Unless, you're taking a shiny ring to Mordor, in which case there is only 1 road, unfortunately).
I'm going to use React.js to code the example app. I've included a Code Sandbox with the finished app at the end of this article.
So you'll also need to have basic familiarity with setting up a React project. Don't worry though, the principles in this article still apply regardless of the language you use to code the app.
OK let's get started. Today we're going to design a... TODO-LIST!
Only joking. We're going to make a simple calculator.
"What does it do?"
This is the first question I ask myself before starting any side project. I want my calculator to be able to:
- Add, subtract, divide and multiply numbers
- Show the result of the calculation
- Reset the display
This should be plenty for now. Planning out the features in this way gives you an idea of your app will do, and starts putting you "in the zone" as it were.
This approach also gives you a solid goal to work towards. Once you have implemented all the features, you're finished, and you can start thinking about your next side project - Huzzah!
Otherwise, you risk ending up trying to add too many features, and seeing calculators in your sleep. Of course, you can keep adding features if you want. But make sure to have an end goal to work towards.
In the real world - depending on your role - there may be a client or product owner who defines the "what does it do" part for you. Your job as a the developer will be break up these requirements into more detailed tasks, which we'll get into later.
"What does it look like?"
Now that I have an idea of the features, I will start to think about what it's going to look like.
If you're struggling to come up with designs, there are a number of ways you can do this:
- look at examples of similar apps
- browse CSS frameworks for elements you can use
- or use your imagination. (Not every side project you do has to look "incredible.")
I am feeling particularly artsy today so I am going to make a quick wireframe with how I want my calculator to look:
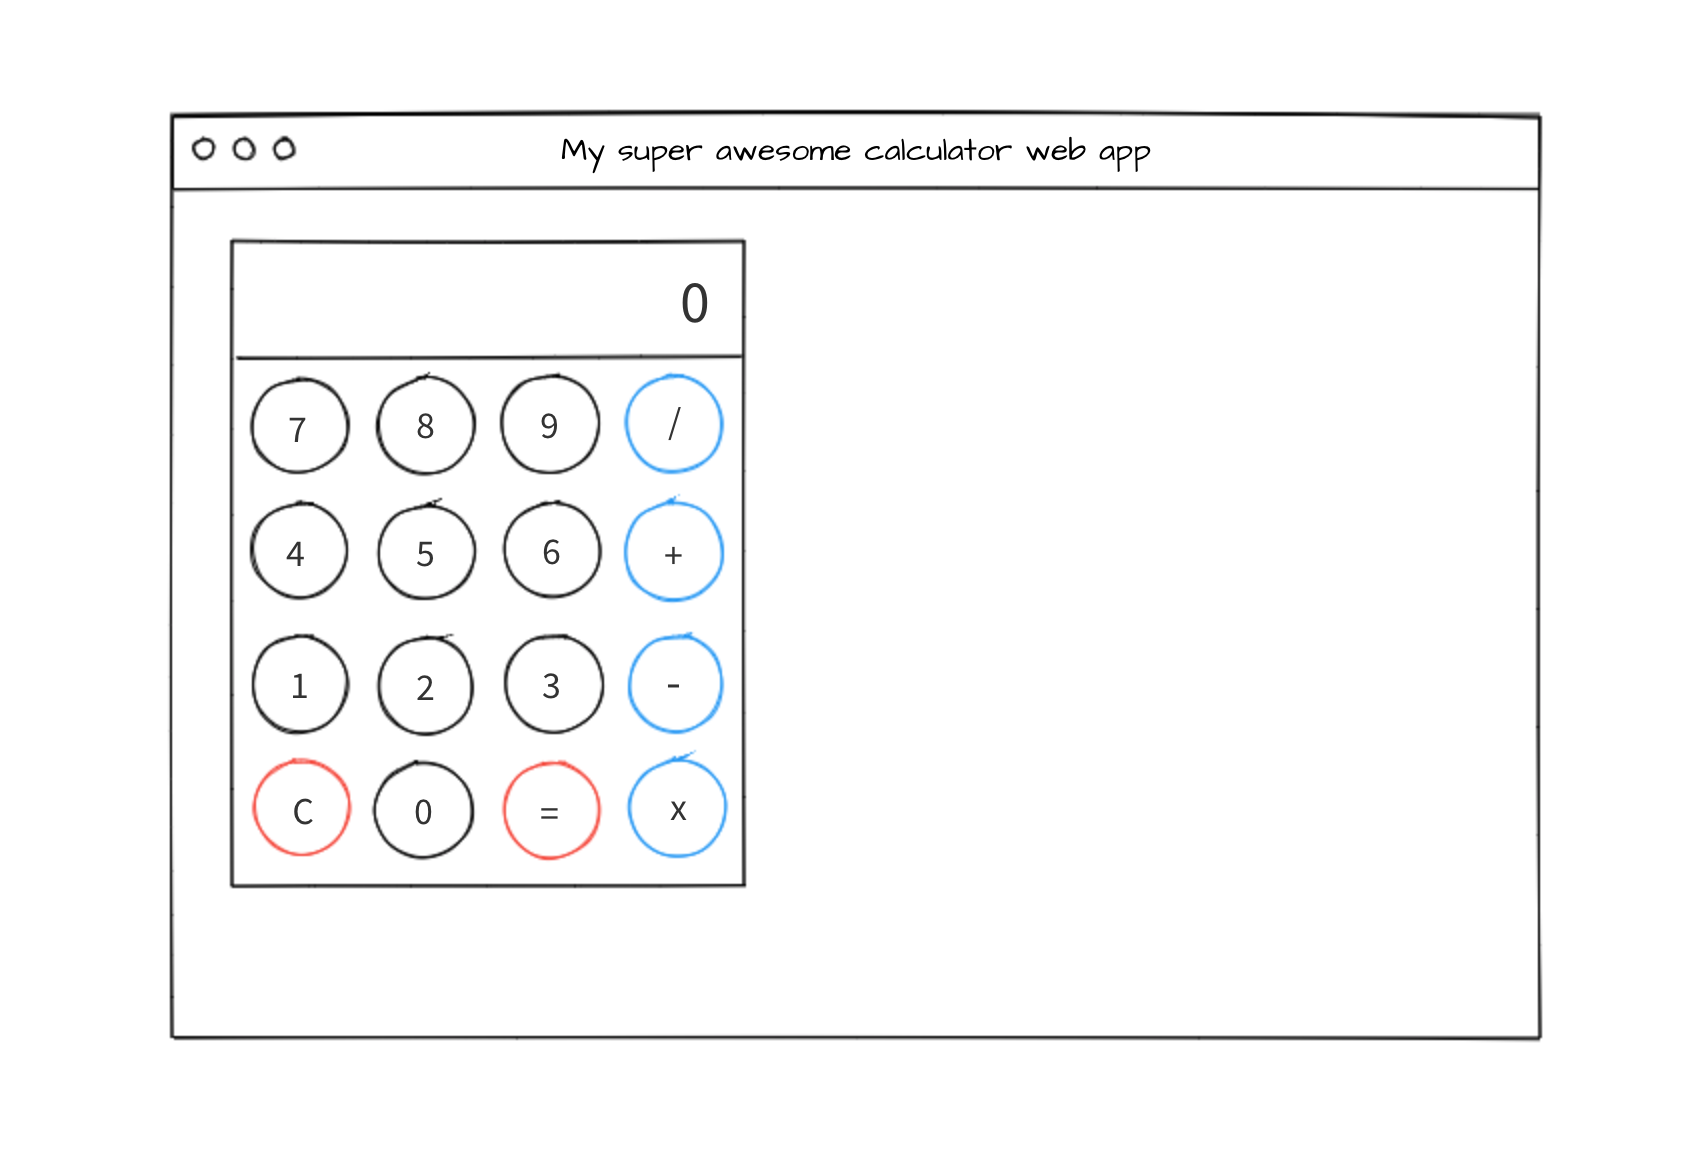
Ah! Marvelous! I should become an artist.
So I have my features, and I have my sketch that Van Gogh himself would be proud of.
In the real world, when you're working as part of a team, a designer may come up with something like this for you. Or, even better, you might be given a working prototype, which you can play with.
"How do I position and style the elements?"
I'm starting to get a good feel for what my app should do, and what it looks like. Now it's time to get a bit more technical.
At this point I'm thinking, "OK, I've got some buttons, and a big ole' display. How will I position everything?"
I like to think that implementing a design is a bit like building a house. Lay the foundation (the layout), build the outer structure (buttons, inputs), and add the finishing touches later (colours, icons, styles).
When talking about layout, the first things that come to my mind are CSS Grid, Flexbox, or a framework (such as Bootstrap). I'm going to use Flexbox, since it is responsive, makes it super easy to arrange items within a row, and well, because I feel like it. This saves me having to install extra dependencies we don't need.
"How does it behave?"
Now it's time to think about how the app will behave. This is basically breaking down our features into more detail to help design the code.
When I ask myself this, I am thinking about things like:
- What does the app look like when it loads?
- What happens when a user clicks a button? Does the style change?
- How does the UI react to various user actions?
Another way to answer this question is to play with an existing example.
A small task for you: try to open up the calculator on your computer, and start doing some stuff. Adding, multiplying, whatever.
When you perform an action, see if you can capture in as much detail as possible, what happens.
Here's what I found:
- When the app loads, the display is set to "0" and all the buttons are in an "inactive" state
- When the user clicks a number, the display will update with the new value. The clicked button will change style to indicate to the user that the click was successful.
- When the user clicks an operator, the selected operator will indicate in some way that it has been selected.
- If an operator button has been clicked, and the user then clicks a number button, the display will firstly reset to zero before displaying the next numbers the user clicks.
- When the equals button is clicked, a calculation is performed using the initial number, the selected operator, and the next number that was entered.
- When the user clicks the clear button, the display will reset to zero, and the app will reset.
In the real world, we won't always have the luxury of an example or a prototype to play with. But as your experience grows, it becomes easier to do this based on a wireframe or mockup. This is why I like to suggest to beginners to replicate existing apps, as that gives you an example to practice this critical thinking and analysis with.
But why do we have to go into such nitty-gritty detail? Good question. And the answer is because computers are incredibly smart, but also incredibly dumb. (Don't believe me? Try removing a random curly brace from your code and watch all hell break loose.)
The instructions we give to computers have to be extremely specific. For example, looking back at our behaviours above, clicking a number will act differently depending on if an operator was clicked or not.
We as humans know how a calculator works, but a computer doesn't until we tell it how.
"What will my code look like?"
Just like I spent some time designing the UI, I like to do the same with the code. There's many benefits to this:
- Makes me think in detail about what components I need
- Makes me think about the workflows
- It means writing the code will be easier/faster, since I have a plan
- Catches issues and problem areas early
I mentioned earlier that for this project I'll aim to keep things simple, so I'll stick to this approach. In the beginning, I'll keep everything in one component. However I'll start to refactor and split into components when:
- That the code grows to the point where it's hard to manage or reason about
- There is a lot of duplicated code
- A single element on the page requires it's own functions and state
Have you ever got towards the end of a project and thought "sh*t! I forgot something now I have to redesign all this stuff?" By planning in advance, you'll avoid this trap. With that in mind, here's the stuff I think I'll need. Don't spend all day thinking about it, find a balance between planning and just getting started. Let's break our UI mockup into it's individual parts and think of what code will be needed.
The Display
My display shows the user the current number, so I'm going to need some sort of state value for this. Nothing happens when I click it, so I don't need anything there.
The number buttons
Since the number buttons affect the number shown in the display, I'm going to need a function that gets called by an onClick event to manage this. No need to store the selected number in state right now.
The operator buttons
The operator button is an interesting one - as different things happen (remember our, "how does it behave?" notes above?). Since I'll need to know the currently selected operator, I'll store that as a state value as well.
The equals buttons
The equal button should take the display value, the operator, the previously entered value and calculate the result. Easy!
Not quite, we've hit our first problem! Let's look back to our behaviours
If an operator button has been clicked, and the user then clicks a number button, the display will firstly reset before display the numbers the user clicked
The first number the user enters into the display gets reset when they click an operator and starts entering the next number - which means our app has no idea what the first number was when the user clicks equals (I told you computers were dumb)! Let's have a think about this:
When the operator button is clicked, this is the point where the display resets, and updates with the next number the user enters. Logically then, it makes sense to store the previous display value when an operator is clicked. For this to work, I'll need a function and a state value that stores the display value when an operator is clicked.
The clear button
This is an easy one - reset our state values to zero, allowing the user to start again. I'll need a simple onClick function attached to the button to handle this.
"What do I need to test? And what can go wrong?"
Depending on who you talk to, there can be different ways to approach testing. Some like to do TDD (which is writing the tests first) and others write them at the end. I do both depending on the project. But the main thing is you write them at some point.
When I think about my tests, I look at the requirements. The first requirement (or feature) is:
- Add, subtract, divide and multiply numbers
So I'll need to test that the app can do these things. I won't go into detail about how to write tests, but a good test suite should cover:
- The requirements and common use cases
- The edge cases (e.g user enters 99999999999999999999 + 9999999999999999999999)
- The error cases and where things can break (e.g user tries to divide by zero)
"How many tests should I write?", is probably your next question. Unfortunately there is no hard and fast number for this. There are endless amount of inputs you can have. If you follow the points above, you'll have a solid test suite for any project.
Thinking about your tests early will help you think about where errors can occur in your code, and allow you cater for it earlier in your designs.
Let's look at the code
This isn't a coding tutorial as such, so I'm not going to go into the nitty gritty of each step in this article. See the code sandbox at the end to see a working example, including the code/walkthrough for each step outlined below. Feel free to fork the code and play, destroy and experiment to your hearts content!
When writing code, we'll stick to the plan:
- Focus on getting the UI layout and elements in place first, using our wireframe as reference
- Implement the logic (JS, event handlers etc)
- Final touchups
- Remember to do the simplest thing to get everything working - no need to worry about refactoring and performance at the start!
Step 1 - Layout and Basic UI elements
(In the Code Sandbox linked below, click Step 1 button to see the working example, see app-step-1.js to view the code!)
Remember, we are going to start with the layout, and get the "scaffolding" of our app together. This will include adding the HTML and using Flexbox, to position our display and buttons. They won't do anything yet, but they will look nice. Sort of.
Step 2 - Adding the logic
(In the Code Sandbox linked below, click Step 2 button to see the working example, see app-step-2.js to view the code!)
We've done our planning for this part, so let's refer back to that. In our "What does my code look like" notes, we have to create a bunch of different state objects and functions to handle the events.
For this I take one item from our "What will my code look like?" list at a time, and reference back to the "How does it behave?" notes to piece everything together. I implement the functionality, and test that it's working (usually automated but manually will do). Example:
The first element in the list is the display. So I will add the state variables and logic for that. Test that it's working, and move onto the number buttons, and repeat. This is where writing your tests early is helpful - you can run the suite every so often to make sure nothing has broken.
Step 3 - Adding the bells and whistles
(In the Code Sandbox linked below, click Step 3 button to see the working example, see app-step-3.js to view the code!)
Awesome we're nearly done! Now that the logic is working, we will now go and add some of the finer touches (rounded buttons, borders, bigger display etc) to the app, and we're done! Our very basic calculator now does stuff!
Step 4 - Over to you!
I've purposely left some things out that you can go ahead and try if you feel like it. Use the approaches we learned so far - thinking about the behaviors, what function/state objects you'll need etc.
- Our calculator doesn't quite match the wireframe - can you add some color to the buttons? What about changing the colour of a selected button when it's clicked?
- No tests! Oh dear! See if you can add some
- Some duplicate code exists - can you find a way to render the buttons so we don't need to hard code 16
buttonelements? - Error handling - there is none! This is bad. What happens if you try to divide by zero? Or if you have a number that is wider than the display?
- When the user starts to input numbers, any preceding zero's are added to the display, for example
000003this isn't good UX, can you fix it?
Thanks for reading! Want more articles like this?
Hopefully this has given you an insight into one approach into coding apps. If you'd like to be updated when I release more articles like this, feel free to join the mailing list over at chrisblakely.dev! Or reach me over at Twitter if you fancy a chat :)