By Kenneth Angelo Reyes
When you're coding in React or any other tool, you might want or need to use a third-party library. Let's talk about an approach which will ensure that the third-party libraries you use will blend well with your application.
As application developers, there's no need to reinvent the wheel every time we start a new project. In most cases, we'll use a third-party library that offers a stable version of the functionality we're looking for.
Treat Libraries as Plugins
In software development, when you're using a third-party library, you have to consider the following:
- The application should be library-agnostic. In the future, you might decide to use a different library. Doing so should not break anything.
- Ensure data model consistency. The application's data model is most likely not compatible with the library's data model. When this is the case, some data transformation is needed.
- Ensure minimal dependency. The application may not need to use all the functionalities offered by the library. You should only consume functionalities that you need.
Essentially, what all this points to is that you shouldn't overly rely on the library. You should treat libraries as plugins that can easily be attached or detached when needed. Let's talk about how you can do that.
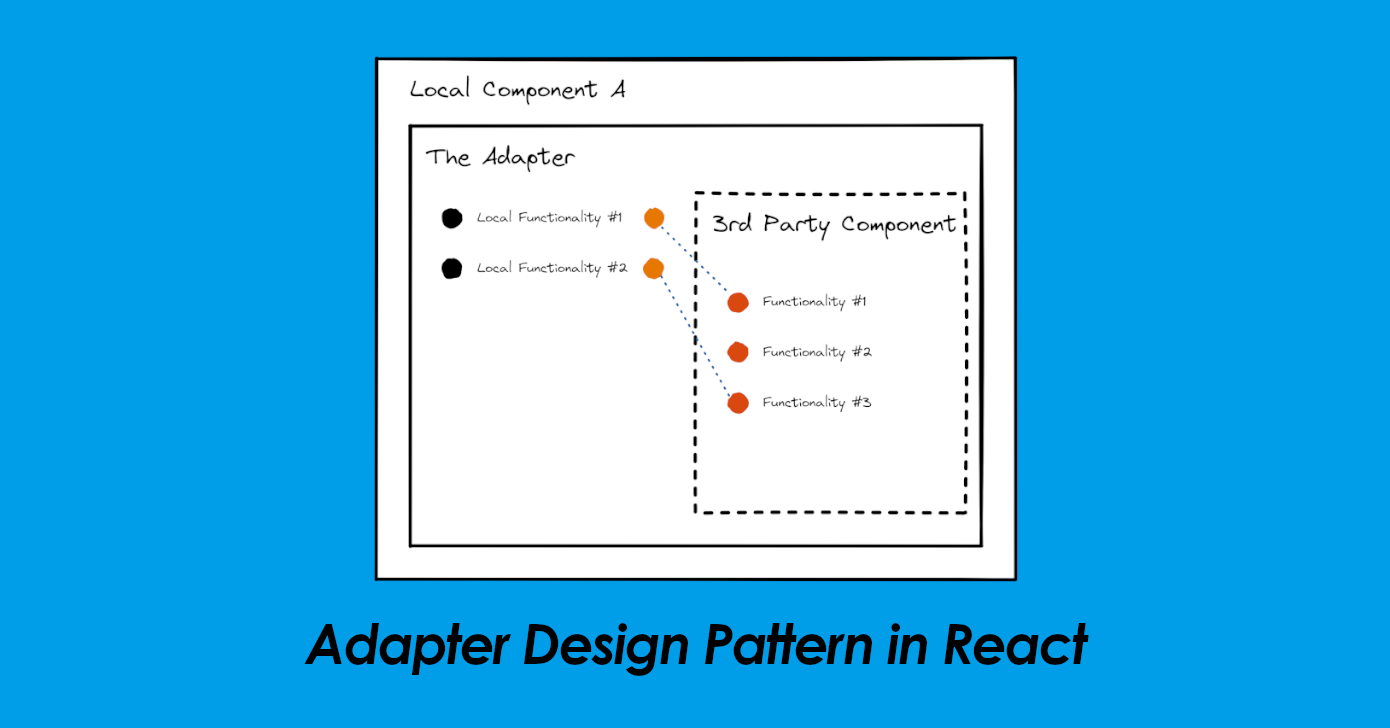
The Adapter Pattern in React
One way to make sure that you address all the points mentioned above is to use the adapter pattern.
The adapter pattern converts the interface of a class into another interface clients expect. The adapter lets classes work together that couldn’t otherwise because of incompatible interfaces. (Source)
To apply this in React, we have to introduce a wrapper around a third-party library. This wrapper will serve as the adapter ensuring that the application always has a stable reference to the functionality we're intending to wrap.
In React, there can be two wrapper types:
- Component wrapper – to wrap library components
- Function wrapper – to wrap library functions
In this article, we'll focus more on component wrappers. Let's take a look at an example.
A Component Wrapper in Action
For our example, we'll create an adapter for React Flow, a third-party diagram library.
The React Flow library exposes a lot of functionalities but for our example, we only need to do the following:
- Render basic diagram nodes
- React when a node is selected
- React when there's no longer any selection
To do this, we'll first implement the Diagram Adapter:
import ReactFlow, { isNode } from "react-flow-renderer";

const DiagramAdapter = ({ nodes, onActivateNode, onDeactivateAll }) => {
    const onSelectionChange = (elements) => {
        if (elements) {
            const selectedNodes = elements.filter((els) => isNode(els));

            if (selectedNodes.length > 0) {
                onActivateNode(selectedNodes[0].id);
            }
        }
    };

    const onPaneClick = () => onDeactivateAll();

    return (
        <div style={{ height: 650 }}>
            <ReactFlow
                elements={nodes}
                onSelectionChange={onSelectionChange}
                onPaneClick={onPaneClick} />
        </div>
    );
}

export default DiagramAdapter;
In the above code, we wrapped the ReactFlow component and attached a few event listeners for it. These event listeners will then transform event data and call the corresponding onActivateNode and onDeactivateAll functions passed by the adapter's parent component.
This way, the parent component doesn't even need to know what library we're using. It just knows that the onActivateNode and onDeactivateAll are available for use.
For your reference, we can use the adapter like this:
function App() {
  const nodes = [
    {
      id: "node_0",
      position: { x: 150, y: 25 },
      data: { label: "Start" }
    },
    {
      id: "node_1",
      position: { x: 150, y: 225 },
      data: { label: "End" }
    },
    {
      id: "node_0-node_1", type: "step", source: "node_0", target: "node_1"
    }
  ];

  const onActivateNode = (node) => {
    console.log("Activated", node);
  };

  const onDeactivateAll = (node) => {
    console.log("Deactivated all");
  };

  return (
    <DiagramAdapter
        nodes={nodes}
        onActivateNode={onActivateNode}
        onDeactivateAll={onDeactivateAll} />
  );
}
A More Realistic Example
For a more real-world example, you can check out one of my learning projects here. It's a simple low-code app builder created using React and ReactFlow.
The adapter code can be found at /src/Editor/DiagramAdapter.js. While the parent component can be found at src/Editor/Canvas.js.
Conclusion
Congratulations! We've successfully used the adapter design pattern on a React application.
We can now enjoy the benefits of decoupling our application from third-party libraries:
- A library-agnostic application
- Data model consistency
- Minimal dependency
I hope you learned something new from me today! If you have any other ways of applying the adapter design or any other similar design patterns on a React application, let me know. Looking forward to hearing from you.