

In this article, we will explore how you can use the ADB to gain some fine-grained control when you're installing, testing, diagnosing, and managing one or more devices and emulators.
For my first few years as a software developer, primarily working with the Android SDK, I had no idea of what the Android Debug Bridge (ADB/adb) was, what it did, or when to use it.
Amusingly, it was not some professional goal which motivated me to learn about it initially. Rather it was my boot looping Nexus 6 which I desperately wanted to resurrect. For a problem like that, Android Studio and Gradle are about as useful as a waterproof tea bag.
I would also like to mention that this article has been written with two kinds of individuals in mind:
Those who are familiar with CLI, Shell, Processes, and the Client-Server Model
Those who are not familiar with CLI, Shell, Processes, and the Client-Server Model
For those in the first category, you may wish to skip the section titled: "How to Work With The ADB."
For those in the second category, I will assume you were like me as a Junior developer and know very little about CLIs, Shells, and the ADB. The first section is a soft introduction and glossary for some basic terms and ideas, explained in the simplest way I can manage.
Preliminaries
Here, we will learn about some topics which are important if you want to understand how the ADB works and is used.
Some of you may have been scared away from learning command line tools in the past by sneering Vim enthusiasts or judgmental Unix System Administrators. As you will see, I freely admit that CLI is not ideal for how my brain works, so I think you might enjoy my take on the subject.
Command Line
Simply put, a command line is an interface (way of sending/receiving information) to a computer which only uses lines of text.
It is important to understand that a command line interface (CLI) is not itself a program, but rather some programs will provide a CLI (and perhaps other interfaces such as a GUI as well).
At some point, you may have typed something into Windows Command Prompt (or MS-DOS if you are a 90s kid like me), Mac Terminal, or something like GNOME Terminal common on many Linux distributions. All of these are primarily used via a CLI.
The benefits and deficits of using a CLI depend largely on the individual using it, and what kind of problem they are trying to solve. I personally do not like using a CLI unless it is for something that I do almost every day.
My brain is simply not suited for memorizing obscure shorthand text commands (I had trouble learning to read as a kid for the same reason), so I must rely on a great deal of repetition-based implicit memory (muscle memory) and cheat sheets.
For those who are willing to put the time in even if it is a struggle (like I do), or those who are really quite good at remembering such things, you will likely learn to appreciate how much more efficient you can be within a CLI versus a GUI.
Many operations can be carried out in a fraction of the time it takes to point and click your way through various menus and screens. It is also possible to write scripts, which are files containing a series of text commands, that can increase your efficiency even further.
How to use the ABD Shell
I will have to assume that you are familiar with the term Operating System (OS), which includes Android, iOS, Windows, Mac, Linux, and any other Unix-like system.
Why is this term relevant to the ADB? To give an explanation which prioritizes clarity over precision, the Android OS is based on Linux, and Linux is based on Unix.
As a result of this, we can use the ADB to get a hold of the Unix Shell for the device or emulator we are working with. This allows us a great deal of flexibility, capabilities, and control over the device or emulator by directly interacting with its shell.
A shell is a general term for the program which you use to interact with an OS. Just as a turtle shell provides protection and access to a turtle (and is the outermost layer), the shell of an OS both protects and provides access to the inner workings of the OS. Personally, I was quite surprised to learn that "Shell" was not some esoteric acronym.
Do not feel the need to overthink this term. If you are reading this on a computer of some kind, you used a shell to help you get here.
A shell can provide either or both a CLI or GUI. In either case you will use it to create/update/delete/move files, start other programs, and access the various services of the OS which are made available through the shell.
How to use the ABD Client and ABD Server
Again, let us start with a slightly imprecise explanation which is hopefully easier to understand. I will correct this definition shortly, though.
Clients and Servers are both computers. The reason why we differentiate them in this way is based on their role. For example, your computer (whether it is a desktop, laptop, phone, or whatever else) is a Client of a freeCodeCamp Server, which serves you this HTML page.
In general, a client is something which uses something else, whereas a server is that which is being used. Do not overthink this term, as a Client-Server Model can describe a very large number of things both inside and outside of computing.
Now, when I said that Clients and Servers are both “computers”, that is not really true in the context that we will use these terms later on.
As programmers and engineers, we typically ought to think of Clients and Servers as being processes (a process is simply a running program).
This means that while a Client process and a Server process often do run on separate computers, it is also fine if they run on the same computer.
They will occupy distinct locations in the memory space of said computer, so effectively the only difference is that they will communicate using IPC (inter-process communication) as opposed to sending messages to each other through a network connection.
As we will see shortly, the ADB makes use of a Server process, which allows multiple developers (multiple clients) to manage multiple Android devices and/or emulators.
In an enterprise setting, this Server process would likely sit on a remote (communicated to through a network connection) computer, but we will set up a Server which is local to our Client. Doing that will be much simpler than you probably think it will be.
What is an ABD Daemon?
In case you skipped ahead, I already explained that a process is simply a running program. A Daemon is a process which runs in the background, which is to say that the user does not directly interact with it.
For example, if you open a web browser, then chances are that the actual work of managing the network connections required to connect to the Internet will be carried out by something like a NetworkManager Daemon (as opposed to the browser process itself).
Each Android device (physical or emulated), assuming it is configured properly, will have an ADB Daemon (adbd) which executes commands given to it by a Server process.
In short, when our Client issues a command to the Server, the Server will forward that command to the ADBD, which will execute it on the device.
How to Use ADB for Android Development
For the remainder of this article, we will explore the following topics:
Drivers and configuration necessary to use the ADB on your system
Using the ADB with physical devices and emulators
Basic commands using the ADB’s CLI
A glance at more complicated usage using an Android device’s Shell via the ADB
Before proceeding, you will want to establish what CLI tool you will be using to interact with the ADB. On Windows, I prefer using PowerShell, but Command Prompt would work too. For Linux and Mac, the default Terminal should work.
Feel free to use whatever gets the job done.
This article contains a very detailed explanation of the whole process, but I have prepared a video tutorial which covers it succintly here:
How To Understand The CLI Examples
This article contains many commands to be inputted to your preferred CLI tool. Any part of a given command which changes situationally will be written within angle brackets.
Do not include the angle brackets in the CLI command you write.
For example, if I wrote...:
adb pair <ip-address>:<port>
...you would substitute the angle brackets and name for the actual value, such as:
adb pair 192.168.0.1:5554
ABD Drivers & Configuration
Firstly, ensure that you have the latest (or at least a recent) version of the Android SDK Platform-Tools. If for some reason you do not use Android Studio (AS), click that link and download the standalone package for your respective OS.
If you have Android Studio, you can download or update this package using the SDK Manager.
There is typically a toolbar icon in AS to open the SDK Manager, but they like to change what it looks like practically every hotfix.
If you do not have luck finding it, go to File -> Settings and in the search bar, type “SDK”, and search for the “Android SDK” menu item.
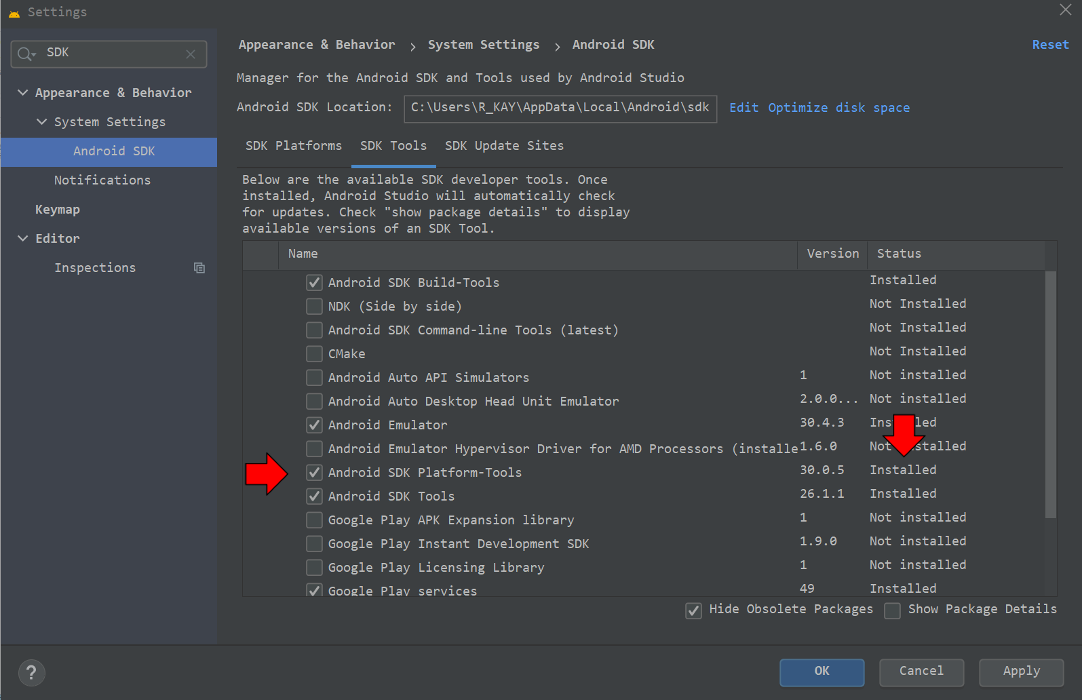
Systems setting showing that Android SDK Platform Tools are installed
The next step changes depending on a number of variables. As discussed in the Preliminaries section, the ADB uses a Client-Server Model which allows a lot of flexibility in how you use the tool.
To be more specific, you may have:
Multiple Clients interacting with a remote Server
A Server which is local (same computer) to one Client
A variety of physical devices and emulators hooked up to the same server
Advanced configuration with multiple Clients and an exceedingly large number of devices is possible with the ADB, but outside of the scope of this article.
One Server can manage up to 16 emulators and as many physical devices as you would like (within reason), without requiring advanced configuration.
For the remainder of this article, the most we will work with is one physical device and one emulator for a single ADB server process.
How to Configure An ABD Emulator
Most likely you do not need to make any further configurations, but it is possible you may need to enable Developer Options on your emulator. You will know very shortly if it is working properly when we get to our first few ADB commands.
If you do wish to enable this feature on your emulator, you will need to research how to do that for your particular version of Android.
USB Debugging – How to Configure a Physical Device
If you are not planning to use a physical Android device, you can skip this section. However, it is worth noting that you may still need to enable Developer Options
In order to proceed, you will need to configure either USB Debugging or WiFi Debugging on your Android device and development machine.
In either case, start by enabling Developer Options on your device. You will need to research how to do that for your particular version of Android.
USB Debugging
Ensure that you have enabled USB Debugging on the Android device via Developer Options. The link I shared above will describe that process, which tends to change somewhat across different versions of the Android OS.
Before proceeding, Windows users will need to download a USB Driver. Ubuntu users also require some extra steps. For Mac and Chrome OS, you should be good to go.
Once USB Debugging is enabled via Developer Options, connect your Android device via a USB cable.
WiFi Debugging
If you happen to have multiple physical devices or a shortage of USB cables, then you may want to opt for WiFi Debugging.
Again, visit Developer Options on your Android device and enable Wireless debugging. It should prompt you about Allowing debugging on the network which the device is currently connected to, which you should allow (assuming that is the appropriate network).
Time to start working with your CLI. First, you will need to locate the platform-tools directory (or folder – same thing) within your Android SDK installation directory.
Assuming you have Android Studio installed, a quick way to locate it via the app is to again go to File -> Settings, then type “SDK” in the search bar. The “Android SDK” menu will show you where your SDK is installed, which will be the directory that should contain platform-tools.
In the example below, I copied the path to my Android SDK directory, and then opened an instance of Windows PowerShell. I then typed the following commands:
Change Directory:
cd <path-to-SDK-directory>
List Files and Directories:
ls
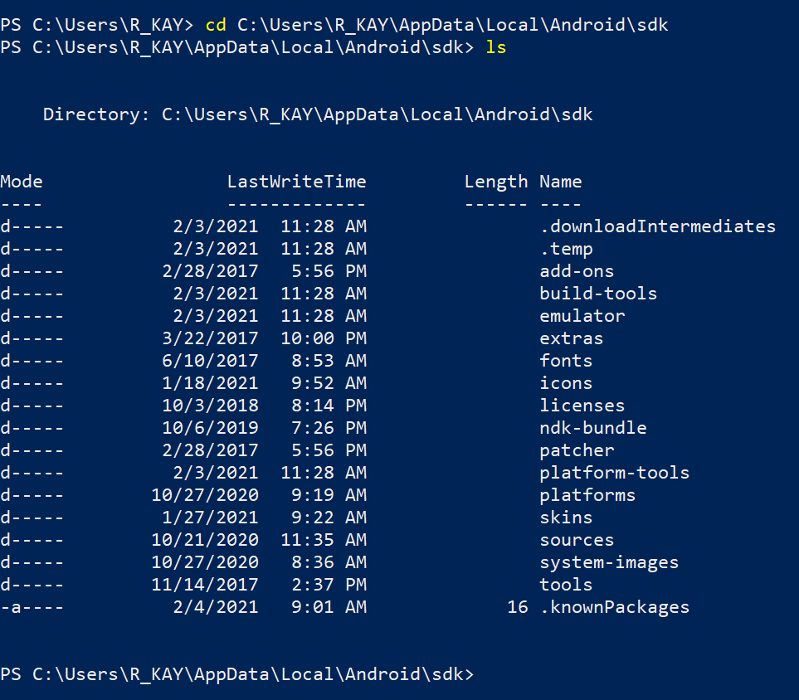
Next, I typed cd platform-tools to navigate to that directory. Note that the following steps assume you are using a device which is running Android OS 11 or higher.
If you are working with a device running Android 10 or lower, detailed instructions for that situation can be found here.
Once you are within the platform-tools directory, you are ready to pair an Android device to a development machine using the following steps:
Within the Wireless debugging submenu in Settings -> System -> Developer options, select Pair device with pairing code.
Within your CLI tool which should be set to the platform-tools directory, enter the following command:
adb pair <IP address>:<Port>
where both the IP address and the Port come from the dialogue on your Android device which popped up after selecting Pair device with pairing code (do not include the angle brackets).
Note: You may need to prepend your call to adb with some other symbols or commands depending on which CLI tool you are using, your OS, and your access controls. For example, I had to type .\adb pair : using PowerShell on Windows.
Assuming things went well with your CLI, you will be prompted to enter the pairing code which was made visible in the same dialog on the Android device which gave you the IP address and Port number.
After entering the pairing code, you will know this operation was successful if you receive a message stating:
Successfully paired to <IP Address>:<Port> [guid=<Some GUID>]
- If you are using Windows or Linux, you will also need to run the following command using the IP Address & Port which is visible from within the Wireless debugging preferences menu (not the dialogue which pops up after selecting Pair device with pairing code):
adb connect <IP Address>:<Port>
after which you should receive a notification on the phone to indicate that you are connected.
How to Use The ADB: Commands
Assuming you managed to properly configure your Android device and your development machine, you can now use the ADB tool.
Before proceeding, navigate to the directory which contains adb using a CLI tool (unless you just followed the steps in the previous section for setting up WiFi debugging).
Otherwise do so now, or check out that section for instructions on how to locate that folder.
How to See Which Devices Are Currently Connected To The Server
You can now start up an adb server by calling just about any command on the ADB except adb kill-server. Whether or not your server process is running, type in the following command:
adb devices
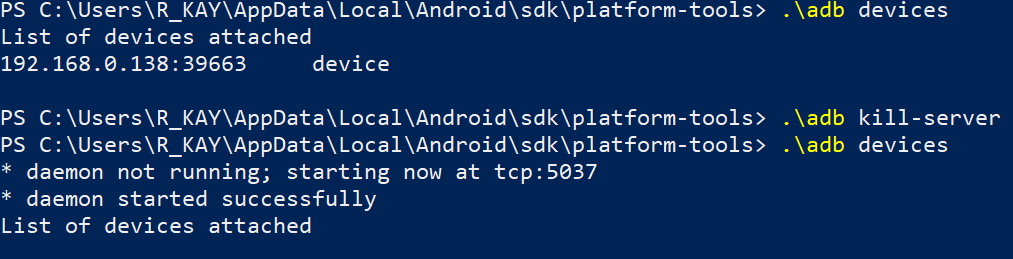
In the above screenshot, I first called adb devices when my Android phone was connected to the server. After killing the server via the adb kill-server command, I once again called devices which restarted the server.
Again, if an ADB server is not currently running, calling more or less any ADB command will start the server back up (except adb kill-server, of course). There is an explicit adb start-server command, but in practice I have never needed to use it.
Since the server was reset, devices did not return any items. Therefore, before moving to the next example I had to once again use the adb pair and adb connect (if on Windows or Linux) commands described in the previous section.
I have now fired up an emulator using PowerShell and the emulator program which is also located in a subdirectory of platform-tools called "emulator."
You may of course use the AVD Manager or Android Studio to start up an emulator to follow along with the example if you would like to.
If you have many connected devices, a useful option for the adb devices command is -l, which gives you more information about the devices.
Below you will see several entries which refer to my physical Android device, as well as an emulator which has been attached to a specific port:

How to Send Commands To A Specific Device
To avoid accidentally bricking my phone, I want to send commands to the emulator instead. To do this, I must prepend the -s option, followed by the serial number of the target device, before typing the command.
The serial number is the first set of characters which describes a connected device after using the devices command.
For example, the emulator’s serial number in this case is just the word emulator followed by the port which the emulator is currently attached to.

The other red arrow points to the serial number for my phone (blocked out for obvious reasons).
Naturally, if you only have one device connected (whatever kind it is), you do not need to use the -s option.
Install An APK (App) On A Device
I am now going to install a test APK on the running emulator using the adb install command.
This is basically equivalent to having Android Studio and Gradle install a debug APK. As you will see, test APKs require the -t option after the install command:
adb -s <device-serial-number> install -t <path-to-APK>

Note: The Android OS requires that any APK must be signed before it can be installed (even if it is just a test/debug APK).
One solution is to build and run the app to be installed in Android Studio, which will sign it with a generated debug certificate. There are several other ways to sign such an APK which you can explore by visiting this link.
What Else Can ADB Do?
Before we take a look at some more advanced usage of the ADB, I strongly encourage you to try the adb --help command. As is customary for most CLI based programs, the help command will print out documentation which describes the various commands and options of the tool.
I am happy to say that the documentation for the ADB is quite legible and useful, which is not always the case in CLI programs.
Advanced ADB Usage Tips
It would be a waste of time for both of us to cover every usage and command of the ADB in this article.
In case there is any confusion, using the ADB to install APKs and do many of the things which Android Studio and Gradle do for you is not something that I would recommend (unless you have a good reason to do so).
With that being said, there are plenty of things that the ADB can do which are either difficult or impossible to do without it.
In the preliminaries section, I mentioned that the ADB can be used to get a hook to the shell of the device. To finish this article off, we will look at how to use shell commands and where to find more information about them.
If you do not know what a shell is, you probably skipped the section above where I explained that.
How to Use the ABD Shell
Sending a command to the device’s shell using the ADB is fairly simple. Remember that if you have multiple devices connected, follow it with -s <device-serial-number> to direct the command to a specific device.
To make a single shell command, we must use the adb shell command (big surprise, eh?), followed by the actual command we want to make on the device's shell:
adb shell ls
Output:
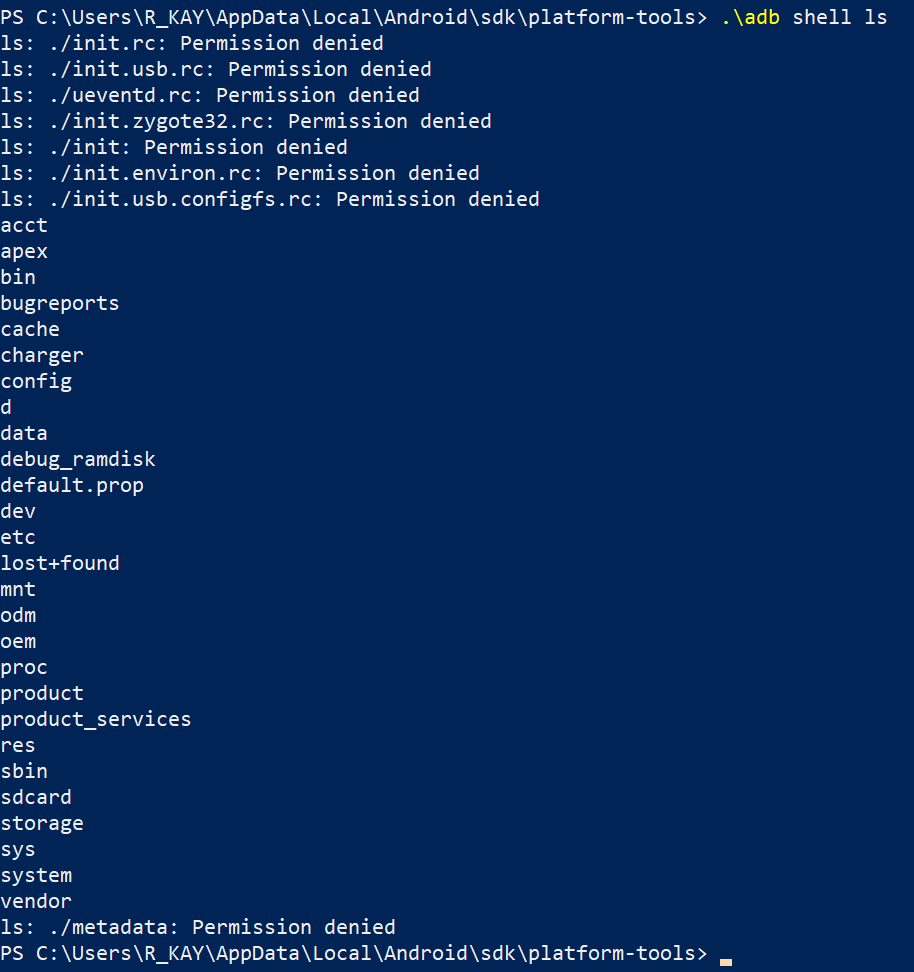
As mentioned previously, the ls command displays a list of files and directories at the CLI's current directory. This happens to be the Android device's root directory until we move to a different one.
If you plan to be making many commands via the Shell, you can also start an interactive Shell session. This can be done via the simple command:
adb shell
While in an interactive Shell session, you can type Shell commands directly without further use of adb shell <command>.
Note that when you want to quit the interactive Shell session, you can do so by typing exit or hitting Ctrl + D.

There are a variety of different commands and utilities you can work with via the Shell. The ActivityManager (am) of an Android device can be particularly useful for testing different components (Activities, Services, BroadcastReceivers, to name a few) of an Android app under different circumstances.
Suppose we want to launch straight into a particular Activity, but this Activity is not designated as the launcher Activity in the manifest.
You will still need to add the android:exported=”true” attribute to each <activity/> entry in the manifest which you want to launch (assuming it is not already the launcher Activity).
After that you can use the following command to go straight to it:
am start -n <app-package-id>/<activity-name>
Note that the <activity-name> must include whichever packages, relative to the package-id, within which it is located. See the output below for an example of launching an Activity which sits within several packages.

Further Reading
My goal in this article was to do my best to introduce, explain, and guide you through the usage of the ABD in my own words (insofar as that is possible).
At this point I would need to start making some very contrived examples or to simply carbon copy the documentation, neither of which are things that I am interested in doing.
Instead, I would like to encourage you to visit the documentation, and to have a brief look at some of the cool things you can do using tools like the Activity Manager, Package Manager, Policy Manager, and others.
You can get in touch with me on social media here:
https://www.instagram.com/rkay301/
https://www.facebook.com/wiseassblog/
https://twitter.com/wiseass301
http://wiseassblog.com/