
By Darren Chowles
Logging into a website via third parties is ubiquitous online. Almost every other member-based website allows you to log in with accounts like Facebook, Twitter, and Google.
If you’ve ever visited NFT marketplaces like OpenSea or Rarible, you would have noticed they allow you to sign in with a crypto wallet like MetaMask.
This login process affirms you’re the owner of the Ethereum address in question and allows the system to authenticate your access. Very similar to how a username and password would allow you access to a gated part of a website.
Prerequisites
Before starting this tutorial, I’ll assume you have a basic understanding of Laravel, and that you can initialise a new project in your environment. Even though this tutorial is Laravel-focused, with some tweaking you can apply this to any other PHP project. The concepts remain the same.
I’ve tried to keep this as generic as possible. I only focus on the MetaMask signing and validation, without restricting you to using it with specific front-end technologies (like React or Vue) or authentication scaffolding (like Breeze or Jetstream). This gives you the freedom to implement it with minimal effort into an existing project.
We’ll need the following before we start:
- A new or existing Laravel project.
- MetaMask installed in your browser.
Boilerplate
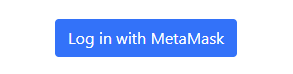
We’ll start out with some boilerplate code by importing Bootstrap 5 and creating a simple “Log in with MetaMask” button.
<!DOCTYPE html>
<html lang="en">
<head>
    <meta charset="utf-8">
    <meta name="viewport" content="width=device-width, initial-scale=1">
    <title>MetaMask Login</title>
    <link href="https://cdn.jsdelivr.net/npm/bootstrap@5.1.3/dist/css/bootstrap.min.css" rel="stylesheet" integrity="sha384-1BmE4kWBq78iYhFldvKuhfTAU6auU8tT94WrHftjDbrCEXSU1oBoqyl2QvZ6jIW3" crossorigin="anonymous">
    <script src="https://cdn.ethers.io/lib/ethers-5.2.umd.min.js"></script>
</head>
<body>
<div class="container">
    <div class="row">
        <div class="col-12 text-center">
            <button class="btn btn-primary mt-5">Log in with MetaMask</button>
        </div>
    </div>
</div>
</body>
</html>
Easy enough. 😀
We’re also importing the ethers.js library that will allow us to interact with the Ethereum blockchain via MetaMask, which in this case acts as the interface to the provider (Infura by default).
Quick tip:
Providers allow us to interact with the Ethereum blockchain. To connect to the network, you need access to a node. Depending on the type of node, it could require a large amount of disk space and bandwidth. Running a node can also be a complex process, especially if you want to focus on development rather than maintaining and operating a node.
Enter, the provider! Companies like Infura provide these nodes as a service, so you don’t need to worry about running your own. Instead, you can access this functionality via their APIs.
You may run into older tutorials that state MetaMask injects web3.js (a library providing similar functionality to ethers.js) into the page by default. This is no longer the case.
Detect the Provider
We’ll start off our new web3Login() function by checking that the browser has a provider available. This would be the case if you have MetaMask installed. You can also test this code where MetaMask is not installed (for example, an incognito window) to confirm the detection works.
Add the click event to the button:
<button class="btn btn-primary mt-5" onclick="web3Login();">Log in with MetaMask</button>
And start off the function with our detection snippet in our <head> below the ethers.js import:
<script>
async function web3Login() {
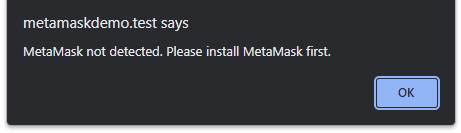
if (!window.ethereum) {
alert('MetaMask not detected. Please install MetaMask first.');
return;
}
}
</script>
Go ahead and test this in a browser with no MetaMask installed.
Install Laravel Dependencies
Before we continue with the front-end login process, we need to put some endpoints in place. Our login script will need these so the user can sign a message with their wallet, and our system can then verify their signature.
We need to install two dependencies via Composer to help us perform hashing and use elliptic curve cryptography:
composer require kornrunner/keccak
composer require simplito/elliptic-php
Add Laravel Routes
Open your routes/web.php file and add the following routes:
Route::get('/web3-login-message', 'Web3LoginController@message');
Route::post('/web3-login-verify', 'Web3LoginController@verify');
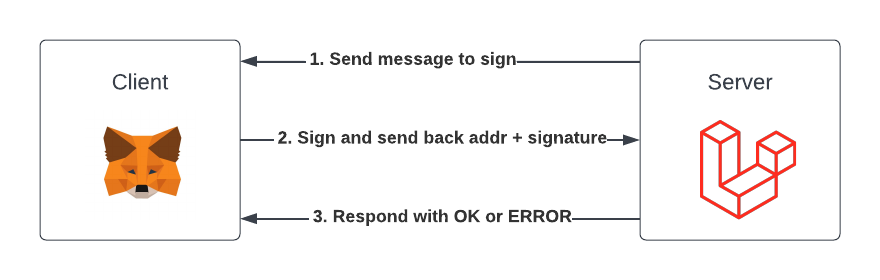
The first route will return the message that needs to be signed, and the second route will verify the signed message.
Create the Login Controller
Now it’s time to create the controller that will generate the message and perform the verification.
Create a new file called Web3LoginController.php in app/Http/Controllers and add the following code to it:
<?php
namespace App\Http\Controllers;
use Elliptic\EC;
use Illuminate\Http\Request;
use Illuminate\Support\Str;
use kornrunner\Keccak;
class Web3LoginController
{
public function message(): string
{
$nonce = Str::random();
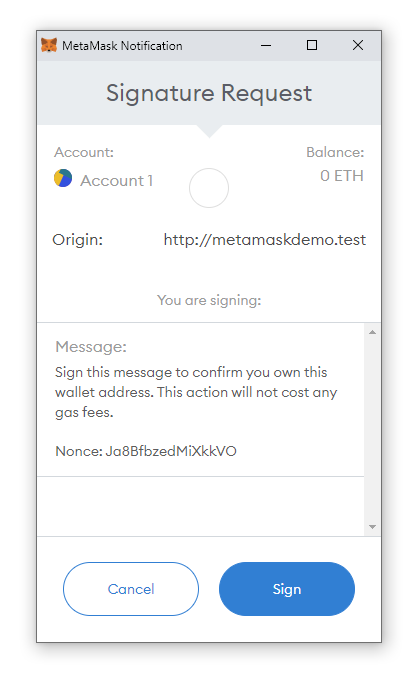
$message = "Sign this message to confirm you own this wallet address. This action will not cost any gas fees.\n\nNonce: " . $nonce;
session()->put('sign_message', $message);
return $message;
}
public function verify(Request $request): string
{
$result = $this->verifySignature(session()->pull('sign_message'), $request->input('signature'), $request->input('address'));
// If $result is true, perform additional logic like logging the user in, or by creating an account if one doesn't exist based on the Ethereum address
return ($result ? 'OK' : 'ERROR');
}
protected function verifySignature(string $message, string $signature, string $address): bool
{
$hash = Keccak::hash(sprintf("\x19Ethereum Signed Message:\n%s%s", strlen($message), $message), 256);
$sign = [
'r' => substr($signature, 2, 64),
's' => substr($signature, 66, 64),
];
$recid = ord(hex2bin(substr($signature, 130, 2))) - 27;
if ($recid != ($recid & 1)) {
return false;
}
$pubkey = (new EC('secp256k1'))->recoverPubKey($hash, $sign, $recid);
$derived_address = '0x' . substr(Keccak::hash(substr(hex2bin($pubkey->encode('hex')), 1), 256), 24);
return (Str::lower($address) === $derived_address);
}
}
There’s a lot going on in there, so let’s break it down:
Create the message
The message() method creates the message we’ll supply to the front end. It also includes a random token to ensure the message to sign will be different each time.
This token is usually referred to as a nonce, or number used once. In this case, however, it’s a simple random string.
The purpose of this is to prevent replay attacks where, if a malicious user obtained your signature, they could use that to authenticate as you on the website.
The message is then saved to the session and returned to the front end.
Verify the message
Once you have signed the message with your private key via MetaMask, your Ethereum address as well as the signature is sent to the back end for verification.
If it passes the verification, we determine the Ethereum address that signed the message and ensure it matches the Ethereum address sent from the front end during the signing process.
If that passes, we send an OK or ERROR back to the front end.
It’s also at this point where you can add additional logic like logging the member in or creating a new member record if one doesn’t exist for the Ethereum address in question.
Finalise the Front End
Now that the backend is ready, we can complete the rest of the front end. This will involve launching MetaMask, asking the user to sign the message, and then verifying the signature by using our back-end route.
Below is the full web3Login() function:
<script>
    async function web3Login() {
        if (!window.ethereum) {
            alert('MetaMask not detected. Please install MetaMask first.');
            return;
        }

        const provider = new ethers.providers.Web3Provider(window.ethereum);

        let response = await fetch('/web3-login-message');
        const message = await response.text();

        await provider.send("eth_requestAccounts", []);
        const address = await provider.getSigner().getAddress();
        const signature = await provider.getSigner().signMessage(message);

        response = await fetch('/web3-login-verify', {
            method: 'POST',
            headers: {
                'Content-Type': 'application/json'
            },
            body: JSON.stringify({
                'address': address,
                'signature': signature,
                '_token': '{{ csrf_token() }}'
            })
        });
        const data = await response.text();

        console.log(data);
    }
</script>
Let’s break it down:
- We first set the provider to the MetaMask provided
window.ethereum. - Next, we grab the message returned from our back end (refresh the page a few times to try this out, you will notice the random token changes every time).
- Once we have the message, we obtain the user’s Ethereum address and ask them to sign the message.
- We then POST the address and signature to the back end (along with our Laravel CRSF token) for verification.
- The result is either an OK or ERROR string which we output in the console.
- At this point you may elect to show an error message (if applicable) or redirect the user if they were registered or logged in during the back-end verification.
Conclusion
In this tutorial we covered the basics of adding a MetaMask login to your website. I hope this has proven useful! Sign up to my newsletter or visit my blog where I’ll share insightful web development articles to supercharge your skills.
Here are some ideas to take your integration one step further:
- Integrate a library like Web3Modal to provide users with various wallet options instead of only MetaMask.
- With the user’s Ethereum address validated, provide them with functions like displaying their ETH balance.
Resources
- Download MetaMask.
- View the ethers.js documentation.
- Latest Laravel documentation.