By Sai Balaji K
Hello, everyone! In this article we are going to learn how to add the Realm database to an iOS app.
We'll create a simple ToDo app so you can learn how to perform CRUD (Create, Read, Update, Delete) operations in the Realm database.
What is Realm?
Realm is an open-source mobile database which is developer friendly and easy to use. You can also use it as an alternative to Core Data in iOS apps.
Realm is a cross platform mobile database, which means that you can use it in native Android and iOS apps and also in cross platform apps like those created using React Native. It supports Objective-C, Swift, Java, Kotlin, C#, and JavaScript.
How to Set Up Realm in Your iOS Project
We can add Realm to our iOS project using SPM (the Swift Package Manager), Cocoa Pods, or Carthage. Here, we are going to use Cocoa Pods to add Realm Pod to our iOS project.
- Open up Xcode and create a blank iOS app project with UIKit and Swift without using Core Data.
- Now close Xcode and open up the terminal. Navigate to your project directory using the terminal.
- Run the following command to create a PodFile.
pod init
- Now when you list the contents of the directory you can see that there is a new Podfile. Open the file using any text editor (here I've used Vim). Edit your Podfile so that it looks similar to the below image. Save and close the Podfile.
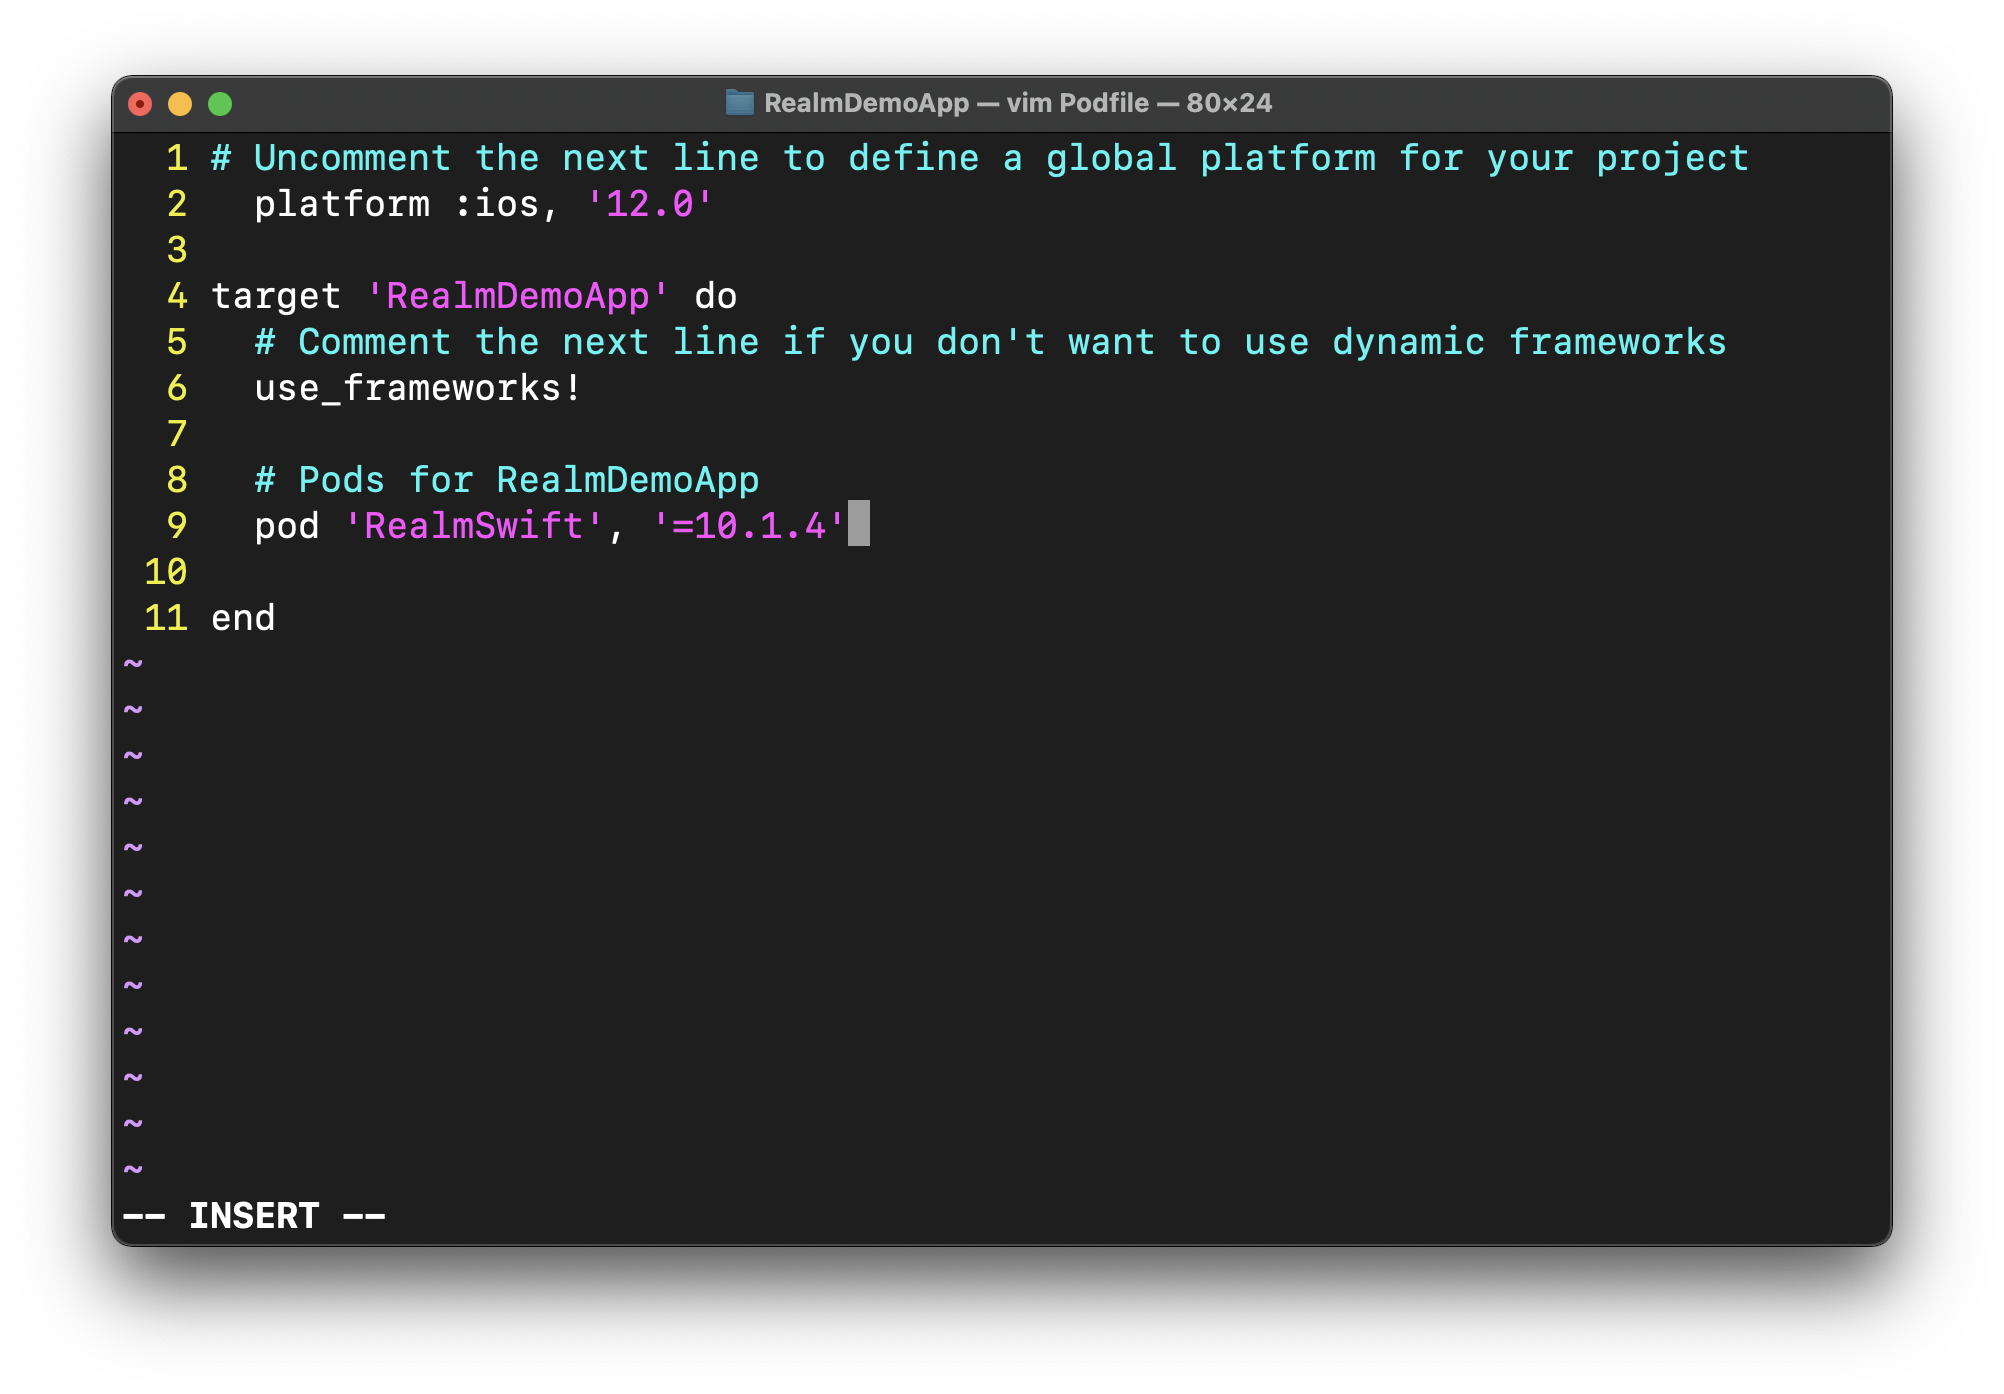
Now that we have specified the dependence for Realm DB, we can install the dependencies by running the below command:
pod install
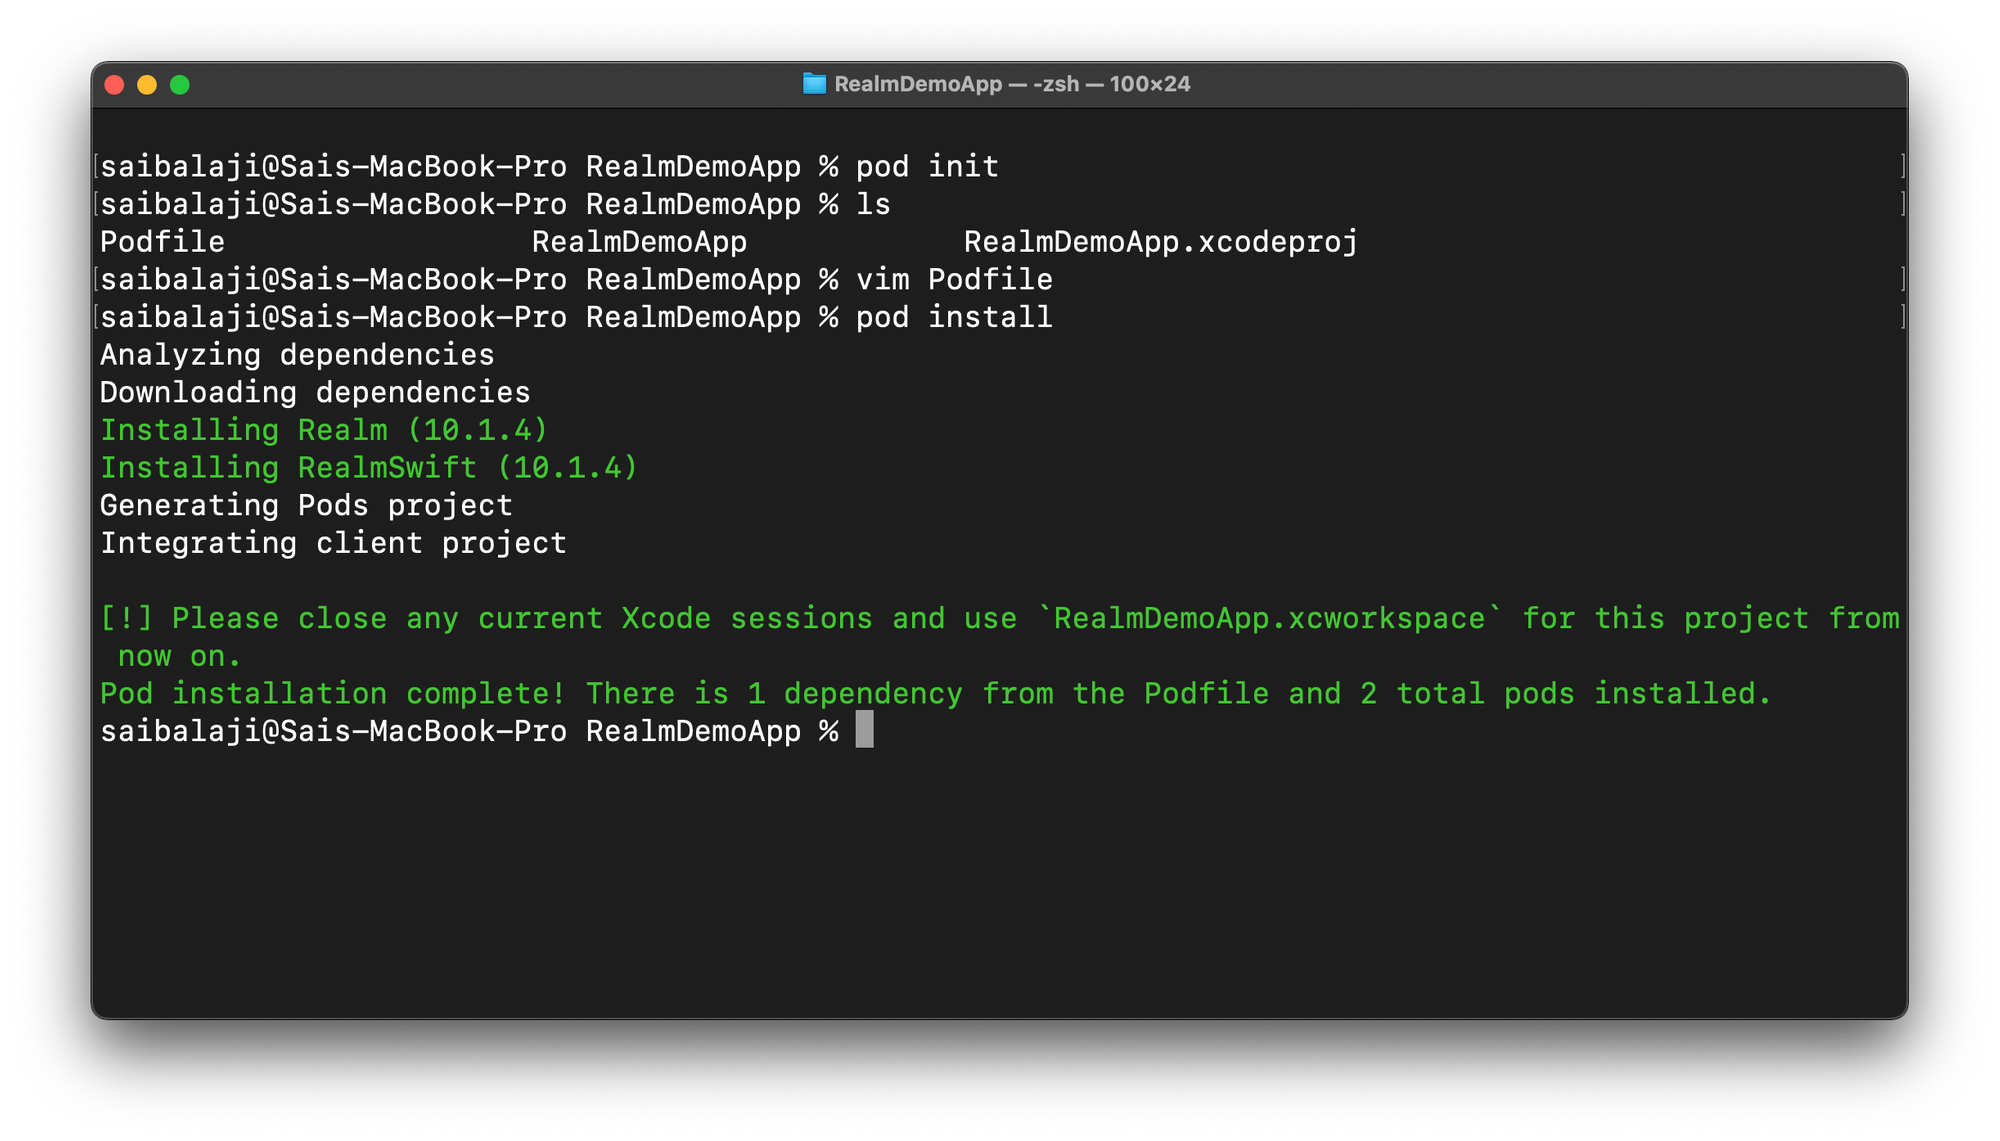
As you can see, we have successfully added the Realm DB dependency in our iOS project. Now run the below command to open our project in Xcode.
open YOUR_APP_NAME.xcworkspace
Note: after opening Xcode, make sure you build your project by pressing Command+B.
How to Design Your User Interface in Realm
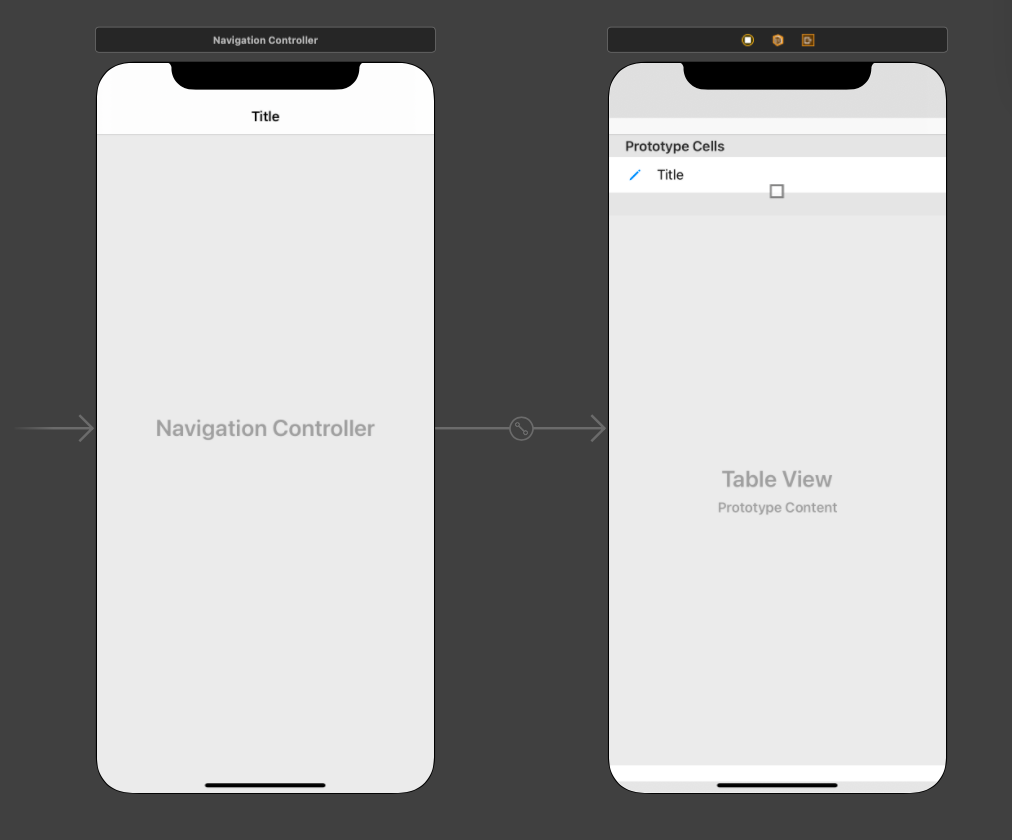
We are going to keep our app's UI simple. Open up Main.storyboard and create a simple UI as shown below by adding a table view with a prototype cell. Then embed a navigation controller and create the IBOutlets for the tableview in the ViewController.swift file:
How to Create a Data Model in Realm
In our ToDo app, each task has a task name and a task id. We are going to create a Model class to represent the todo task. In the project navigator right click and create a new Swift file, and add the below code.
import Foundation
import RealmSwift


class ToDoTask:Object
{
    @objc dynamic var tasknote: String?
    @objc dynamic var taskid: String?
}
Her we created our model class named ToDoTask. It inherits the Object class which is a class that comes with RealmDB. This class handles all the under the hood processes of saving the data created using this model class in the database.
We also added two properties: tasknote, which is the task to be done, and taskid – both of type string. @objc means that your Swift code is visible to Objective C and dynamic means you want to use Objective C dynamic dispatch.
Basic CRUD App functions
Our app will perform the following functions:
- Get input from the user using AlertViewController.
- Add the input to the database and also to the table view.
- Allow the user to edit their input.
- Swipe to delete a row to remove the data from both the table view and the database.
- Fetch all the data (if present) from the database and display it in the table view.
How to get input from the user using AlertViewController
Open up ViewController.swift and add the below code inside the ViewDidLoad() method. And create a new function called addTask() and add the code to display the alert view controller with a text box to get input from the user.
Now when the right bar button is pressed it will call the addTask() function which will display the alertviewcontroller with a text field to get user input.
navigationItem.rightBarButtonItem = UIBarButtonItem(image: .add, style: .done, target: self, action: #selector(addTask))

navigationController?.navigationBar.prefersLargeTitles = true

title = "RealmDB"
@objc
    func addTask()
    {
        let ac = UIAlertController(title: "Add Note", message: nil, preferredStyle: .alert)

        ac.addTextField(configurationHandler: .none)

        ac.addAction(UIAlertAction(title: "Add", style: .default, handler: { (UIAlertAction) in

              if let text = ac.textFields?.first?.text
            {
                print(text)
            }

        }))
        ac.addAction(UIAlertAction(title: "Cancel", style: .cancel, handler: nil))
        present(ac, animated: true, completion: nil)
    }
How to add the input to the database and table view
To save data into Realm, first we need obtain an instance for Realm through which we can access all the methods needed for CRUD operations. Create a property of type Realm in the ViewController.swift file and initialise it in the viewDidLoad() method.
var realmDB: Realm!
 override func viewDidLoad() {
        super.viewDidLoad()

        navigationItem.rightBarButtonItem = UIBarButtonItem(image: .add, style: .done, target: self, action: #selector(addTask))
        navigationController?.navigationBar.prefersLargeTitles = true
        title = "RealmDB"

        realmDB = try! Realm()

    }
Create an empty array of type our DataModel (ToDoTask). This array will hold all the tasks which need to be added to the table view and database.
Now inside the addTask() function modify the Add action closure so that it gets the user input and creates a random ID for that input. Then append it to our array and save it to the database.
var tasks = [ToDoTask]()
 if let text = ac.textFields?.first?.text
            {
                //Add data to data model array
                let t = ToDoTask()
                t.taskid = UUID().uuidString
                t.tasknote = text
                self.tasks.append(t)

                //Add data to database
                try! self.realmDB.write {
                    self.realmDB.add(t)
                }
                //Update table view UI
                self.tasktv.reloadData()
            }
Now when you run the app, the data will be saved in the database. But it will not show in table view because we have not implemented the delegate methods.
Make the ViewController class implement the UITableViewDelegate and UITableViewDataSource protocols and add the protocol stubs.
Now inside the numberOfRowsInSection method, return the count of our tasks array which gives the number of rows to be added to the table view. This is equal to the number of elements in tasks array.
 func tableView(_ tableView: UITableView, numberOfRowsInSection section:
 Int) -> Int
 {
        return tasks.count;
 }
The next thing we need to do is specify the content in each row. We can do this using the cellForRowAt delegate method. Here we dequeue a cell using the identifier which we have mentioned in storyboard and specify the label text as the tasks array element tasknote property.
 func tableView(_ tableView: UITableView, cellForRowAt indexPath: IndexPath) -> UITableViewCell {
        if let cell = tableView.dequeueReusableCell(withIdentifier: "cell")
        {
            cell.textLabel?.text = tasks[indexPath.row].tasknote
            return cell
        }
        return UITableViewCell()
    }
How to allow users to edit their input
Now we have to allow the user to edit their entered tasks and update the changes in both the database and UI. We can do this using similar methods of getting input from the user. Implement the didSelectRowAt delegate method which will be called when user taps the table view row.
Add the below code which displays an AlertViewController with a text view. Then update the content of the cell with the entered text, and at the same time update the database contents.
func tableView(_ tableView: UITableView, didSelectRowAt indexPath: IndexPath) {

        let tasktomodify = tasks[indexPath.row]
        let ac = UIAlertController(title: "Update task", message: nil, preferredStyle: .alert)

        ac.addTextField(configurationHandler: .none)
        ac.addAction(UIAlertAction(title: "Ok", style: .default, handler: { (UIAlertAction) in
            if let text = ac.textFields?.first?.text
            {
                if(!text.isEmpty)
                {
                try! self.realmDB.write({
                    tasktomodify.tasknote = text
                })
                self.tasktv.reloadData()
                }
            }
        }))

        present(ac, animated: true, completion: nil)
    }
How to swipe to delete a row & remove the data from both the table view and database
Here we are going to implement a swipe to delete feature in our table view so that users can delete their tasks. But under the hood when the user swipe deletes a table view row then it should delete the data from database, data model array, and update the UI of the table view.
We can do this by implementing the commit editingStyle delegate method and adding the following code:
 func tableView(_ tableView: UITableView, commit editingStyle: UITableViewCell.EditingStyle, forRowAt indexPath: IndexPath) {
        if editingStyle == .delete
        {
            let tasktoDelete = tasks[indexPath.row]
            try! realmDB.write({
                realmDB.delete(tasktoDelete)
                self.tasks.remove(at: indexPath.row)
                self.tasktv.deleteRows(at: [indexPath], with: .fade)
            })
        }
    }
How to fetch all the data (if present) from the database and display it in the table view
Now we are going to implement our last operation, Read. Whenever the user launches the app, it should fetch data from the database (if data is present) and display it in the table view.
We can do this by creating a function getTodo in the view controller swift file and adding the following code inside it:
func getTodos()
    {
       //Get all the data from the database
        let notes = realmDB.objects(ToDoTask.self)

        //Clear the model data array to prevent duplicates
        self.tasks.removeAll()

        /*If the fetched data is not empty then add it to model data array and update the UI */
        if(!notes.isEmpty)
        {
        for n in notes
        {

            self.tasks.append(n)

        }
            self.tasktv.reloadData()
        }


    }
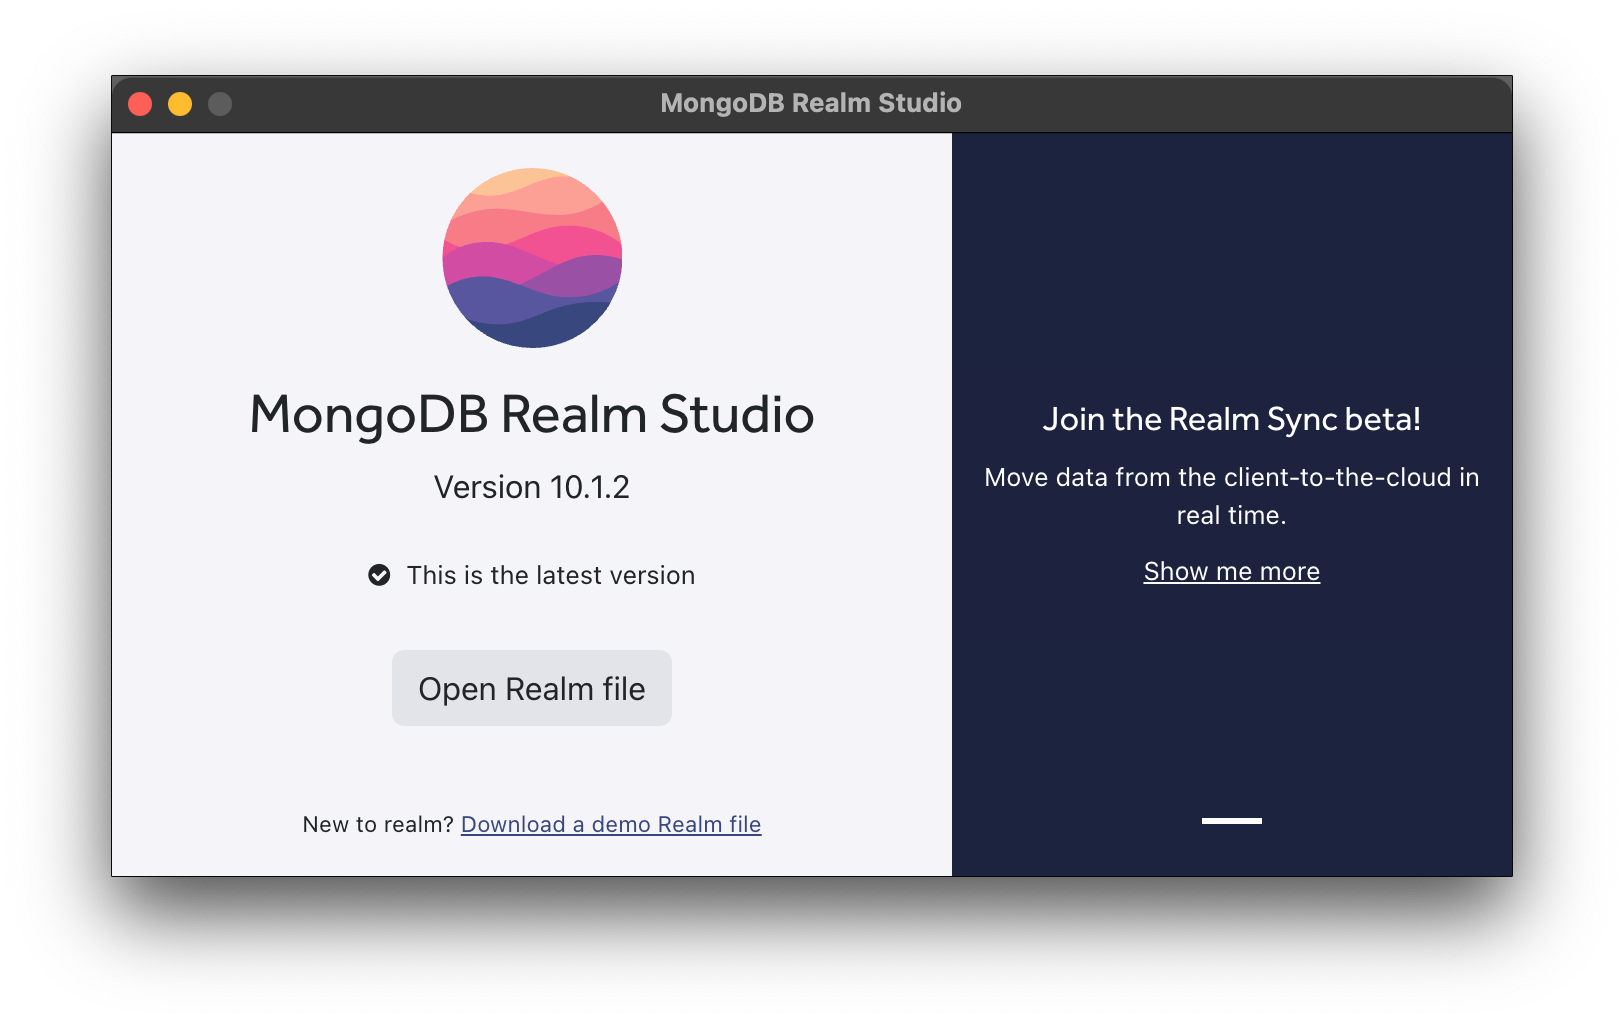
Bonus Tip: How to View Your Database Content in an iOS Simulator
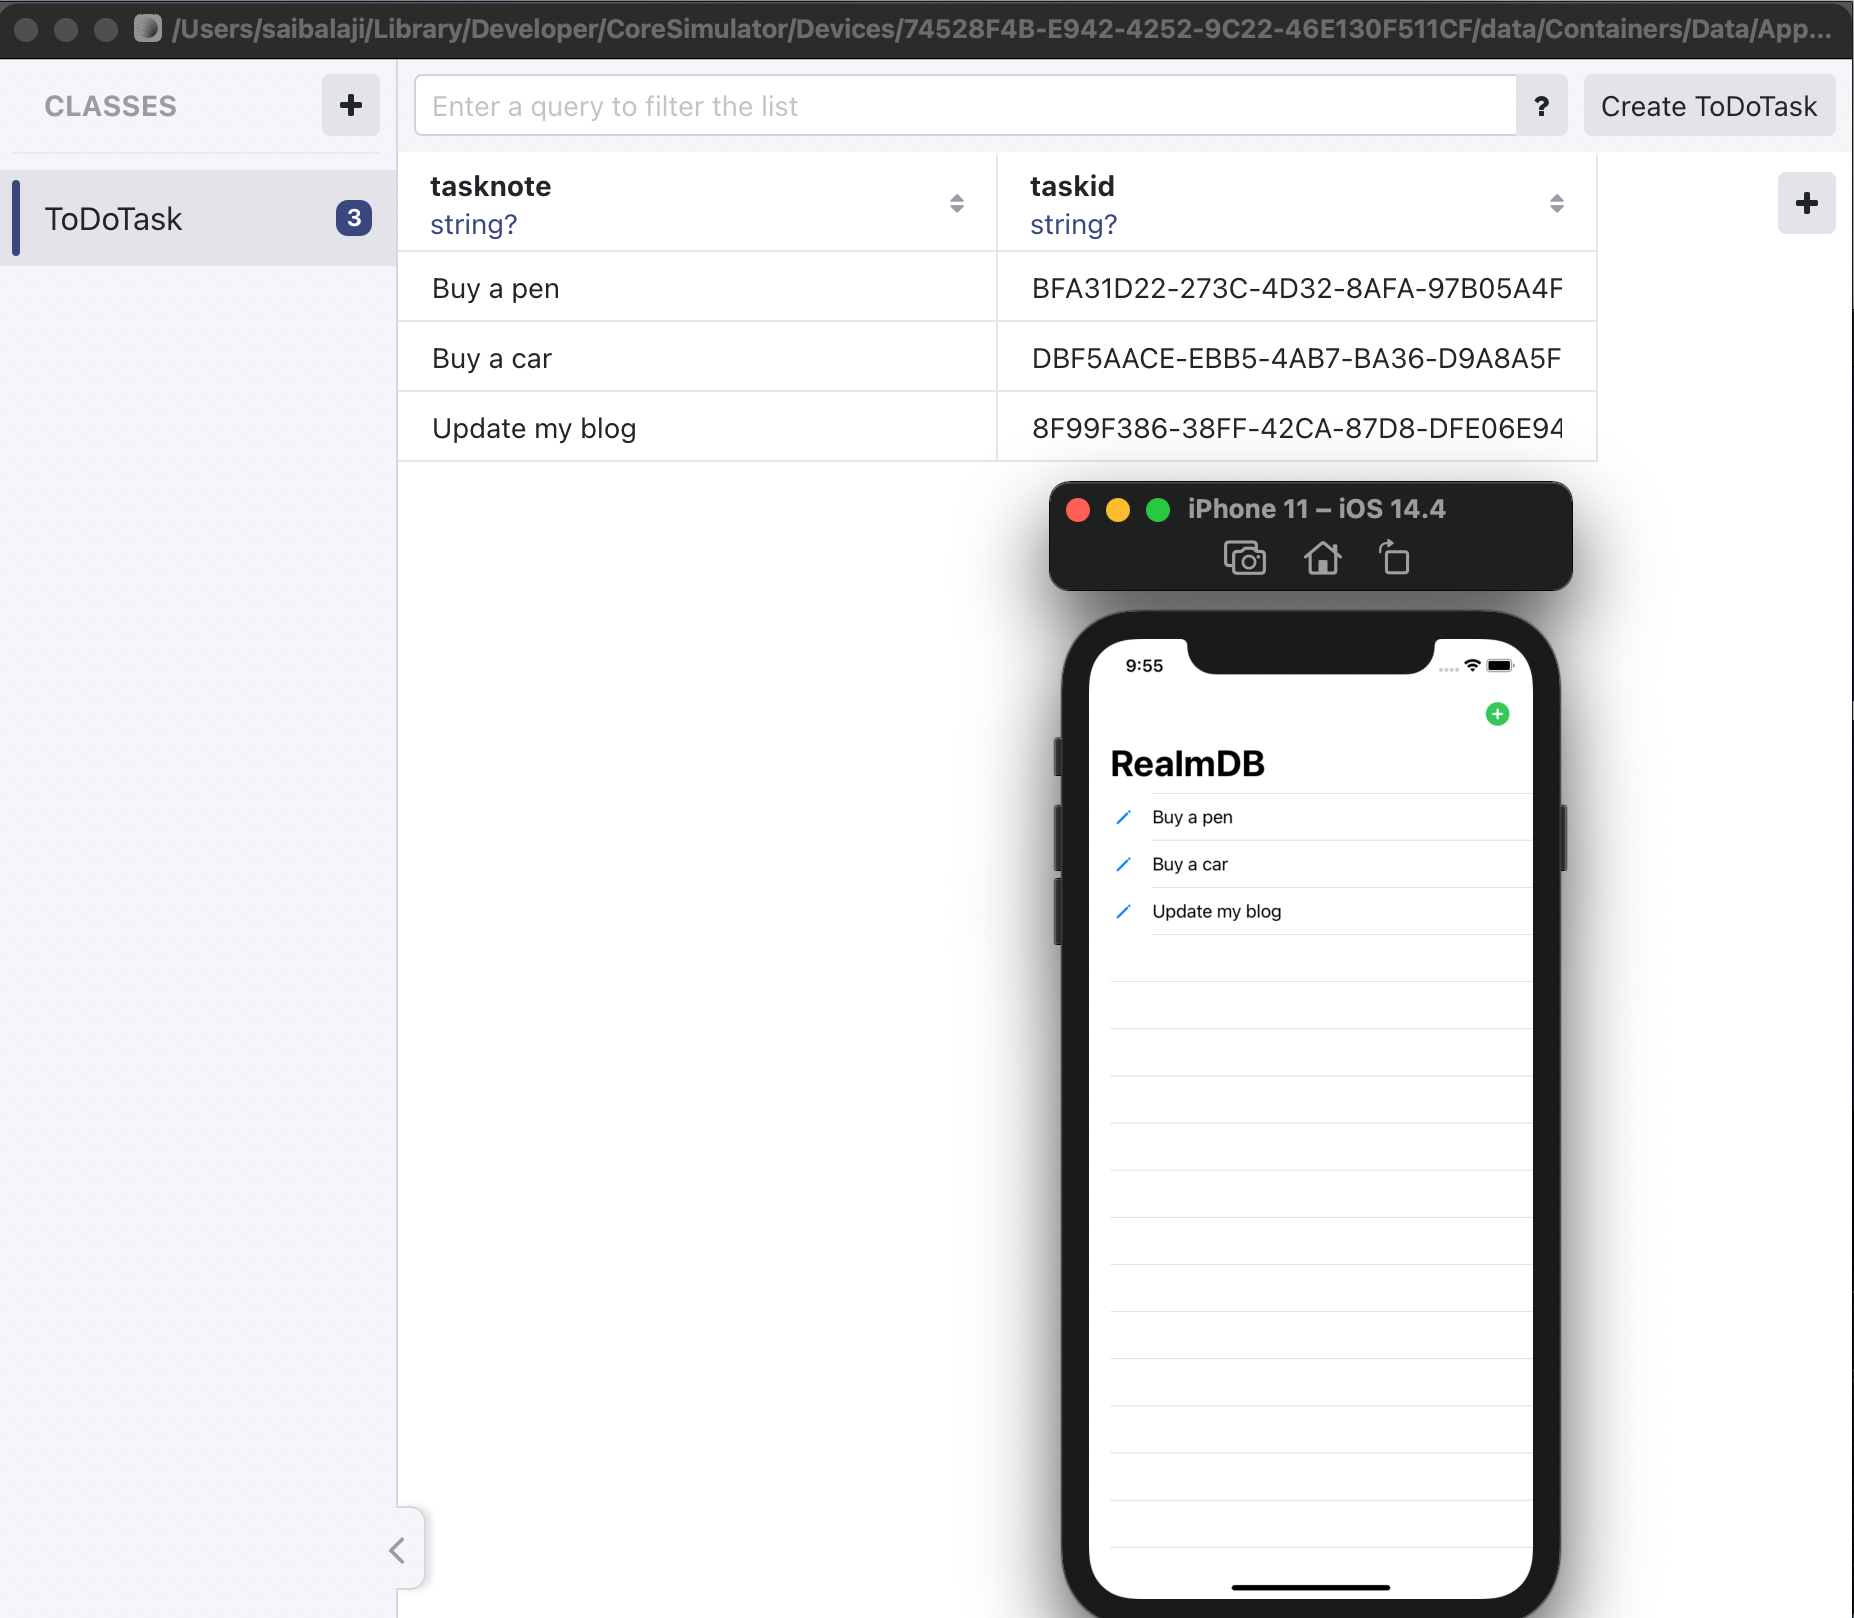
Now when you run your app, you can see that it works as expected. But how can we check if the data is really stored in the database? We can use an app called MongoDB Realm Studio through which we can view our data stored in the Realm database of the simulator.
Note that this method works only when you test the app using iOS simulator
In the viewDidLoad() method, add the below line of code which will print the real file path of our app:
print(realmDB.configuration.fileURL!)

Now copy the file path printed in the console, open up the terminal, and run the following command:
open REALM_FILE_PATH_HERE
Make sure you have downloaded MongoDB Realm Studio from the browser before running the above command.
Now it will open the RealmFile of the app in MongoDB Realm Studio. This will display the data stored in the database in a table format.
If you make changes to your data by editing or deleting the task, the changes will be reflected in the MongoDB Realm Studio app:
Congratulations! You have made a simple app which implements CRUD operations in iOS apps.