

In this post we will walk through getting authentication set up using Supabase and Vue 3.
This will also work with Vue 2, but you'll need to move things around to work with the options API. I am using Vue 3 as it is now the default version.
Just a heads up – there will not be much styling involved here so that the focus stays on Supabase authentication.
Prerequisites
You should be familiar with JavaScript and have had some experience with Vue 3. Having some experience with Supabase will help, but isn't necessary.
If you need a quick review of Supabase you can check out a previous post of mine where I go over how to get started using it.
You will also need Node.js and NPM installed on your machine.
Getting Started
Let's start by building some of the frontend before we start building the database using Supabase.
The first thing we need to do is set up our project. Inside of your terminal and inside of the folder where you want this project to live, run this command:
npm init vite@latest vue-supabase-auth --template vue
This will initialize a new Vite project with Vue 3 in a folder called vue-supabase-auth.
Open this up in your code editor of choice and open up the App.vue file inside of the src folder. When I initialized the project, Vite put the script tag above the template tag. My personal preference is to move the template tag to the top, but that isn't necessary.
Add Authentication to the App
The next step is to add authentication to our app. Supabase gives us the ability to authenticate a user in many different ways.
We'll be walking through how to set up basic email/password authentication, and authentication with a "magic link". A "magic link" is just a link sent to a user's email that, when clicked, will take them to your application and log them in.
Get a Supabase Account
If you haven't already, you'll need to sign up for an account on Supabase. It asks you to sign up with GitHub, so if you don't have a GitHub account, you should also sign up for one of those.
Once you are signed in, you'll click the green button that says "New Project" and select the default organization that was created when you logged in. Mine was called "briancbarrow's Org."
This will bring up a box where you provide some info about the project. I'll name it basic-auth, give it a strong password, and then I'm going to select the region West US (North California) because that is closest to me.
Once the project is done setting up, go into the Authentication -> Settings and disable the "Enable email confirmations." It just makes things a little smoother for this tutorial.
 Showing the "Enable email confirmations" setting disabled
Set up Supabase in the Vue Project
First, we need to run npm install @supabase/supabase-js to get the JavaScript package to integrate with Supabase.
Then we need to create a supabase.js file in the src folder of the project. That should contain the following:
import { createClient } from '@supabase/supabase-js'

const supabaseUrl = import.meta.env.VITE_SUPABASE_URL
const supabaseAnonKey = import.meta.env.VITE_SUPABASE_ANON_KEY

export const supabase = createClient(supabaseUrl, supabaseAnonKey)
As you can see in the code above, we need to set up some environment variables that contain our Supabase keys. Create a .env.local file at the root of the project and add the VITE_SUPABASE_URL and the VITE_SUPABASE_ANON_KEY. You can find your url and anon_key on the dashboard of your Supabase project.
Your .env.local file will look like this:
VITE_SUPABASE_URL=YOUR_SUPABASE_URL
VITE_SUPABASE_ANON_KEY=YOUR_SUPABASE_ANON_KEY
We also want to create a central store for data that is needed throughout the app, like user info. Create a store.js file in the src folder and fill it with this code:
import { reactive } from "vue";

export const store = {
  state: reactive({
    user: {},
  }),
};
Create SignIn and SignUp Components
Supabase authentication separates the signIn and signUp processes, so we'll need to handle them differently. I decided to create two separate components just to make things a little clearer in my head.
Create a SignUp.vue file in the components folder and add the following code:
<template>
  <div>
    <h2>Sign up for an account</h2>
    <form @submit.prevent="handleSignup">
      <div>
        <label for="email">Email</label>
        <input id="email" type="email" v-model="email" />
      </div>
      <div>
        <label for="password">Password</label>
        <input id="password" type="password" v-model="password" />
      </div>
      <div>
        <button type="submit">Sign up</button>
      </div>
    </form>
  </div>
</template>

<script>
import { ref } from "vue";
import { supabase } from "../supabase";

export default {
  setup() {
    const email = ref("");
    const password = ref("");

    const handleSignup = async () => {
      try {
        // Use the Supabase provided method to handle the signup
        const { error } = await supabase.auth.signUp({
          email: email.value,
          password: password.value,
        });
        if (error) throw error;
      } catch (error) {
        alert(error.error_description || error.message);
      }
    };

    return {
      email,
      password,
      handleSignup,
    };
  },
};
</script>
Now create a SignIn.vue file and add the code below. The only differences are the method names that get called, and the text is slightly different in the markup.
<template>
  <div>
    <h2>Sign in to your account</h2>
    <form @submit.prevent="handleSignin">
      <div>
        <label for="email">Email</label>
        <input id="email" type="email" v-model="email" />
      </div>
      <div>
        <label for="password">Password</label>
        <input id="password" type="password" v-model="password" />
      </div>
      <div>
        <button type="submit">Sign in</button>
      </div>
    </form>
  </div>
</template>

<script>
import { ref } from "vue";
import { supabase } from "../supabase";

export default {
  setup() {
    const email = ref("");
    const password = ref("");

    const handleSignin = async () => {
      try {
        // Use the Supabase provided method to handle the signin
        const { error } = await supabase.auth.signIn({
          email: email.value,
          password: password.value,
        });
        if (error) throw error;
      } catch (error) {
        alert(error.error_description || error.message);
      }
    };

    return {
      email,
      password,
      handleSignin,
    };
  },
};
</script>
Now we want to create a wrapper component for these two. Create a file named Auth.vue with the code below:
<template>
  <div>
    <sign-up v-if="isSignUp" />
    <sign-in v-else />
    <button @click="isSignUp = !isSignUp">
      {{
        isSignUp
          ? "Already have an account? Sign In"
          : "Don't have an account yet? Sign Up"
      }}
    </button>
  </div>
</template>

<script>
import { ref } from "vue";
import SignUp from "./SignUp.vue";
import SignIn from "./SignIn.vue";
export default {
  components: { SignUp, SignIn },
  setup() {
    const isSignUp = ref(true);

    return {
      isSignUp,
    };
  },
};
</script>

<style scoped></style>
This just allows the user to toggle between the SignIn and SignUp views. Now open up App.vue again and update the code to this:
<template>
  <!-- Check if user is available in the store, if not show auth compoenent -->
  <Auth v-if="!store.state.user" />
  <!-- If user is available, show the Hello World component -->
  <HelloWorld v-else msg="Hello Vue 3 + Vite" />
</template>

<script>
import Auth from "./components/Auth.vue";
import HelloWorld from "./components/HelloWorld.vue";

import { store } from "./store";
import { supabase } from "./supabase";

export default {
  components: {
    HelloWorld,
    Auth,
  },
  setup() {
    // we initially verify if a user is logged in with Supabase
    store.state.user = supabase.auth.user();
    // we then set up a listener to update the store when the user changes either by logging in or out
    supabase.auth.onAuthStateChange((event, session) => {
      if (event == "SIGNED_OUT") {
        store.state.user = null;
      } else {
        store.state.user = session.user;
      }
    });

    return {
      store,
    };
  },
};
</script>

<style>
#app {
  font-family: Avenir, Helvetica, Arial, sans-serif;
  -webkit-font-smoothing: antialiased;
  -moz-osx-font-smoothing: grayscale;
  text-align: center;
  color: #2c3e50;
  margin-top: 60px;
}
</style>
This will show the Auth component if a user is not signed in, otherwise it will show the HelloWorld.vue as we had initially set up.
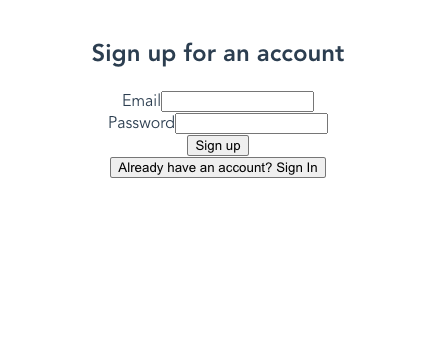 Sign up form
Sign up using your email and a password you create, and you should then see the HelloWorld component again.
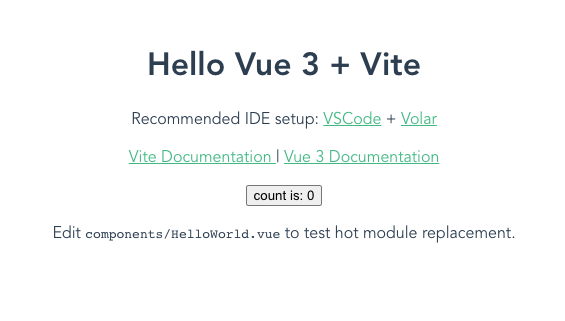 Hello World component showing after sign up
How to log out
Logging out is relatively straightforward. Inside the HelloWorld component, add the following to the bottom of the template tag:
<button @click="signOut">Sign Out</button>
Then update the script tag on HelloWorld to this:
<script setup>
import { ref } from "vue";
import { supabase } from "../supabase";

defineProps({
  msg: String,
});

const count = ref(0);
async function signOut() {
  const { error } = await supabase.auth.signOut();
}
</script>
You can see we are now importing the supabase file we created earlier and then creating a signOut method that gets called on a button click.
Authenticate using Magic Link
Supabase also offers the ability to send users a magic link to their email which they click, and it takes them to the app and signs them in. The link it sends will redirect them to your site, so we need to make sure we have the correct redirect URL in our Supabase setup.
Navigate to the Auth -> Settings page in the Supabase dashboard for your project and make sure the localhost URL is in the Site URL box.
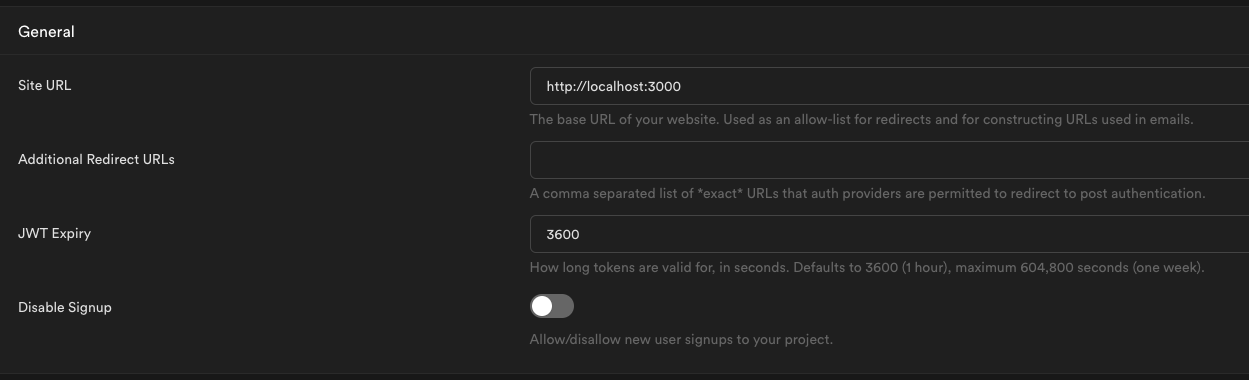 Make sure your site url matches where it should redirect to on login
Create the MagicLink component
Create a new file in the components folder called MagicLink.vue and add the following code:
<template>
  <div>
    <h2>Sign in With Magic Link</h2>
    <form @submit.prevent="handleMagicLink">
      <div>
        <label for="email">Email</label>
        <input id="email" type="email" v-model="email" />
      </div>
      <div>
        <button type="submit">Sign in</button>
      </div>
    </form>
  </div>
</template>

<script>
import { ref } from "vue";
import { supabase } from "../supabase";

export default {
  setup() {
    const email = ref("");

    const handleMagicLink = async () => {
      try {
        // We call the signIn method from Supabase to send the magic link. We only pass it the email though.
        const { error } = await supabase.auth.signIn({
          email: email.value,
        });
        if (error) throw error;
      } catch (error) {
        alert(error.error_description || error.message);
      }
    };

    return {
      email,
      handleMagicLink,
    };
  },
};
</script>
This component is very similar to the SignIn component. It uses the same method, but to get the magic link, we only pass in the email.
Now we need to update Auth.vue to also use the MagicLink component. Update Auth.vue to the following:
<template>
  <div>
    <!-- v-if logic to determine which auth component to show -->
    <sign-up v-if="isSignUp && !useMagicLink" />
    <sign-in v-else-if="!isSignUp && !useMagicLink" />
    <magic-link v-else />
    <div v-if="!useMagicLink">
      <button v-if="!useMagicLink" @click="isSignUp = !isSignUp">
        {{
          isSignUp
            ? "Already have an account? Sign In"
            : "Don't have an account yet? Sign Up"
        }}
      </button>
      <p>Or</p>
    </div>
    <button @click="toggleMagicLink">
      {{
        useMagicLink
          ? "Sign in with email and password"
          : "Sign in with magic link"
      }}
    </button>
  </div>
</template>

<script>
import { ref } from "vue";
import SignUp from "./SignUp.vue";
import SignIn from "./SignIn.vue";
import MagicLink from "./MagicLink.vue";
export default {
  components: { SignUp, SignIn, MagicLink },
  setup() {
    const isSignUp = ref(true);
    const useMagicLink = ref(false);

    function toggleMagicLink() {
      useMagicLink.value = !useMagicLink.value;
    }

    return {
      isSignUp,
      useMagicLink,

      toggleMagicLink,
    };
  },
};
</script>

<style scoped></style>
Now the Auth page should look like this by default:
 Default Auth view
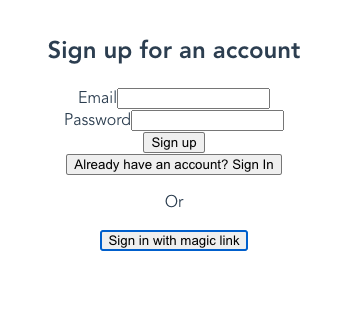
And it should look like this if the user clicks on the "Sign in with magic link" button:
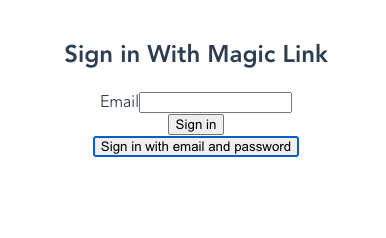 Auth view when signing in with magic link
If you input your email and click "Sign In", you should get an email with the magic link. Click that link, and you should be redirected to the app as a logged in user, where you'll see the HelloWorld view.
Summary
Supabase makes setting up authentication relatively easy. They also provide authentication using several social providers like Google, Apple, Github, and many more.
For my basic projects, I like to keep it simple and stick with email/password login or just letting Supabase send a magic link to log them in.