

There are three types of menus in Android: Popup, Contextual and Options.
Each one has a specific use case and code that goes along with it. To learn how to use them, read on.
Each menu must have an XML file related to it which defines its layout. These are the tags associated with the menu option:
<menu> - This is the container element for your menu (similar to LinearLayout)
<item> - This denotes an item and is nested inside of the menu tag. Be aware that an item element can hold a <menu> element to represent a submenu
<group> - This is used to signify a certain property or feature to a couple of menu items (I.E. state/visibility)
<?xml version="1.0" encoding="utf-8"?>
<menu xmlns:android="http://schemas.android.com/apk/res/android"
    xmlns:app="http://schemas.android.com/apk/res-auto"
    xmlns:actionProviderClass="http://schemas.android.com/tools">
    <item android:id="@+id/item1"
        android:icon="@drawable/ic_baseline_check_circle_24px"
        android:title="item1"
        app:showAsAction="always"
        />
    <item android:id="@+id/item2"
        android:icon="@drawable/ic_baseline_copyright_24px"
        android:title="item2"
        app:showAsAction="always"
        />
    <item android:id="@+id/item3"
        android:icon="@drawable/ic_baseline_favorite_24px"
        android:title="item3"
        app:showAsAction="always">
    </item>
</menu>
As shown in the code snippet above, each menu item has various attributes associated with it. I’ll detail the main ones here, but if you want to see what else you can add, go here.
- id - This is a unique identifier for the item in the menu. You can use this to see exactly which item the user clicked
- icon - If you want to show an icon associated with that menu item
- title - Text that will be shown in the menu for that item
- showAsAction - This attribute should only be used when using a menu in an activity that uses an application bar(or as it is also referred to, the action bar). It controls when and how this item should appear as an action in the application bar. There are five values: always, never, ifRoom, withText, and collapseActionView
android:showAsAction="always|never|ifRoom|withText|collapseActionView"
I’ll elaborate on the meaning of each of these values in the next section.
In addition, you need to add the relevant onCreate menu method to your activity.
//Options Menu
@Override
public boolean onCreateOptionsMenu(Menu menu) {
    MenuInflater inflater = getMenuInflater();
    inflater.inflate(R.menu.options_menu, menu);
    return super.onCreateOptionsMenu(menu);
}

//Context Menu
@Override
public void onCreateContextMenu(ContextMenu menu, View v,
                                ContextMenu.ContextMenuInfo menuInfo) {
  super.onCreateContextMenu(menu, v, menuInfo);
  MenuInflater inflater = getMenuInflater();
  inflater.inflate(R.menu.context, menu);
}
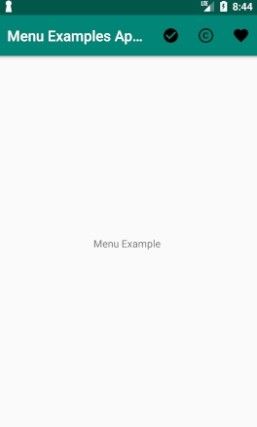
Options Menu
This menu is usually found at the top of your application and in it, you should place actions that affect the application as a whole. These could be the application’s settings or a search box.
Using the menu layout from above, we get the following options menu:
As promised, let’s go over the values that can be given for the showAsAction attribute:
- always - will always show in the action bar
- never - will never show, and therefore will be available through the overflow menu
- ifRoom - only if there is sufficient space in the action bar, then it would be shown. Keep in mind that per the documentation, there is a limit to how many icons you can have on the action bar.
- withText-will include the item’s title in the action bar
- collapseActionView - if this item has an action view associated with it, it will become collapsible(from API 14 and above)
If we go ahead and change the last item in our menu to showAsAction=”never”, we get the following:
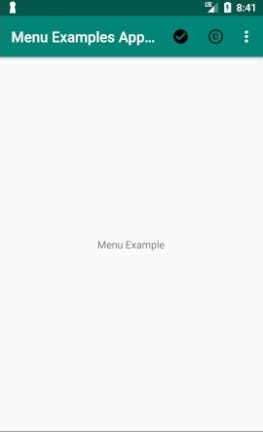 The third menu item moved to the overflow menu
Contextual Menu
This menu appears when a user performs a long click on one of your UI elements. The options found in this menu affect what UI element the user made the click on. It is common to use this type of menu in list or grid views, where the user’s interaction with each item can lead to a specific action.
Imagine a scenario where you have an application with an image, and you want to present to the user several choices when they click on the image.
A context menu can appear in two ways :
- A floating menu
- An action bar at the top of your application
We will only demonstrate how to use the first option, but you can read more about the second option here.
Using the following XML:
<?xml version="1.0" encoding="utf-8"?>
<menu xmlns:android="http://schemas.android.com/apk/res/android">
    <item
        android:id="@+id/share"
        android:title="Share"/>
    <item
        android:id="@+id/Mail"
        android:title="Mail"/>
    <item
        android:id="@+id/MoreInfo"
        android:title="More Information"/>
</menu>
And adding the following code to our main activity:
 @Override
    protected void onCreate(Bundle savedInstanceState) {
       super.onCreate(savedInstanceState);
       setContentView(R.layout.activity_main);
       TYPE_OF_LAYOUT layout = (TYPE_OF_LAYOUT)findViewById(R.id.main_layout);
       registerForContextMenu(layout);
  }
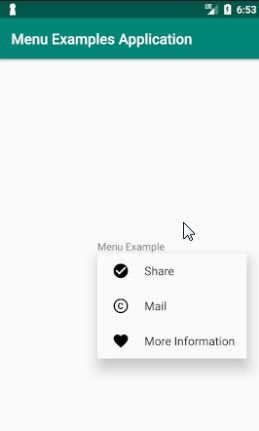
We will get the following:
 When performing a long click on the text, the context menu appears
Popup Menu
A popup menu is a type of menu that displays items in a vertical list. This list is attached to the view the user has clicked on to invoke this menu. It is important to keep in mind, that when choosing a popup menu, you do not want the user’s choice to affect the previous content the user pressed.
We will use the same menu XML layout as before, but we will need to add the following code to our activity:
void showPopupMenu(View view) {
  PopupMenu popup = new PopupMenu(this, view);
  MenuInflater inflater = popup.getMenuInflater();
  inflater.inflate(R.menu.actions, popup.getMenu());
  popup.show();
}
We will get the same result as the previous screenshot, but without the need for the user to perform a long click.
Icons In Popup Menus
Now I know what you are probably here for: you want to know how you can add icons to the menus.
While I will show an example of how to do this, it is wise to understand that this is a feature that is not enabled for popup menus and may cause unexpected behavior. You can achieve this by using reflection to turn on a flag called setForceShowIcon.
//popup is an instance of PopupMenu

try {
      Field[] fields = popup.getClass().getDeclaredFields();
      for (Field field : fields) {
          if ("mPopup".equals(field.getName())) {
              field.setAccessible(true);
              Object menuPopupHelper = field.get(popup);
              Class<?> classPopupHelper = Class.forName(menuPopupHelper
                      .getClass().getName());
              Method setForceIcons = classPopupHelper.getMethod(
                      "setForceShowIcon", boolean.class);
              setForceIcons.invoke(menuPopupHelper, true);
              break;
          }
      }
  } catch (Throwable e) {
      e.printStackTrace();
  }
I’ve just scratched the surface with Android menus, but hopefully, it is enough to inspire you to dig deeper.