Angular is one of the most popular JavaScript frameworks created and developed by Google. In the last couple of years, ReactJS has gained a lot of interest and has become the most popular modern JS library in the industry. But this doesn’t mean Angular is not important anymore.
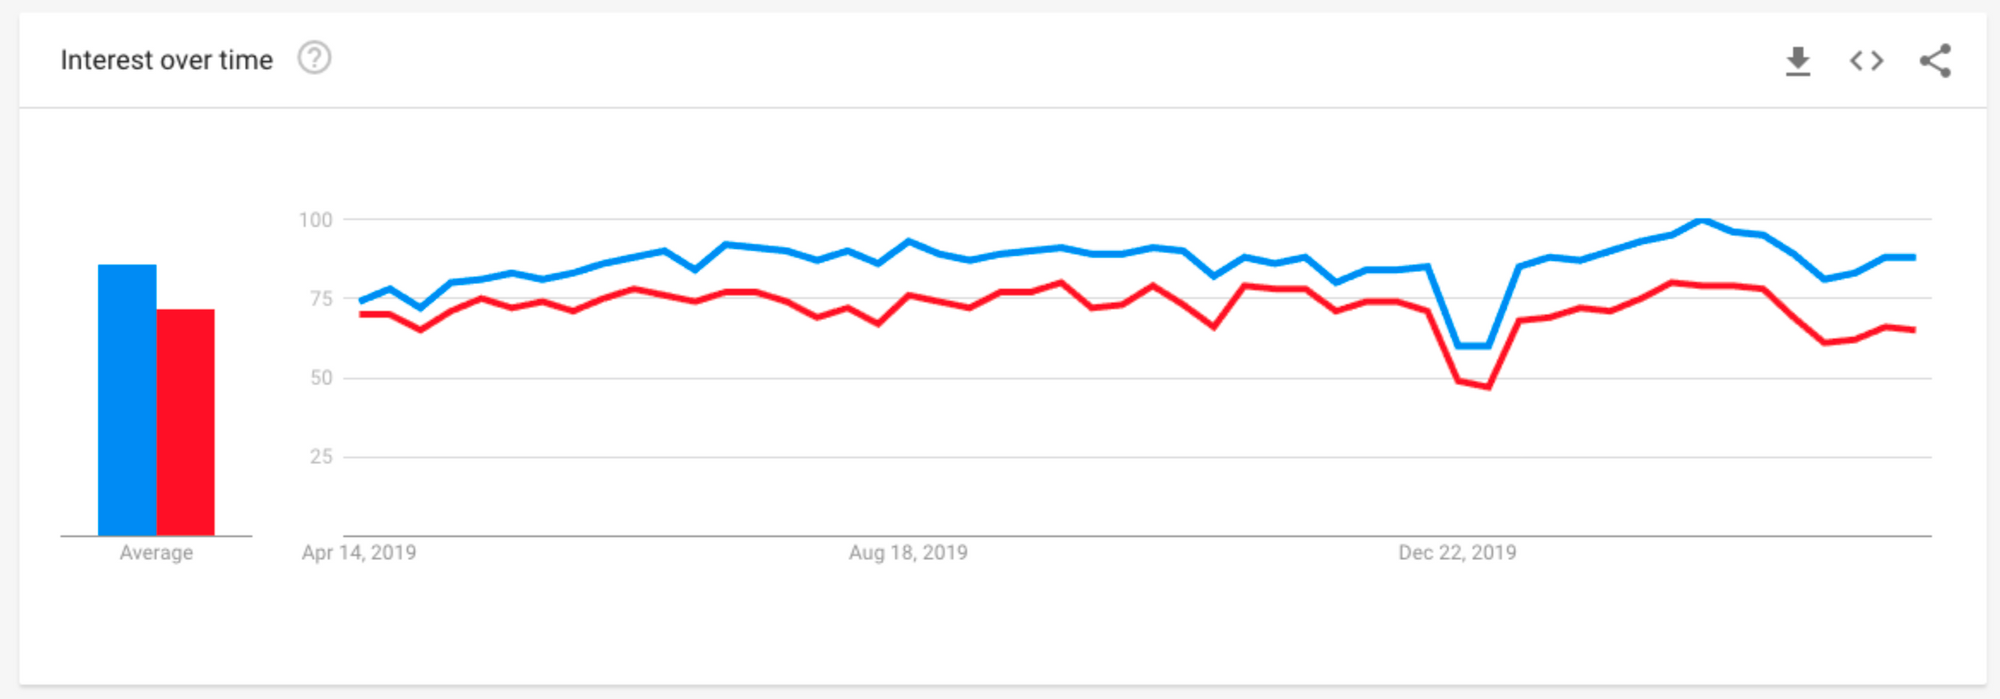
On the contrary, Angular is the second most popular framework after React according to Google Trends (world-wide):

As a front end developer, I have worked with Angular. Now I would like to cover some important features of Angular in my upcoming articles:
- Part 1: How to install your first App with the Angular CLI (currently you’re here)
- Part 2: Angular Components & String Interpolation
- Part 3: Angular Directives & Pipes
- Part 4: One-Way Data Binding in Angular
- Part 5: Angular Two-Way Data Binding with ngModel
In the first part of my Angular for Beginners series, you’re going to learn what Angular & Angular CLI is and how to install your first Angular app by using the CLI.
Prerequisites
Before starting to learn Angular, I recommend that you become familiar with the following languages if you aren't already:
- HTML, CSS
- JavaScript / ES6
- TypeScript
If you prefer, you can watch the tutorial video below:
What is Angular?
Angular is a JavaScript framework developed and maintained by Google for building front-end applications. Let me start first explaining what a framework is…
What is a Framework?
A Framework is a complete package with its own functionalities & libraries. A Framework has its own rules, you don’t have much flexibility and the project is dependent on the Framework you use. Angular is an example of a framework.
Angular has released in 2016 but before Angular, there was AngularJS. One of the most asked questions about Angular is that what is the difference between AngularJS and Angular?
AngularJS vs Angular
These 2 versions of Angular confuse many developers. AngularJS and Angular are completely different frameworks. Angular versions (like 1, 1.2, 1.5, etc) are called Angular JS and starting from version 2 and above is called Angular.
- Angular JS → versions from 1.x
- Angular → version 2 and above
So Angular version 2 is a complete rewrite of the AngularJS framework and the newer versions (like 4,5,6 and so on) are minor changes of Angular version 2.
In this article series, you’re going to learn Angular 2+.
What is Angular CLI?
CLI stands for Command Line Interface. Angular has its own official CLI that helps us with lots of things during the development process.
Angular CLI is being used for automating operations in Angular projects rather than doing them manually. CLI supports us, developers, in an Angular project from beginning to end.
For example, Angular CLI can be used for:
- Configurations, Environment Setup
- Building components, services, routing system
- Starting, testing and deploying the project
- Installing 3rd party libraries (like Bootstrap, Sass, etc.)
and much more. Now let’s see how to install our first Angular App by using the CLI step by step.
Step 1: Install NPM (Node Package Manager)
First of all, we are going to need Node js. NPM (node package manager, is a part of node js) is a tool for installing 3rd party libraries and dependencies to our project. If you don’t have it yet, you can download and install it from here. I have also explained it step by step on the tutorial video.
Step 2: Install Angular CLI
If you have node js installed, the next step is installing the Angular CLI itself to your computer:
npm install -g @angular/clig stands for global installation. If you use -g later you can use the CLI in any Angular project on your computer.
Tip: Type ng v to your command-line interface (or terminal) to verify your Angular version.
Step 3: Create a new Angular Project
After the installation is completed, you can use Angular CLI to create a new Angular project with the following command:
ng new my-first-appThis command creates a new Angular project (named my-first-app, you can use any name) with all the necessary dependencies and files. You don’t have to worry about anything because the CLI does it automatically for you.
Step 4: Run the App
After installing the CLI and creating a new Angular app, the final step is to start the project. To do that, we need to use the following command:
ng serve -- openThe “open” flag opens your local browser window automatically.
Angular supports live server, so you can see the changes in your local without refreshing your browser’s page. For more details and updates, check also the official documentation.
Conclusion
So in the first part, we’ve made an introduction to Angular, what CLI is and how to install your first Angular app. In the second post, you’re going to learn about Angular Components and String Interpolation. Stay tuned :)
If you want to learn more about Web Development, feel free to follow me on Youtube!
Thank you for reading!

