
By Victor Onwuzor
Building an Angular application that involves many forms can be stressful. Especially so when you have to handle the validation messages on each component.
One way to reduce your stress is to write a generic validation class that handles all your validation messages.
On the one hand, this will significantly reduce the code on your HTML template. It will also give you one source of error messages with the flexibility to override the error message on each component
On the other, it involves writing a little more code on the component and extra files
But I think the pros outweigh the cons when dealing with multiple forms in different components.
Prerequisites
- Basic knowledge of Angular
- Basic knowledge of reactive forms
What we are building
Angular has two types of forms: template driven forms and reactive forms. In this post, we will focus on reactive forms.
We will learn how to validate a simple Login and Sign up form with generic validation using a reactive form. I used the Bulma CSS framework for the design.
The form input values are just console log when you click on submit. I did this so that we can focus mainly on form validation, but you can do whatever you want with the form input values.
Here is the demo link on Stackblitz.
Step 1: Setup
I have created a starter file for this project with all the HTML, CSS, and Bulma done. This allows us to focus more on the generic form validation. Clone this repo on GitHub here.
Then, in your terminal run this command:
git clone git@github.com:onwuvic/generic-reactive-form-validation.git
Or you can do this:
git clone https://github.com/onwuvic/generic-reactive-form-validation.git
cd generic-reactive-form-validation
git checkout starter
npm install
ng serve
Next, visit http://localhost:4200/ on your browser.
Open the generic-reactive-form-validation folder in any of your editors. The file structure should look like this:
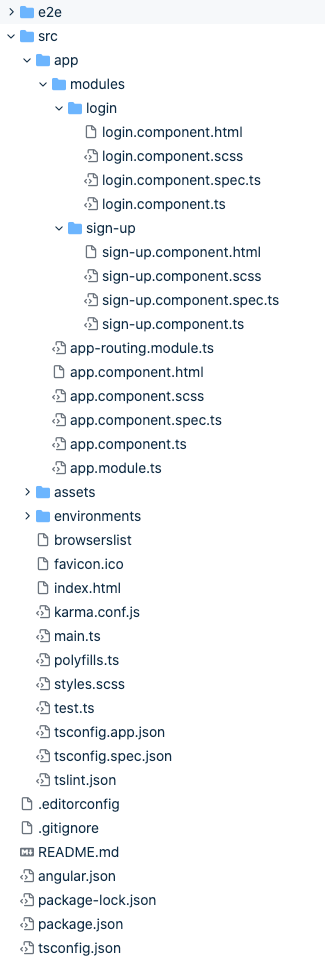 file structure
Step 2: Import ReactiveFormsModule
Now, let's import ReactiveFormsModule into our app module and add it to the imports array.
import { BrowserModule } from '@angular/platform-browser';
import { NgModule } from '@angular/core';
import { ReactiveFormsModule } from '@angular/forms';

import { AppRoutingModule } from './app-routing.module';
import { AppComponent } from './app.component';
import { LoginComponent } from './modules/login/login.component';
import { SignUpComponent } from './modules/sign-up/sign-up.component';

@NgModule({
  declarations: [
    AppComponent,
    LoginComponent,
    SignUpComponent
  ],
  imports: [
    BrowserModule,
    AppRoutingModule,
    ReactiveFormsModule
  ],
  providers: [],
  bootstrap: [AppComponent]
})
export class AppModule { }
Step 3: Create a generic validation class and password confirmation validator
Generic validation class
Let's create a shared folder inside the root app folder. Then inside the shared folder, create a generic-validator.ts file. Write the following code:
import { FormGroup } from '@angular/forms';

// Provide all set of validation messages here
const VALIDATION_MESSAGES = {
  email: {
    required: 'Required',
    email: 'This email is invalid'
  },
  password: {
    required: 'Required',
    minlength: 'The password length must be greater than or equal to 8'
  },
  confirmPassword: {
    required: 'Required',
    match: 'Password does not match'
  },
  firstName: {
    required: 'Required'
  },
  lastName: {
    required: 'Required'
  }
};

export class GenericValidator {
  // By default the defined set of validation messages is pass but a custom message when the class is called can also be passed
  constructor(private validationMessages: { [key: string]: { [key: string]: string } } = VALIDATION_MESSAGES) {}

  // this will process each formcontrol in the form group
  // and then return the error message to display
  // the return value will be in this format `formControlName: 'error message'`;
  processMessages(container: FormGroup): { [key: string]: string } {
    const messages = {};
    // loop through all the formControls
    for (const controlKey in container.controls) {
      if (container.controls.hasOwnProperty(controlKey)) {
        // get the properties of each formControl
        const controlProperty = container.controls[controlKey];
        // If it is a FormGroup, process its child controls.
        if (controlProperty instanceof FormGroup) {
          const childMessages = this.processMessages(controlProperty);
          Object.assign(messages, childMessages);
        } else {
          // Only validate if there are validation messages for the control
          if (this.validationMessages[controlKey]) {
            messages[controlKey] = '';
            if ((controlProperty.dirty || controlProperty.touched) && controlProperty.errors) {
              // loop through the object of errors
              Object.keys(controlProperty.errors).map(messageKey => {
                if (this.validationMessages[controlKey][messageKey]) {
                  messages[controlKey] += this.validationMessages[controlKey][messageKey] + ' ';
                }
              });
            }
          }
        }
      }
    }
    return messages;
  }
}
First, we import the FormGroup. We can write all our validation messages in this file or pass each form validation message from their component.
Each property on the VALIDATION_MESSAGES object corresponds to each input field name or formControlName. Also, each property of the input field corresponds to the validation name on it. Its value is what you want to show as the error message.
For instance, the input field name formControlName "email" has validations of “required” and “email” on it.
In constructor method, we can override the default error messages from the component where our generic validation is being used by passing the validation message when we instantiate our generic validation class.
The processMessages method processes each form input field and returns the error message to display.
Password confirmation validation
Now, let’s create a password confirmation validator to check if our password and confirm password match.
Inside the shared folder, create a password-matcher.ts file. Write the following code:
import { AbstractControl } from '@angular/forms';

export class PasswordMatcher {
  static match(control: AbstractControl): void | null {
    const passwordControl = control.get('password');
    const confirmPasswordControl = control.get('confirmPassword');

    if (passwordControl.pristine || confirmPasswordControl.pristine) {
      return null;
    }

    if (passwordControl.value === confirmPasswordControl.value) {
      return null;
    }

    confirmPasswordControl.setErrors({ match: true });
  }
}
Step 4: Add FormGroup and FormBuilder to each components and templates
Sign up form component
Inside the app/modules/sign-up, add the below code to the sign-up component:
import { Component, OnInit } from '@angular/core';
import { FormGroup, FormBuilder, Validators } from '@angular/forms';

import { PasswordMatcher } from '../../shared/password-matcher';

@Component({
  selector: 'app-sign-up',
  templateUrl: './sign-up.component.html',
  styleUrls: ['./sign-up.component.scss']
})
export class SignUpComponent implements OnInit {
  signupForm: FormGroup;

  // Use with the generic validation message class
  displayMessage: { [key: string]: string } = {};

  constructor(private fb: FormBuilder) {}

  ngOnInit() {
    this.signupForm = this.fb.group({
      firstName: ['', [Validators.required]],
      lastName: ['', [Validators.required]],
      email: ['', [Validators.required, Validators.email]],
      password: ['', [Validators.required, Validators.minLength(8)]],
      confirmPassword: ['', Validators.required]
    }, { validator: PasswordMatcher.match });
  }

  signup() {
    console.log('---form', this.signupForm.value);
  }

}
We have Angular in-built validations for each input field along with our custom PasswordMatcher validation to ensure that the password and confirmed password match.
Sign up form template
Now let's have a look at the sign up form template:
<h1 class="title is-4">Sign Up</h1>
<p class="description">Let's get started!</p>
<form (ngSubmit)="signup()" [formGroup]="signupForm" novalidate autocomplete="false">
  <div class="field">
    <div class="control">
      <input [ngClass]="{'is-danger': displayMessage.firstName}" formControlName="firstName" class="input is-medium" type="text" placeholder="First Name">
      <p *ngIf="displayMessage.firstName" class="help is-danger">
        {{ displayMessage.firstName }}
      </p>
    </div>
  </div>
  <div class="field">
    <div class="control">
      <input [ngClass]="{'is-danger': displayMessage.lastName}" formControlName="lastName" class="input is-medium" type="text" placeholder="Last Name">
      <p *ngIf="displayMessage.lastName" class="help is-danger">
        {{ displayMessage.lastName }}
      </p>
    </div>
  </div>
  <div class="field">
    <div class="control">
      <input [ngClass]="{'is-danger': displayMessage.email}" formControlName="email" class="input is-medium" type="email" placeholder="Email">
      <p *ngIf="displayMessage.email" class="help is-danger">
        {{ displayMessage.email }}
      </p>
    </div>
  </div>
  <div class="field">
    <div class="control">
      <input [ngClass]="{'is-danger': displayMessage.password || displayMessage.confirmPassword }" formControlName="password" class="input is-medium" type="password" placeholder="Password">
      <p *ngIf="displayMessage.password" class="help is-danger">
        {{ displayMessage.password }}
      </p>
    </div>
  </div>
  <div class="field">
    <div class="control">
      <input [ngClass]="{'is-danger': displayMessage.confirmPassword}" formControlName="confirmPassword" class="input is-medium" type="password" placeholder="Confirm Password">
      <p *ngIf="displayMessage.confirmPassword" class="help is-danger">
        {{ displayMessage.confirmPassword }}
      </p>
    </div>
  </div>
  <br>
  <button type="submit" class="button is-block is-primary is-fullwidth is-medium" [disabled]="signupForm.invalid">Submit</button>
  <br>
  <small class="has-text-centered">
    <em>
      Already have an account
      <a [routerLink]="['']" class="primary-color">Login</a>
    </em>
  </small>

</form>
<form (ngSubmit)="signup()" [formGroup]="signupForm" novalidate autocomplete="false">
We added our ngSubmit and formGroup to the form tag.
<input [ngClass]="{'is-danger': displayMessage.firstName}" formControlName="firstName" class="input is-medium" type="text" placeholder="First Name">
We also added formControlName to each input field. If the display message has a firstName error message it will apply the ngClass is-danger to the input field.
<p *ngIf="displayMessage.firstName" class="help is-danger">
  {{ displayMessage.firstName }}
</p>
This displays our error message.
<button type="submit" class="button is-block is-primary is-fullwidth is-medium" [disabled]="signupForm.invalid">Submit</button>
We disable the submit button if the form is not valid.
Login form component
Inside the app/modules/login, add the below code to the login component:
import { Component, OnInit } from '@angular/core';
import { FormGroup, FormBuilder, Validators } from '@angular/forms';

@Component({
  selector: 'app-login',
  templateUrl: './login.component.html',
  styleUrls: ['./login.component.scss']
})
export class LoginComponent implements OnInit, AfterViewInit {
  loginForm: FormGroup;

  // Use with the generic validation message class
  displayMessage: { [key: string]: string } = {};
  private validationMessages: { [key: string]: { [key: string]: string } };

  constructor(private fb: FormBuilder) {
    // Defines all of the validation messages for the form.
    this.validationMessages = {
      email: {
        required: 'Required',
        email: 'This email is invalid'
      },
      password: {
        required: 'Required',
        minlength: 'The password length must be greater than or equal to 8'
      }
    };
  }

  ngOnInit() {
    this.loginForm = this.fb.group({
      email: ['', [Validators.required, Validators.email]],
      password: ['', [Validators.required, Validators.minLength(8)]],
    });
  }

  login() {
    console.log('---form', this.loginForm.value);
  }

}
The only difference here with the sign up component is that we will be overriding the default error message in our generic validation class with the validation message.
Login form template
Write the following code in the login template:
<h1 class="title is-4">Login</h1>
<p class="description">Welcome back!</p>
<form (ngSubmit)="login()" [formGroup]="loginForm" novalidate autocomplete="false">
  <div class="field">
    <div class="control">
      <input [ngClass]="{'is-danger': displayMessage.email}" class="input is-medium" type="email" placeholder="Email" formControlName="email">
      <p *ngIf="displayMessage.email" class="help is-danger">
        {{ displayMessage.email }}
      </p>
    </div>
  </div>
  <div class="field">
    <div class="control">
      <input [ngClass]="{'is-danger': displayMessage.password}" class="input is-medium" type="password" placeholder="Password" formControlName="password">
      <p *ngIf="displayMessage.password" class="help is-danger">
        {{ displayMessage.password }}
      </p>
    </div>
  </div>
  <button type="submit" class="button is-block is-primary is-fullwidth is-medium" [disabled]="loginForm.invalid">Login</button>
  <br>
  <small class="has-text-centered">
    <em>
      Don't have an account
      <a [routerLink]="['signup']" class="primary-color">Sign Up</a>
    </em>
  </small>
</form>
Step 5: Use Generic Validation in each component
Generic validation on Sign up
Add the following code to the sign-up.component.ts file:
import { Component, OnInit, ViewChildren, ElementRef, AfterViewInit } from '@angular/core';
import { FormGroup, FormBuilder, Validators, FormControlName, AbstractControl } from '@angular/forms';
import { Observable, fromEvent, merge } from 'rxjs';
import { debounceTime } from 'rxjs/operators';
import { GenericValidator } from '../../shared/generic-validator';
import { PasswordMatcher } from '../../shared/password-matcher';

@Component({
  selector: 'app-sign-up',
  templateUrl: './sign-up.component.html',
  styleUrls: ['./sign-up.component.scss']
})
export class SignUpComponent implements OnInit, AfterViewInit {
  // Access every form input fields in our signup html file
  @ViewChildren(FormControlName, { read: ElementRef }) formInputElements: ElementRef[];
  signupForm: FormGroup;

  // Use with the generic validation message class
  displayMessage: { [key: string]: string } = {};
  private genericValidator: GenericValidator;

  constructor(private fb: FormBuilder) {
    // Define an instance of the validator for use with this form,
    this.genericValidator = new GenericValidator();
  }

  ngOnInit() {
    this.signupForm = this.fb.group({
      firstName: ['', [Validators.required]],
      lastName: ['', [Validators.required]],
      email: ['', [Validators.required, Validators.email]],
      password: ['', [Validators.required, Validators.minLength(8)]],
      confirmPassword: ['', Validators.required]
    }, { validator: PasswordMatcher.match });
  }

  ngAfterViewInit(): void {
    // Watch for the blur event from any input element on the form.
    const controlBlurs: Observable<any>[] = this.formInputElements
      .map((formControl: ElementRef) => fromEvent(formControl.nativeElement, 'blur'));

    // Merge the blur event observable with the valueChanges observable
    merge(this.signupForm.valueChanges, ...controlBlurs).pipe(
      debounceTime(800)
    ).subscribe(value => {
      this.displayMessage = this.genericValidator.processMessages(this.signupForm);
    });
  }

  signup() {
    console.log('---form', this.signupForm.value);
  }

}
Here we have imported the generic validation class.
@ViewChildren(FormControlName, { read: ElementRef }) formInputElements: ElementRef[];
We added the @ViewChildren to access every form input field in our signup HTML file. This helps us listen for an event on them.
private genericValidator: GenericValidator;

constructor(private fb: FormBuilder) {
   // Define an instance of the validator for use with this form
   this.genericValidator = new GenericValidator();
}
We instantiate the Generic validation inside the constructor.
Then, we implement the ngAfterViewInit interface.
ngAfterViewInit(): void {
   // Watch for the blur event from any
   // input element on the form.
   const controlBlurs: Observable<any>[] = this.formInputElements
      .map((formControl: ElementRef) =>
         fromEvent(formControl.nativeElement, 'blur')
      );
   // Merge the blur event observable
   // with the valueChanges observable
   merge(this.signupForm.valueChanges, ...controlBlurs)
    .pipe(debounceTime(800))
    .subscribe(value => {
      this.displayMessage = this.genericValidator
        .processMessages(this.signupForm);
   });
}
Here we watch for the blur event from any input element on the form.
const controlBlurs: Observable<any>[] = this.formInputElements
      .map((formControl: ElementRef) =>
         fromEvent(formControl.nativeElement, 'blur')
      );
merge(this.signupForm.valueChanges, ...controlBlurs)
    .pipe(debounceTime(800))
    .subscribe(value => {
      this.displayMessage = this.genericValidator
        .processMessages(this.signupForm);
   });
Now we have combined the form value changes observable (which gets triggered when any of the input values change) and the blur events of any input field into one observable.
So, when a user changes an input value or taps into any input field, this merge method gets triggered.
Then we add a delay of 800 milliseconds with debounceTime(800). This gives the user time to make changes before trigging the validation.
Finally, we get the error messages to display by calling the generic validator method.
Generic validation on Login
Write the following code to the login.component.ts file:
import { Component, OnInit, ViewChildren, ElementRef, AfterViewInit } from '@angular/core';
import { FormGroup, FormBuilder, Validators, FormControlName } from '@angular/forms';
import { Observable, fromEvent, merge } from 'rxjs';
import { debounceTime } from 'rxjs/operators';
import { GenericValidator } from '../../shared/generic-validator';

@Component({
  selector: 'app-login',
  templateUrl: './login.component.html',
  styleUrls: ['./login.component.scss']
})
export class LoginComponent implements OnInit, AfterViewInit {
  // Access every form input fields in our login html file
  @ViewChildren(FormControlName, { read: ElementRef }) formInputElements: ElementRef[];
  loginForm: FormGroup;

  // Use with the generic validation message class
  displayMessage: { [key: string]: string } = {};
  private validationMessages: { [key: string]: { [key: string]: string } };
  private genericValidator: GenericValidator;

  constructor(private fb: FormBuilder) {
    // Defines all of the validation messages for the form.
    this.validationMessages = {
      email: {
        required: 'Required',
        email: 'This email is invalid'
      },
      password: {
        required: 'Required',
        minlength: 'The password length must be greater than or equal to 8'
      }
    };
    // Define an instance of the validator for use with this form,
    // passing in this form's set of validation messages.
    this.genericValidator = new GenericValidator(this.validationMessages);
  }

  ngOnInit() {
    this.loginForm = this.fb.group({
      email: ['', [Validators.required, Validators.email]],
      password: ['', [Validators.required, Validators.minLength(8)]],
    });
  }

  ngAfterViewInit(): void {
    // Watch for the blur event from any input element on the form.
    const controlBlurs: Observable<any>[] = this.formInputElements
      .map((formControl: ElementRef) => fromEvent(formControl.nativeElement, 'blur'));

    // Merge the blur event observable with the valueChanges observable
    merge(this.loginForm.valueChanges, ...controlBlurs).pipe(
      debounceTime(800)
    ).subscribe(value => {
      this.displayMessage = this.genericValidator.processMessages(this.loginForm);
    });
  }

  login() {
    console.log('---form', this.loginForm.value);
  }

}
The only difference here from the sign up code is that we are overriding our default validation messages with our new validation Messages specified in this component. Then we're passing it into the generic validation class when we instantiate it.
  constructor(private fb: FormBuilder) {
    // Defines all of the validation messages for the form.
    this.validationMessages = {
      email: {
        required: 'Required',
        email: 'This email is invalid'
      },
      password: {
        required: 'Required',
        minlength: 'The password length must be greater than or equal to 8'
      }
    };
    // Define an instance of the validator for use with this form,
    // passing in this form's set of validation messages.
    this.genericValidator = new GenericValidator(this.validationMessages);
  }
We can expected this to work the same way as the sign up generic validation.
And that's all you need to build a generic validator in Angular.
Conclusion
Creating a generic validator makes it easy to handle multiple form validations without using a ton of redundant code in your Angular application.
I hope this article was useful to you!