By Deborah Kurata
An exciting new feature is coming to Angular: signals! Signals provide a new way for our code to tell our templates (and other code) that our data has changed. This improves Angular's change detection, which also improves performance, and makes our code more reactive.
You can try out this powerful new feature now. Signals are available for developer preview in Angular v16, due to be released in May of 2023. You can get early versions of Angular v16 to try it out now. I'll walk through how later in this tutorial.
Watch the associated video here for the concepts and a demonstration:
Find the sample code here: https://stackblitz.com/edit/angular-signals-deborahk
Before we jump into the details of the "what?" and "how?", let's start with the "why?". Why would you want to use this new signals feature?
Why Do We Need Signals?
Let's start with a simple example without the use of signals. Say you are writing code to perform some basic math operations.
let x = 5;
let y = 3;
let z = x + y;
console.log(z);
What does this code log to the console? Yep, it logs out 8.
Some time later in the code, we change the value of x. What does z log out now?
let x = 5;
let y = 3;
let z = x + y;
console.log(z);

x = 10;
console.log(z);
It still logs out 8! That's because a value is assigned to z when the expression is first evaluated. The z variable does not react to changes in x or y.
But we want our variables to react to changes!
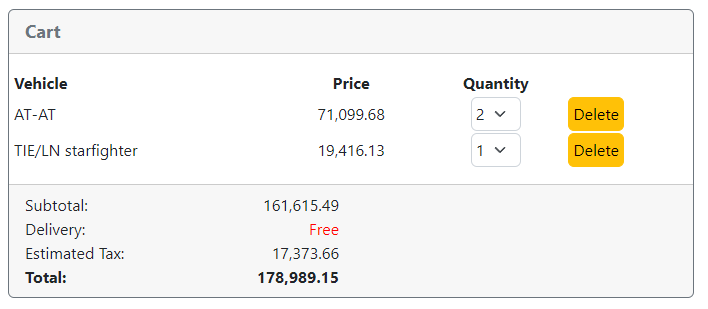
One of the reasons we use Angular is to build reactive websites, like Figure 1. When the user updates the quantity, the related variables (such as subtotal and tax) should react and adjust the costs. If the user selects to delete an item from the cart, we again want the related variables to react and correctly recalculate the costs.
With signals, our code can be more reactive. Our prior example implemented with signals would look like this:
const x = signal(5);
const y = signal(3);
const z = computed(() => x() + y());
console.log(z()); // 8

x.set(10);
console.log(z()); // 13
We'll look at this syntax in detail shortly. For now, the code above defines two signals: x and y and gives them initial values of 5 and 3. We then define a computed signal, z, which is the sum of x and y. Since signals provide change notifications, when the x or y signals change, any values computed from those signals will automatically recalculate. This code is now reactive! Nice!
Computed signals react and recalculate when any of its dependent signals change. If a signal is bound in a template, when the signal changes, Angular's change detection automatically updates any view that reads the signal. And the user sees the changed value.
So the answer to "why do we need signals?":
- Signals provide more reactivity
- Using signals gives us finer control over change detection, which can improve performance.
Let's dive a bit deeper into what a signal is and how it is used.
What Is a Signal?
You can think of a signal as a value plus a change notification. A signal is just a special type of variable that holds a value. But unlike other variables, a signal also provides notification when the variable value changes.
Think of a normal variable as a shelf, like on the left side of Figure 2. When a value is assigned to the variable, it sits on that shelf. Any code within scope can simply read that variable on the shelf.
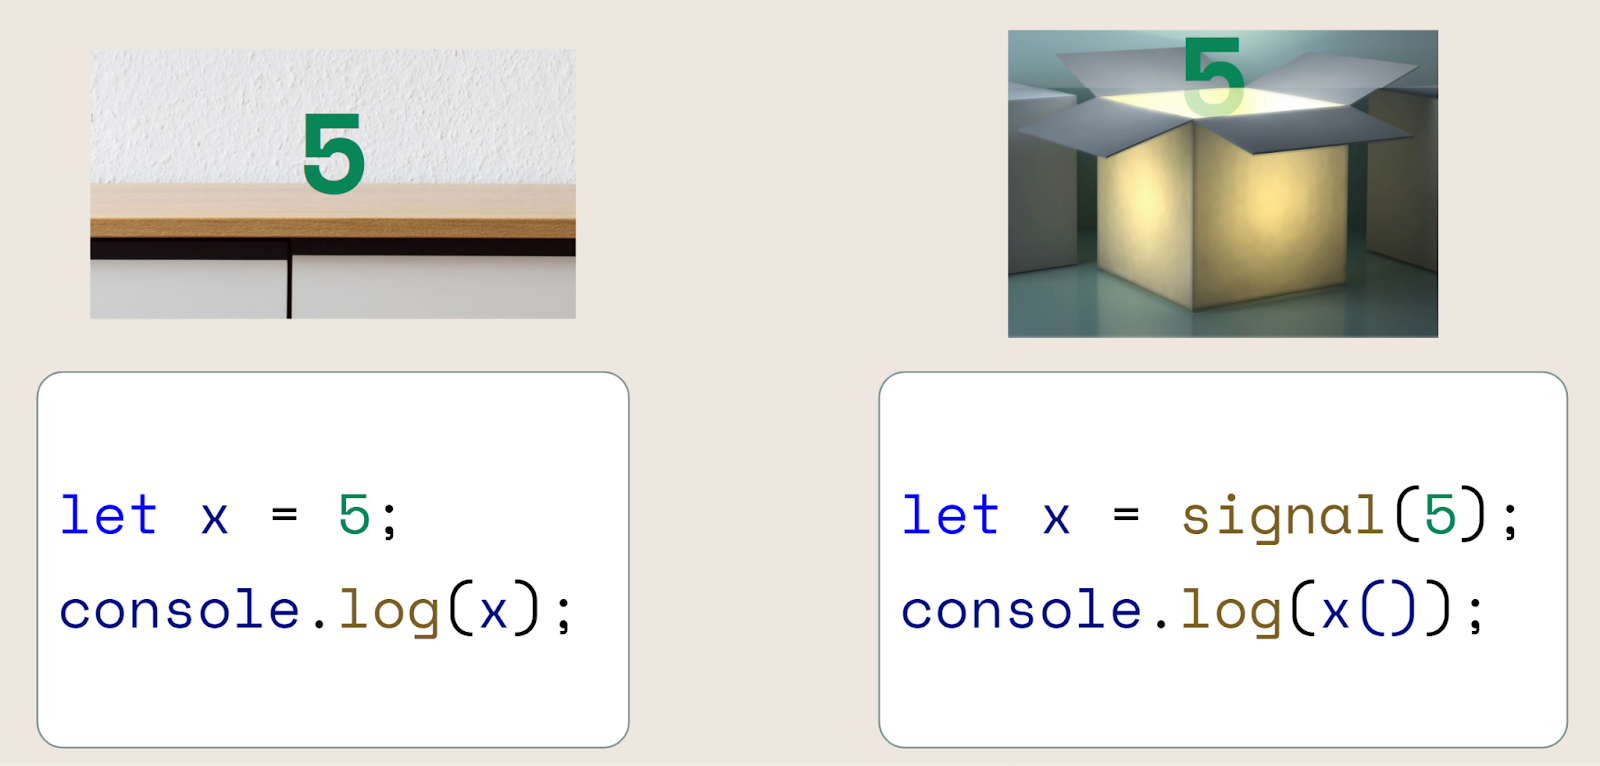
A signal is more like a box, as shown on the right side of Figure 2. Creating a signal metaphorically creates a box and puts the value inside of that box. The box glows when the value of the signal changes. To read the signal, first open the box using parentheses: x(). Technically speaking, we call the signal's getter function to read the signal.
We now have the answer to "what is a signal?":
- A signal is a variable + change notification
- A signal is reactive, and is called a "reactive primitive"
- A signal always has a value
- A signal is synchronous
- A signal is not a replacement for RxJS and Observables for asynchronous operations, such as
http.get
Where can we use signals?
- Use them in components to track local component state
- Use them in directives
- Use them in a service to share state across components
- Read them in a template to display signal values
- Or use them anywhere else in your code
Next let's walk through how to create and use signals.
How to Create a Signal
To use a signal, you first create one.
quantity = signal<number>(1);
The above syntax creates and initializes a signal using the signal constructor function.
Optionally, provide a generic type parameter to define the signal's data type. A signal can be a string, number, array, object, or any data type. In many cases, the data type can be inferred and the generic type parameter is unnecessary.
Pass to the constructor the default value of the signal. A signal always has a value, starting with that default.
Here are some additional examples:
quantity = signal(1);

qtyAvailable = signal([1, 2, 3, 4, 5, 6]);

selectedVehicle = signal<Vehicle>({
  id: 1,
  name: 'AT-AT',
  price: 19416.13
});

vehicles = signal<Vehicle[]>([]);
The first code line above creates a numeric signal with a default value of 1. Because the default value is a number, the quantity is a signal that holds a number. The generic type parameter isn't needed.
The second line is a signal that holds an array of numbers. The default provides an array of values 1 through 6. Again, the generic type parameter isn't needed in this case because it can be inferred from the default value.
The selectedVehicle signal holds a Vehicle object. In this example, the type cannot be inferred, so we specify a generic type parameter of Vehicle.
The vehicles signal holds an array of Vehicle objects. Its default is an empty array. To strongly type the array, we add a generic type parameter of <Vehicle[]>.
A signal created with the signal constructor function is writable, so you can set it to a new value, update it based on the current value, or mutate its content. We'll see examples of these operations shortly.
Once you've created a signal, you may want to read its value.
How to Read a Signal
Earlier, we represented a signal as a box. Metaphorically speaking, to read a signal's value you must first open the box. You do that by adding parentheses as shown below.
quantity();
Start with the signal name and follow it with open and closing parentheses. Technically speaking, this calls the signal's getter function. The getter function is created behind the scenes – you won't see it in your code.
When working with Angular, a common place to read signals is in the template.
<select
    [ngModel]="quantity()"
    (change)="onQuantitySelected($any($event.target).value)">
  <option *ngFor="let q of qtyAvailable()">{{ q }}</option>
</select>

<div>Vehicle: {{ selectedVehicle().name }}</div>
<div>Price: {{ selectedVehicle().price }}</div>
<div [style.color]="color()">Total: {{ totalPrice() }}</div>
The above template displays a select box for selection of a quantity. The [ngModel] reads the value of the quantity signal, binding to that value.
The change event binding calls the onQuantitySelected() method in the component.
The option element uses ngFor to iterate through each array element in the qtyAvailable signal. It reads the signal and creates a select option for each array element.
Below the select element are three div elements. The first one reads the selectedVehicle signal, then accesses its name property. The second div element reads the selectedVehicle signal, then displays its price property. The last div element reads the totalPrice signal (which we have not yet defined). And it sets the text color to the value from the color signal (which we also have not defined).
It's important to note that reading a signal always reads the current signal value. The code doesn't have any knowledge of any prior signal values.
When the user picks a different quantity from the select element, we want to change the value of the quantity signal. That way the quantity signal becomes the "source of truth" for the user's selected quantity. Let's look at how to do that next.
How to Change the Value of a Signal
The signal set method replaces the value of a signal with a new value. It basically opens the box, removes the current item, and sets in a new item to take its place.
this.quantity.set(qty);
A common scenario is to change the signal value based on a user action. For example:
- The user selects a new quantity using the
selectelement - The
selectelement event binding calls theonQuantitySelected()method and passes in the selected quantity - The user action is handled in that event handler within the component
- The new value is set into the
quantitysignal.
Here is an example event handler:
onQuantitySelected(qty: number) {
  this.quantity.set(qty);
}
Whenever the signal is set, the code notifies any consumers that the signal has changed. In this context, a consumer is any code that is interested in receiving change notifications.
How does the consumer indicate that it's interested in receiving notifications about a particular signal?
If code reads a signal, that code is notified when the signal changes.
If a template reads a signal, that template is notified when the signal changes and the view is scheduled to be re-rendered.
So the act of reading a signal registers the consumer's interest in watching that signal. The Angular team calls this the golden rule of signal components: "change detection for a component will be scheduled when and only when a signal read in the template notifies Angular that it has changed."
Here is an example to illustrate the process. Let's say that there is some work going on within the method below that needs to adjust the quantity. Maybe if the quantity is 5 or more you get one free, for example. The point is that the quantity signal could change several times within the execution of the method.
onQuantitySelected(qty: number) {
  this.quantity.set(qty);

  this.quantity.set(5);
  this.quantity.set(42);
}
The quantity is displayed in the template using Angular's binding as shown below. Since the binding reads the quantity signal, the template registers its interest in receiving change notifications.
{{ quantity() }}
When the user selects a quantity, the onQuantitySelected() method executes. The code in the method first sets the signal to the user-selected quantity. When the new signal is set, the signal generates a notification. At this point, Angular's change detection is scheduled to run. But it doesn't have an opportunity to run until after the execution of the onQuantitySelected() method.
The onQuantitySelected() method continues, setting the signal to 5. The signal generates another change notification. Again Angular's change detection is reminded that it needs to run, but it still can't run because the onQuantitySelected() method is still executing. The method then sets the signal to 42 and the process repeats.
When the onQuantitySelected() method has completed its execution, Angular's change detection can finally run. The template reads the signal, and gets the current value of that signal, which is 42. The template is not aware of any of the prior signal values. The view is then re-rendered, and the new quantity signal value is displayed.
If a signal is changed, any consumer interested in reading that signal is notified. But the consumer is not given the new value. The next time it's their turn to execute, the consumer reads the current value from the signal.
If you are familiar with RxJS and Observables, signals are quite different. Signals don't emit values like Observables do. And signals don't require a subscription.
In addition to the set(), there are two other ways to change a signal: update() and mutate().
The set() method replaces a signal with a new value, metaphorically replacing the contents of the signal box. Pass the new value into the set method.
// Replace the value
this.quantity.set(qty);
The update() method updates the signal based on its current value. Pass to the update method an arrow function. The arrow function provides the current signal value so you can update it as needed. In the code below, the quantity is doubled.
// Update value based on current value
this.quantity.update(qty => qty * 2);
The mutate() method modifies the content of a signal value, not the signal value itself. Use it with arrays to modify array elements, and objects to modify object properties. In the code below, a vehicle's price is increased by 20%.
this.selectedVehicle.mutate(v => v.price = v.price + (v.price * .20));
Regardless of how the signal is modified, consumers are notified that the signal was changed. The consumers can then read the new signal value when it's their turn to execute.
How to Define a Computed Signal
Oftentimes we have variables in our code that depend on other variables. For example, the total price for an item is the price for that item times the desired quantity of that item. If the user changes the quantity, we want to change the total price. For that, we use computed signals.
Define a computed signal by calling the computed creation function. The computed() function creates a new signal that depends on other signals.
Pass to the computed function a computation function that performs the desired operation. The operation reads the value of one or more signals to perform its computation.
totalPrice = computed(() => this.selectedVehicle().price * this.quantity());

color = computed(() => this.totalPrice() > 50000 ? 'green' : 'blue');
The first line of code above defines a totalPrice computed signal by calling the computed() creation function. The computation function passed into this computed function reads the selectedVehicle and quantity signals. If either signal changes, this computed signal is notified and will update when it is its turn to execute.
The second line of code defines a color computed signal. It sets the color to green or blue depending on the value of the totalPrice signal. The template can bind to this signal to display the appropriate style.
A computed signal is read only. It cannot be modified with set(), update() or mutate().
The value of a computed signal is re-computed when:
- One or more of its dependent signals is changed.
- AND the value of the computed signal is read.
The computed signal value is memoized, meaning it stores the computed result. That computed value is reused the next time the computed value is read.
Say for example we have this in our template:
Extended price: {{ totalPrice() }}
Total price: {{ totalPrice() }}
Amount due: {{ totalPrice() }}
The first time that the template reads the totalPrice computed signal, the value is calculated and stored in memory. The other two times the totalPrice signal is read, the stored value is reused. The value is not recalculated unless one of its dependent signals changes.
How to Use an Effect
There may be times that you need to run code when a signal changes, and that code has side effects. By side effects I mean code that calls an API or performs another operation not related to the signal. In these cases, you'll use an effect().
For example, you want to debug your signals and log out the signal value each time the code reacts to a change to that signal. Calling console.log() is a side effect.
To define an effect, call the effect() creation function. Pass to the function the operation to perform. This operation is re-executed every time the code reacts to a change in any dependent signal.
effect(() => console.log(this.selectedVehicle()));
The effect() function can be called within other function. Since the effect sets up a handler of sorts, it is often called in the constructor or other startup code.
Alternatively, an effect can be defined declaratively as shown below:
e = effect(() => console.log(this.selectedVehicle()));
An effect should not change the value of any signals. If you need to change a signal based on a change to a dependent signal, use a computed signal instead.
You'll find that you won't use effects often. Though they are useful for logging, or calling other external APIs. (But don't use them to work with RxJS and Observables. There will be signal features to convert to and from Observables.)
When to Use Signals
Here are some suggestions for when to use signals.
First, continue to use event handlers in a component as you do now for user actions. Actions such as a selection from a drop down list, a click on a button, or an entry in a textbox.
Use a signal or a computed signal in a component for any state that could change. In this context, state refers to any data that the component manages. Everything from an isLoading flag to the current displayed "page" of data to the user's selected filter criteria could be signals. Signals are especially useful when displaying data in the template when that data should react to other actions.
Put shared signals in services. The array of vehicles returned in an Observable could be transformed into a signal. Any totals could also be signals in a service if those signals are shared between components.
Continue to use Observables for asynchronous operations, such as http.get(). There are more features coming to signals to map a signal to and from an Observable.
Wrapping Up
Signals represent a major advancement in Angular's reactive programming capabilities and change detection features.
This tutorial answered the questions: "Why?", "What?" and "How?". And we threw in "Where?" and "When?", too.
Signals are available as a developer preview in Angular v16. As part of that preview, signals are integrated into the existing change detection model. Future signal features expect to improve change detection and mark components for check, somewhat like OnPush change detection that we have today with the async pipe.
An easy way to try out signals is to use stackblitz, which is an online editor that works well with Angular and doesn't require any installation. To use stackblitz with signals:
- Navigate to the stackblitz website: www.stackblitz.com.
- Click the Angular icon to create an Angular project.
- Edit the resulting
package.jsonfile and change the versions of the @angular packages to the latest pre-release of Angular v16. - Save the project to refresh dependencies.
- Try out signals!
To see these steps in action, check out the demo provided near the end of this video:
Or start with my stackblitz link: https://stackblitz.com/edit/angular-signals-deborahk. Be sure to fork my project to try out your own changes.
Signals are coming! They'll improve our code's reactivity and change detection. They'll make our code easier to create and read. And they are great fun!