

When you're building a project using the latest version of Next.js, you'll be prompted to select between using the app/ directory or the pages/ directory. The app/ directory is now the recommended way of building apps in Next.js.
In this article, you'll learn how to maximize the potential of the app directory in Next.js by learning about its available features.
Table of Contents
- The
app/Folder - Layout
- Routing
- Fonts usage
- Loading Component
- Error Component
- Not-Found Component
- Template Component
- Server Component
The app/ Folder
The app/ directory in Next.js comes with a lot of features, unlike the pages/ directory. Some of these features include:
- Layout
- Routing
- Fonts usage
- Loading Component
- Error Component
- Not Found Component
- Template Component
- Server Component
Layout
Using Layout in thte app/ directory makes it simpler to lay down complex interfaces that enable advanced routing patterns, prevent costly re-renders, and maintain state across navigations.
In the app/ directory, you can utilize the Layout function by creating a layout.jsx file at the root of the app/ directory. This defines a user interface (UI) that is shared across multiple locations.
A layout can render another layout or a page within it. Whenever a route changes to any component within the layout, its state is preserved because the layout component does not unmount.
 An image showing a nested layout in the app directory
How to add meta tags to Layouts
Meta tags are small pieces of information that provide details about a webpage to browsers and search engines.
To add meta tags to your application when using the app/ directory in Next.js, you can use metadata in the layout.js file. The metadata is exported from the file, similar to the following code snippet:
export const metadata = {
  title: 'Keyword Title',
  description: 'Any Keyword,Another Keyword, More Keywords ',
};
Overriding the meta tag of the main layout is crucial when you want to have different meta tags for each route. To override these, you need to export the variable metadata from the route file where you want the meta tag to take effect.
There's no _app.js file
The _app.jsx file has disappeared from the app/ directory. As you may have anticipated, we will store everything under the layout.jsx file, which is the basic layout when using the app/ directory in Next.js.
If, for instance, you want to use Chakra UI, you will need to place the provider in the layout.jsx file. Below is a code snippet from the Chakra documentation demonstrating how to link the provider to the layout file:
// app/providers.tsx
'use client'

import { ChakraProvider } from '@chakra-ui/react'

export function Providers({ children }: { children: React.ReactNode }) {
  return <ChakraProvider>{children}</ChakraProvider>
}
// app/layout.tsx
import { Providers } from './providers'

export default function RootLayout({
  children,
}: {
  children: React.ReactNode,
}) {
  return (
    <html lang='en'>
      <body>
        <Providers>{children}</Providers>
      </body>
    </html>
  )
}
Routing
Routing in the app/ directory involves the use of strictly folder-based routing. This is unlike the pages/ directory, which allows the use of either file-based routing or folder-based routing.
Folder-based routing involves creating a folder where the name of the route should match the name of the folder, and then creating a page.js file which references the / URL of that folder.
For instance, if you create a folder called about, and a page.js is created in that folder, assuming you are still using a development server, the URL will be localhost:3000/about. Similarly, any folder created anywhere in the app/ directory will follow this pattern.
Nested routing
Nested routes in the app/ directory involve creating or nesting folders within others. Since each folder in the app/ directory corresponds to a route, with the page.js file in the respective folder pointing to the / URL of that folder, you can create nested routes by placing folders within other folders.
For example, the /dashboard/analytics URL path would correspond to a folder structure like app/dashboard/analytics, with a page.js file present in the analytics folder to make the route publicly accessible.
Route group
Due to the folder-based approach of the app directory, each folder containing a page.js file is automatically considered a route for that application.
To avoid using the folder name directly in the route, you can enclose the folder name in parentheses, such as (name_of_folder), which effectively groups the routes under that name. You can see this visually represented in the image below:
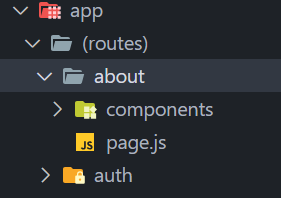 Image Illustrating Route Group
Fonts Usage
In Next.js 12, installing fonts in the page/ directory involves copying the font stylesheet link into the CSS file.
But in Next.js 13, the process in the app/ directory involves using the import keyword to import any font of your choice from next/font/google. After importing, the subset of the font is initialized and stored in a variable which is then added to the body tag as a class.
//importing the fonts
import { Inter } from 'next/font/google';

//initialising a variable
const inter = Inter({ subsets: ['latin'] });


export default function RootLayout({ children }) {


  return (
    <>
      <html lang="en">
        //Adding the variable as a class to the body tag
        <body className={inter.className}>
            {children}
        </body>
      </html>
    </>
  );
}
How to create a favicon
Similarly, the way we import fonts in Next.js has evolved since its introduction, and so has the method for creating a favicon.
In the app/ directory, creating a favicon in Next.js involves either creating or replacing the favicon.ico file located in the root folder of the app directory with the image you wish to use. Note that if your image is in another format, such as JPG, PNG, or SVG, you need to convert it to ICO format.
The loading.jsx file.
Utilizing a loading component is a useful feature in Next.js, where you can obtain the loading function simply by creating a file named loading.jsx in the designated folder. This is particularly useful when you are fetching data from an API and need to display a loading state while awaiting the response.
You can create a loading.jsx file that sets its state to 'loading' while waiting for the API response.
Here's an example of what a loading.jsx file might look like:
// app/loading.jsx
const loadingPage = ()=>{
    return (
        <div className="loader">
            <div id="loader-wrapper">
                <div id="loader">
                <img src="/img/Spinner-1s-120px.gif"/>
                </div>
                <div className="loader-section section-left">

                </div>
                <div className="loader-section section-right"></div>


      </div>
        </div>

    )
}

export default loadingPage
The error.jsx file.
The error.jsx file is a special file used to handle server-side errors. It is part of the new error handling features introduced in Next.js version 13.4.
This file is intended to replace the traditional pages/error.js or pages/_error.js files for handling errors in a more centralized manner.
One main advantage is that this file can handle both client-side and server-side errors. It can receive a statusCode prop to determine the type of error that occurred and display the appropriate message or style.
Below is an example of what an error.jsx file could look like:
// app/error.jsx
function Error({ statusCode }) {
  return (
    <div>
      <h1>Error</h1>
      <p>An error {statusCode} occurred on server</p>
    </div>
  );
}

Error.getInitialProps = ({ res, err }) => {
  const statusCode = res ? res.statusCode : err ? err.statusCode :  404;
  return { statusCode };
};

export default Error;
In the example above, the Error component receives a statusCode prop, which is determined in the getInitialProps method. This method checks if there is a response object (res), an error object (err), or defaults to 404 if neither is present. The status code is then displayed in the error page.
The not-found.jsx file
The not-found.jsx file is a special file convention used to handle cases where a user navigates to a route that doesn't exist within that application. It is typically used to render a custom "Not Found" page when a requested resource cannot be found
Here's an example of what a not-found.jsx could look like:
// app/not-found.jsx
import Link from 'next/link';

export default function NotFound() {
  return (
    <div>
      <h2>Not Found</h2>
      <p>The page you were looking for does not exist.</p>
      <Link href="/">Go back home</Link>
    </div>
  );
}
The template.jsx file.
Imagine you have a box of LEGO blocks, and you want to build different types of cars. A template.jsx file in Next.js is like a special blueprint that helps you build those cars. Each car has a different design, but they all follow the same basic rules of building.
The template.jsx file tells Next.js how to put together the pieces for each page of your website. Just like how you might use a simple blueprint to build many cars, the template.jsx file gives instructions for building many web pages.
Every time you want to make a new page, you would follow the blueprint. But unlike a normal blueprint, this one gets wiped clean after you finish making a page, so you start fresh with a new page. This is why it's called a "template" – it's something you use as a starting point for building something else.
Sometimes, you might want to add a special feature to just one car, like a glow-in-the-dark bumper. In Next.js, you could do this with a template.jsx file by adding a special piece of code just for that one page. After you finish, you'll forget about the special feature because the blueprint gets erased.
So, in short, a template.jsx file is like a special rule book that helps you make different pages on your website, and it starts fresh for each new page you make.
How is it different from layout.jsx file?
In Next.js, both template.jsx and layout.jsx are used to wrap around pages and provide a common structure, but they behave differently when it comes to navigation and state preservation.
Layouts (layout.jsx): These are persistent and maintain their state across different routes. They are ideal for elements that should stay the same and consistent throughout the navigation, such as headers, footers, and sidebars.
Layouts minimize re-renders and help boost performance since they don't re-mount and re-render upon navigation.
Templates (template.jsx): These are not persistent and create a new instance for each of their children on navigation. This means that when a user navigates between routes that share a template, a new instance of the component is mounted, DOM elements are recreated, and state is not preserved.
Templates are useful when you need to isolate components from sharing state or behaviors, or when you need to trigger certain effects or state changes every time a user navigates to a component.
For example, they are suitable for collecting feedback with a useState managed form that's unique to each page or tracking page views with useEffect.
In essence, layouts are for consistent, stateful elements, while templates are for distinct, state-independent components that need fresh state on each navigation. You would choose layouts for efficiency and consistency, and templates for isolated, state-independent components that require fresh state on navigation.
Server Components
Server components are now the default state of the app directory in Next.js . They allow you to perform server-side rendering in your front-end application, which reduces the amount of JavaScript code sent to the client.
Some of the benefits of using server components include:
- Data fetching
- Security
- Caching
- Bundle Sizes
- Search Engine Optimization and Social Network Shareability
Server side rendering (SSR) vs server components in Nextjs
The key differences between these two lie in where they are used (pages vs. app), how they affect the client-side bundle size, and the level of control they provide over rendering.
Server Components offer a way to leverage server-side logic without the overhead of traditional SSR, which can lead to better performance and maintainability for modern web applications.
Also, while both SSR and Server Components render on the server, the latter does not support interactivity—a process known as hydration—with JS, and as such, event handlers and React features such as useState, useEffect, and other DOM operations do not function with it.
You can gain access to these features by converting the default server component into a client component by placing the useClient directive at the top of the code.
Conclusion
The app/ directory in Next.js offers a robust set of features designed to enhance the developer experience and optimize the performance of applications.
By leveraging the app/ directory, you can take full advantage of the latest advancements in Next.js, such as the Layout component for managing UI consistency and state preservation, folder-based routing for streamlined navigation, and the ability to import fonts and create favicons with ease.
The introduction of special files like loading.jsx, error.jsx, and not-found.jsx provides a centralized approach to handling loading states, errors, and non-existent routes, respectively.
Also, the template.jsx file acts as a blueprint for constructing web pages, offering flexibility for unique page designs while ensuring a consistent structure.
Server components, now the default in the app/ directory, also offer significant benefits
At this point you are confident enough to utilize this features in building powerful, scalable, and maintainable applications with Next.js.
###