

To understand what asynchronous programming means, think about multiple people working on a project simultaneously, each on a different task.
In traditional (synchronous) programming, each person would have to wait for the person before them to finish their task before starting their own.
But with asynchronous programming, everyone can start and work on their tasks simultaneously without waiting for the others to finish.
Similarly, in a computer program, asynchronous programming allows a program to work on multiple tasks simultaneously instead of completing one task before moving on to the next one. This can make the program get more things done in a shorter amount of time.
For example, a program can send a request to a server while handling user input and processing data, all at the same time. This way, the program can run more efficiently.

In this article, we will delve into the world of asynchronous programming in JavaScript, exploring the different techniques and concepts that are used to achieve this powerful programming paradigm.
From callbacks to promises and async/aawait, you will understand how to harness the power of asynchronous programming in your JavaScript projects.
Understanding asynchronous programming is essential for building high-performance web applications, whether you're a seasoned developer or just getting started with JavaScript. So, read on to learn more about this vital concept.
What is Synchronous Programming?
Synchronous programming is a way for computers to do things one step at a time, in the order they are given the instructions.
Imagine you're cooking dinner and have a list of tasks, like boiling water for pasta, frying chicken, and making a salad.

You would do these tasks one at a time and wait for each one to finish before moving to the next.
Synchronous programming works similarly, where the computer will complete one task before moving on to the next. This makes it easy to understand and predict what the computer will do at any given time.
Here's an example of synchronous code in JavaScript:
// Define three functions
function firstTask() {
  console.log("Task 1");
}

function secondTask() {
  console.log("Task 2");
}

function thirdTask() {
console.log("Task 3");
}

// Execute the functions
firstTask();
secondTask();
thirdTask();
This code will output the following messages in the order they appear:
"Task 1"
"Task 2"
"Task 3"
The code will execute the tasks in the order you see them and wait for each task to be completed before moving on to the next one.
 Diagram showing how synchronous programming works.
However, synchronous programming can be problematic in certain situations, particularly when dealing with tasks that take a significant amount of time to complete.
For example, let's say that a synchronous program performs a task that requires waiting for a response from a remote server. The program will be stuck waiting for the response and cannot do anything else until the response is returned. This is known as blocking, and it can lead to an application appearing unresponsive or "frozen" to the user.
Consider the following code:
function someLongRunningFunction() {
    let start = Date.now();
    while (Date.now() - start < 5000) {
        // do nothing
    }
    return "Hello";
}

console.log('Starting...');

let result = someLongRunningFunction();
console.log(result);

console.log('...Finishing');
In this example:
- The program starts by logging "Starting..." to the console.
- Then it calls the
someLongRunningFunction, which simulates a long-running task that takes 5 seconds to complete. This function will block the execution of the rest of the program while it runs. - Once the function completes, it will return "Hello", and the program will log it on the console.
- Finally, the program will log "Finishing" to the console.
During the 5 seconds that someLongRunningFunction() is being executed, the program will be blocked, become unresponsive, and be unable to execute the next line of code. This can cause the program to take a long time to complete and make the application unresponsive to the user.
However, if the program is executed asynchronously, it will continue to run the next line of code instructions rather than becoming blocked. This will enable the program to remain responsive and execute other code instructions while waiting for the timeout to complete.
What is Asynchronous Programming?
Asynchronous programming is a way for a computer program to handle multiple tasks simultaneously rather than executing them one after the other.
 Diagram showing how asynchronous programming works.
Asynchronous programming allows a program to continue working on other tasks while waiting for external events, such as network requests, to occur. This approach can greatly improve the performance and responsiveness of a program.
For example, while a program retrieves data from a remote server, it can continue to execute other tasks such as responding to user inputs.
Here's an example of an asynchronous program using the setTimeout method:
console.log("Start of script");

setTimeout(function() {
  console.log("First timeout completed");
}, 2000);

console.log("End of script");
In this example, the setTimeout method executes a function after a specified time. The function passed to setTimeout will be executed asynchronously, which means that the program will continue to execute the next line of code without waiting for the timeout to complete.
When you run the code, the output will be:
Start of script
End of script
First timeout completed
As you can see, console.log("First timeout completed") will be executed after 2 seconds. Meanwhile, the script continues to execute the next code statement and doesn't cause any "blocking" or "freezing" behaviour.
In JavaScript, asynchronous programming can be achieved through a variety of techniques. One of the most common methods is the use of callbacks.
How to Use a Callback Function
Let's say you want to plan a birthday party for your child. You have to invite the guests, order a cake, and plan the games. But you also want to hire a clown to entertain the guests. You can only have the clown come to the party once all the other party arrangements are done, and the guests have arrived.
 Illustration of a clown
So, you tell the clown to come to the party only after you have notified him that the guests have arrived. In this case, the clown represents a callback function, and the "guests arriving" represents the function that has to complete execution before the callback can be executed.
In code, a callback function is a function that is passed as an argument to another function, and it is executed after the first function has finished running. It's commonly used in JavaScript to handle asynchronous operations like fetching data from a server, waiting for a user's input, or handling events.
Here is a simple example of how you can use a callback function to handle an asynchronous operation:
// Declare function
function fetchData(callback) {
  setTimeout(() => {
    const data = {name: "John", age: 30};
    callback(data);
  }, 3000);
}

// Execute function with a callback
fetchData(function(data) {
  console.log(data);
});

console.log("Data is being fetched...");
In this example:
- We have a function called
fetchDatathat uses thesetTimeoutmethod to simulate an asynchronous operation. The function takes a callback as an argument. - The callback function is then passed the data retrieved by the function after the timeout has been completed.
The setTimeout method is used to execute the callback after a specified time (in this case, 3 seconds). The callback will be executed asynchronously, which means that the program will continue to execute the next line of code without waiting for the timeout to complete.
When you run the code, the output will be:
Data is being fetched...
{name: "John", age: 30}
As you can see, console.log("First timeout completed") will be executed after 3 seconds. Meanwhile, the script continues to execute the next statement, console.log("Data is being fetched...");.
This is the core concept of asynchronous programming. The script doesn't wait for the asynchronous operation to complete. It just continues to execute the next instruction.
What is Callback Hell?
Callbacks provide a useful way to handle asynchronous operations. However, when many callbacks are nested, the code can be complex and hard to read and understand.
This happens when you chain multiple callbacks together, one after the other, creating a pyramid-like structure of indentation called callback hell, also known as the "Pyramid of Doom".

Here is an example of callback hell:
getData(function(a) {
  getMoreData(a, function(b) {
    getEvenMoreData(b, function(c) {
      getEvenEvenMoreData(c, function(d) {
        getFinalData(d, function(finalData) {
          console.log(finalData);
        });
      });
    });
  });
});
In this example:
- The
getDatafunction takes a callback as an argument and is executed after data is retrieved. - The callback function then takes the data and calls the
getMoreDatafunction, which also takes a callback as an argument, and so on.
This nesting of callbacks can make the code difficult to maintain, and the indentation makes it even harder to see the overall structure of the code.
To avoid callback hell, you can use a more modern way of handling async operations known as promises. Promises provide a more elegant way of handling the asynchronous flow of a program compared to callback functions. This is the focus of the next section.
How Do Promises Work?
A promise represents a way of handling asynchronous operations in a more organized way. It serves the same purpose as a callback but offers many additional capabilities and a more readable syntax.
A promise in JavaScript is a placeholder for a future value or action. By creating a promise, you are essentially telling the JavaScript engine to "promise" to perform a specific action and notify you once it is completed or fails.
 Illustration of a promise and the JS engine
Next, callback functions are then attached to the promise to handle the outcome of the action. These callbacks will be invoked when the promise is fulfilled (action completed successfully) or rejected (action failed).
As a JavaScript developer, you will likely spend more time consuming promises returned by asynchronous Web APIs and managing their outcomes rather than creating them yourself.
How to Create a Promise
To create a promise, you'll create a new instance of the Promise object by calling the Promise constructor.
The constructor takes a single argument: a function called executor. The "executor" function is called immediately when the promise is created, and it takes two arguments: a resolve function and a reject function.
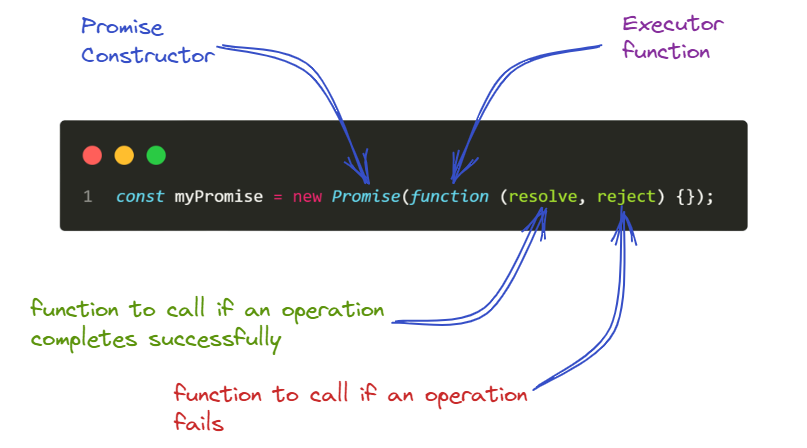 Diagram of the anatomy of a promise.
Write the following line of code to declare a promise:
// Initialize a promise
const myPromise = new Promise(function(resolve, reject) => {})
Now, let's inspect the myPromise object by logging it to the console.
console.log(myPromise);
 This image represents an output of inspecting the
 promise object.
As you can see, the promise has a pending status and an undefined value. This is because nothing has been set up for the promise object yet, so it's going to sit there in a pending state forever without any value or result.
Now, let's set up myPromise to resolve with a string printed to the console after 2 seconds.
const myPromise = new Promise((resolve, reject) => {
    setTimeout(() => {
        resolve("Hello from the promise!");
    }, 2000);
});
Now, when you inspect myPromise object, you'll find that it has a status of "fulfilled", and a value set to the string you passed to the resolve function.

A promise has three states:
- Pending: initial state, neither fulfilled nor rejected.
- Fulfilled: meaning that an operation was completed successfully.
- Rejected: meaning that an operation failed.
 Pending, fulfilled, and rejected states of a promise.
It's important to note that a promise is said to be settled when it is resolved or rejected.
Now that you know how promises are created, let's look at how you may consume them.
How to Consume a Promise
Consuming a promise involves the following steps:
- Obtain a reference to the promise: To consume a promise, you first need to obtain a reference to it. Based on the code from the previous section, our reference to a promise will be the
myPromiseobject. - Attach callbacks to the promise: Once you have a reference, you can attach callback functions by using the
.thenand.catchmethods. The.thenmethod is called when a promise is fulfilled and the.catchmethod is called when a promise is rejected. - Wait for the promise to be fulfilled or rejected: Once you've attached callbacks to the promise, you can wait for the promise to be fulfilled or rejected.
Here is an example of how you might consume a promise:
myPromise
    .then((result) => {
        console.log(result);
    })
    .catch((error) => {
        console.log(error);
    });
Once the promise is fulfilled, the .then callback method will be called with the resolved value. And if the promise is rejected, the .catch method will be called with an error message.
You can also add the .finally() method, which will be called after a promise is settled. This means that .finally() will be invoked regardless of the status of a promise (whether resolved or rejected).
myPromise
  .then((result) => {
    console.log(result);
  })
  .catch((error) => {
    console.log(error);
  })
  .finally(() => {
    //code here will be executed regardless of the status
    //of a promise (fulfilled or rejected)
  });
How to Chain Promises
Promise chaining is a pattern that allows for a clear and easy-to-understand approach to handling asynchronous operations.
The pattern involves connecting multiple promises in a sequence, where the output of one promise is passed as input to the next promise.
The linking of the promises is achieved using the then() method. This method uses a callback function as an argument and returns a new promise. The new promise is then resolved with the value returned by the callback function.
Here is an example of promise chaining:
fetch('https://example.com/data')
    .then(response => response.json())
    .then(data => processData(data))
    .then(processedData => {
        // do something with the processed data
    })
    .catch(error => console.log(error))
From the above code:
- The first promise, which is the
fetch APIfunction, is fetching data from a server. - The second promise is parsing the response as JSON.
- The third promise is processing the data.
- The fourth promise is performing action on the data.
- The
.catchmethod at the end of the chain will handle any errors that occurred in any of the previous promises.
It's important to keep in mind that .then methods are executed asynchronously and in order, each one waiting for the previous one to be resolved, and that the returned value of each .then will be passed as an argument to the next one.
Error Handling
When a promise is rejected, it will trigger the .catch() method, which handles errors. The .catch() method takes a single argument, which is the error thrown.
Another way of handling errors in a promise is by using the "try-catch" block inside a .then method.
Here is an example:
fetch("https://api.github.com/users/octocat")
  .then((response) => response.json())
  .then((data) => {
    try {
      //processing received data
      console.log(data);
    } catch (error) {
      console.log(error);
    }
  })
  .catch((error) => console.log(error));
From the above code:
- The
fetch()function makes a request to the GitHub API to fetch user data. - The "try-catch" block is used inside the second
.thenmethod to handle any error that may occur when processing the data received from the server. - And the outer
.catchmethod will only catch errors that occur during the fetch request.
Handling errors is very important because promises are used to handle asynchronous operations, and these operations may fail for various reasons.
If an error occurs during the execution of a promise and it is not handled, the program will continue to execute and may lead to unexpected behaviour or crashes.
By handling errors, we can ensure that the program can continue to function even when an error occurs and also provide meaningful feedback to the user about the problem.
How to Use the Promise.all Method
The Promise.all() method takes an array of promises as input and returns a single promise that is fulfilled when all input promises have been fulfilled. It can be useful when you wait for multiple promises to be resolved before taking action.
For example, if you want to fetch data from multiple URLs.
let promise1 = fetch('https://jsonplaceholder.typicode.com/posts/1');
let promise2 = fetch('https://jsonplaceholder.typicode.com/posts/2');
let promise3 = fetch('https://jsonplaceholder.typicode.com/posts/3');
Here, promise1, promise2, and promise3 are promises that are fetching data from three different URLs.
Now, you can use Promise.all([promise1, promise2, promise3]) to wait for all the promises to resolve before doing something with the data, as shown below.
Promise.all([promise1, promise2, promise3])
.then((values) => {
  console.log(values);
})
In the above example:
Promise.all()takes an array of promises as input and returns a new promise.- The
thenmethod is then called on the returned promise to log the resolved values of all the input promises in the order they were passed toPromise.all().
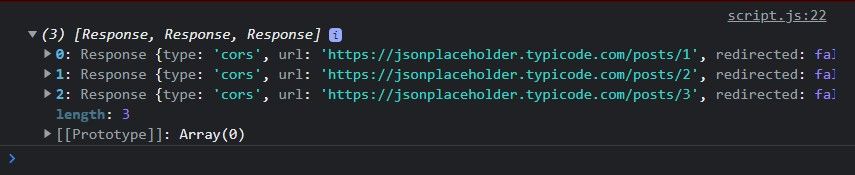
Note that in an instance where any input promises are rejected, the returned promise will also be rejected with the value of the first rejected promise.
How to Use the Fetch API with Promises
I have been using the Fetch API for some examples in this article, and I understand that it may be unfamiliar to some readers. So I created this section to explain the basics of the Fetch API for those who may need to become more familiar with it.
The Fetch API is a built-in JavaScript feature that allows you to make network requests, such as fetching data from a server. It is a modern alternative to the older XMLHttpRequest API and is designed to be easier and more powerful.
Here is an example of how to use the Fetch API to fetch data from a server:
fetch('https://some-api.com/data')
  .then(response => response.json())
  .then(data => {
    console.log(data);
  })
  .catch(error => {
    console.error('Error:', error);
  });
In this example,
- The
fetch()method is used to make a request to the server located at "https://some-api.com/data". The returned value is a promise that will be fulfilled with the server's response. - The first
.then()method is called to consume the promise and extract JSON data from the response. - The next
then()method is called to log the extracted data to the console. - If any errors occur, they will be caught in the
catch()method and logged to the console.
I hope the above explanation helps to clear up any confusion about the Fetch API and allows you to better understand the examples provided in this article.
Async Functions with async/await
Async/Await is a feature that allows you to write asynchronous code in a more synchronous, readable way.
asyncis a keyword that is used to declare a function as asynchronous.awaitis a keyword that is used inside anasyncfunction to pause the execution of the function until a promise is resolved.
Here's an example of how you can use async/await:
async function getData() {
  const response = await fetch('https://jsonplaceholder.typicode.com/posts/1');
  const data = await response.json();
  console.log(data);
}

getData();
In this example,
- the
getDatafunction is declared as an asynchronous function using theasynckeyword. - Inside the asynchronous function, we use the
awaitkeyword to wait for thefetchfunction to complete and retrieve some data from an API. - Once the data is retrieved, we use
awaitagain to wait and parse the retrieved data as JSON. - And then finally, we log the data to the console.
"Aync/Await" is a powerful tool for handling asynchronous operations. It allows for more readable and maintainable code by eliminating the need for callbacks and providing a more intuitive way to handle asynchronous operations.
Using the "async" keyword before a function definition and the "await" keyword before an asynchronous operation makes the code look more like synchronous code, making it easier to understand.
Overall, "Async/Await" is valuable to the JavaScript developer's toolbox and can significantly simplify handling asynchronous operations in your code.
Conclusion
In summary, asynchronous programming is an essential concept in JavaScript that allows your code to run in the background without blocking the execution of other code.
Developers can create more efficient and responsive applications by using features like callbacks, async/await, and promises.
Asynchronous programming can be tricky to understand at first. But with practice and a solid understanding of the concepts, it becomes a powerful tool for building high-performance web applications.
Thank you for reading this article!
If you enjoyed this article and want to learn more about programming, follow me on Instagram at @alege_dev, where I post regular updates and tips on various programming topics.