
By Hrishikesh Pathak
With the advent of Web 2.0, authenticating users became a crucial task for developers.
Before Web 2.0, website visitors could only view the content of a web page – there was no interaction. This era of the internet was called Web 1.0.
But after Web 2.0, people gained the ability to post their own content on a website. And then content moderation became a never-ending task for website owners.
To reduce spam on these websites, developers introduced user authentication systems. Now website moderators can easily know the source of spam and can prevent those spammers from accessing the website further.
If you are want to know how to implement content moderation on your website, you can read my article on How to detect and blur faces in your web applications.
Now let's see what we'll be getting into in this tutorial.
What You'll Learn in This Tutorial
In this tutorial, we will discuss different authentication techniques you can use to authenticate users. These include email-password authentication, phone auth, OAuth, passwordless magic links, and at last facial authentication.
Our primary focus will be on authentication via face recognition techniques in this article.
We'll also build a project that teaches you how to integrate facial recognition-based authentication in your React web application.
In this project, we'll use the FaceIO SaaS (software as a service) platform to integrate facial recognition-based authentication. So, make sure you set up a free FaceIO account to follow along.
And finally, we'll take a look at the user privacy aspect and discuss how face recognition doesn't harm your privacy. We'll also talk about whether it's a reliable choice for developers in the future.
This article is packed with information, hands-on projects, and discussions. Grab a cup of coffee and a slice of pizza 🍕 and let's get started.
The final version of this project looks like this. Looks interesting? Let's do it then.
Different Types of User Authentication Systems
There are many user authentication systems out there right now that you can choose to implement in your websites. There are no real superior or inferior auth techniques. All of these auth systems depend on using the right tool for the job.
For example, if you are making a simple landing page to collect emails from users, there is no need to use OAuth. But if you are building a social platform, then using OAuth makes more sense than traditional authentication. You can pull the user's details and profile images directly from OAuth.
If your web application is built around any investment-related content or legally binding services, then using phone auth makes more sense. A user can create unlimited email accounts but they'll have limited phone numbers to use.
Let's take a look at some popular authentication systems so we can see their pros and cons.
Email-password based authentication
Email-password-based authentication is the oldest technique for verifying a user. The implementation is also very simple and easy to use.
The pro of this system is you don't need to have a third-party account to log in. If you have an email, whether it is self-hosted or from a service (like Gmail, Outlook, and so on), you are good to go.
The primary con of this system is you need to remember all of your passwords. As the number of websites is constantly growing and we need to log in to most sites to access our profiles, remembering passwords for every site becomes a daunting task for us humans.
Coming up with a unique and strong password is also a huge task. Our brains aren't typically capable of memorizing many random strings of letters and numbers. This is the biggest drawback of email-password-based authentication systems.
Phone authentication
Phone authentication is generally a very reliable auth technique to verify a user's identity. As a user typically doesn't have more than one phone number, this can be best suited for assets-related websites where user identity is very important.
But the drawback of this system is people don't want to reveal their phone numbers if they don't trust you. A phone number is much more personal than an email.
One more important factor of phone authentication is its cost. The cost of sending a text message to a user with an OTP is high compared to email. So website owners and developers often prefer to stick with email auth.
OAuth-based authentication
OAuth is a relatively new technique compared to the previous two. In this technique, OAuth providers user authentication and useful information on behalf of the user.
For example, if the user has an account with Google (for example), they can log in to other sites directly using their Google account. The website gets the user details details from Google itself. This means that there's no need to create multiple accounts and remember every password for those accounts.
The major drawback of this system is that you as a developer have to trust the OAuth providers and many people don't want to link all their accounts for privacy reasons. So you'll often see an email-password field in addition to OAuth on most websites.
Magic link authentication
Magic links solve most of the problems you face in email password-based authentication. Here you have to provide only your password and you will receive an email with an auth link. Then you have to open this link in your browser and you are done. No need to remember any passwords.
This type of authentication has gained in popularity these days. It saves a lot of time for the user, and it's also very cheap. And you don't have to trust a 3rd-party like in the case of OAuth.
Facial recognition authentication
Facial recognition is one of the latest authentication techniques, and many developers are adopting it these days. Facial recognition reduces the hassle of entering your email-password or any other user credentials to log in to a web application.
The most important thing is that this authentication system is fast and doesn't need any special hardware. You just need a webcam, which almost all devices have nowadays.
Facial recognition technology uses artificial intelligence to map out the unique facial details of a user and store them as a hash (some random numbers and text with no meaning) to reduce privacy-related issues.
Building and deploying an artificial intelligence-based face recognition model from scratch is not easy and can be very costly for indie developers and small startups. So you can use SaaS platforms to do all this heavy-lifting for you. FaceIO and AWS recognition are examples of these type of services you can use in your projects.
In this hands-on project, we are going to use FaceIO APIs to authenticate a user via facial recognition in a React web application. FaceIO gives you an easy way to integrate the authentication system with their fio.js JavaScript library.
Project Setup
Before starting, make sure to create a FaceIO account and create a new project. Save the public ID of your FaceIO project. We need this ID later in our project.
To make a React.js project, we will use Vite. To start a Vite project, navigate to your desired folder and execute the following command:
npm create vite@latest
Then follow the instructions and create a React app using Vite. Navigate inside the folder and run npm insall to install all the dependencies for your project.

After following all these steps, your project structure should look like this:
.
├── index.html
├── package.json
├── package-lock.json
├── public
│   └── vite.svg
├── src
│   ├── App.css
│   ├── App.jsx
│   ├── assets
│   │   └── react.svg
│   └── main.jsx
└── vite.config.js
How to Integrate FaceIO into Our React Rroject
To integrate FaceIO into our project, we need to add their CDN in the index.html file. Open the index.html file and add the faceIO CDN before the root component. To learn more, check out FaceIO's integration guide.
<body>
    <script src="https://cdn.faceio.net/fio.js"></script>
    <div id="root"></div>
    <script type="module" src="/src/main.jsx"></script>
</body>
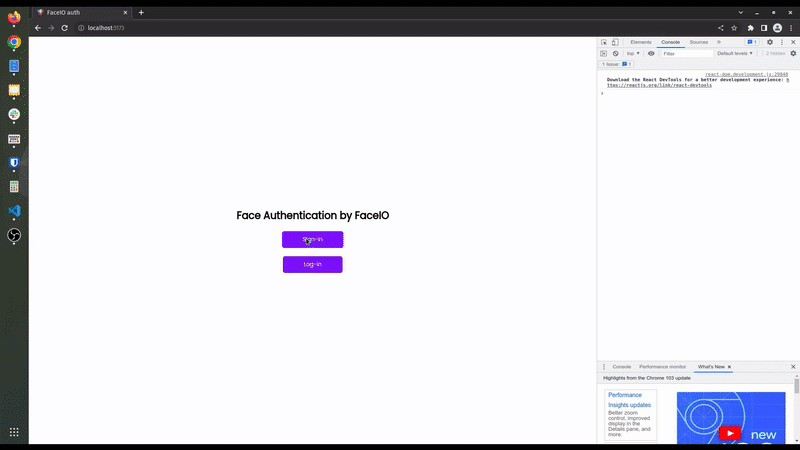
Now remove all the code from the App.jsx file to start from scratch. I've kept this tutorial as minimal as possible. So I've only added a heading and two buttons in the UI to demonstrate how the FaceIO facial authentication process works.
Here, one button works as a sign-in button, and the other one works as a log-in button.
The code inside the App.jsx file looks like this:
import "./App.css";
function App() {
  return (
    <section>
      <h1>Face Authentication by FaceIO</h1>
      <button>Sign-in</button>
      <button>Log-in</button>
    </section>
  );
}

export default App;
How to Register a User's Face using FaceIO
Working with FaceIO is very fast and easy. As we are using the fio.js library, we have to execute only one helper function to authenticate a user. This fio.js library will do most of the work for us.
To register a user, we initialize our FaceIO object inside a useEffect hook. Otherwise, every time a state changes, it re-runs the components and reinitializes the faceIO object.
let faceio;
useEffect(() => {
    faceio = new faceIO("Your Public ID goes here");
}, []);
Your FaceIO public ID is located on your FaceIO console. Copy the public ID and paste it here to initialize your FaceIO object.
Now, define a function named handleSignIn(). This function contains our user registration logic.
Inside the function call the enroll method of the faceIO object. This enroll method is equivalent to the sign-up function in a standard password backed registration system and accepts a payload argument. You can add any user-specific information (for example their name or email address) to this payload.
This payload information will be stored along with the facial authentication data for future reference. To learn about other optional arguments, check out their API docs.
In our sign-in button, on user click we invoke this handleSignIn() function. The code snippets for user sign-in look like this:
const handleSignIn = async () => {
    try {
      let response = await faceio.enroll({
        locale: "auto",
        payload: {
          email: "example@gmail.com",
          pin: "12345",
        },
      });

      console.log(` Unique Facial ID: ${response.facialId}
      Enrollment Date: ${response.timestamp}
      Gender: ${response.details.gender}
      Age Approximation: ${response.details.age}`);
    } catch (error) {
      console.log(error);
    }
  };

<button onClick={handleSignIn}>Sign-in</button>
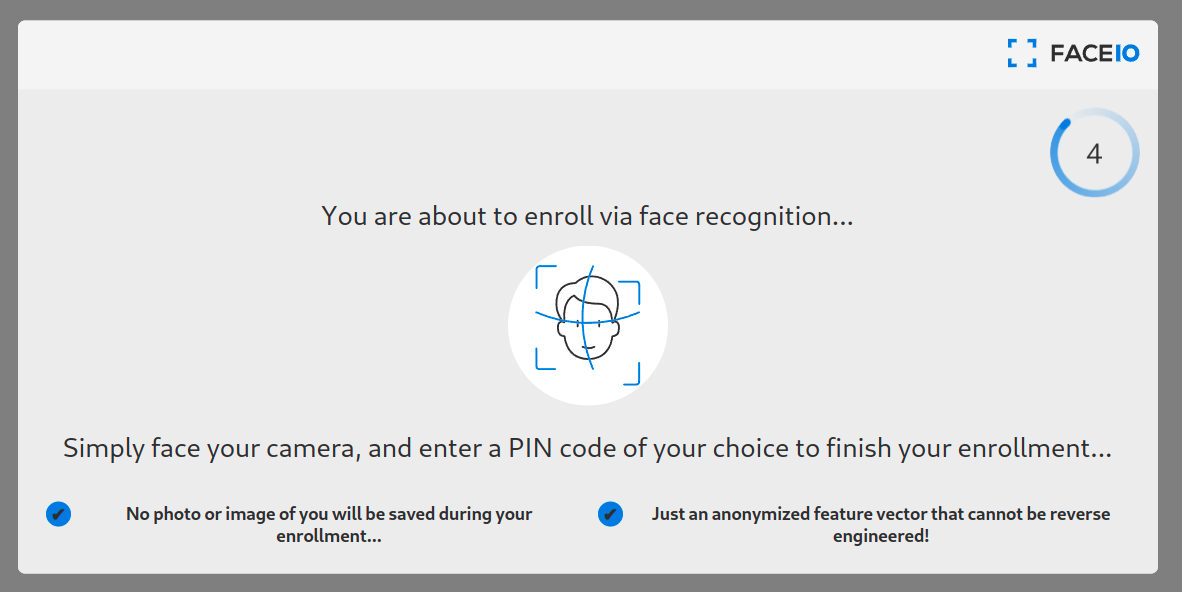 FaceIO screen
How to Sign In using Face Recognition
After registering the user, then you'll need to get the user into the authentication or log-in/sign-in flow. Using the fio.js library also makes it very easy for us to set up a log-in flow using face authentication.
We have to invoke the authenticate method of the faceIO object which is equivalent to the sign-in function in a standard password backed registration system and all the critical work will be done by the fio.js package.
At first, define a new function named handleLogIn() to handle all the log-in logic in our React app. Inside this function, we invoke the authenticate method of the faceIO object as I mentioned earlier.
This method accepts a locale argument. This is the default language of the interaction of users with FaceIO widgets. If you are not sure, you can assign auto in this field.
The authenticate method also take more optional arguments like permissionTimeout, idleTimeout, replyTimeout and so on. You can check out their API documentation to know more about optional arguments.
We invoke this handleLogIn() function when someone clicks on the Log-in button:
const handleLogIn = async () => {
    try {
      let response = await faceio.authenticate({
        locale: "auto",
      });

      console.log(` Unique Facial ID: ${response.facialId}
          PayLoad: ${response.payload}
          `);
    } catch (error) {
      console.log(error);
    }
  };

<button onClick={handleLogIn}>Log-in</button>
Our user authentication project using FaceIO and React is now complete! You learned how to register and login a user. You can see the process is fairly simple compared to implementing an email-password based or some other authentication method we discussed earlier in this article.
Now you can style all the jsx elements using CSS. I didn't add CSS here to reduce complexity in this project. If you are curious, you can take a look at my GitHub gist.
If you want to host this React FaceIO project for free, you can check out this article on how to deploy your React and Nextjs project in Cloudflare pages.
How to Use the FaceIO REST API
Besides providing widgets via the fio.js library, FaceIO also provides REST APIs to streamline the authentication process.
Every application in the FaceIO console has an API key. You can use this API key to access the FaceIO REST API endpoints. The base URL for the REST API is https://api.faceio.net/.
The URL schema accepts URL parameters like this https://api.faceio.net/cmd?param=val¶m2=val2. Here cmd is an API endpoint and param is an endpoint parameter if it accepts any.
Using the REST API endpoints, you can automate various tasks in your backend.
- You can delete a face ID on a user's request.
- You can attach a payload with a face ID.
- You can change the PIN associated with a face ID.
This REST API is intended to be used purely on the server side. Make sure you don't expose it to clients. It's important that you read the following Privacy and Security sections to learn more about this.
How to Use FaceIO WebHooks
Webhooks are event-driven communication systems among servers. You can use this webhook feature of FaceIO to update and sync your backend with new events happening in your front-end web application.
The event of this webhook fires on new user enrollment, facial authentication success, facial ID deletion, and so on.
You can set up FaceIO webhooks in your project console. A typical webhook call from FaceIO lasts for 6 seconds. This contains all the information about a specific event in a JSON format and looks like this:
{
  "eventName":"String - Event Name",
  "facialId": "String - Unique Facial ID of the Target User",
  "appId":    "String - Application Public ID",
  "clientIp": "String - Public IP Address",
  "details": {
     "timestamp": "Optional String - Event Timestamp",
     "gender":    "Optional String - Gender of the Enrolled User",
     "age":       "Optional String - Age of the Enrolled User"
   }
}
Privacy and FaceIO
Privacy is the most important thing for a user nowadays. As big corporations use your data for their good, questions arise on whether the privacy of these face recognition techniques is valid and legitimate.
FaceIO as a service follows all the privacy guidelines and gets user consent before requesting their camera access. Even if the developer wanted, FaceIO doesn't scan faces without getting consent. Users can easily opt-out of the system and can delete their facial data from the server.
FaceIO is CCP and GDPR compliant. As a developer, you can release this facial authentication system anywhere in the world without facing privacy issues. You can read this article to know more about FaceIO privacy best practices.
FaceIO Security
The security of a web application is an important topic to discuss and consider. As a developer, you are responsible for the security of a site or application's users.
FaceIO follows some important and serious security guidelines for user data protection. FaceIO hashes all the unique facial data of the user along with the payload we specified earlier. So the stored information is nothing but some random strings which can't be reverse engineered.
FaceIO outlines some very important security guidelines for developers. Their security guide focuses on adding a strong pin code to protect user data. FaceIO also rejects covered faces so that no one can impersonate someone else.
Conclusion
If you've read this far, thank you for your time and effort. Make sure to follow along with the hands-on tutorial so you can fully grasp the topic.
The project should be approachable if you follow all the steps. If you make something out of it, show me on Twitter. If you have any questions, please ask. I will happy to help you. Till then, have a good day.