
These days, developers use automation tools all the time to manage tasks effectively and streamline their daily activities. And one of these popular tools is GitHub Actions.
When talking about software, including the open-source variety, you'll likely agree with me that efficiency is in high demand. And with the help of of such automation tools, maintainers can automate repetitive tasks and focus on more important tasks such as writing quality code, reviewing contributions, and creating an active community around the project.
I have had to manually do certain tasks that could've been automated, so I feel like I am in a good position to share how using GitHub actions can save time.
I spend the better part of my mornings going over one of my mini-python-projects that has attracted contributors. I write warm and welcoming message to new contributors, I check the recently made PRs to make sure they adhere to the rules of the project like including README files with instructions, screenshots if needed, and so on.
But what I didn't know is that I could automate some of these tasks and much more to reduce my workload. And I could do this with the help of GitHub Actions.
In this guide, I'll share more on GitHub Actions and how I use it. I'll show you how you can leverage it to automate various aspects of your projects from welcoming new contributors to assigning tasks, checking code quality, and much more. Let's make your project more efficient and interactive together.
What is GitHub Actions?
GitHub Actions is a tool that enables you to perform different automations within a GitHub repository. It lets you create custom workflows that you can use to automate your development process such as building, testing, and deploying code.
After integrating this tool with other GitHub features, you can transform your project management routine and make it more enjoyable and engaging for everyone contributing to it.
How to set up GitHub Actions in your repo
It all begins in the root folder. By default, GitHub Actions is usually integrated within your GitHub repository, so you won't need to sig-up for a separete account on install it. But you will need to follow a few steps in order for you to access it's functionalities.
- In your GitHub repository, on the top navigation tab you will see the Actions tab. Click on it, and it will give you access to a list of recommended workflows and also an option to create your own.
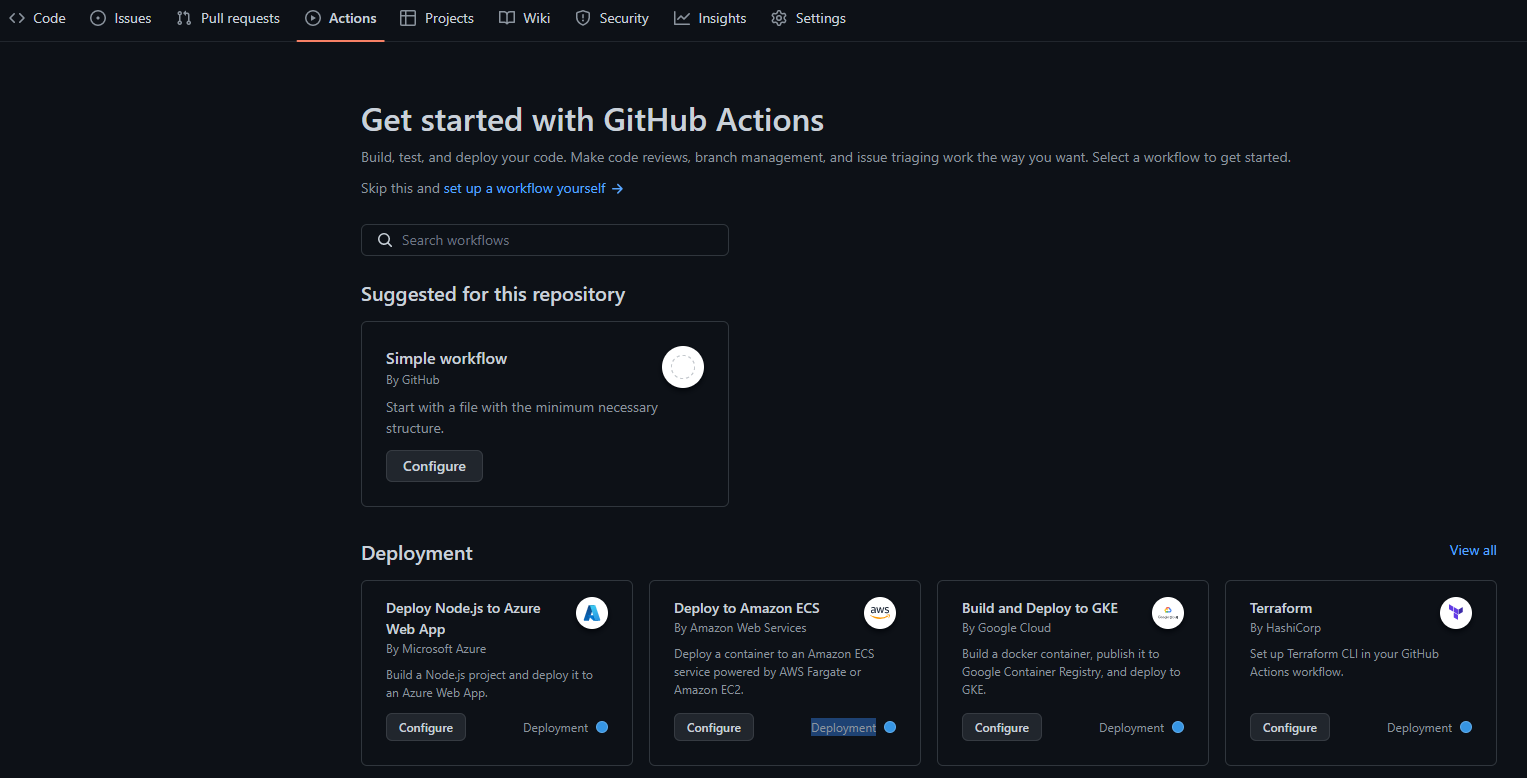
Now, depending on the nature of your project, you can either choose to pick an already created workflow from the available lists or you can choose to create one by yourself. Since you understand what your project is all about and what you may need to automate, I would recommend setting a new workflow yourself. This will give you a better understanding of what is happening.
To set up a new workflow, click on Set up a workflow yourself. This will take you to a workflow creation screen with a new YAML file named
main.yml. At this point I should mention that having an understanding of YAML is really important since you have chosen to write your own workflows.
What happens behind the scene is, once you have clicked this option, two folders are created alongside the main.yml file. If you access your repository afterwards or take a look at the path just before you file name you will see: .github/workflows/<filename>.
- Inside the
main.ymlfile is where you define your workflow, and after writing everything you commit the changes just like your would do when making changes to a repository. With this, you have your workflow set and it'll run based on the triggers defined within the YAML file.
Alternatively you can still accomplish all this from your favorite code editor. All you need to do is clone the repository onto your computer, create a .github folder on the root folder of your project, create another folder within it named workflows, and finally add a file with an extension of .yml and write your script in it.
In the examples below, I will be referencing the code that I implemented in my project to help you understand.
GitHub Actions Components
GitHub actions mainly consists of three main components, which include:
Workflows - These are sets of rules that define the automation process. They are defined in the YAML file which is stored in the
.github/workflowsdirectory.Events - These are what initiate a workflow. For example you can have an event set to run a workflow when a PR is created, or when an issue is opened. To define an event in a workflow, use the keyword
onfollowed by the event names.
For example:
on:
    issues:
        types: [opened]
    pull_request_target:
        types: [opened]
- Jobs - These are what make up a workflow. Jobs are run concurrently by default. To define your jobs in a given workflow, use the keyword
jobsfollowed by a unique identifier for each job and its configuration.
For example:
jobs:
  build:
    runs-on: ubuntu-latest
    steps:
      - name: Check out repository
        uses: actions/checkout@v2
      - name: Set up Python
        uses: actions/setup-python@v2
        with:
          python-version: 3.10
      - name: Install dependencies
        run: |
          pip install -r requirements.txt
All of these components work together to ensure a given set of rules are successfully executed. Now let's start working on our project.
How to Automate Issue and Pull Request Management
Managing issues and pull requests can be a very time-consuming task especially for large open-source projects. But with GitHub Actions, maintainers are able to automate this processes and spend more time on coding and engaging with the community.
How to Create Issue and Pull Request Templates
If you are an active open-source contributor, chances are that you have come a cross a guide that tells you what to include either in your issue or PR submission. The main aim of such templates is to give guidance and ensure that the contributors provide all necessary info.
Now, let's see how you can implement this template on your projects:
- First step is to make sure there is a
.githubdirectory in the root of the repository if you don't already have it. - Within the
.githubfolder, create two more foldersISSUE_TEMPLATEandPULL_REQUEST_TEMPLATE. - Within these two folders, add markdown files representing the content you want to be automated: For example you can have
feature_request.mdandissue_report.mdfor the issue template andpull_request_template.mdfor the PR template.
Below is a reference of what I have in my pull_request_template.md file. It's a simple guide that tells the contributors what to include before submitting their pull request.
**Related Issue(s):**
Please provide a title for this pull request.

**Description:**
Please provide a brief description of the changes you are proposing.

**Checklist:**

-   [ ] I have read and followed the [contributing guidelines](/CONTRIBUTING.md).
-   [ ] I have included a README file for my project.
-   [ ] I have updated the main README file where necessary.
-   [ ] I have included a requirements.txt file.
-   [ ] I have added tests that prove my changes are effective or that my feature works.
-   [ ] All new and existing tests pass.

**Screenshots**
If applicable, add screenshots to help explain behavior of your code.

**Additional Notes:**
Please provide any additional information about the changes you are proposing.
For a more detailed explanation, check out the GitHub Action's documentation about issue and pull request templates here.
Welcoming New Contributors and Recognizing Community Efforts
Being a maintainer and engaging with your community is important, as you get an opportunity to directly interact with and get feedback from your peers. But if you are running a large project that attracts many contributors you might not get that opportunity to directly engage with the community very often.
With the help of GitHub Actions, you can accomplish some of these tasks like welcoming new contributors, recognizing their efforts, and creating a positive atmosphere for the existing community members.
If you are managing a small project, you can probably directly interact with your community but still utilize automation to help yourself out.
For instance, here is some sample code that I have implemented to welcome new contributors when they open a pull request or create a new issue on the repository. In it, you can see I have a message thanking them for their effort and also assuring them that their changes will be reviewed as soon as I'm able. Despite this I do follow up through conversation if anything extra is required or to suggest new ideas.
name: Welcome New Contributors

on:
    issues:
        types: [opened]
    pull_request_target:
        types: [opened]

jobs:
    welcome:
        runs-on: ubuntu-latest
        steps:
            - name: Welcome Issue
              if: github.event_name == 'issues'
              uses: actions/github-script@v5
              with:
                  script: |
                      const issue = context.issue;
                      const repo = context.repo;
                      const issueAuthor = context.payload.sender.login;
                      const welcomeMessage = `
                        Hi @${issueAuthor}! :wave:
                        Thank you for creating an issue in our repository! We appreciate your contribution and will get back to you as soon as possible.
                      `;
                      github.rest.issues.createComment({
                        ...repo,
                        issue_number: issue.number,
                        body: welcomeMessage
                      });
            - name: Welcome Pull Request
              if: github.event_name == 'pull_request_target'
              uses: actions/github-script@v5
              with:
                  script: |
                      const pr = context.issue;
                      const repo = context.repo;
                      const prAuthor = context.payload.sender.login;
                      const welcomeMessage = `
                        Hi @${prAuthor}! :wave:
                        Thank you for submitting a pull request! We appreciate your contribution and will review your changes as soon as possible.
                      `;
                      github.rest.issues.createComment({
                        ...repo,
                        issue_number: pr.number,
                        body: welcomeMessage
                      });
In addition to this simple workflow, if you are leading a more complex project you might consider writing a more detailed workflow that is able to automatically assign badges, labels, or custom titles to contributors.
Similary you can choose to add a workflow that thanks contributors when their pull request is merged or issue closed. You can check out GitHub's Action documentation for a detailed guide.
How to Automate Code Quality Assurance
For most developers, writing quality code is very important, especially if they're working on consumer related applications. While the success of a project depends on well-written and tested code, sometimes reviewing the changes might take time and even delay in-demand features.
With the help of code automation tools, you can maintain a consistent coding style and quickly and easily identify potential bugs, keeping your project clean.
So, how do you set up continuous integration (CI) with GitHub Actions, integrate code formatting and linting tools, and use automated code review services in your project?
Continuous Integration (CI) helps you automate processes like building, testing, and validating code changes. Just like the any other automation code, the CI code is written in a .yml file stored within the .github/workflows folders.
Below is an example of a Python project CI workflow that runs when a push or pull request is made to the main branch a repository. It tests the Python code with multiple versions, installs the necessary dependencies, and runs the tests using the unittest module.
name: Python CI

on:
  push:
    branches:
      - main
  pull_request:
    branches:
      - main

jobs:
  build:
    runs-on: ubuntu-latest
    strategy:
      matrix:
        python-version: [3.7, 3.8, 3.9, 3.10]

    steps:
    - uses: actions/checkout@v2
    - name: Set up Python ${{ matrix.python-version }}
      uses: actions/setup-python@v2
      with:
        python-version: ${{ matrix.python-version }}
    - name: Install dependencies
      run: |
        python -m pip install --upgrade pip
        pip install -r requirements.txt
    - name: Run tests
      run: |
        python -m unittest discover
In addition to the above code, if you want help maintaining consistency in your coding style, you can integrate code formatting and linting tools such as black, isort or flake8. For that all you need to do is add them within your requirements.txt file which is already included in the above code and icluding the block below to run the tools.
#...
    # ...
    - name: Run black for code formatting
      run: |
        black --check .
    - name: Run isort for import sorting
      run: |
        isort --check --diff .
    - name: Run flake8 for linting
      run: |
        flake8 .
If it finds any code formatting issues, the CI build will fail. To fix it you will have to manually check the logs. Check out this guide on building and testing Python for more examples.
The above ideas are just a few of the automations you can use in your projects. For a more complex application, you might consider also adding workflows for generating documentation with tools like Sphinx or MkDocs, automating dependancy updates, automating release management and project tracking, and more.
Tips for Building Custom GitHub Actions
There are many pre-built actions already available in the GitHub Actions market place. But sometimes you may want or need to customize your workflows to fit your needs.
For that, you can choose either JavaScript or Docker containers and share it with the community.
Here are some best practices to follow:
- Understand the problem – just like any other project, before you begin building make sure you understand the problem you are trying to solve and how you will solve it.
- Choose the right stack – as discussed above, GitHub Actions can either be written using JavaScript or Docker. Make sure to choose what best fits your needs and understanding.
- Make sure you adhere to the best coding practices so others can easily understand and read your code.
- Make use of already available packages such as
@actions/coreand@actions/githubwhich provide easy interaction with the GitHub Actions environment and the GitHub API. - Chances are that after successfully creating your own workflow, you might be want to publish it. Whether you publish or not, make sure to test your action for potential issues or bugs.
With these easy tips, you can build a custom GitHub Action that automates some major/basic tasks in your project. In addition to the above tips, more details about creating custom actions can be found on the official documentation.
Conclusion
In this guide, we have seen the potential benefits that GitHub Actions can bring to our projects. Not only does it simplify the production process, but it also allows us to customize the actions to fit our project needs.
This is just the tip of what we can achieve. I would encourage you to get a better understanding and explore different ways in which you can further implement GitHub Actions to enhance your open-source project. Let's embrace automation and utilize it to get more done.