
By Matt Morgan
A three-tier web application has a presentation layer, an application layer, and a database layer.
This familiar pattern is fertile ground for learning new technologies like the AWS Cloud Development Kit (CDK).
In this tutorial, we will create a simple note-taking application using a DynamoDB table, HTTP API endpoints, Lambda handlers, and a frontend React application with the CloudFront Content Delivery Network (CDN).
All of this can be deployed to an AWS account using a single command. And all of it will be written in TypeScript.
The source code for this tutorial is available on GitHub.
How to get AWS Account Credentials
To begin with, we will need an AWS account and credentials available in our command line. All the resources deployed in this tutorial should remain in the free tier of use, however a credit card is still required to sign up for an AWS account.
If you don't yet have an AWS account, here is a good resource for doing so safely and with best practices in mind.
Newcomers to AWS may also wish to check out the CDK Workshop, in particular, the part about creating an AWS account and user.
Other Prerequisites
When working with AWS, it is a good idea to install the AWS CLI. You will also need to have a recent version of Node.js installed.
How to Initialize the Application
To get started, we can use the cdk command-line utility to scaffold an application.
mkdir cdk-three-tier-serverless && cd cdk-three-tier-serverlessnpx cdk init app --language=typescript
This will create some files to get us started and download the necessary dependencies.
CDK v1 vs v2 – What is the Difference?
AWS CDK v2 was made generally available in December 2021. AWS has announced that v1 will enter a maintenance phase and eventually end support for v1 in June of 2023. The primary difference between v1 and v2 is that v2 does a better job of managing dependencies. Published constructs built for v1 will need to be updated before they can work in v2 applications.
What is Projen? (Optional)
Projen is popular in the CDK community as an alternative to cdk init. To avoid introducing too many concepts, this tutorial doesn't use projen but you could create a very similar application by starting with npx projen new awscdk-app-ts.
How to Bootstrap Your AWS Account
In order to use our AWS account with AWS CDK, we must first bootstrap the account by deploying a simple stack to manage our assets in the account.
You can do this by entering npx cdk bootstrap at the command line. It's best to do this after initializing a project or the bootstrap will ask for additional information. If the bootstrap is successful, we are ready to continue building our application, otherwise, we should refer to the official documentation for troubleshooting advice.
How to Bootstrap AWS Roles (optional)
The bootstrap will create several roles that can be used to deploy, manage assets and look up resource Amazon Resource Names (ARNs). Although you can complete this tutorial with a user that has the AdministratorAccess policy, that is not a best practice.
If we look up the ARNs of the roles created by the bootstrap, we can construct a fine-grained policy and apply it to a new user.
The policy we create might look something like this. See the official docs on creating IAM users.
{
    "Version": "2012-10-17",
    "Statement": [
        {
            "Sid": "assumecdkroles",
            "Effect": "Allow",
            "Action": [
                "sts:AssumeRole",
                "iam:PassRole"
            ],
            "Resource": [
                "arn:aws:iam::1234567890:role/cdk-abc123-deploy-role-1234567890-us-east-1",
                "arn:aws:iam::1234567890:role/cdk-abc123-file-publishing-role-1234567890-us-east-1",
                "arn:aws:iam::1234567890:role/cdk-abc123-image-publishing-role-1234567890-us-east-1",
                "arn:aws:iam::1234567890:role/cdk-abc123-lookup-role-1234567890-us-east-1"
            ]
        }
    ]
}
A policy like that in an account that also has MFA and root access locked down should provide a reasonable degree of safety for learners. Enterprise users will want to think about setting up AWS SSO and an AWS Organization.
How to Build Out The Data Tier
We'll start by building out the data tier. We'll be able to deploy our application each step of the way and check our progress in the AWS Console.
How to Create a DynamoDB Table
The init operation will have created a file called cdk-three-tier-serverless-stack.ts. We can start there to build out our application. First let's remove the commented code and add a Table declaration. Note that, unlike CDK v1 applications, there's no need to install additional packages to start using DynamoDB.
import { RemovalPolicy, Stack, StackProps } from 'aws-cdk-lib';
import { AttributeType, BillingMode, Table } from 'aws-cdk-lib/aws-dynamodb';
import { Construct } from 'constructs';
export class CdkThreeTierServerlessStack extends Stack {
constructor(scope: Construct, id: string, props?: StackProps) {
super(scope, id, props);
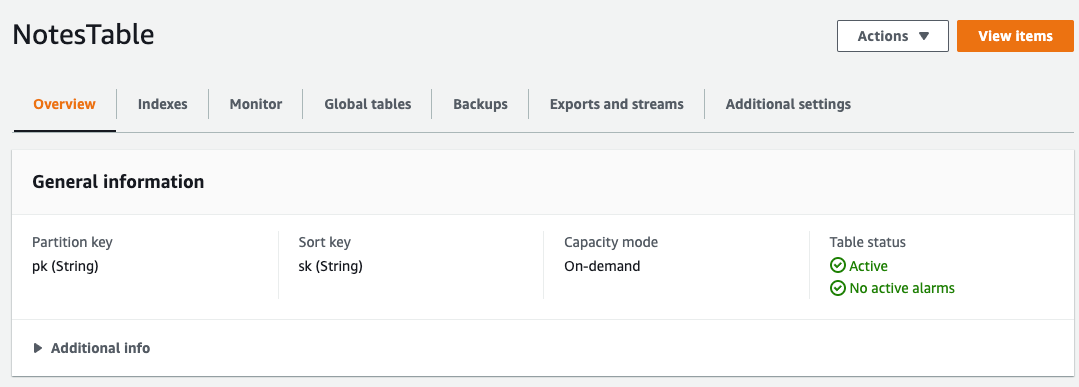
const table = new Table(this, 'NotesTable', {
billingMode: BillingMode.PAY_PER_REQUEST,
partitionKey: { name: 'pk', type: AttributeType.STRING },
removalPolicy: RemovalPolicy.DESTROY,
sortKey: { name: 'sk', type: AttributeType.STRING },
tableName: 'NotesTable',
});
}
}
We can immediately deploy this table using npx cdk deploy and then inspect it in the console.
How to Model Data using AWS DynamoDB OneTable
OneTable is a tool for managing DynamoDB queries. The concept behind it is that several different entities can be modeled in the same DynamoDB table, a practice endorsed by many experts in the field.
In our simple application, we'll just have the single entity notes, but we'll use OneTable anyway because it will help manage our schema. Since DynamoDB is a NoSQL database, the schema isn't defined at table creation and instead, we'll define it in application code.
To begin, we need to install dependencies.
npm i @aws-sdk/client-dynamodb dynamodb-onetable
We're going to create two Lambda functions in a moment and we'll want to share a model between them. We can organize the code any way we like. Let's create a "fns" folder under lib and create files called notesTable.ts, readFunction.ts and writeFunction.ts.
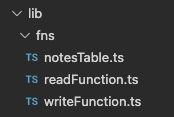
We can define a schema in notesTable.ts.
import { DynamoDBClient } from '@aws-sdk/client-dynamodb';
import { Entity, Table } from 'dynamodb-onetable';
import Dynamo from 'dynamodb-onetable/Dynamo';

const client = new Dynamo({ client: new DynamoDBClient({}) });

const schema = {
  indexes: {
    primary: {
      hash: 'pk',
      sort: 'sk',
    },
  },
  models: {
    note: {
      type: {
        required: true,
        type: 'string',
        value: 'note',
      },
      pk: {
        type: 'string',
        value: 'note',
      },
      sk: {
        type: 'string',
        value: '${date}',
      },
      note: {
        required: true,
        type: 'string',
      },
      date: {
        required: true,
        type: 'string',
      },
      subject: {
        required: true,
        type: 'string',
      },
    },
  },
  version: '0.1.0',
  params: {
    typeField: 'type',
  },
  format: 'onetable:1.0.0',
} as const;

export type NoteType = Entity<typeof schema.models.note>;

const table = new Table({
  client,
  name: 'NotesTable',
  schema,
  timestamps: true,
});

export const Notes = table.getModel<NoteType>('note');
We're defining the properties of "type", "subject", "note" and "date" for the model. All of these will have the string type. We're also going to indicate that the partition key will be always set to "note". This is fine for a small sample application, but for something larger, it would make sense to use a value like a user id or account id based on the kinds of queries or access patterns the application requires.
The sort key and date field will have exactly the same data in them. This data duplication is a best practice because it will allow us to have different kinds of entities in our table and some of them may not be sorted by date.
The Application Tier
Our application tier will consist of some Lambda functions and an API Gateway to connect them to the Internet.
Lambda Handlers
We will now fill in our Lambda handlers. We can add extra typings to make it easier to work in a TypeScript environment.
npm i -D @types/aws-lambda
Thanks to OneTable extracting away a lot of the complexity of dealing with DynamoDB, our Lambda handlers are quite simple. Our read function executes a find operation and returns the result.
import type { APIGatewayProxyResultV2 } from 'aws-lambda';

import { Notes } from './notesTable';

export const handler = async (): Promise<APIGatewayProxyResultV2> => {
  const notes = await Notes.find({ pk: 'note' }, { limit: 10, reverse: true });
  return { body: JSON.stringify(notes), statusCode: 200 };
};
Adding the limit and reverse parameters means the query will return the ten most recent notes, automatically sorted by the sort key.
Our write function is similarly quite simple.
import type {
  APIGatewayProxyEventV2,
  APIGatewayProxyResultV2,
} from 'aws-lambda';

import { Notes } from './notesTable';

export const handler = async (
  event: APIGatewayProxyEventV2
): Promise<APIGatewayProxyResultV2> => {
  const body = event.body;
  if (body) {
    const notes = await Notes.create(JSON.parse(body));
    return { body: JSON.stringify(notes), statusCode: 200 };
  }
  return { body: 'Error, invalid input!', statusCode: 400 };
};
The NodejsFunction Construct
Returning to our stack, we now need to create the function constructs. Our Lambda functions will be written in TypeScript and thus will require a transpilation step before they can run in the Lambda runtime.
Fortunately, the CDK provides a NodejsFunction construct that will take care of this for us. NodejsFunction uses esbuild, a very fast transpiler. esbuild is not a direct dependency of CDK, so we'll need to install it to avoid the slower fallback, which builds in Docker.
npm i -D esbuild
Now we can add the constructs to our stack.
import { RemovalPolicy, Stack, StackProps } from 'aws-cdk-lib';
import { AttributeType, BillingMode, Table } from 'aws-cdk-lib/aws-dynamodb';
import { Architecture } from 'aws-cdk-lib/aws-lambda';
import { NodejsFunction } from 'aws-cdk-lib/aws-lambda-nodejs';
import { RetentionDays } from 'aws-cdk-lib/aws-logs';
import { Construct } from 'constructs';

export class CdkThreeTierServerlessStack extends Stack {
  constructor(scope: Construct, id: string, props?: StackProps) {
    super(scope, id, props);

    const table = new Table(this, 'NotesTable', {
      billingMode: BillingMode.PAY_PER_REQUEST,
      partitionKey: { name: 'pk', type: AttributeType.STRING },
      removalPolicy: RemovalPolicy.DESTROY,
      sortKey: { name: 'sk', type: AttributeType.STRING },
      tableName: 'NotesTable',
    });

    const readFunction = new NodejsFunction(this, 'ReadNotesFn', {
      architecture: Architecture.ARM_64,
      entry: `${__dirname}/fns/readFunction.ts`,
      logRetention: RetentionDays.ONE_WEEK,
    });

    const writeFunction = new NodejsFunction(this, 'WriteNoteFn', {
      architecture: Architecture.ARM_64,
      entry: `${__dirname}/fns/writeFunction.ts`,
      logRetention: RetentionDays.ONE_WEEK,
    });
  }
}
Our list of imports is growing, but all of them were installed along with aws-cdk-lib, so there's no worry about versioning. One more thing we'll need is to grant permissions to our functions to access the table.
    table.grantReadData(readFunction);

    table.grantWriteData(writeFunction);
All of this can be deployed at this stage. While our functions won't be accessible over the Internet, they could be executed from the AWS Console.
Lambda functions should be unit tested! Writing tests will be beyond the scope of this tutorial, but you can see some tests in the source repo.
HTTP API
We'll build our user-facing API using AWS API Gateway HTTP API. HTTP API is a lower-cost alternative to REST API. The CDK construct for HTTP API is still experimental, so we'll need to install additional modules to use it.
npm i @aws-cdk/aws-apigatewayv2-alpha @aws-cdk/aws-apigatewayv2-integrations-alpha
Then we can import the necessary classes into our stack.
import {
  CorsHttpMethod,
  HttpApi,
  HttpMethod,
} from '@aws-cdk/aws-apigatewayv2-alpha';
import { HttpLambdaIntegration } from '@aws-cdk/aws-apigatewayv2-integrations-alpha';
To create the HTTP API, we will need the base construct with a CORS configuration, since our view will be served from a CloudFront domain. Then we create integration constructs and finally add the routes.
    const api = new HttpApi(this, 'NotesApi', {
      corsPreflight: {
        allowHeaders: ['Content-Type'],
        allowMethods: [CorsHttpMethod.GET, CorsHttpMethod.POST],
        allowOrigins: ['*'],
      },
    });

    const readIntegration = new HttpLambdaIntegration(
      'ReadIntegration',
      readFunction
    );

    const writeIntegration = new HttpLambdaIntegration(
      'WriteIntegration',
      writeFunction
    );

    api.addRoutes({
      integration: readIntegration,
      methods: [HttpMethod.GET],
      path: '/notes',
    });

    api.addRoutes({
      integration: writeIntegration,
      methods: [HttpMethod.POST],
      path: '/notes',
    });
API Gateway will automatically generate a URL for our endpoint. We could apply a custom domain, but that would cost something, so we'll use the generated URL for now. It's desirable to output that from our stack so we don't need to look it up on the console. We can add CfnOutput to our aws-cdk-lib imports and one more line to our stack.
new CfnOutput(this, 'HttpApiUrl', { value: api.apiEndpoint });
Now let's deploy it again with npx cdk deploy. We'll be rewarded with output that looks something like this.
Outputs:
CdkThreeTierServerlessStack.HttpApiUrl = https://g50qzchav1.execute-api.us-east-1.amazonaws.com
We can immediately open https://g50qzchav1.execute-api.us-east-1.amazonaws.com/notes in a web browser and see the working API. Since nothing is in the database yet, we'll just get an empty array back. We could use a REST client and start posting data, but instead, let's build out our user interface.
Capture the API URL
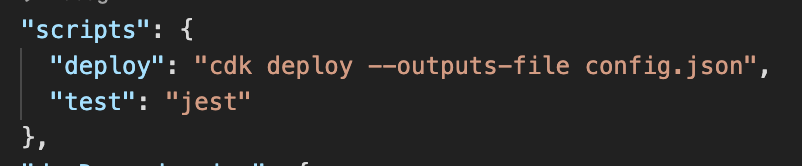
In order to have a nicer developer experience, we can actually store that url in a local config file for use in our project. This can be done by adding the –outputs-file argument to our deploy command. We can add this to our npm scripts to output a config.json.
It's probably a good idea to add that config.json file to our .gitignore. We won't need it in source control and we'll manage our deployed web application in another way.
The Presentation Tier
Lastly let's build out the presentation layer. We'll use React in this tutorial. The presentation layer will be served via a CloudFront Distribution, but it can be built and deployed as part of our CDK application.
React App
A cool thing about full-stack TypeScript applications is we can manage all our dependencies in one place. We're going to build a React application in TypeScript. We'll bundle it with esbuild and use vitejs, a nice tool that adds live reload and a few other quality-of-life capabilities to esbuild. Let's add our dependencies and devDependencies. Note that the distinction here is more by convention and this app will probably work just the same whether these are in dependencies or devDependencies.
npm i react react-dom
npm i -D @types/react @types/react-dom @vitejs/plugin-react-refresh vite
By convention, vitejs wants an index.html in the root of the project, so let's add that.
<!DOCTYPE html>
<html lang="en">
  <head>
    <meta charset="UTF-8" />
    <meta
      name="description"
      content="Sample Three-tier Serverless Web Application"
    />
    <meta
      http-equiv="Cache-Control"
      content="no-cache, no-store, must-revalidate"
    />
    <meta http-equiv="Pragma" content="no-cache" />
    <meta http-equiv="Expires" content="0" />
    <meta name="viewport" content="width=device-width, initial-scale=1.0" />
    <title>Three-tier Serverless Web App</title>
  </head>
  <body>
    <div id="root"></div>
    <script type="module" src="/lib/web/main.tsx"></script>
  </body>
</html>
The index.html directly refers to a main.tsx. Let's create a new directory under lib called web and add App.tsx, index.css, main.tsx, and utils.ts in that subdirectory.
Since we're adding React to the project, we need to modify our tsconfig.json adding the following keys and values:
    "jsx": "react",
    "esModuleInterop": true,
    "allowSyntheticDefaultImports": true
We will also need to add another value to the "lib" key in tsconfig.json.
"lib": ["DOM", "es2018"],
Now let's write that main.tsx. This is the entrypoint for the React application and only needs to invoke another component.
import './index.css';

import React from 'react';
import ReactDOM from 'react-dom';

import App from './App';

ReactDOM.render(
  <React.StrictMode>
    <App />
  </React.StrictMode>,
  document.getElementById('root')
);
We can throw together a little css in index.css to get the app started.
body {
  background-color: darkslategray;
  color: antiquewhite;
  font-family: 'Lucida Sans', 'Lucida Sans Regular', 'Lucida Grande',
    'Lucida Sans Unicode', Geneva, Verdana, sans-serif;
  font-size: 16pt;
}

button {
  background-color: forestgreen;
  color: white;
}

input,
textarea {
  width: 200px;
}

table {
  border: 1px solid;
  margin: 20px;
}

td {
  font-size: 12pt;
  padding: 10px;
  overflow: hidden;
  white-space: nowrap;
  text-overflow: ellipsis;
}
App.tsx starts to get a bit long and might be better broken into individual components, but React state management is well beyond the scope of this tutorial, so let's keep it simple.
import React, { useEffect, useState } from 'react';

import { NoteType } from '../fns/notesTable';
import { getNotes, saveNote } from './utils';

const App = () => {
  const [body, setBody] = useState('');
  const [notes, setNotes] = useState([]);
  const [subject, setSubject] = useState('');
  useEffect(() => {
    getNotes().then((n) => setNotes(n));
  }, []);
  const clickHandler = async () => {
    if (body && subject) {
      setBody('');
      setSubject('');
      await saveNote({
        date: new Date().toISOString(),
        note: body,
        subject,
        type: 'note',
      });
      const n = await getNotes();
      setNotes(n);
    }
  };
  return (
    <div>
      <div>
        <div>
          <input
            onChange={(e) => setSubject(e.target.value)}
            placeholder="Note Subject"
            type="text"
            value={subject}
          />
        </div>
        <div>
          <textarea
            onChange={(e) => setBody(e.target.value)}
            placeholder="Note Body"
            value={body}
          ></textarea>
        </div>
        <div>
          <button onClick={clickHandler}>save</button>
        </div>
      </div>
      <div>
        <table>
          <thead>
            <tr>
              <th>Subject</th>
              <th>Note</th>
              <th>Date</th>
            </tr>
          </thead>
          <tbody>
            {notes.map((note: NoteType) => (
              <tr key={note.date}>
                <td>{note.subject}</td>
                <td>{note.note}</td>
                <td>{new Date(note.date).toLocaleString()}</td>
              </tr>
            ))}
          </tbody>
        </table>
      </div>
    </div>
  );
};

export default App;
We need to build out our http client in utils.ts. Here we have an extra step where we will fetch that HTTP API url from the config.json file we created earlier. This way we can have a local development environment without needing to copy-paste URLs.
import { NoteType } from '../fns/notesTable';

let url = '';

const getUrl = async () => {
  if (url) {
    return url;
  }
  const response = await fetch('./config.json');
  url = `${(await response.json()).CdkThreeTierServerlessStack.HttpApiUrl}/notes`;
  return url;
};

export const getNotes = async () => {
  const result = await fetch(await getUrl());

  return await result.json();
};

export const saveNote = async (note: NoteType) => {
  await fetch(await getUrl(), {
    body: JSON.stringify(note),
    headers: { 'Content-Type': 'application/json' },
    method: 'POST',
    mode: 'cors',
  });
};
To enable the react-refresh plugin, we can optionally add a vite.config.ts file in the root of our project with the following code.
import { defineConfig } from 'vite';
import reactRefresh from '@vitejs/plugin-react-refresh';

// https://vitejs.dev/config/
export default defineConfig({
  plugins: [reactRefresh()],
});
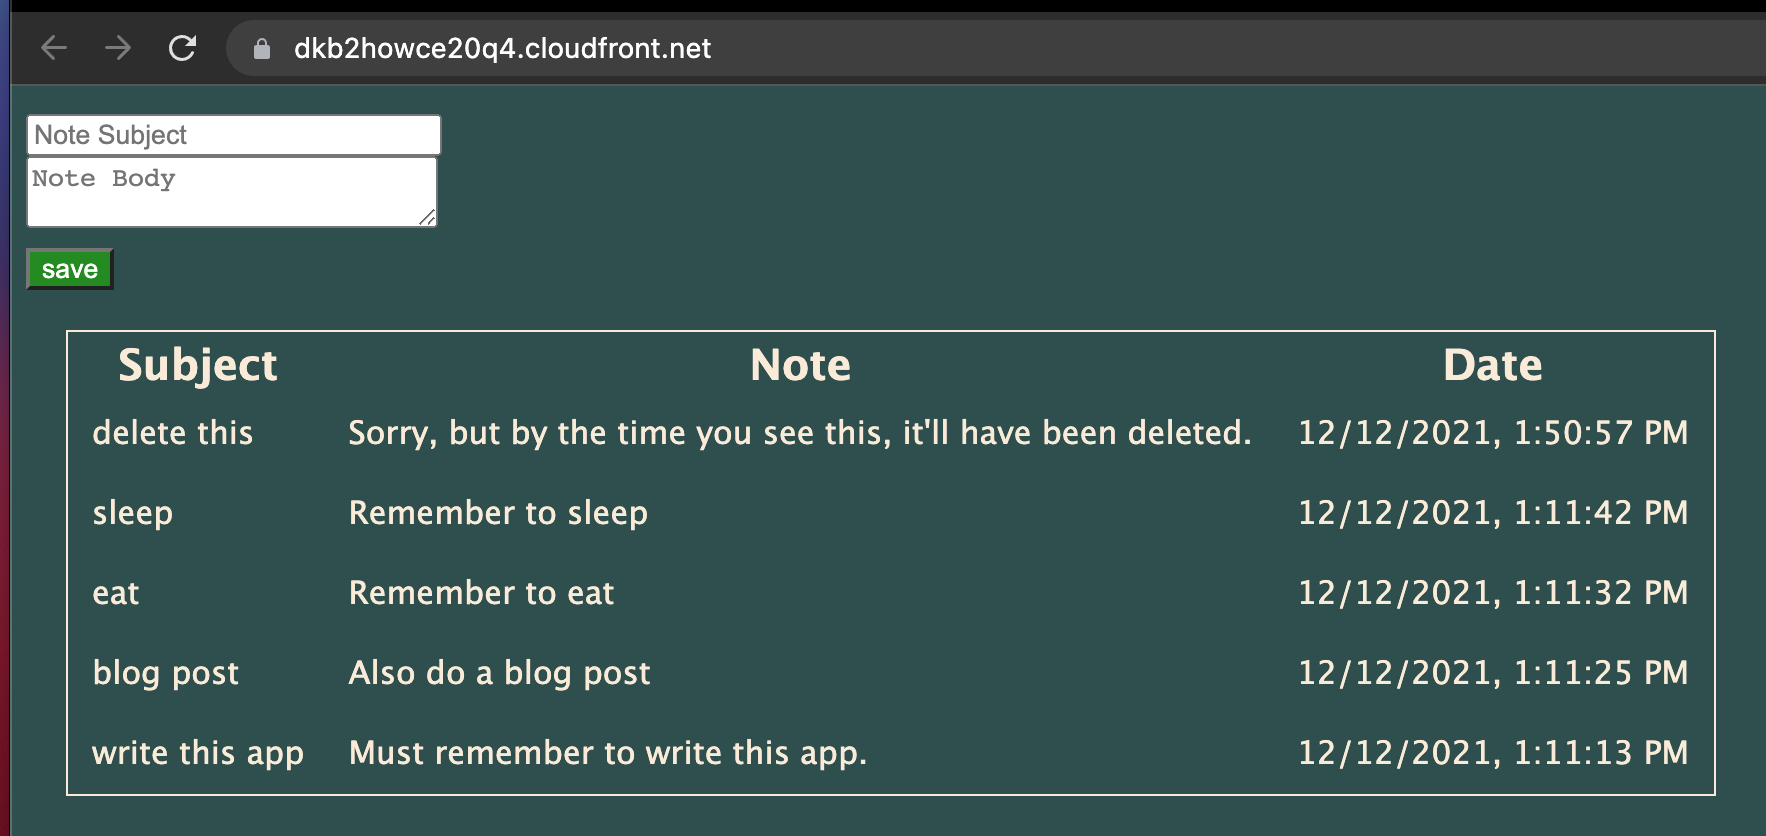
All that done, we can start our development server using npx vite, then view the web application on http://localhost:3000. The server will detect changes and reload if we make changes. We can try saving a few notes and see how that works.
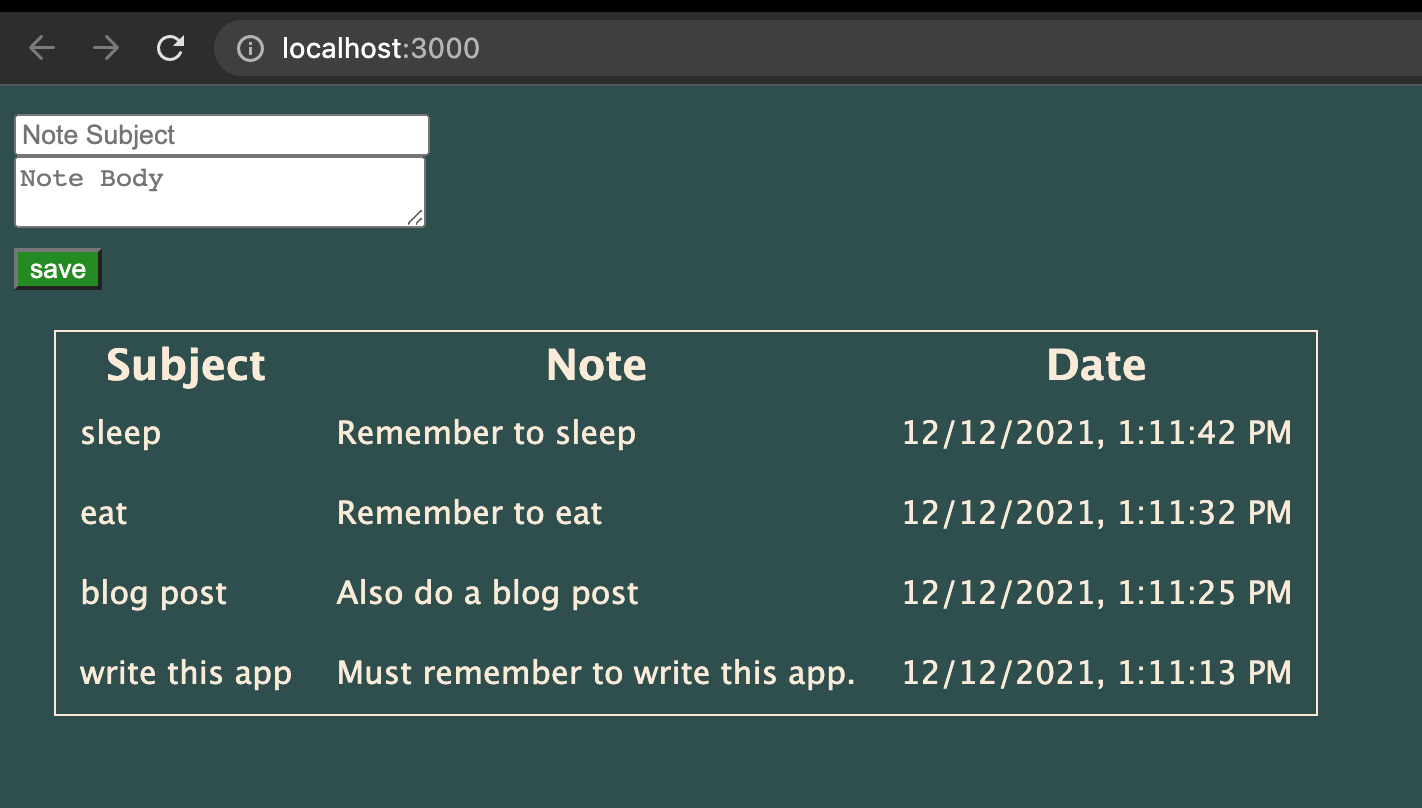
Could perhaps use some styling help, but otherwise, this is working pretty well.
CloudFront Distribution
In this section, we'll add several more constructs to cdk-three-tier-serverless-stack.ts. We'll only need one additional dependency. Our stack is starting to get kind of big at this point, but for the sake of this tutorial, we'll keep it all in one module. It's generally a good practice at this point to start thinking about how to break down large modules or stacks, but this deep topic would be best covered in another tutorial or blogpost.
Our web application will consist of an S3 Bucket for storage, a CloudFront Distribution and build step for the React application and a Custom Resource that will provide our API url to the web application.
Creating an S3 Bucket in CDK is easy. Note that while S3 websites are possible, this will not be an S3 website because we want to use CloudFront for global CDN and https. If we had a custom domain, we'd also want to attach it to our CloudFront Distribution.
import { BlockPublicAccess, Bucket } from 'aws-cdk-lib/aws-s3';

    const websiteBucket = new Bucket(this, 'WebsiteBucket', {
      autoDeleteObjects: true,
      blockPublicAccess: BlockPublicAccess.BLOCK_ALL,
      removalPolicy: RemovalPolicy.DESTROY,
    });
We're using autoDeleteObjects and RemovalPolicy.DESTROY here just because this is a tutorial. If you are building a production application, you may want to be more protective of your assets.
This S3 Bucket has no public access. Instead, we're going to give access via CloudFront Distribution. To do that, we'll need to use the OriginAccessIdentity construct to grant the read access CloudFront will need.
import {
  Distribution,
  OriginAccessIdentity,
  ViewerProtocolPolicy,
} from 'aws-cdk-lib/aws-cloudfront';

    const originAccessIdentity = new OriginAccessIdentity(
      this,
      'OriginAccessIdentity'
    );
    websiteBucket.grantRead(originAccessIdentity);
Then we create the actual Distribution.
import {
  Distribution,
  OriginAccessIdentity,
  ViewerProtocolPolicy,
} from 'aws-cdk-lib/aws-cloudfront';
import { S3Origin } from 'aws-cdk-lib/aws-cloudfront-origins';

    const distribution = new Distribution(this, 'Distribution', {
      defaultBehavior: {
        origin: new S3Origin(websiteBucket, { originAccessIdentity }),
        viewerProtocolPolicy: ViewerProtocolPolicy.REDIRECT_TO_HTTPS,
      },
      defaultRootObject: 'index.html',
      errorResponses: [
        {
          httpStatus: 404,
          responseHttpStatus: 200,
          responsePagePath: '/index.html',
        },
      ],
    });
This Distribution is designed for a single-page application like React and will upgrade all traffic to https.
For the next part, we're going to add one new helper library, fs-extra. This will make it easier to copy our build files around in the application.
npm i -D @types/fs-extra fs-extra
We're going to use the CDK asset bundling capabilities to build our React application with vitejs and esbuild as part of our stack synthesis process. By default, CDK asset bundling wants to use Docker. Since we are already in a NodeJS runtime, we'll prefer to bypass the slower Docker build and instead use local bundling.
import {
  CfnOutput,
  DockerImage,
  RemovalPolicy,
  Stack,
  StackProps,
} from 'aws-cdk-lib';
import { execSync, ExecSyncOptions } from 'child_process';
import { join } from 'path';
import { copySync } from 'fs-extra';

    const execOptions: ExecSyncOptions = {
      stdio: ['ignore', process.stderr, 'inherit'],
    };

    const bundle = Source.asset(join(__dirname, 'web'), {
      bundling: {
        command: [
          'sh',
          '-c',
          'echo "Docker build not supported. Please install esbuild."',
        ],
        image: DockerImage.fromRegistry('alpine'),
        local: {
          tryBundle(outputDir: string) {
            try {
              execSync('esbuild --version', execOptions);
            } catch {
              return false;
            }
            execSync('npx vite build', execOptions);
            copySync(join(__dirname, '../dist'), outputDir, {
              ...execOptions,
              recursive: true,
            });
            return true;
          },
        },
      },
    });
The bundler will run vite build which puts our transpiled web application under /dist, then it'll copy those files into the CDK staging directory (usually cdk.out).
We'll round all this out with a BucketDeployment that actually handles shipping our changes to the target S3 Bucket.
import { BucketDeployment, Source } from 'aws-cdk-lib/aws-s3-deployment';

    new BucketDeployment(this, 'DeployWebsite', {
      destinationBucket: websiteBucket,
      distribution,
      logRetention: RetentionDays.ONE_DAY,
      prune: false,
      sources: [bundle],
    });
AwsCustomResource
All this is pretty good, but we'll still be lacking a config.json file that will help the React application know our HTTP API URL. We could deploy the stack once, generating the file, then bundle it up and ship it, but that means we'd have to deploy twice to stand up our application. It would be better to generate this file on the fly the first time we deploy. We can do that with AwsCustomResource. The Custom Resource will implicitly create a Lambda Function that can receive the generated URL, then make an AWS SDK call to store it in S3 where our Web Application can find it. All of this can be done with just a few lines of code!
import { AwsCustomResource, AwsCustomResourcePolicy, PhysicalResourceId } from 'aws-cdk-lib/custom-resources';
import { PolicyStatement } from 'aws-cdk-lib/aws-iam';

    new AwsCustomResource(this, 'ApiUrlResource', {
      logRetention: RetentionDays.ONE_DAY,
      onUpdate: {
        action: 'putObject',
        parameters: {
          Body: Stack.of(this).toJsonString({
            [this.stackName]: { HttpApiUrl: api.apiEndpoint },
          }),
          Bucket: websiteBucket.bucketName,
          CacheControl: 'max-age=0, no-cache, no-store, must-revalidate',
          ContentType: 'application/json',
          Key: 'config.json',
        },
        physicalResourceId: PhysicalResourceId.of('config'),
        service: 'S3',
      },
      policy: AwsCustomResourcePolicy.fromStatements([
        new PolicyStatement({
          actions: ['s3:PutObject'],
          resources: [websiteBucket.arnForObjects('config.json')],
        }),
      ]),
    });
One more thing before we deploy again. Now that we have a CloudFront distribution to host our React application, let's add another CfnOutput so we can easily get the URL of that distribution.
    new CfnOutput(this, 'DistributionDomain', {
      value: distribution.distributionDomainName,
    });
Now we can visit the Distribution URL and see our working application! We'll see our existing notes and can add new ones as well!
Conclusion and Next Steps
If you've come this far and gotten your application working, congratulations! You may wish to add additional functionality such as pagination, authorization, or allow users to update or delete notes. When you're done experimenting, it's a good idea to take the advice given above and execute npx cdk delete to remove the stack and resources to avoid incurring bills.
We've covered all the steps needed to create a three-tier web application using AWS CDK. Want to learn more about the CDK? Join the community and slack channel on https://cdk.dev/ and check out https://thecdkbook.com/, written by CDK community members.
Like full-stack TypeScript but want to sharpen your skills? Then check out my book The TypeScript Workshop. Questions or comments about this tutorial, about the CDK, or about TypeScript? Find me on Twitter https://twitter.com/NullishCoalesce or at https://mattmorgan.cloud.