
In this step-by-step guide, you'll learn how to build a basic Blender file with incorporated fundamental animations. After that, you'll learn how to integrate Three.js with your React apps using React Three Fiber.
Getting familiar with these concepts can help you make sure your upcoming React.js applications stand out.
🔐 Here's What We'll Cover:
- Crafting a Blender model, encompassing animations, materials and the export process.
- Building a React.js application integrated with Three.js via React Three Fiber.
- Incorporating your personally created Blender model into the React.js application.
📝 Prerequisites:
- A fundamental grasp of the 3D software Blender is recommended.
- Basic familiarity with React.js is required.
- Prior experience with Three.js is not necessary.
Table of Contents
- 💭 What are Three.js and Blender?
- 🔧 How to Set Up React.js with Three.js
- 🔨 How to Create a Blender Model
- ✏️ Texture Baking for Procedural Materials
- ✒️ How to Implement the Blender Model into the React.js Application
- 📄 Additional information
- 📋 Wrap-up
💭 What are Three.js and Blender?
Three.js is a JavaScript library that functionas as an API, allowing you to exhibit 3D models within web browsers.
Leveraging Three.js helps you seamlessly integrate interactivity and distinctive functionalities into your website.
Blender is a robust software tailored for crafting and refining 3D models. Its versatility offers boundless opportunities, catering to a wide spectrum of creative visions.
Beyond its display capabilities, Blender provides you with an array of tools encompassing cameras, lighting, and even post-production enhancements.
When used together, these tools facilitate boundless creativity, allowing you to seamlessly translate your artistic creations into your upcoming website project.
🔧 How to Set Up React.js with Three.js
To start the process, install the React.js application:
npx create-react-app my-app
Next, we'll install Three.js and React Three Fiber. React Three Fiber serves as a React renderer for Three.js, harnessing the power of React components to streamline Three.js integration within a React.js environment:
npm install three @react-three/fiber
For an enriched Three.js experience, we'll also integrate React Three Drei, a package that introduces an assortment of helpers for diverse Three.js scenarios, including several camera controls, for example:
npm install @react-three/drei
glTF Tools extension
I also recommend installing the glTF Tools extension. Although not strictly necessary, this extension can help you perform various tasks.
If you're using Visual Studio Code as your Integrated Development Environment (IDE), you can conveniently add the extension through the extensions tab. Again, this extension is optional, but it can significantly simplify certain processes later on. I will use it throughout this tutorial:
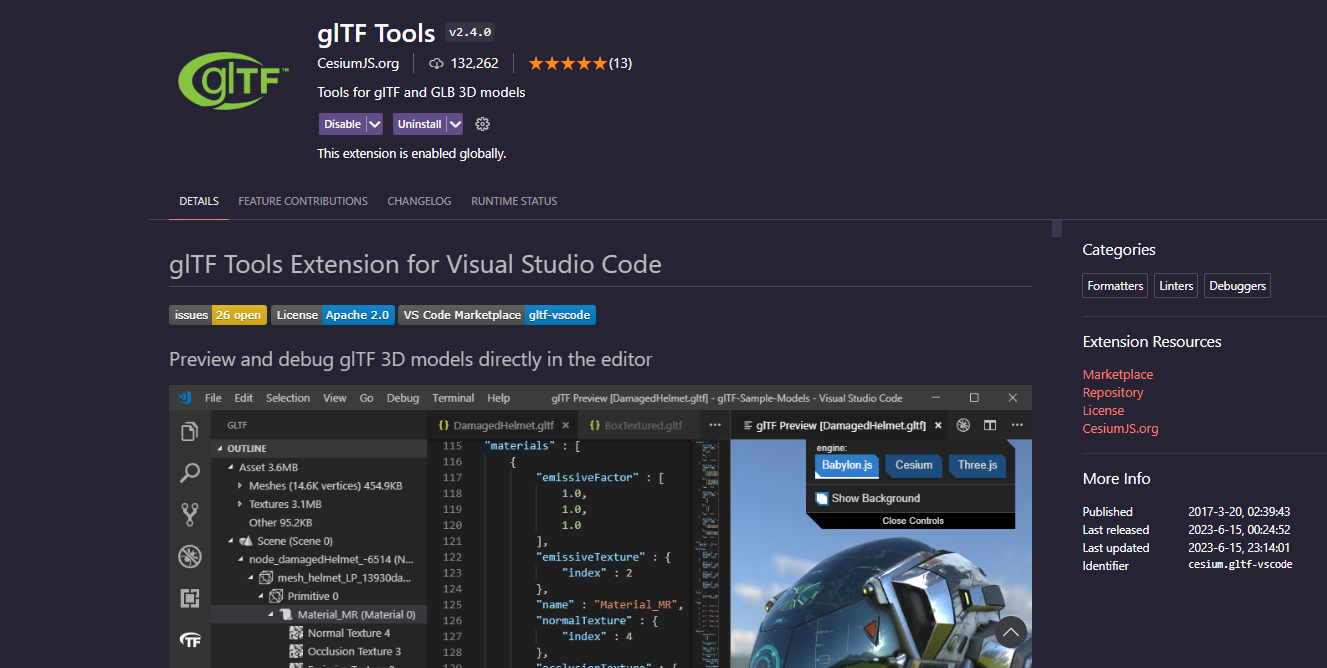 gltf Tools extension in Visual Studio Code
Completed setup for Three.js in React.js
The dependencies in the package.json file of our React.js application now appear as follows:
"dependencies": {
    "@react-three/drei": "^9.80.2",
    "@react-three/fiber": "^8.13.6",
    "@testing-library/jest-dom": "^5.17.0",
    "@testing-library/react": "^13.4.0",
    "@testing-library/user-event": "^13.5.0",
    "react": "^18.2.0",
    "react-dom": "^18.2.0",
    "react-scripts": "5.0.1",
    "three": "^0.155.0",
    "web-vitals": "^2.1.4"
  },
These dependencies are sufficient for accomplishing a variety of tasks with Three.js in a React.js environment. Of course, you can incorporate any additional libraries you may desire for purposes beyond Three.js integration.
In addition to this, I have also made the code from this tutorial available on GitHub. This will allow you to quickly access the information without having to scroll through the entire article.
🔨 How to Create a Blender Model
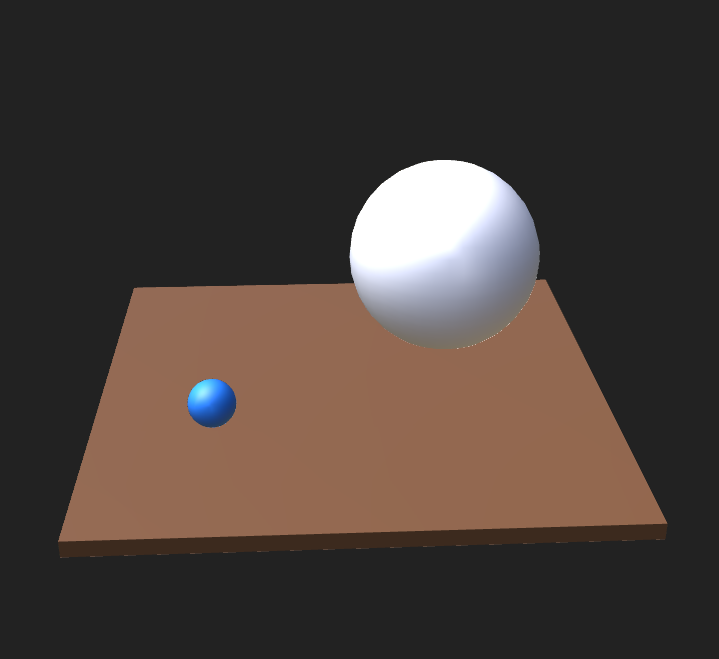
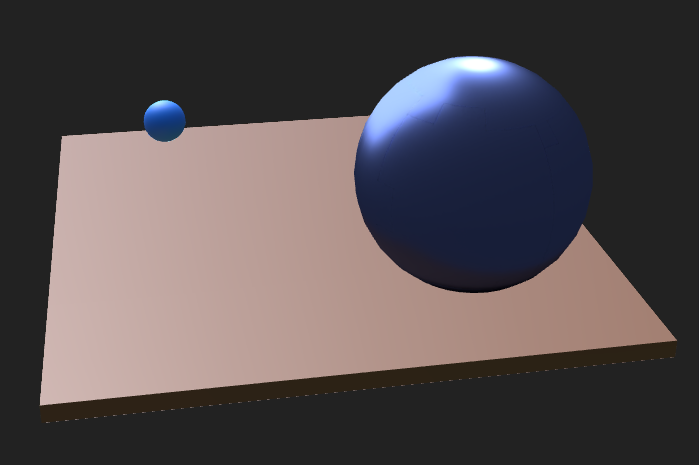
To begin, our initial task involves creating a Blender model that will then be integrated into our React.js application. For this stage, let's consider a scene in the Layout tab where we've got three objects: two spheres and one plane. You can add such objects with the Shift + A shortcut in Blender.
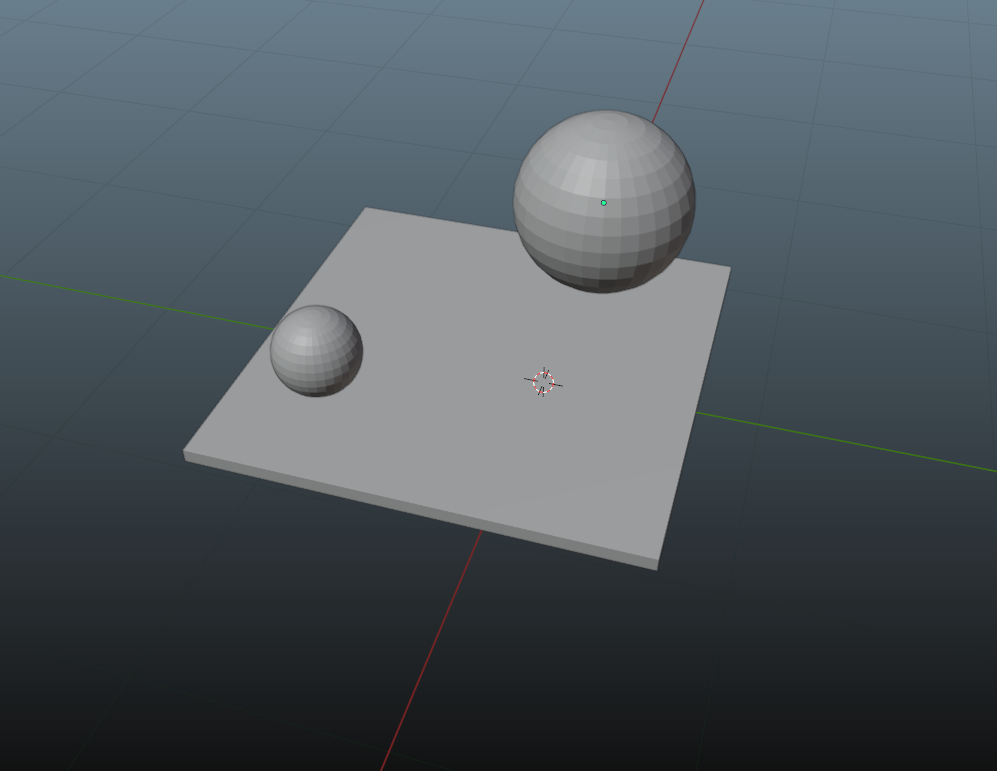 Blender scene with two spheres and one plane in the Layout tab
This composition includes just a plane and two spheres, with no additional details. Of course, you can work on more elaborate scene and model designs according to your preferences.
But for the purpose of illustrating the fundamental process of incorporating your custom Blender models into React.js, this basic example will serve us just fine.
How to add animations to the model
Now, our focus shifts to introducing basic animations to all three objects within this Blender scene. These animations can facilitate movement, rotation, or even adjustments in scale for the objects, enabling dynamic transformations.
In order to add animations in Blender for your objects, you can switch to the Animation tab, next to the Shading and Rendering tab.
In the Animation tab, you can add points to a certain frame. For instance, if you want to shift a sphere a bit to the left, begin by adding a starting keyframe (right-click on the object, choose "Insert Keyframe," then pick "Location").
Afterward, move ahead a few frames on the object's animation timeline, adjust the object's position, and repeat the same process. This way, you'll have two keyframes: the initial one and the new position.
Remember, this motion is in one direction. If you want to repeat the animation, it will move to the new location and then return to its initial position with a jump.
To make the movement smoother, you can copy the initial keyframe and insert it at the end. This will make the object move back with a smooth motion after reaching the new location. This is also how I set up the keyframes in our Blender model.
Of course, you can add more keyframes to make more complex animations. This is just a basic introduction to starting with Blender animations. Like many aspects of Blender, there's a lot more to explore and learn.
 Adding animations to all three objects in the Animation tab
In this context, it's not necessary to have a thorough understanding of the specifics of these animations we added here. So, you don't really need to know to which exact position the first sphere is being moved through the animation.
The key point is to acknowledge their presence, as they will be integrated into our React.js application at a later stage so we can activate them in the browser.
How to add colors
Moving forward, we'll add some simple colors for the small sphere and the underlying plane, which you can do within the Shading tab, for example.
For basic colors, you can also go to the Material Properties section of the object (right-click on the object, then choose the second-to-last category at the bottom). But I want to focus on a specific situation you might encounter with your models later on. Therefore, I'll exclusively use the Shading tab for setting object colors in this tutorial.
In the Shading tab, you can add nodes at the bottom of the screen. These nodes can modify the color and texture of an object, among other things. You'll also find Vector and Shader nodes that, when combined, can create unique visuals for your objects.
All these adjustments apply to a specific material. So, if you want the same visual for different objects, you can simply apply the same material to them.
The Principled BSDF and Material Output nodes are initially generated when we open the Shading tab to look up on of our object's material for the first time. Both nodes are pretty much the basic case.
The Principled BSDF has a lot of settings you can play around with. In our case we just want to change the Base Color property to a blue color.
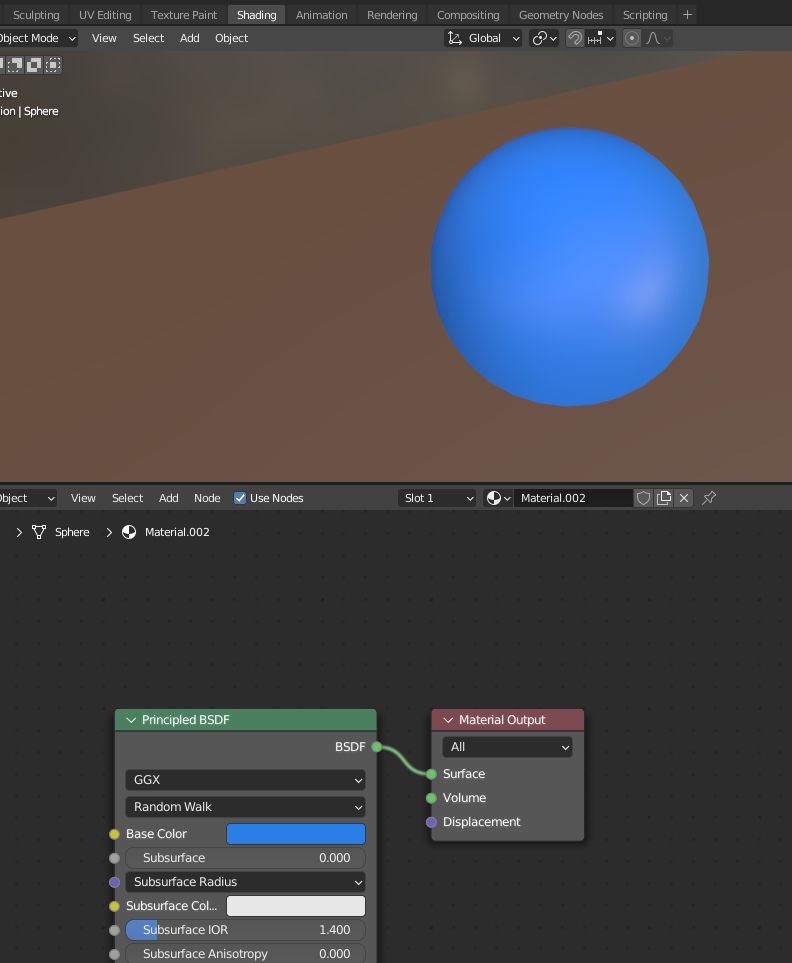 Material of one sphere where we just adjust the
 Base Color within the Principled BSDF node
For the larger sphere, a similar material application is used. But, in contrast to the Principled BSDF node, we'll use the Glossy BSDF node which is such a node from the Shader category. This will help us recognize a possible issue that you might come across when designing a Blender model for your React.js application – which you will see later on.
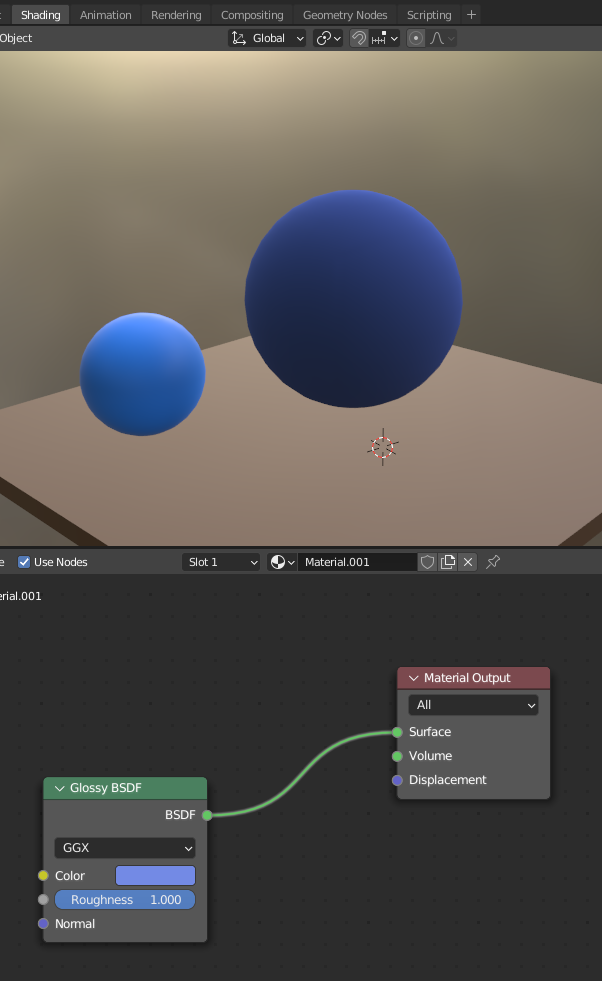 Using the
 Glossy BSDF node to add a material to the large sphere
Once we've done this, we're ready to export our Blender model. Note that this version is considerably simplified. You can work on more detailed model designs tailored to your preferences. Still, the overall workflow remains similar.
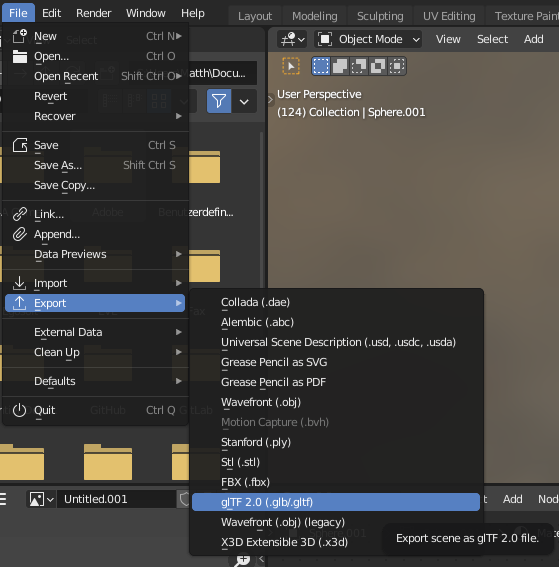
How to export the model
To export the model, we need to generate a .glb/.gltf file. This is crucial as Three.js expects particular file formats for compatibility, and in this instance, a .glb or .gltf file aligns with the library's requirements.
So, once you've finished creating your model with objects, animations, colors, and more, you can do the following:
- Click on the File tab located at the top left corner.
- Choose Export from the options that appear. Now, a variety of export formats will be shown.
- If you plan to use your model with Three.js in your application, you need to pick the
glTF 2.0 (.glb/.gltf)option, like I mentioned earlier.
After selecting this option, a new window will pop up. This window lets you pick the folder where you want to save your file.
On the right side of this window, there are additional choices. You can decide which specific objects you want to export, for instance. In most situations, the default settings should work well. Just remember that you can adjust these settings to your liking if necessary.
 Remember to export with the
 glTF 2.0 (.glb/.gltf) format.
How to visualize the exported model
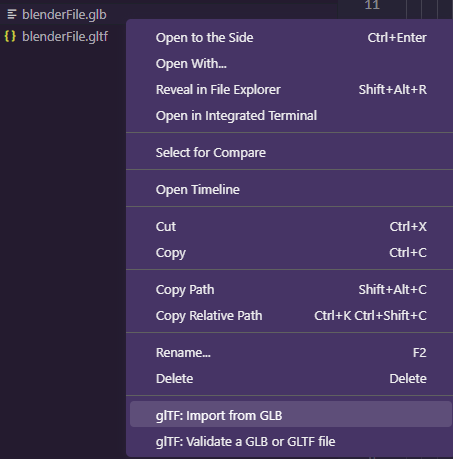
Next, let's transition to Visual Studio Code and navigate to the folder where we've stored our exported file.
Within this directory, you'll find a .glb file. Referring back to the glTF Tools extension setup from earlier, you can simply right-click on the .glb file in order to find two additional options positioned at the bottom, called glTF: Import from GLB and glTF: Validate a GLB or GLTF file.
In this scenario, we'll opt for the glTF: Import from GLB option. This action will generate a .gltf file in the same folder, in our case blenderFile.gltf.
 Generating a
 .gltf file from the original .glb file we exported in Blender with the glTF Tools extension
We've chosen this approach to bring enhanced accessibility to the .gltf file, enabling direct viewing within Visual Studio Code through the glTF Tools extension. This can be quite helpful to check on your file prior to its actual implementation.
If we access the newly created .gltf file, we can observe a bunch of information based on the Blender model. It's important to note that the specifics could differ in your case, as they're tailored to reflect the attributes of the objects and scenes within your Blender project.
If we look at the upper-right corner, there is a symbol that looks like a cube with a cone next to it. By clicking on this symbol, you can seamlessly preview your Blender scene directly within your IDE. This functionality is exclusively accessible for the .gltf file and not applicable to the .glb file in this case.
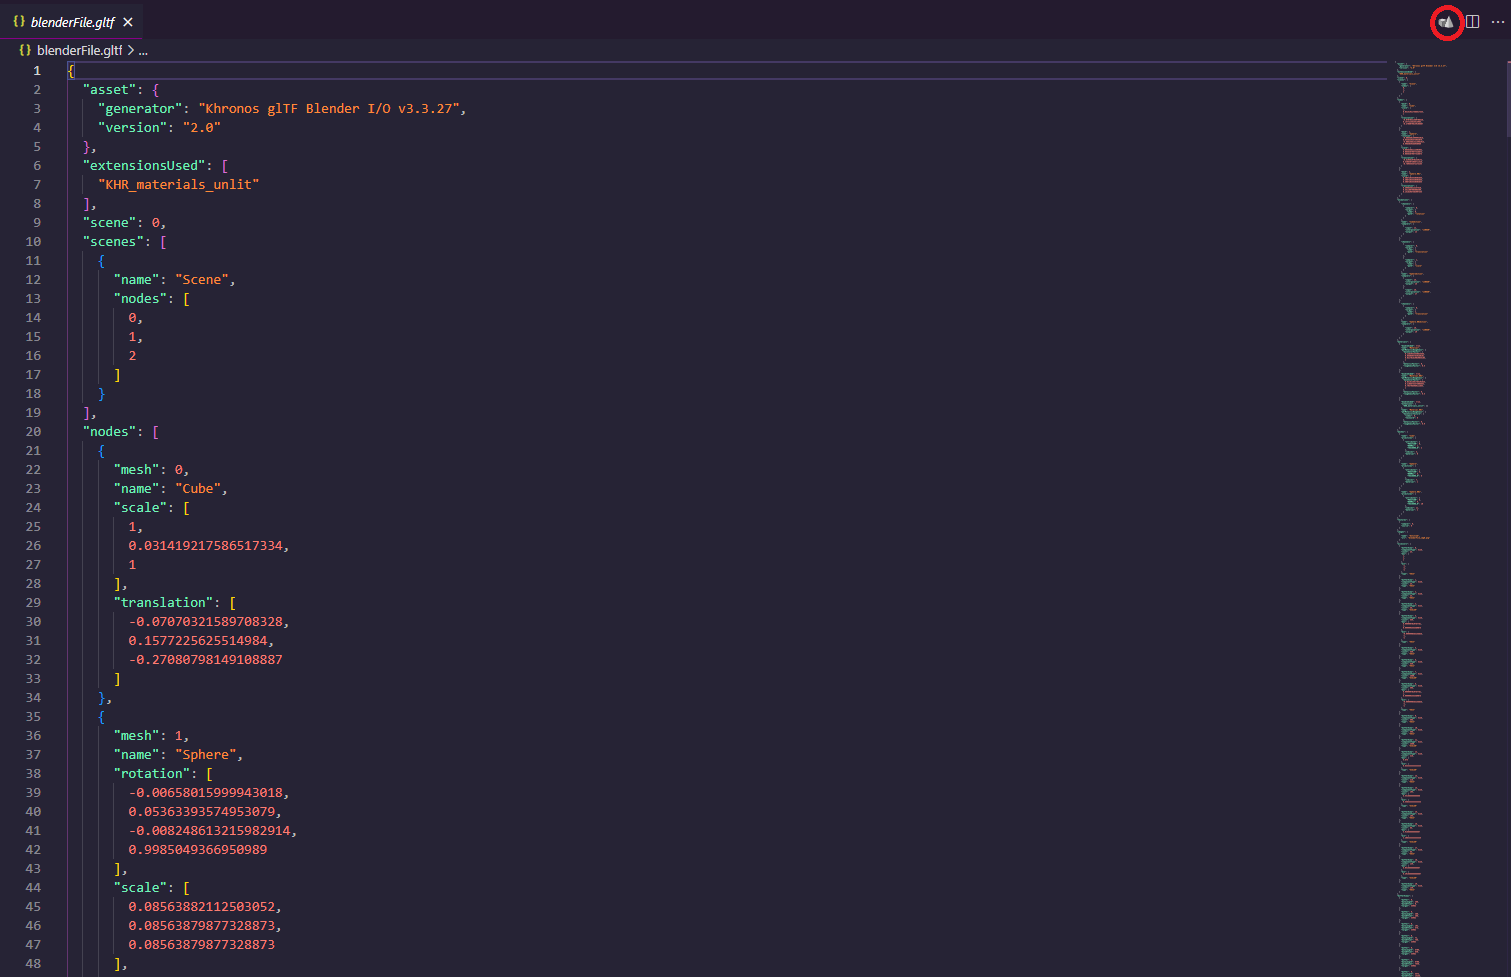 The newly created
 .gltf file with the option to view the model directly in Visual Studio Code (in the upper-right corner, circled in red)
It's worth noting that you don't have to do this through the glTF Tools extension. Alternatively, various websites allow you to upload your file for visualization. But I've personally found this in-IDE approach to be especially convenient. It centralizes the process, enabling you to assess your file's integrity before actually implementing it.
If you find any errors, this practice lets you preemptively find out whether the issue is based on a problematic file export or just an implementation oversight within your React.js application. Consequently, I wholeheartedly recommend evaluating your model file following its export from Blender.
 Viewing the Blender model with glTF Tools in Visual Studio Code
By using the glTF Tools extension to view our Blender model in Visual Studio Code, we can see that all three objects are correctly recognized. Both the small sphere and the plane are shown in their intended colors.
But the large sphere doesn't have the expected color assigned and just appears with a default white color instead.
This discrepancy raises the question: what led to this anomaly? It's circumstances like this that demonstrate how useful it is to preview your model before integrating it into your React.js application.
By scrutinizing your model at this stage, you can affirm that the issue originates from the Blender model itself rather than the implementation process, given that we haven't done any implementation yet.
This pre-implementation assessment proves to be handy and enables you to diagnose and address potential complications before proceeding with the implementation process in React.js.
✏️ Texture Baking for Procedural Materials
In a nutshell, Blender provides the flexibility to employ procedural nodes for your materials. While these nodes function seamlessly within Blender, they are not directly compatible with other game engines or software frameworks such as Three.js.
To learn more, consider watching the following video. In just 10 minutes, it demonstrates the process of texture baking, which effectively resolves the issue at hand.
Personally, when confronted with this challenge and initially uncertain about its nature, I found this video to be a valuable resource for gaining deeper insights into the subject matter.
In our specific scenario, while we might not encounter as complex a situation as seen in the video, we are still faced with the use of nodes that lack direct compatibility with various software tools.
Next, we'll briefly walk through the steps mentioned in the video. However, if you're interested in delving deeper into this process, I highly recommend watching the video.
How to create an image texture node
To start, in the Shading tab for the material containing the Glossy BSDF node, we'll introduce an Image Texture node and connect it to a new image (by click on New).
We'll leave the settings at their default values, which means a width and height of 1024px. Using larger values would considerably extend the processing time we're going to face. Still, it's important to note that a larger texture can offer more detail and an overall improved appearance.
In our current situation, we're aiming for a quick process. But for more significant projects, visual quality might be crucial. In such cases, opting for a higher resolution could be desirable.
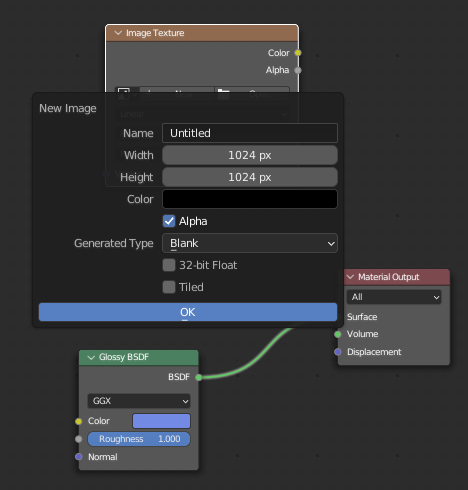 Creating an
 Image Texture node and assigning a new image to it with default settings
How to apply the Smart UV Project process
Next, we need to employ the Smart UV Project option located in the UV Editing tab. Essentially, this action unwraps the faces of the particular object onto a texture.
This process enables us to specify which parts of the texture should be colored and modified as soon as we are back in the Shading tab. To make this process effective, we must select all the faces of the large sphere.
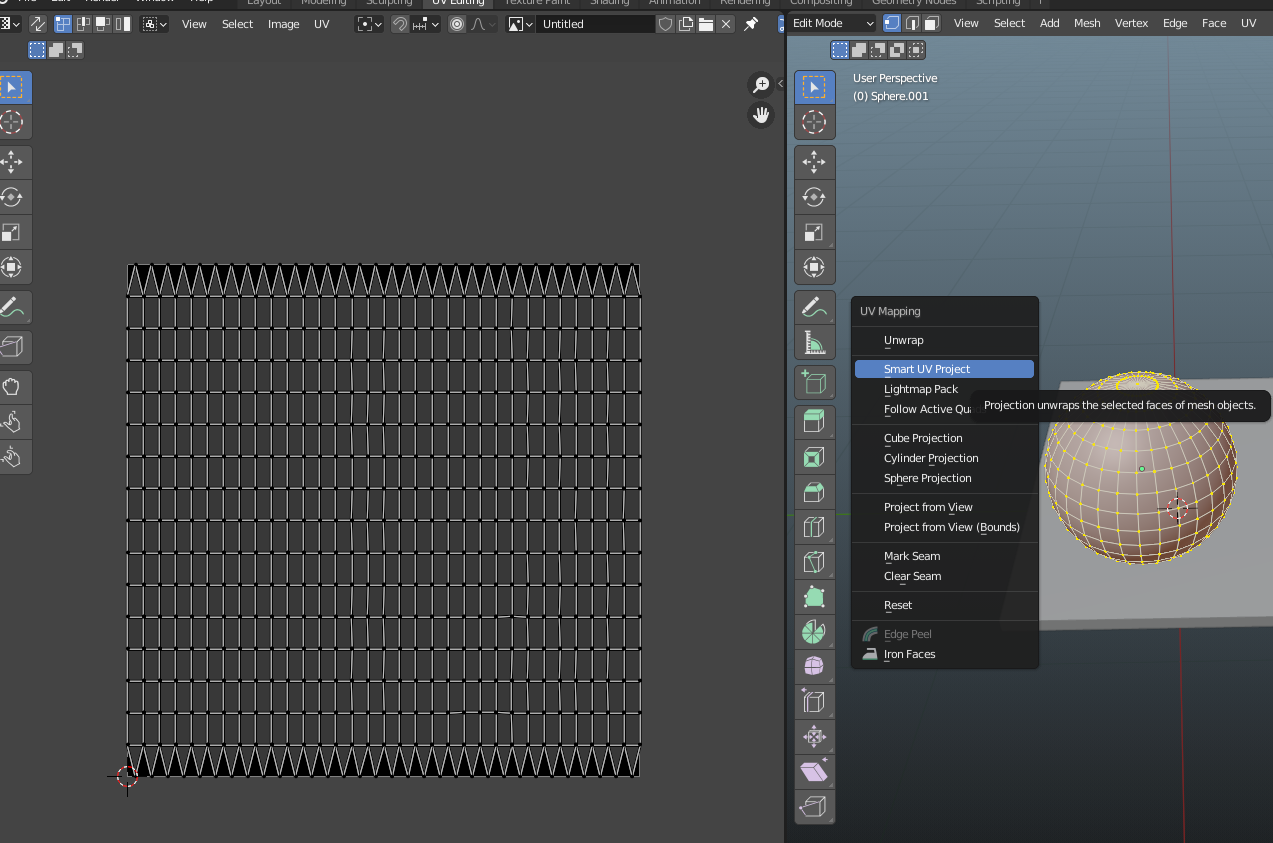 Selecting all faces of the object in the UV Editing tab and applying
 Smart UV Project on it
Once we've finished this step and utilized the default settings for the Smart UV Project procedure, the image on the left —previously featuring a grid— will now display the shapes of the sphere we applied this process to. In our situation, it seems like the texture captured various angles of our sphere.
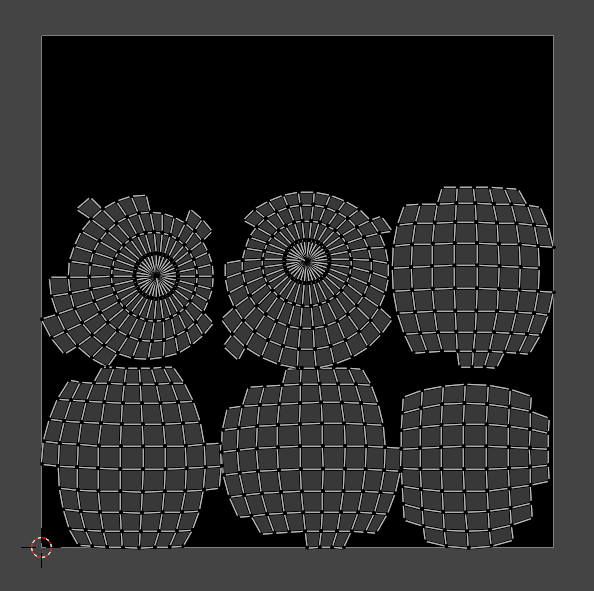 The texture after
 Smart UV Project
Depending on the specific object, you may need to fine-tune the settings presented after clicking the Smart UV Project button. If you encounter challenges with a particular object, the video I shared earlier can give you additional guidance on this aspect.
Generally, to mitigate issues, you should optimize your object layout during its creation phase. Avoiding the introduction of excessive edges in specific locations can prevent problems like clipping, for instance.
The Bake process
Now, let's return to the Shading tab, where we'll access the Render Properties on the right side (represented by the small screen or TV symbol). If not already selected, pick Cycles as your Render Engine. Then navigate to the Bake category, which is located below the Performance category.
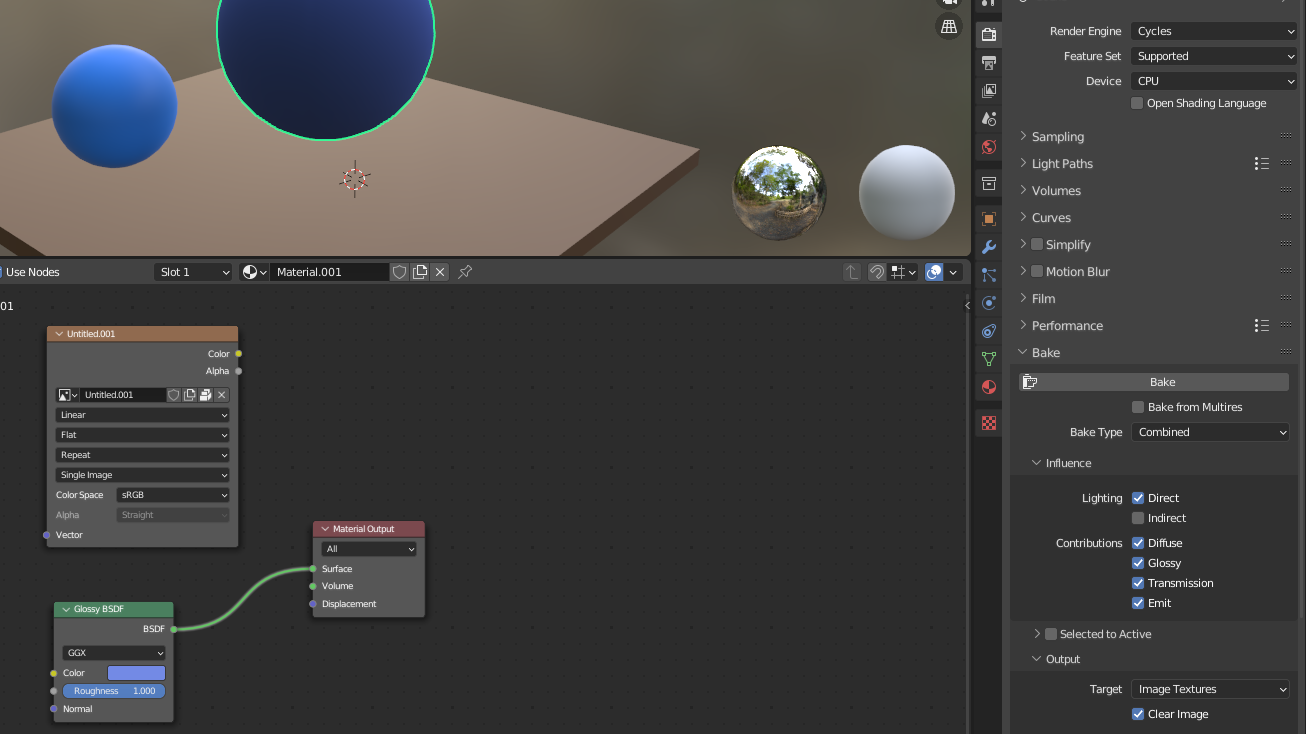
Bake option in the Shading tab within the Render Properties
With the existing default settings, you can proceed by clicking the Bake button while ensuring that both the Image Texture node and the large sphere are selected.
Keep in mind that I integrated a Sun light into my scene, as this bake process takes the scene's lighting into account. Without sufficient lighting, the result might appear excessively dark.
After a period of processing (which might be more time-consuming if you've employed larger dimensions for the Image Texture node's image), the baking process will finish. This results in the texture being applied to the image from the Image Texture. Instead of obtaining the texture from the Shader node named Glossy BSDF, we now have access to it through a regular "normal" image texture.
Then we can establish a connection from the Image Texture node to the Material Output node, thereby successfully implementing our material. At this stage, there isn't a significant difference compared to the previous method where we had the Principled BSDF node connected to the Surface input of the Material Output node.
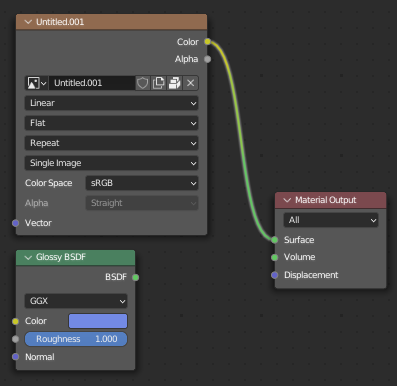
Image Texture node with the "baked" texture is connected with the Material Output node instead of the Glossy BSDF node
How to see the final result
Now, we can export the file again, repeat the same process from before in our IDE with glTF Tools and view the .gltf file with the extension. Upon examining the outcome, you might notice that it's not an exact match to the version we had using the Glossy BSDF node in Blender. This difference can be primarily attributed to the lighting conditions in the Blender scene.
Bear in mind that the approach I've outlined isn't the typical usage for the baking process, since in this case you could also just have picked a similar base color with the Principled BSDF node and would achieve pretty much the same solution, for example.
 Finalized view with glTF Tools, including the "baked" texture for the large sphere
I introduced the baking process based on personal experience. There were instances where I encountered a scenario where materials appeared differently in Blender compared to when implemented them in a React.js application with Three.js. This situation prompted me to explore the concept of baking, which turned out to be a helpful solution.
To summarize, if you find yourself facing a scenario where your materials don't appear as expected in your React.js application with Three.js, considering the baking process and researching this topic can provide valuable insights. This can be particularly beneficial for people who are new to Blender.
✒️ How to Implement the Blender model in the React.js Application
To implement the Blender file, we can use a really useful shortcut (source: https://github.com/pmndrs/gltfjsx):
npx gltfjsx public/blenderFileName.glb
It's important to note that you need to store your Blender file within the public folder of your React.js application for this step. It's also worth highlighting that you need React Three Drei to use this helper. So in our case, we can directly use this shortcut without the need for any additional preparations.
Upon executing this shortcut, we are presented with the following file:
/*
Auto-generated by: https://github.com/pmndrs/gltfjsx
Command: npx gltfjsx@6.1.4 public/blenderStuff/blenderFile.glb
*/

import { useLayoutEffect, useRef } from "react";
import { useGLTF, useAnimations } from "@react-three/drei";

export function Model(props) {
  const group = useRef();
  const { nodes, materials, animations } = useGLTF(
    "./blenderStuff/blenderFile.glb"
  );
  const { actions } = useAnimations(animations, group);

  return (
    <group ref={group} {...props} dispose={null}>
      <group name="Scene">
        <mesh
          name="Cube"
          geometry={nodes.Cube.geometry}
          material={materials.Material}
          position={[-0.07, 0.16, -0.27]}
          scale={[1, 0.03, 1]}
        />
        <mesh
          name="Sphere"
          geometry={nodes.Sphere.geometry}
          material={materials["Material.002"]}
          position={[-0.62, 0.43, -0.79]}
          rotation={[-0.01, 0.11, -0.02]}
          scale={0.09}
        />
        <mesh
          name="Sphere001"
          geometry={nodes.Sphere001.geometry}
          material={materials["Material.001"]}
          position={[0.4, 0.55, 0.15]}
          scale={0.41}
        />
      </group>
    </group>
  );
}

useGLTF.preload("./blenderStuff/blenderFile.glb");
At first glance, you can see that this process has added many elements, so we basically don't need to add much on our own.
An important aspect to configure is the path within the useGLTF hook. In my instance, the accurate path to incorporate is ./blenderStuff/blenderFile.glb (this applies to useGLTF.preload() as well). This is because I created a sub-folder named blenderStuff within my public directory.
How to add a Canvas wrapper and other components
With this configuration in place, we're now ready to use the Model component. But to effectively integrate this Model component into our desired location, we need to make some adjustments in the parent component.
In my case, I've opted to implement it within the main App.js file. And I've assigned a height of 100vh to the App's CSS class to ensure the desired display.
import "./App.css";
import { Model } from "./BlenderFile";
import { Canvas } from "@react-three/fiber";
import { OrbitControls } from "@react-three/drei";

function App() {
  return (
    <div className="App">
      <Canvas camera={{ fov: 64, position: [-2, 2, 0] }}>
        <ambientLight intensity={5} />
        <OrbitControls enableZoom={true} />
        <Model />
      </Canvas>
    </div>
  );
}

export default App;
Generally speaking, you'll need a component to encapsulate all the Three.js related elements. Within the Canvas component, there's an opportunity to configure various settings. In my specific instance, I'm adjusting the initial camera position.
The light for the component plays a crucial role. In our case we made use of ambientLight which will add a light to the whole scene. Without adequate lighting, your scene might appear exceedingly dark or even entirely black despite the presence of object colors. You can also use additional light sources like the spotLight component.
The OrbitControls component, accessible from the Drei helper library, enhances your interactivity by enabling scrolling and rotation within the model right within the browser. This single line of code substantially improves user interactivity options.
Remember that your Canvas component can accommodate multiple models. You can also selectively apply components like OrbitControls to specific Blender models, thereby tailoring their behavior.
To do this, you'll need to build a parent component for each scene you want to make to be integrated within the Canvas. Within each new parent component, incorporate your Blender model component, along with any supplementary helper components you want to add.
This approach proves particularly advantageous when distinct models require different lighting or unique camera positions, for example.
How to implement the animations
At this point, we've established a functional Three.js Canvas environment, featuring our Blender model. But it's important to remember that we've also introduced basic animations, which are not yet operational.
To tackle this, we can leverage the pre-implemented useAnimations hook.
  const { actions, names } = useAnimations(animations, group);

  useLayoutEffect(() => {
    names.forEach((animation) => {
      actions?.[animation]?.play();
    });
  }, [actions, names]);
By incorporating this implementation, all animations associated with this Blender model will start playing upon the rendering of the page. This behavior also includes an indefinite loop for each animation.
📄 Additional Information
While this tutorial primarily focused on integrating a Blender model into a React.js application using Three.js, there's a realm of untapped potential within Three.js that we didn't cover.
Although we didn't use it in this basic example, you can introduce Post Processing to your Three.js models within React.js. The React Three Postprocessing library serves as a valuable tool in this regard. It lets you elevate your Three.js scenes with sophisticated effects like Bloom or Noise effects, which can add a more advanced dimension to your visualizations.
Also, when working on future Three.js projects, consider exploring the React Spring library which integrates well with React Three Fiber. React Spring provides the opportunity to incorporate custom animations within your Three.js scenes, on top of any animations directly integrated within Blender.
For instance, you could make a specific object within your scene get larger or smaller upon clicking it. As with other aspects of Three.js, this aspect might enhance interactivity and might be worth your time to get into.
By the way, if you find that your frames are running at a lower rate, consider toggling Hardware Acceleration within your browser settings to potentially improve performance.
📋 Wrap-up
At this point, we've successfully crafted a Blender model with animations and materials. Afterwards we integrated it into our React.js application using React Three Fiber.
Although the example we looked at here was quite basic, the integration approach remains the same for more complex Blender models. The fundamental functions of Three.js can be combined with supplementary helpers to enhance your scenes.
In addition to Post Processing, additional animations or also specific Blender materials, aspects like cameras and lights often are the most important when aiming to enhance the visual impact of your Blender models within Three.js scenes.