

Ghost CMS is a popular content management system that many devs and companies use to host their blogs.
It has many features and an editor that's highly optimized for writing. You can even build different themes using handlebars.js.
But if you don't know Handlebars, learning it can be a long and difficult process. If you are already a Next.js developer and you don't know Handlebars, creating a new theme for your Ghost-based site can be tough.
In the article, I will teach you how to use Ghost CMS as a backend and Next.js as a frontend. I will guide you through everything related to Nextjs 13 app directory and the Ghost CMS API.
Next.js 13 team currently working on the experimental app folder. Next uses file-based routing with the page directory. The new app directory is based on file system routing and provides additional functionality like layouts, error handling, component loading, and server-side and client-side rending out of the box.
All the code is available on GitHub. You can also check out the live demo website.
Table of Contents
- Why Use Next.js for the Front End and Not a Ghost CMS Theme?
- Project Requirements
- How to Set Up Ghost CMS
- How to Set Up Ghost CMS with the Cloud
- How to Get the Blog Template
- How to Set Up Next.js
- What to know before following this tutorial
- Folder Structure
- How to Configure Ghost CMS and Next.js
- Understanding the Next.js 13 App Folder
- Demo Data for the Project
- How to Build the Blog
- How to Build the Header
- How to Build the Footer
- How to Build the Layout
- How to Build the Homepage
- How to Build the Reading Page
- How to Build the Tag Page
- How to Build the Author Page
- How to Build Single Pages
- How to Handle Pagination
- Next.js SEO
- How to Enable Search
- Error Handling
- How to Rebuild Your Static Site with Webhooks
- Conclusion
In this article, we cover the basics of Next's experimental app directory. Then I'll teach you how to step up Next and Ghost CMS locally and how to integrate Ghost with Next. Lastly, I'll show you how to consume data from the backend (via theGhost CMS API ) and show it on the site with React.js.
Why Use Next.js for the Front End and Not a Ghost CMS Theme?
There are a few reasons why you might consider using Next as the frontend framework for your blog:
- Ghost CMS doesn't generate static builds, but Next.js does.
- You get increased website speed and performance with Next.js and it now provides built-in SEO support and other optimizations. Ghost doesn't have some of these features.
- For React developers, it is easy to build a new blog with Next (since Next is React-based), and you do not need to learn additional tools.
- You'll find a few service providers available for Ghost to deploy a Ghost blog with one click. Most of them come with a paid plan while one or two offer a free plan (but these tend to have time and feature limitations). For Next.js, many players are available in the market.
Basically, when it comes to static builds and website performance, Ghost doesn't perform as well in either case. The alternative is to use a frontend platform like Next, React, Angular, or Vue.
I chose Next because it's a highly in-demand and popular React framework, and plenty of tools and libraries are built around it.
Note that the current project is not ready for TypeScript, but I'm working on it. Because of this I disabled TypeScript during build time like this:
/** @type {import('next').NextConfig} */
const nextConfig = {
  experimental: {
    appDir: true,
  },

  typescript: {
    ignoreBuildErrors: false,
  },

}

module.exports = nextConfig
Project Requirements
To follow along with this tutorial, you'll need basic knowledge of the following packages:
- PNPM is a Node.js package manager similar to npm or yarn (you can use any of them that you prefer).
- TypeScript helps you write type-safe code in JavaScript, and can also help improve productivity. It is not required, though. You can use JavaScript in your project.
- React.js is a free and open-source front-end JavaScript library for building user interfaces with class and function components.
- Next.js 13 (app) is based on React and it provides additional functionality like routing, error handling, and layouts.
- Ghost CMS API is an open-source content management system (CMS) similar to WordPress. Ghost is specifically designed and built for blogging. In this project, we'll Ghost as the backend and Next as the frontend. For communication between the backend and frontend development, we'll use the Ghost CMS API.
- Tailwind CSS is an open source CSS-based framework similar to Bootstrap. We'll use Tailwind CSS to design our blog website.
How to Set Up Ghost CMS
The next step is installing Ghost locally, which you can do with one command. First, you need to install ghost-cli globally with pnpm, yarn, or npm.
pnpm add -g ghost-cli@latest

# or

yarn global add ghost-cli@latest

# or

npm install ghost-cli@latest -g
After installing the Ghost CLI, you can create a new Ghost blog project locally with the following command:
ghost install local
After the blog installation is finished, you can start your local development server with the ghost start command and your local development serve on http://localhost:2368/ghost.
Additional Ghost CLI Commands
There are a few additional commands that are helpful when using the Ghost CLI:
ghost start: start your server.ghost stop: stop your running Ghost server.ghost help: check the available list of commands.
Note:
Make sure your current installation directory is empty before installation. Currently, you are installing Ghost in development mode. For production, you won't follow the same steps.
How to Set Up Ghost CMS with the Cloud
If you run into any problems with Ghost local installation, or maybe it's too complicated and you do not have enough space on your drive, you can use a tool like digital press or any other cloud service like GCP or AWS, Digital Ocean, and so on.
I like digital press because it comes with a free plan. Other cloud services do not provide that, which is why I suggest it.
How to Get the Blog Template
Creating a new blog from scratch can be tough. In this tutorial, we'll use a pre-build template from the frontend web. All templates have an open-source MIT license, so you can use them, and you don't need to set up everything.
I picked the Open-blog template from the frontend web.
How to Set Up Next.js
Setting up Next is one of the main parts of this tutorial, where you'll spend time and energy coding, debugging, and deploying the site.
Here are the commands to run depending on whether you're using npx, yarn, or pnpm:
npx create-next-app@latest --experimental-app

# or

yarn create next-app --experimental-app

# or

pnpm create next-app --experimental-app
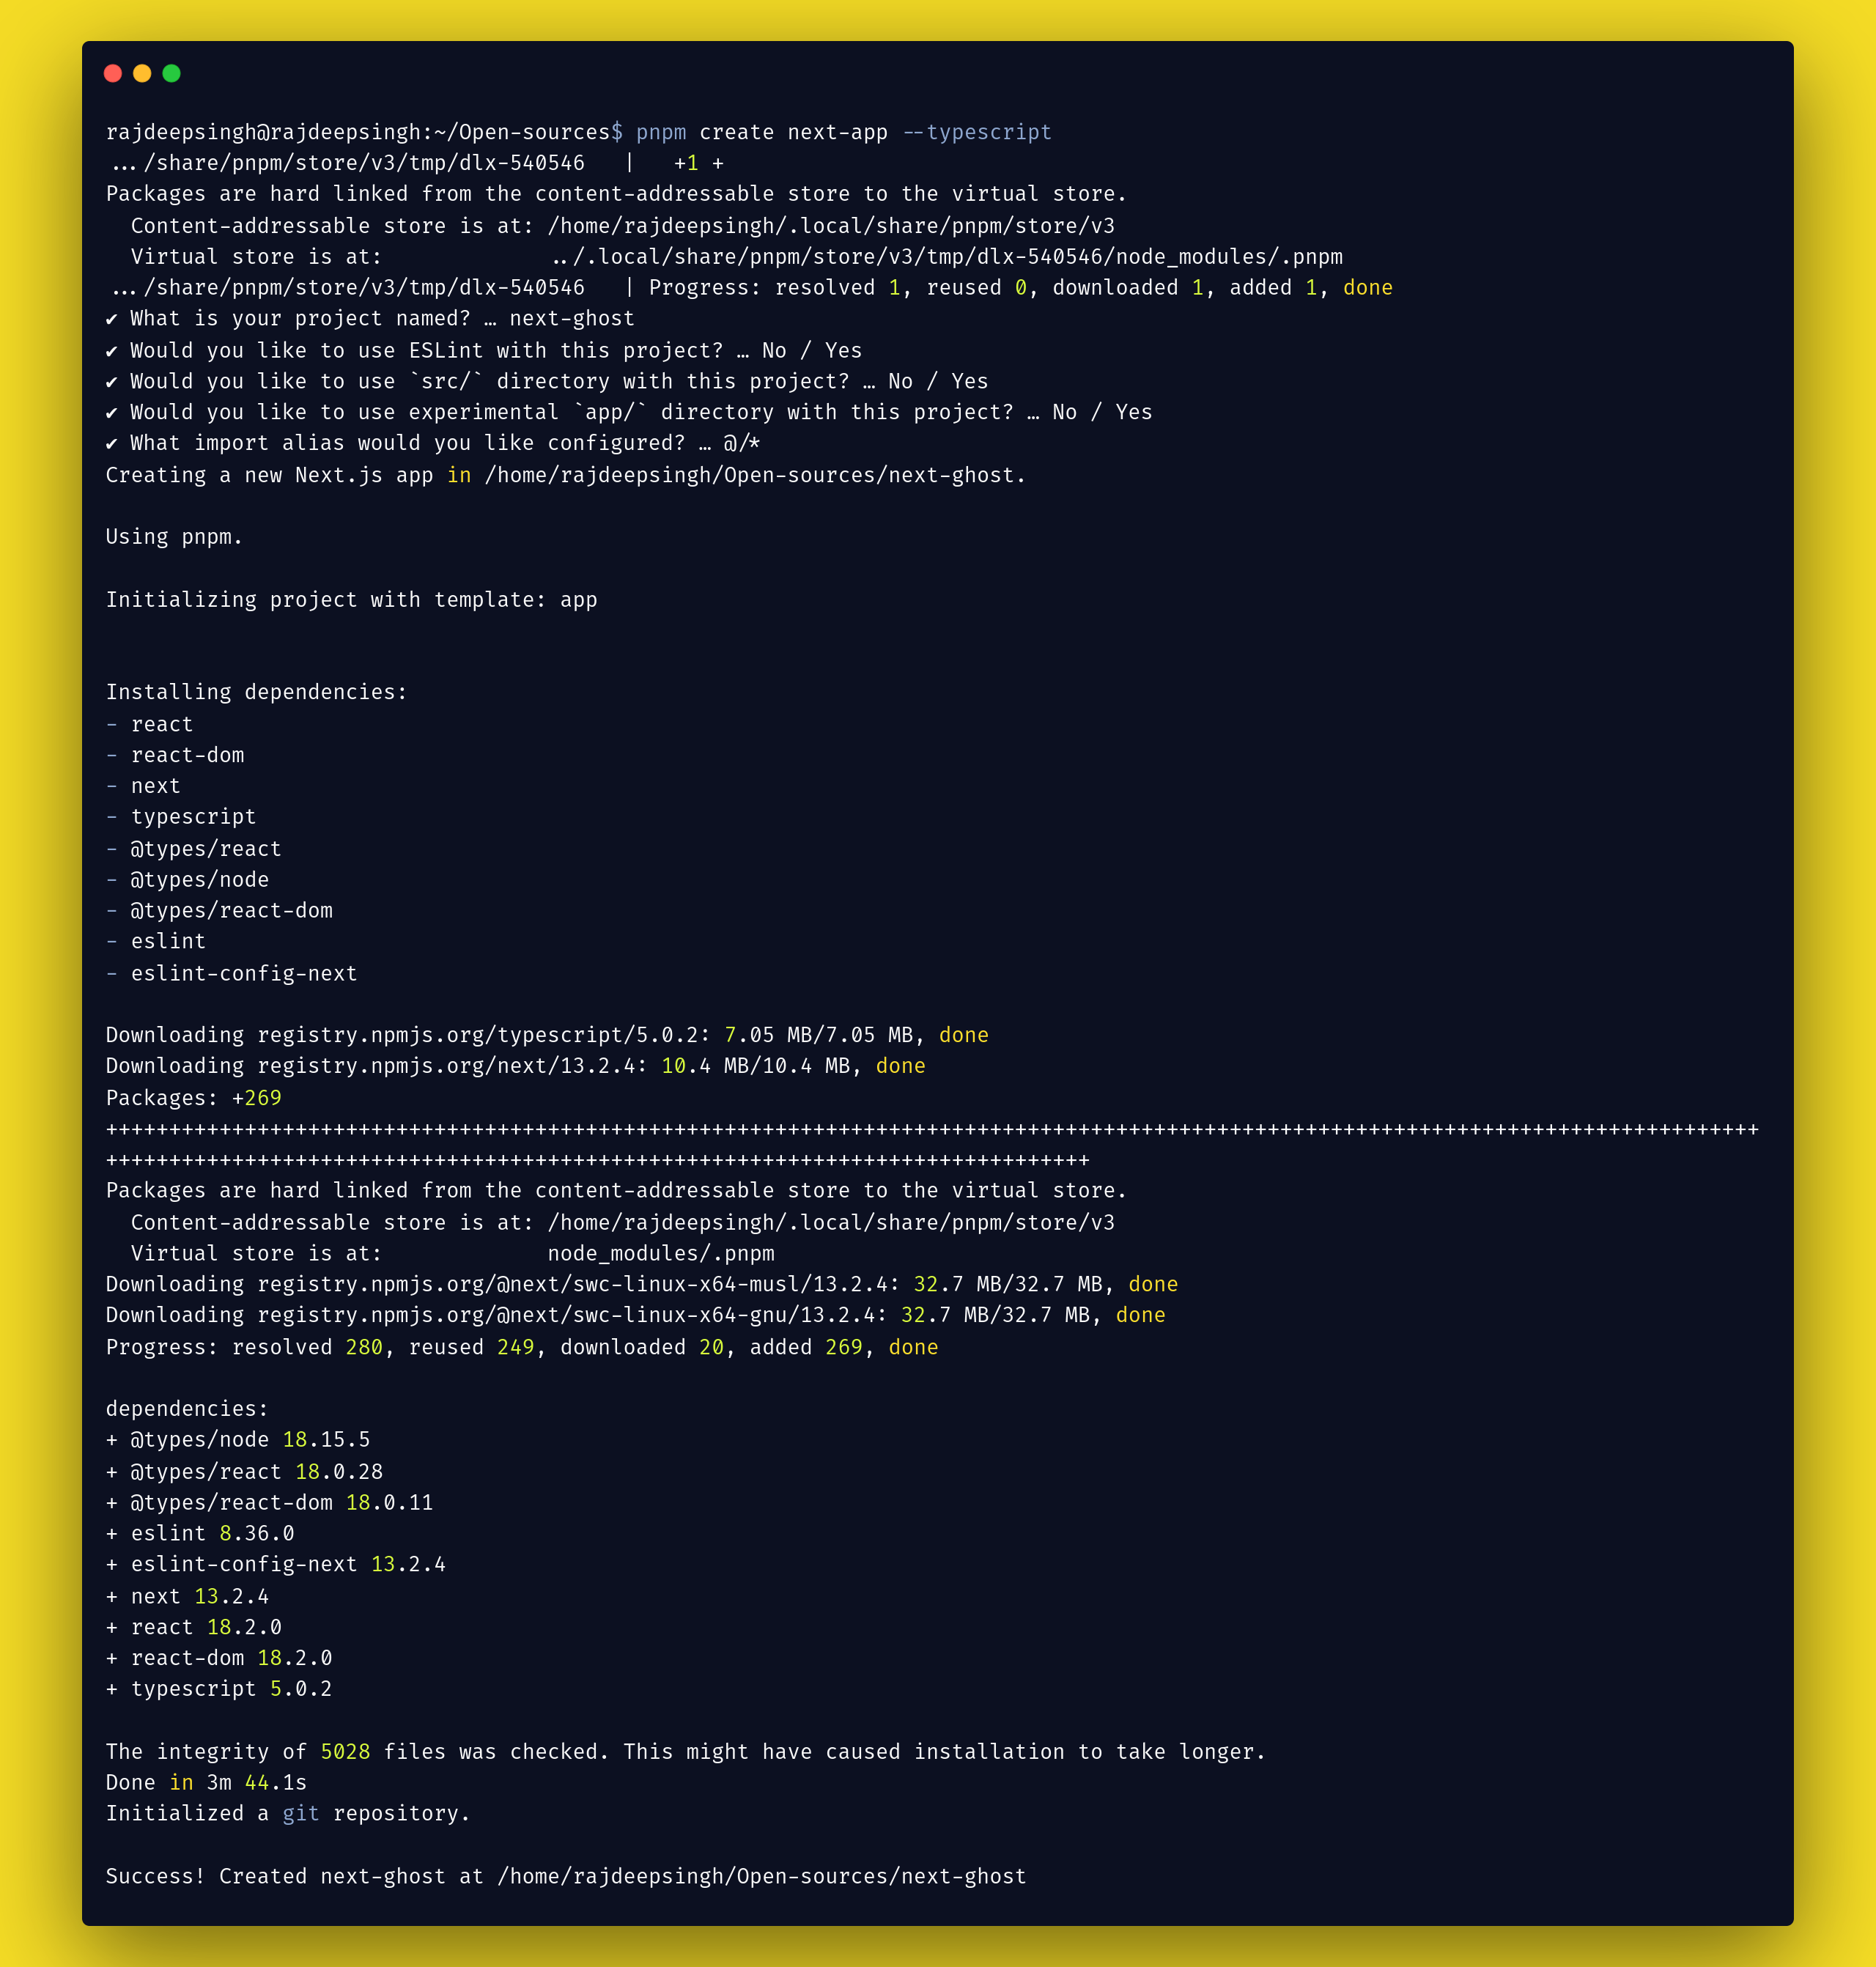 create a new nextjs app.
After completing the installation process, we must install some additional Node packages for the blog.
These Node packages can help you speed up your development process. Make sure to install all the below packages to follow along with this guide:
Node packages to install:
pnpm add @tryghost/content-api(required)pnpm add @types/tryghost__content-api(required by TypeScript)pnpm add tailwindcss postcss autoprefixerpnpm add @tailwindcss/typographypnpm add react-iconspnpm add date-fnspnpm add next-themespnpm add @radix-ui/react-popover
Here's what each of these packages does:
- @tryghost/content-api package is a Ghost JavaScript Client Library for fetching content API data.
- @types/tryghost__content-api package contains type definitions for @tryghost/content-api.
- TailwindCSS, autoprefixer, and PostCSS are packages required for Tailwind CSS.
- @tailwindcss/typography package for handling dynamic typography with Tailwind CSS.
- The next-themes package enables themes like switching from dark to light mode on your site.
- The react-icons package provides lots of SVG icons for the project. This way, you do not need to download them manually.
- @radix-ui/react-popover is part of the Radix UI ecosystem. I choose the Radix popover component for the design of the search component on the site.
- date-fns package helps convert your
published_atdate into a different date format.
What to Know Before Following This Tutorial
Before building this project, I highly recommend watching some tutorials on YouTube (especially if you're a beginner with Next.js). These will help you understand some basics about the Next.js experimental app folder.
Every video explains the same kind of topic. If you watch each of the four videos, you have a basic idea of how the Next.js app folder works. That will make this advanced tutorial easier to follow.
Vercel
In this tutorial, Lee Robinson covers the basics of routing, dynamic route segments, data fetching, caching, and metadata.
Sakura Dev
Sakura Dev teaches you about the difference between Next.js pages and the app folder and routing with examples.
Tuomo Kankaanpaa
Tuomo Kankaanpaa teaches you about Next app folder routing, layouts, and server components.
Piyush Garg
Piyush Garg compiles all the new Next features and converts them into a small crash course, and builds a demo project.
Now that you're ready to go, let's get into building our blog.
Folder Structure
Our folder structure looks like this for our demo application:
.
├── next.config.js
├── next-env.d.ts
├── package.json
├── pnpm-lock.yaml
├── postcss.config.js
├── public
├── README.md
├── search.json
├── src
│   └── app
│       ├── authors
│       │   └── [slug]
│       │       └── page.tsx
│       ├── BlogLayout.tsx
│       ├── cards.min.css
│       ├── Card.tsx
│       ├── error.tsx
│       ├── favicon.ico
│       ├── Footer.tsx
│       ├── ghost-client.ts
│       ├── globals.css
│       ├── Header.tsx
│       ├── layout.tsx
│       ├── not-found.tsx
│       ├── pages
│       │   └── [slug]
│       │       └── page.tsx
│       ├── page.tsx
│       ├── pagination
│       │   └── [item]
│       │       └── page.tsx
│       ├── Pagination.tsx
│       ├── read
│       │   └── [slug]
│       │       ├── Newsletter.tsx
│       │       └── page.tsx
│       ├── Search.tsx
│       ├── SocialIcons.tsx
│       └── tags
│           └── [slug]
│               └── page.tsx
├── tailwind.config.js
└── tsconfig.json

13 directories, 30 files
How to Configure Ghost CMS and Next.js
The next step is to set up data fetching for the Ghost Content API. This is why we installed the @tryghost/content-api package above.
Ghost CMS comes with two types of APIs: the first is the Content API, and the second is the Admin API. For the blog, we'll use the Content API.
Content API is a RESTful API that fetches the published content for the Ghost database. It is a read-only API. You can not call POST requests with it.
To configure it, we create a new file inside the src/app folder with ghost-client.ts. Inside the file, we have a new Ghost API instance.
// ghost-client.ts

import GhostContentAPI from "@tryghost/content-api";

// Create API instance with site credentials
const api = new GhostContentAPI({
  url: process.env.GHOST_URL as string,
  key: process.env.GHOST_KEY as string,
  version: "v5.0"
});
We need the blog URL, key, and version to config the Ghost content API in Next. You can find both the URLs and Key properties in the Ghost dashboard, as well as the version value which is your current version of Ghost CMS.
Go to the Ghost dashboard:
 Get your KEY and URL
Go to dashboard > settings > integrations > Your-intergration-id and get your GHOST_URL and GHOST_KEY . Now you can copy both and paste them inside your .env.local file.
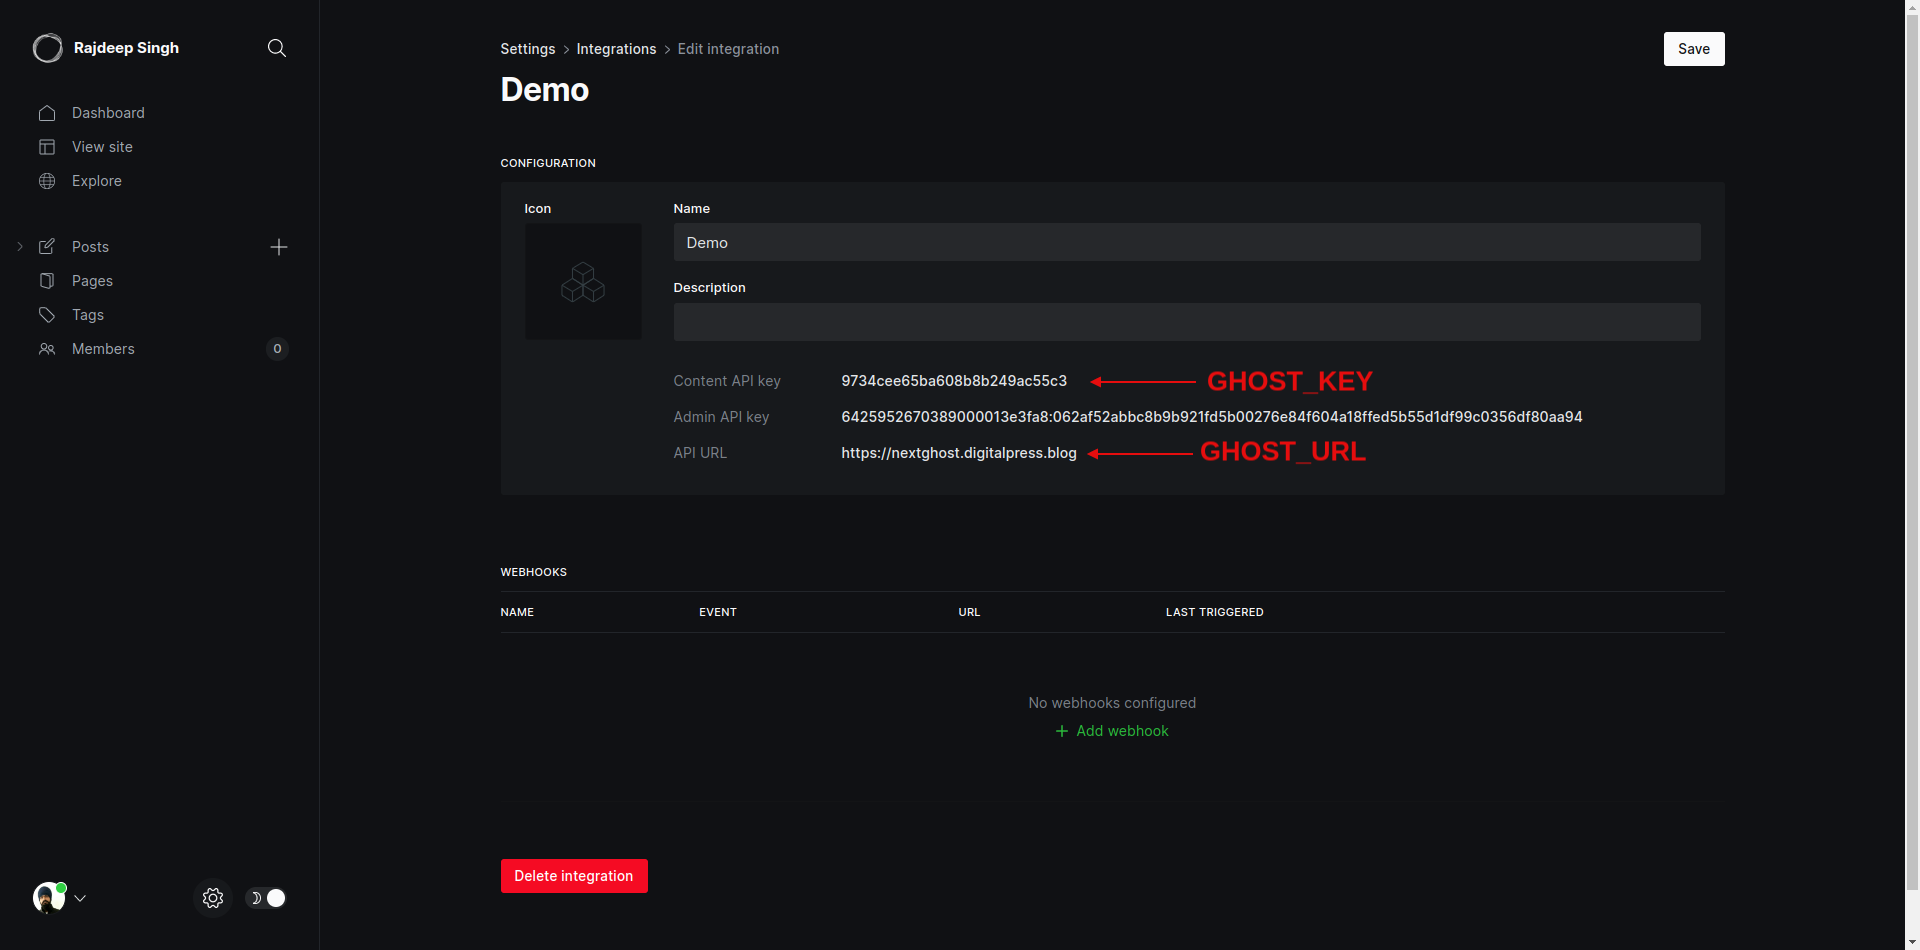 _Get your
 GHOST_KEY and GHOST_URL_
Understanding the Next.js 13 App Folder
There have been lots of changes in the Next.js pages folder and app folder with the release of Next.js 13. We'll discuss some important stuff now and more when we're building the app:
- There is no
_app,_document,getServerSideProps,getStaticProps,getStaticPaths,404anduseRouter. - Now it combines the
_appand_documentfiles with thelayoutfile. useRouteris import fromnext/navigation.- The
404file is replaced by thenotFound()function. - The
error.tsxfile provides functionality like reacting to error boundaries. - Now the
index.jsfile is replaced bypage.js. - Passing dynamic route segments
pages/blog/[slug].jsis changed, and the Next app directory looks like this:app/blog/[slug]/page.js.
Examples
To understand the Next experimental app folder, let's look at a real example:
- tag page =>
app/tag/[slug]/page.ts - category =>
app/tag/[slug]/page.ts
Now you can create five files inside every route. For example, if you create a tag or category route in your app folder, then you can create four files inside your app route folder.
page.ts(required): it is your main file.layout.ts(optional): it helps design your layoutloading.ts(optional): it creates a loading indicator with React suspense.error.ts(optional): it helps handle errors in your React app.components(optional): you can also create another component in your routes.
Let's understand how the new Next.js 13 app route works with a real-life example: your tag route folder looks like this.
app/tag/[slug]/page.ts
app/tag/[slug]/loading.ts
app/tag/[slug]/layout.ts
app/tag/[slug]/error.ts
app/tag/[slug]/my-card-component.ts
Demo Data for the Project
You don't have to worry about creating a demo or dummy blog post data. For your testing, You can download it from this GitHub repository.
How to Build the Blog
We'll go through and build each part of the blog in the following sections so you can follow along at home.
- How to build the header
- How to build the footer
- How to build the layout
- How to build the homepage
- How to build the reading page
- How to build the tag page
- How to build the author page
- How to build single pages
- How to handle pagination
- Next.js SEO
- How to Enable Search
- Error Handling
- How to rebuild your static site with webhooks
How to Build the Header
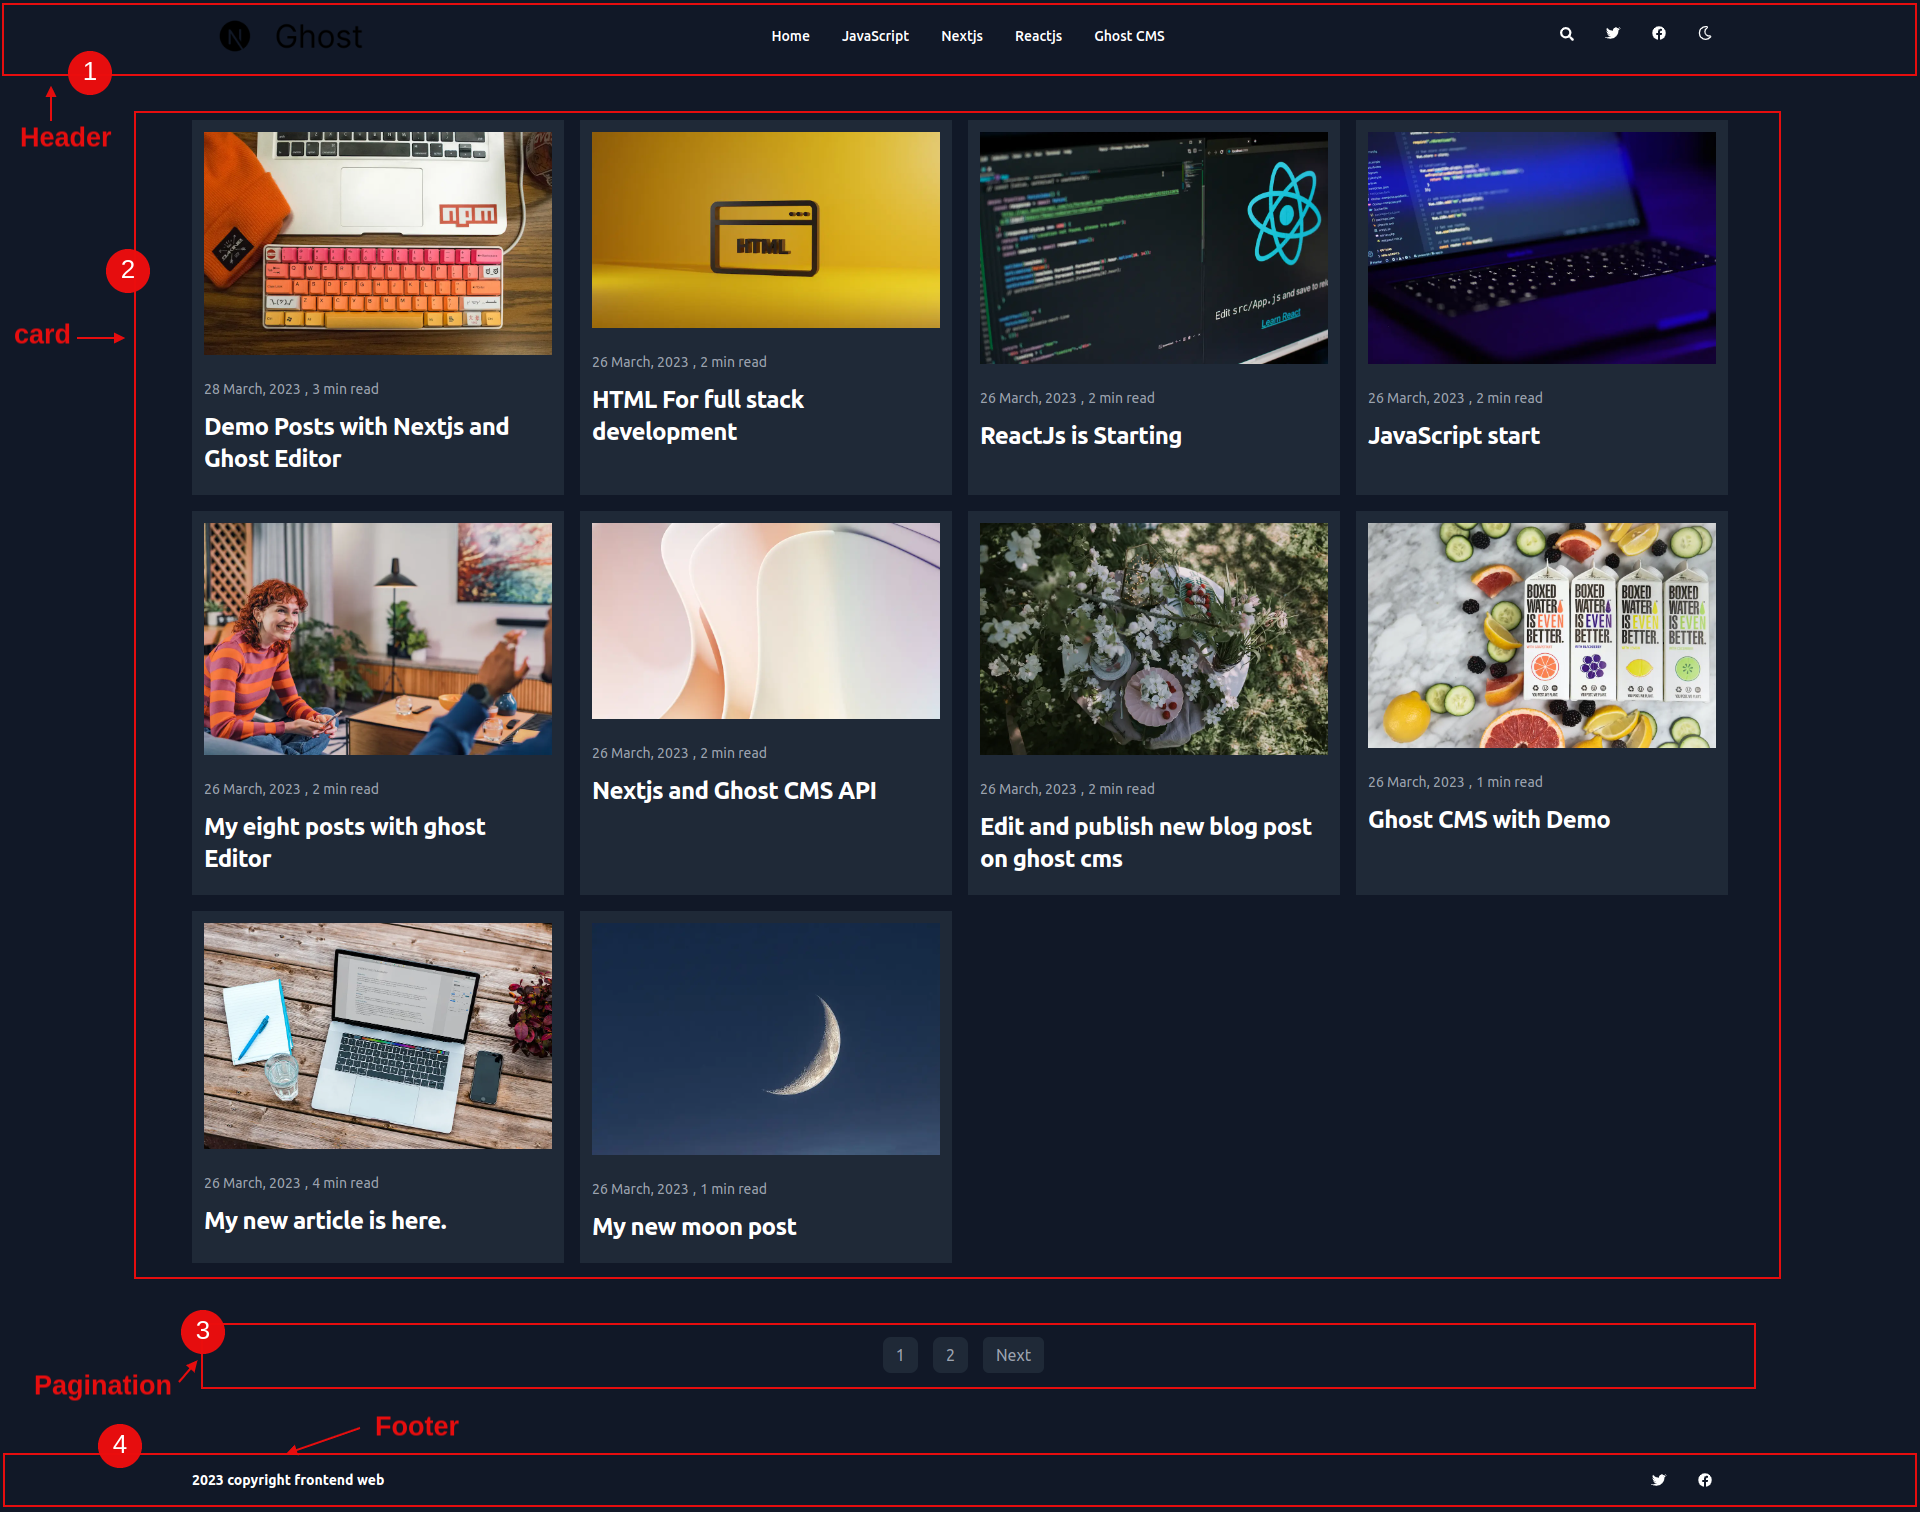
The first and main part of the site is the header. First, we'll create a simple header for our demo blog. Our header will end up looking like this:
 Design of the header
First is the logo, next comes the nav bar with various elements, and last is the icon section. All the data comes from the Ghost CMS API. You can change things inside Ghost CMS and it will reflect on the site.
Here's the code to build the header component:
// Header.tsx

import Link from "next/link";
import SocialIcons from "./SocialIcons";
import Image from "next/image";
import type { Settings } from "@tryghost/content-api";

function Header({ setting }: { setting: Settings }) {

  return (
    <header className="px-2 sm:px-4 py-2.5 dark:bg-gray-900 w-full">

      <div className="container flex flex-wrap items-center justify-between mx-auto">
        {/* Logo for blog */}
        <Link href="/" className="flex items-center">
          {setting.logo !== null ?
            <Image
              alt={setting.title} width={200} height={100} src={setting.logo} className="self-center text-xl font-semibold whitespace-nowrap dark:text-white" />
            : setting.title}
        </Link>
        <div className="flex md:order-2">

          <ul className="flex flex-wrap p-4 md:space-x-8 md:mt-0 md:text-sm md:font-medium">

            {
              /* Blog Navigation Edit in GHOST CMS  */
              setting.navigation !== undefined ? setting?.navigation.map(item => <li key={item.label} className="block py-2 pl-3 pr-4 text-gray-700 rounded hover:text-blue-700 dark:hover:text-blue-700 md:p-0 dark:text-white"
                aria-current="page">
                <Link href={item.url}>
                  {item.label}
                </Link>
              </li>) : " "

            }

          </ul>

        </div>
        <SocialIcons setting={setting} />
      </div>

    </header >
  )

}
export default Header
How to Build the Footer
The footer is also an important section of a blog site. It shows your important information and various helpful links.
 Design of the footer
I designed a basic footer with copyrighted text and added social icons for the site. The social icons come from the Ghost CMS API.
// Footer.tsx

import { FaTwitter, FaFacebook } from "react-icons/fa";
import Link from "next/link";
import type { Settings } from "@tryghost/content-api";

function Footer({ setting }: { setting: Settings }) {

  return (

    <footer className="px-2 sm:px-4 py-2.5 dark:bg-gray-900 w-full">

      <div className="container flex flex-wrap items-center justify-between mx-auto">

        <Link href="https://github.com/frontendweb3" className="flex items-center">
          <span className="self-center text-gray-800 text-sm font-semibold whitespace-nowrap dark:text-white">2023 copyright frontend web</span>
        </Link>

        <div className="flex md:order-2">

          <ul className="flex p-4 flex-row md:space-x-8 md:mt-0 md:text-sm font-medium">

            {
              setting.twitter !== null ? <li>
                <Link target="_blank" href={`https://twitter.com/${setting.twitter}`} className="block py-2 pl-3 pr-4 text-gray-700 rounded hover:text-blue-700 dark:hover:text-blue-700 md:p-0 dark:text-white" aria-current="page">
                  <FaTwitter />
                </Link>
              </li> : " "

            }

            {
              setting.facebook !== null ? <li>
                <Link target="_blank" href={`https://www.facebook.com/${setting.facebook}`} className="block py-2 pl-3 pr-4 text-gray-700 rounded hover:text-blue-700 dark:hover:text-blue-700 md:p-0 dark:text-white ">
                  <FaFacebook />
                </Link>
              </li> : " "

            }

          </ul>
        </div>

      </div>
    </footer>

  )
}

export default Footer
How to Build the Layout
I designed a basic layout for the blog. For building layouts in Next.js, there's a special layout.tsx file.
Before we create the layout design, we need to define a getNavigation function to fetch navigation and basic website-related data from Ghost.
// ghost-client.ts


export async function getNavigation() {
  return await api.settings.browse()
}
The data look like this:
{
  title: 'Rajdeep Singh',
  description: 'Thoughts, stories and ideas.',
  logo: 'http://localhost:2368/content/images/2023/04/nextjsandghostlogo-2.png',
  icon: 'http://localhost:2368/content/images/size/w256h256/2023/04/nextjs-60pxx60px.png',
  accent_color: '#d27fa0',
  cover_image: 'https://static.ghost.org/v4.0.0/images/publication-cover.jpg',
  facebook: 'ghost',
  twitter: '@ghost',
  lang: 'en',
  locale: 'en',
  timezone: 'Etc/UTC',
  codeinjection_head: null,
  codeinjection_foot: null,
  navigation: Array(5) [
    { label: 'Home', url: '/' }, { label: 'JavaScript', url: '/tags/javascript/' }, { label: 'Nextjs', url: '/tags/nextjs/' },
    { label: 'Reactjs', url: '/tags/reactjs/' }, { label: 'Ghost CMS', url: '/tags/ghost-cms/' }
  ],
  secondary_navigation: Array(1) [ { label: 'Login', url: '#/portal/' } ],
  meta_title: 'My demo post',
  meta_description:
    'Lorem Ipsum is simply dummy text of the printing and typesetting industry. Lorem Ipsum has been the industry\'s standard dummy text ever since the 1500s, when an unknown printer took a galley of type and scrambled it to make a type specimen book.',
  og_image: null,
  og_title: null,
  og_description:
    'Lorem Ipsum is simply dummy text of the printing and typesetting industry. Lorem Ipsum has been the industry\'s standard dummy text ever since the 1500s, when an unknown printer took a galley of type and scrambled it to make a type specimen book.',
  twitter_image: null,
  twitter_title: null,
  twitter_description:
    'Lorem Ipsum is simply dummy text of the printing and typesetting industry. Lorem Ipsum has been the industry\'s standard dummy text ever since the 1500s, when an unknown printer took a galley of type and scrambled it to make a type specimen book.',
  members_support_address: 'noreply',
  members_enabled: true,
  members_invite_only: false,
  paid_members_enabled: false,
  firstpromoter_account: null,
  portal_button_style: 'icon-and-text',
  portal_button_signup_text: 'Subscribe',
  portal_button_icon: null,
  portal_plans: Array(1) [ 'free' ],
  portal_name: true,
  portal_button: true,
  comments_enabled: 'all',
  url: 'http://localhost:2368/',
  version: '5.39'
}
The getNavigation function returns the settings data, and then we pass the data as props into the header and footer components.
Our Main layout.tsx file works server side. It helps fetch data on the server side with the React use hook.
// Layout.tsx


import "./globals.css";
import BlogLayout from './BlogLayout'
import { getNavigation, } from "./ghost-client"
import { use } from "react"
import type { Settings } from "@tryghost/content-api"

interface UpdateSettings extends Settings {
  accent_color?: string;
}

export default function RootLayout({
  children,
}: {
  children: React.ReactNode
}) {

  const settings: UpdateSettings = use(getNavigation())

  return (

    <html className='light' lang="en">

      <body
        style={{
          '--bg-color': settings?.accent_color ? settings.accent_color : "",
        }}
        className={` bg-[--bg-color] dark:bg-gray-900`}>

        <BlogLayout setting={settings}>

          {children}

        </BlogLayout>

      </body>

    </html>

  )
}
BlogLayout component
The BlogLayout component works on the client side. In the Next.js app folder, you can easily convert your server-side component to the client side with the following "use client" syntax.
The purpose of the BlogLayout component is to contain the ThemeProvider, header, and footer. ThemeProvider is a high-order component, and it provides additional functionality, like changing the theme from dark to light. We wrap the intra-site with ThemeProvider's higher component. In the old pages directory, we achieve similarly functionally with nextjs _app.ts custom app.
ThemeProvider component helps to change the theme from light to dark mode.
"use client"

// BlogLayout.tsx

import Footer from "./Footer";
import Header from "./Header";
import { ThemeProvider } from 'next-themes';
import type { Settings } from "@tryghost/content-api";
function Layout({ setting, children }: { setting: Settings, children: React.ReactNode }) {
  return <ThemeProvider attribute="class">
    <Header setting={setting} />
    {children}
    <Footer setting={setting} />
  </ThemeProvider>

}
export default Layout
How to Build the Homepage
Next.js has a special app/page.tsx file for designing and building the home page. Our blog website's home page looks like what you see below. We import the header, card, pagination, and footer on the home page. The header and footer are part of layout.tsx.
 Home page
First, we fetch all posts data from Ghost CMS with the help of the getPosts function, which I defined in the ghost-client.ts file.
// ghost-client.ts

export async function getPosts() {
  return await api.posts
    .browse({
      include: ["tags", "authors"],
      limit: 10
    })
    .catch(err => {
      throw new Error(err)
    });
}
By default, the api.post.browse() returns only post data, but you can easily extend it. In every article or post data, we also include tags and authors with the help of include. Then we set the article limit to ten.
The data look like this:
[
{
id: '6422a742136f5d40f37294f5',
uuid: '8c2fcfda-a6e4-4383-893b-ba18511c0f67',
title: 'Demo Posts with Nextjs and Ghost Editor',
slug: 'demo-posts-with-nextjs-and-reactjs',
html: `<p><strong>Lorem Ipsum</strong> is simply dummy text of the printing and typesetting industry. Lorem Ipsum has been the industry's standard dummy text si
nce the 1500s when an unknown printer scrambled a galley of type and scrambled it to make a type specimen book. </p><p>It has survived five centuries and the leap i
nto electronic typesetting, remaining essentially unchanged. </p><p>It was popularised in the 1960s with Letraset sheets containing Lorem Ipsum passages and, more r
ecently, desktop publishing software like Aldus PageMaker, including versions of Lorem Ipsum.</p><figure class="kg-card kg-gallery-card kg-width-wide kg-card-hascap
tion"><div class="kg-gallery-container"><div class="kg-gallery-row"><div class="kg-gallery-image"><img src="http://localhost:2368/content/images/2023/03/Build-and-d
eploy.png" width="1500" height="400" loading="lazy" alt srcset="http://localhost:2368/content/images/size/w600/2023/03/Build-and-deploy.png 600w, http://localhost:2
368/content/images/size/w1000/2023/03/Build-and-deploy.png 1000w, http://localhost:2368/content/images/2023/03/Build-and-deploy.png 1500w" sizes="(min-width: 720px)
720px"></div><div class="kg-gallery-image"><img src="http://localhost:2368/content/images/2023/03/Build-and-deploy-profile-1.png" width="1500" height="400" loading
="lazy" alt srcset="http://localhost:2368/content/images/size/w600/2023/03/Build-and-deploy-profile-1.png 600w, http://localhost:2368/content/images/size/w1000/2023
/03/Build-and-deploy-profile-1.png 1000w, http://localhost:2368/content/images/2023/03/Build-and-deploy-profile-1.png 1500w" sizes="(min-width: 720px) 720px"></div>
</div><div class="kg-gallery-row"><div class="kg-gallery-image"><img src="http://localhost:2368/content/images/2023/03/Build-and-deploy-profile--1--1.png" width="15
00" height="400" loading="lazy" alt srcset="http://localhost:2368/content/images/size/w600/2023/03/Build-and-deploy-profile--1--1.png 600w, http://localhost:2368/co
ntent/images/size/w1000/2023/03/Build-and-deploy-profile--1--1.png 1000w, http://localhost:2368/content/images/2023/03/Build-and-deploy-profile--1--1.png 1500w" siz
es="(min-width: 720px) 720px"></div><div class="kg-gallery-image"><img src="http://localhost:2368/content/images/2023/03/Build--Test-and-Deploy-profile-1.png" width
="1500" height="400" loading="lazy" alt srcset="http://localhost:2368/content/images/size/w600/2023/03/Build--Test-and-Deploy-profile-1.png 600w, http://localhost:2
368/content/images/size/w1000/2023/03/Build--Test-and-Deploy-profile-1.png 1000w, http://localhost:2368/content/images/2023/03/Build--Test-and-Deploy-profile-1.png
1500w" sizes="(min-width: 720px) 720px"></div></div></div><figcaption>Build and deploy</figcaption></figure><h2 id="why-do-we-use-it">Why do we use it?</h2><p>It is
a long-established fact that a reader will be distracted by the readable content of a page when looking at its layout. </p><p>The point of using Lorem Ipsum is tha
t it has a more-or-less normal distribution of letters, as opposed to using 'Content here, content here', making it look like readable English. </p><p>Many desktop
publishing packages and web page editors now use Lorem Ipsum as their default model text, and a search for 'lorem ipsum' will uncover many web sites still in their
infancy. </p><p>Various versions have evolved over the years, sometimes by accident, sometimes on purpose (injected humour and the like).</p><hr><h2 id="where-can-i
-get-some">Where can I get some?</h2><p>There are many variations of passages of Lorem Ipsum available, but the majority have suffered alteration in some form, by i
njected humour, or randomised words which don't look even slightly believable. </p><p>If you are going to use a passage of Lorem Ipsum, you need to be sure there is
n't anything embarrassing hidden in the middle of text. </p><p>All the Lorem Ipsum generators on the Internet tend to repeat predefined chunks as necessary, making
this the first true generator on the Internet. </p><p>It uses a dictionary of over 200 Latin words, combined with a handful of model sentence structures, to generat
e Lorem Ipsum which looks reasonable. </p><p>The generated Lorem Ipsum is therefore always free from repetition, injected humour, or non-characteristic words etc.</
p><div class="kg-card kg-callout-card kg-callout-card-red"><div class="kg-callout-emoji">💡</div><div class="kg-callout-text">My note is here </div></div><p></
p><div class="kg-card kg-header-card kg-width-full kg-size-small kg-style-dark" style data-kg-background-image><h2 class="kg-header-card-header" id="product">Produc
t</h2><h3 class="kg-header-card-subheader" id="my-blog-list">My blog list</h3></div><p></p><figure class="kg-card kg-embed-card kg-card-hascaption"><iframe width="2
00" height="113" src="https://www.youtube.com/embed/_q1K7cybyRk?feature=oembed" frameborder="0" allow="accelerometer; autoplay; clipboard-write; encrypted-media; gy
roscope; picture-in-picture; web-share" allowfullscreen title="Next.js 13.1 Explained!"></iframe><figcaption>youtube</figcaption></figure><hr><figure class="kg-card
kg-embed-card"><blockquote class="twitter-tweet"><p lang="en" dir="ltr">In 2022, we enabled developers to create at the moment of inspiration, now with over 2 mill
ion deployments per week.<br><br>Here's what we shipped ↓ <a href="https://t.co/6k7Xmbpna3?ref=localhost">pic.twitter.com/6k7Xmbpna3</a></p>— Vercel (@ver
cel) <a href="https://twitter.com/vercel/status/1611094825587167254?ref_src=twsrc%5Etfw&ref=localhost">January 5, 2023</a></blockquote>\n` +
'<script async src="https://platform.twitter.com/widgets.js" charset="utf-8"></script>\n' +
'</figure><hr><figure class="kg-card kg-bookmark-card kg-card-hascaption"><a class="kg-bookmark-container" href="https://medium.com/frontendweb/what-is-progre
ssive-web-app-and-how-to-enable-it-in-nextjs-application-17f2e3240390?ref=localhost"><div class="kg-bookmark-content"><div class="kg-bookmark-title">What is Progres
sive Web App and How to enable it in nextjs Application?</div><div class="kg-bookmark-description">A detailed guide to Progressive Web Apps: How to use it with next
js and publish on Google play store, Microsoft store, Meta Quest, and…</div><div class="kg-bookmark-metadata"><img class="kg-bookmark-icon" src="https://cdn-static-
1.medium.com/_/fp/icons/Medium-Avatar-500x500.svg" alt><span class="kg-bookmark-author">FrontEnd web</span><span class="kg-bookmark-publisher">Rajdeep singh</span><
/div></div><div class="kg-bookmark-thumbnail"><img src="https://miro.medium.com/v2/resize:fit:1200/1*yAoHfq4Wm2Bp8DU1Dav29Q.png" alt></div></a><figcaption>Bookmark<
/figcaption></figure><div class="kg-card kg-header-card kg-width-full kg-size-small kg-style-dark" style data-kg-background-image><h2 class="kg-header-card-header"
id="thank-you">Thank you</h2></div>',
comment_id: '6422a742136f5d40f37294f5',
feature_image: 'https://images.unsplash.com/photo-1543966888-7c1dc482a810?crop=entropy&cs=tinysrgb&fit=max&fm=jpg&ixid=MnwxMTc3M3wwfDF8c2VhcmNofDE2fHxqYXZhc2Nya
XB0fGVufDB8fHx8MTY3OTk5MjY1NA&ixlib=rb-4.0.3&q=80&w=2000',
featured: false,
visibility: 'public',
created_at: '2023-03-28T08:37:22.000+00:00',
updated_at: '2023-03-28T08:51:38.000+00:00',
published_at: '2023-03-28T08:50:44.000+00:00',
custom_excerpt: 'It has survived five centuries and the leap into electronic typesetting, remaining essentially unchanged. ',
codeinjection_head: null,
codeinjection_foot: null,
custom_template: null,
canonical_url: null,
tags: [ [Object] ],
authors: [ [Object] ],
primary_author: {
id: '1',
name: 'Rajdeep Singh',
slug: 'rajdeep',
profile_image: 'https://www.gravatar.com/avatar/dafca7497609ae294378279ad1d6136c?s=250&r=x&d=mp',
cover_image: null,
bio: 'Lorem Ipsum is simply dummy text of the printing and typesetting industry. ',
website: 'https://officialrajdeepsingh.dev',
location: 'India',
facebook: 'officialrajdeepsingh',
twitter: '@Official_R_deep',
meta_title: null,
meta_description: null,
url: 'http://localhost:2368/author/rajdeep/'
},
primary_tag: {
id: '6422aa9a136f5d40f3729552',
name: 'demo',
slug: 'demo',
description: null,
feature_image: null,
visibility: 'public',
og_image: null,
og_title: null,
og_description: null,
twitter_image: null,
twitter_title: null,
twitter_description: null,
meta_title: null,
meta_description: null,
codeinjection_head: null,
codeinjection_foot: null,
canonical_url: null,
accent_color: null,
url: 'http://localhost:2368/tag/demo/'
},
url: 'http://localhost:2368/demo-posts-with-nextjs-and-reactjs/',
excerpt: 'It has survived five centuries and the leap into electronic typesetting, remaining essentially unchanged. ',
reading_time: 3,
access: true,
comments: true,
og_image: null,
og_title: null,
og_description: null,
twitter_image: null,
twitter_title: null,
twitter_description: null,
meta_title: null,
meta_description: null,
email_subject: null,
frontmatter: null,
feature_image_alt: 'Demo Posts with Nextjs and Ghost Editor',
feature_image_caption: 'Photo by <a href="https://unsplash.com/@pinjasaur?utm_source=ghost&utm_medium=referral&utm_campaign=api-credit">Paul Esch-Laurent</a> /
<a href="https://unsplash.com/?utm_source=ghost&utm_medium=referral&utm_campaign=api-credit">Unsplash</a>'
},
meta:{
pagination: { page: 1, limit: 10, pages: 2, total: 12, next: 2, prev: null }
}
]
Now we call the getPosts function on the server side. It returns all the post data with the associated tags and authors. Now you can loop through the data with a map() function.
We pass the data into app/page.tsx to the card.tsx components. We pass the article data as props into the card component.
// src/app/page.tsx

import { getPosts } from "./ghost-client"
import Card from './Card'

export default async function Home() {

  const getPost = await getPosts()

  return (
    <>
      <main className="container my-12 mx-auto grid grid-cols-1 gap-2 md:gap-3 lg:gap-4 lg:grid-cols-3 md:grid-cols-2 xl:grid-cols-4 2xl:grid-cols-4">

        {
          getPost?.map(
            item => {
              return <Card key={item.uuid} item={item} />
            })
        }

      </main>

    </>
  )
}
Card component
I designed a basic card for the blog. The card component looks like this:
 Card component
I rendered every item of data coming from the home page as props and showed it on the site with Card.tsx .
// Card.tsx

import Image from "next/image"
import Link from "next/link"
import type { PostOrPage } from "@tryghost/content-api";
import { format } from 'date-fns'

function Card({ item }: { item: PostOrPage }) {

  return (
    <div className="max-w-full bg-white dark:bg-gray-800" >

      {
        item.featured !== null && item.feature_image !== undefined ? <Link href={`/read/${item.slug}`}>
          <Image className="rounded-lg p-3" width={1000} height={324} src={item.feature_image} alt={item.feature_image_alt || item.title} />
        </Link> : " "
      }

      <div className="p-3">

        <div className="flex mb-3">
          {
            item.published_at !== null && item.published_at !== undefined ? <p className="text-sm text-gray-500 dark:text-gray-400">
              {format(new Date(item.published_at), 'dd MMMM, yyyy')}
            </p> : ""
          }
          <p className="text-sm text-gray-500 dark:text-gray-400 mx-1"> , </p>
          <p className="text-sm text-gray-500 dark:text-gray-400">
            {item.reading_time} min read
          </p>
        </div>

        <Link href={`/read/${item.slug}`}>
          <h5 className="mb-2 text-2xl font-bold tracking-tight text-gray-900 dark:text-white">
            {item.title}
          </h5>
        </Link>


      </div>

    </div>

  )

}


export default Card
How to Build the Reading Page
The reading page is the second most important page for the blog site. If people can't figure out how to read what the author writes, this is a big problem for front-end developers.
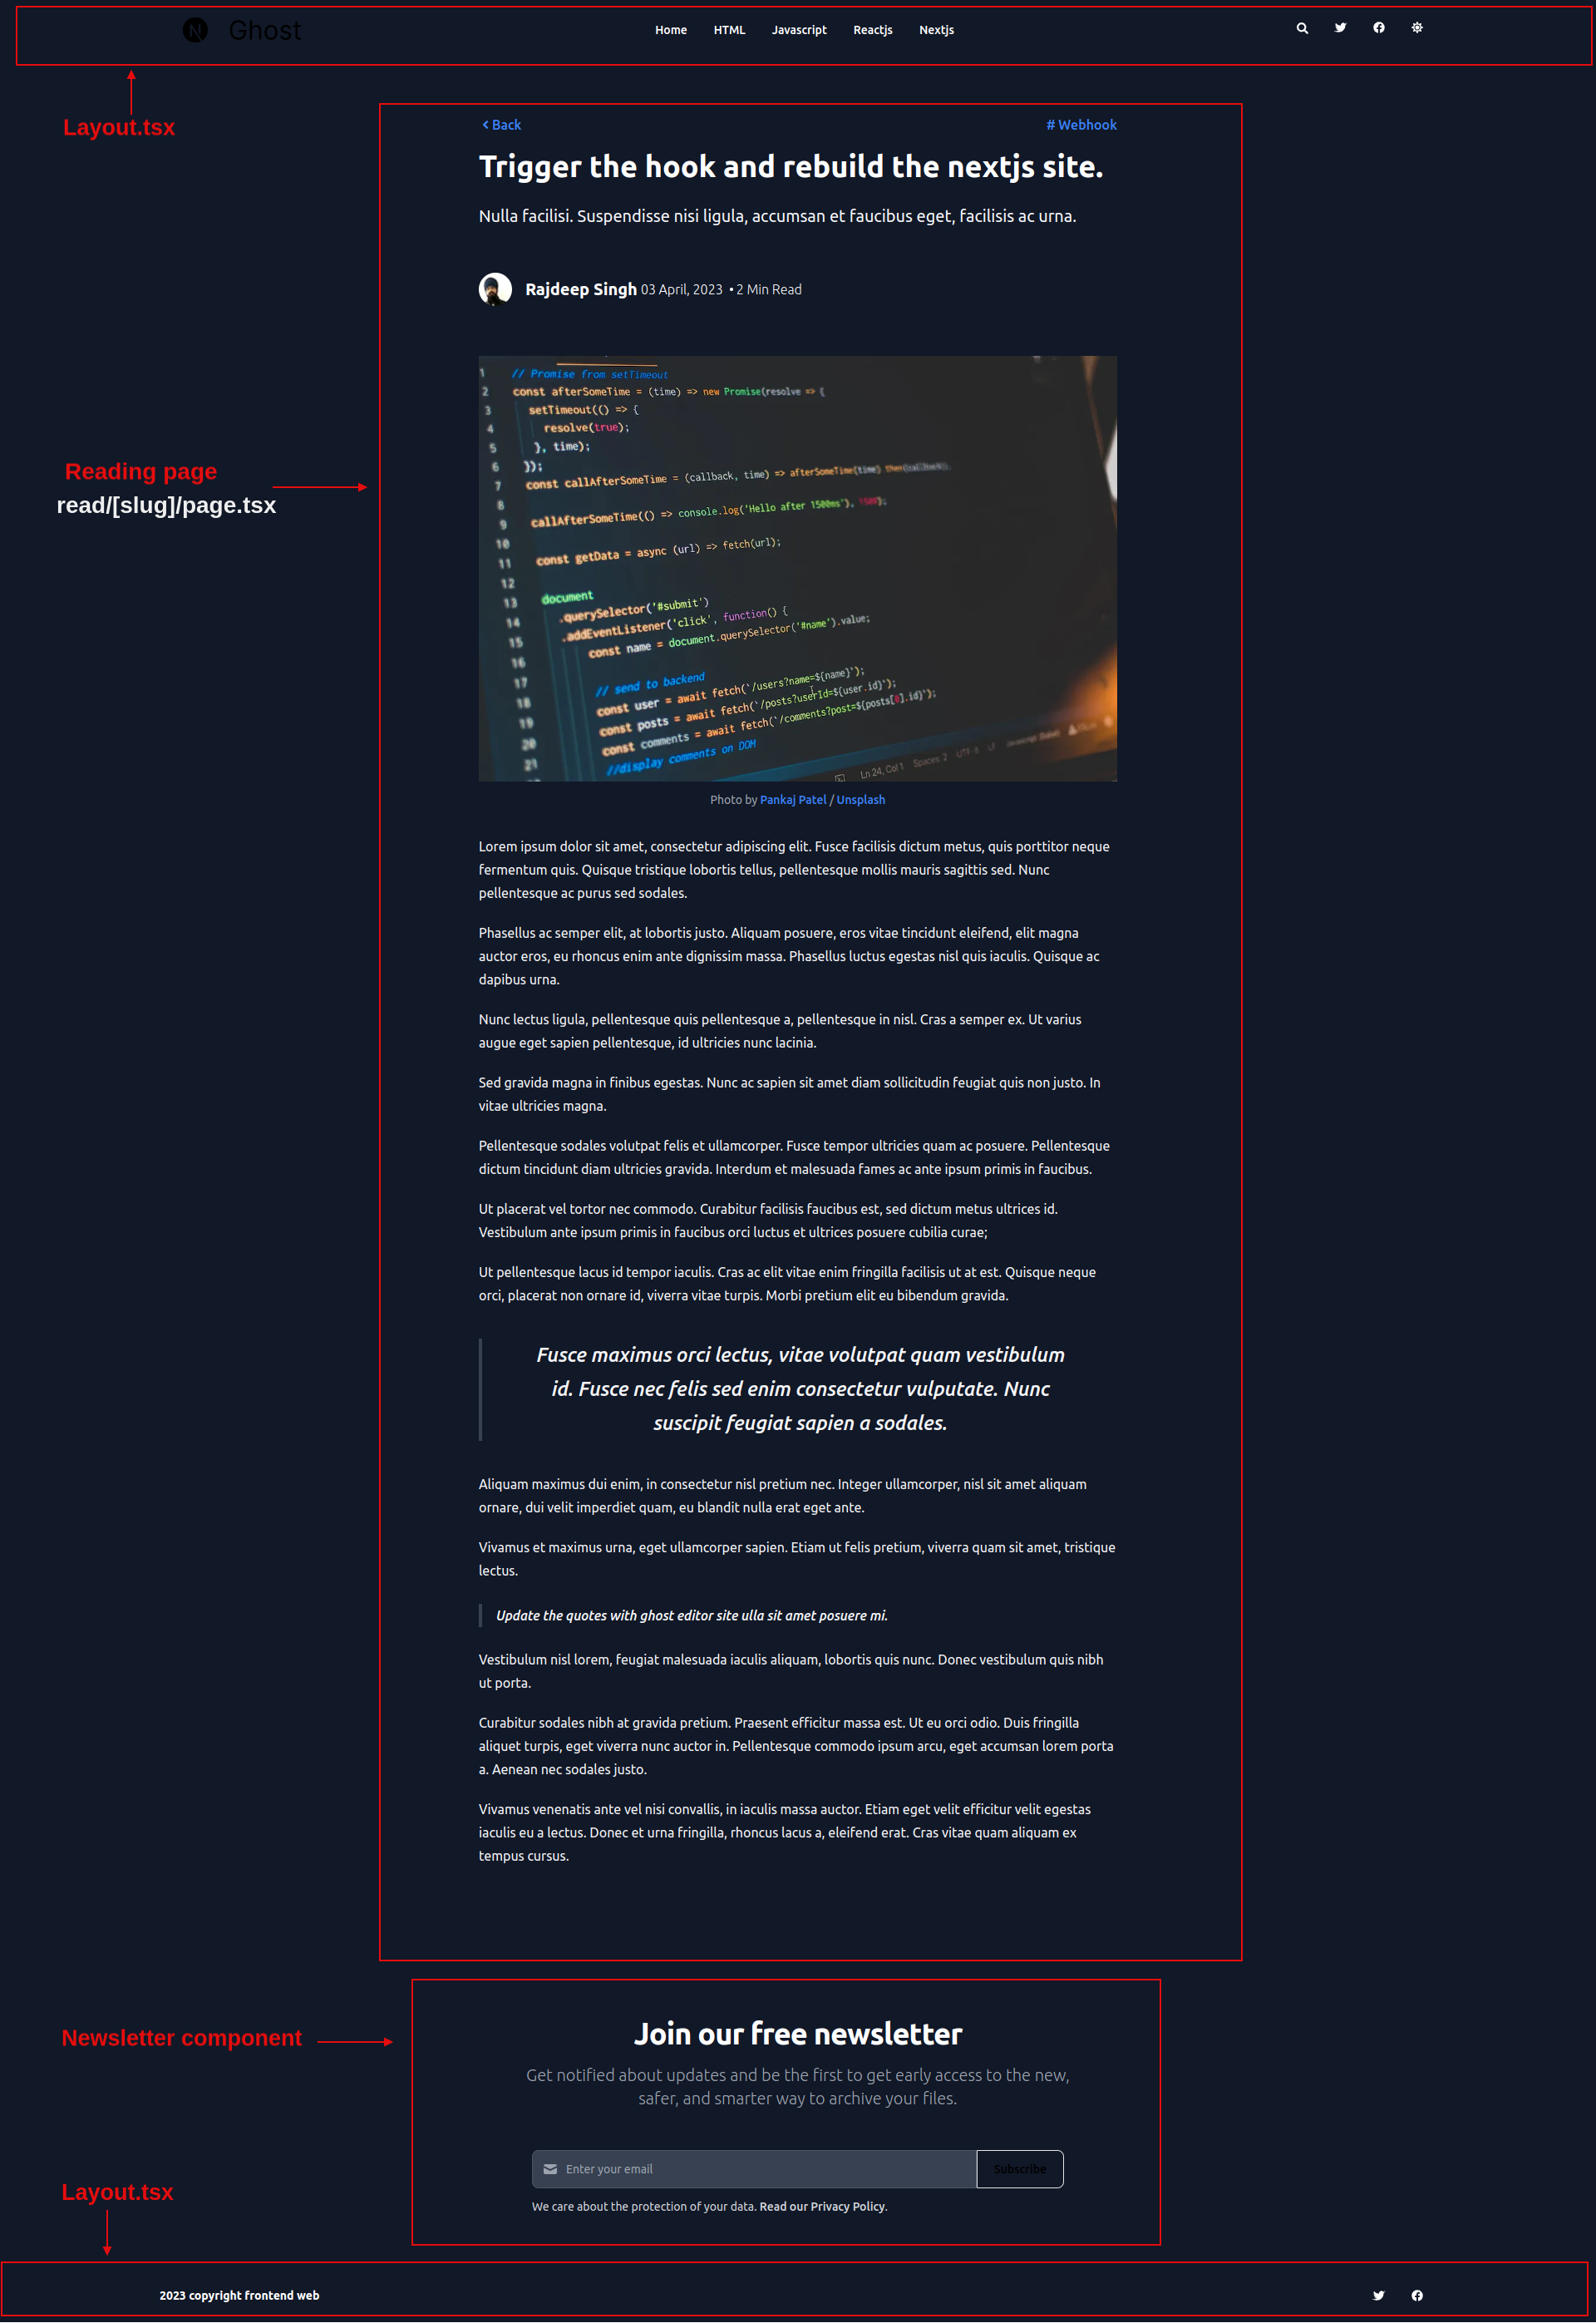 Reading page
First, we get a single article from the Ghost CMS API based on its slug. We pass it to the Card component with the Link component.
// ghost-client.ts

export async function getSinglePost(postSlug: string) {
  return await api.posts
    .read({
      slug: postSlug
    }, { include: ["tags", "authors"] })
    .catch(err => {
      console.error(err);
    });
}
The getSinglePost(<you-slug>) function returns data about a single article, and you can render that data on the page.
// src/app/read/[slug]/page.tsx

import Newsletter from "./Newsletter";
import Link from "next/link";
import { getSinglePost, getPosts } from "../../ghost-client"
import Image from "next/image";
// import icon
import { FaAngleLeft } from "react-icons/fa";

// types for typescript
import type { Metadata } from "next";
import type { PostOrPage } from "@tryghost/content-api";

// format the date
import { format } from 'date-fns'

// css for card
import "../../cards.min.css"


export async function generateStaticParams() {
  const posts = await getPosts()
  return posts.map((post) => ({
    slug: post.slug,
  }));
}


async function Read({ params }: { params: { slug: string }; }) {

  const getPost = await getSinglePost(params.slug)

  return (
    <>
      <main className="pt-8 pb-16 lg:pt-16 lg:pb-24 dark:bg-gray-900">

        <div className="flex justify-between px-4 mx-auto max-w-screen-xl ">

          <article className="mx-auto w-full max-w-3xl prose prose-xl prose-p:text-gray-800  dark:prose-p:text-gray-100 sm:prose-base prose-a:no-underline prose-blue dark:prose-invert">

            <div className="flex mb-4 w-full justify-between">

              <Link className="inline-flex items-center" href={`/`}>
                <FaAngleLeft /> Back
              </Link>

              {
                getPost.primary_tag ? <Link href={`/tags/${getPost?.primary_tag.slug}`}>
                  # {getPost?.primary_tag.name}
                </Link> : ""
              }

            </div>

            <h1 className="mb-4 text-3xl font-extrabold leading-tight text-gray-900 lg:mb-6 lg:text-4xl dark:text-white">
              {getPost.title}
            </h1>

            <p className="lead">
              {getPost.excerpt}
            </p>

            <header className="mb-4 lg:mb-6 not-format">

              <address className="flex items-center mb-6 not-italic">

                <div className="inline-flex items-center mr-3 text-sm text-gray-900 dark:text-white">

                  <Image width={32} height={32} className="mr-4 w-10 h-10 rounded-full" src={getPost?.primary_author.profile_image} alt={getPost?.primary_author.name} />
                  {
                    getPost.primary_author ? <Link href={`/authors/${getPost?.primary_author.slug}`} rel="author" className="text-xl font-bold text-gray-800 dark:text-white">{getPost?.primary_author.name}</Link> : " "
                  }

                  {
                    getPost.published_at ? <time className="text-base font-light text-gray-800 dark:text-white mx-1" dateTime={getPost?.published_at} title={format(new Date(getPost?.published_at), 'yyyy-MM-dd')}>
                      {format(new Date(getPost?.published_at), 'dd MMMM, yyyy')}
                    </time> : ""
                  }

                  <div className="text-base w-1 h-1 rounded-full bg-black dark:bg-white mx-1"></div>

                  <p className="text-base font-light text-gray-500 dark:text-gray-400"> {getPost.reading_time}  Min Read</p>

                </div>

              </address>

            </header>

            <figure>
              <Image className="mx-auto" width={1000} height={250} src={getPost.feature_image} alt={getPost.feature_image_alt} />
              <figcaption className="text-center"
                dangerouslySetInnerHTML={{
                  __html: getPost?.feature_image_caption
                }}></figcaption>
            </figure>

            <div dangerouslySetInnerHTML={{ __html: getPost?.html }}></div>

          </article>
        </div>
      </main>
      <Newsletter />
    </>
  )

}
export default Read
You render the post's HTML data with dangerouslySetInnerHTML . But you need to write lots of CSS to handle the dynamic content coming from the Ghost CMS API.
To solve that, I used the @tailwindcss/typography package. I also downloaded cards.min.css from Ghost. Now you don't need to write a single line of CSS in your Next app.
Generate the static site with the generateStaticParams function. Before, we used to getStaticProps function.
// ghost-client.ts


export async function generateStaticParams() {

  // fetch All posts

  const posts = await getPosts()

  // return the slug

  return posts.map((post) => ({
    slug: post.slug,
  }));

}
How to Build the Tag Page
I designed a simple tag page for the blog. The tag page shows articles related to the tags that are used.
You can also create a category page. Tag pages and category pages use the same logic and functionalities.
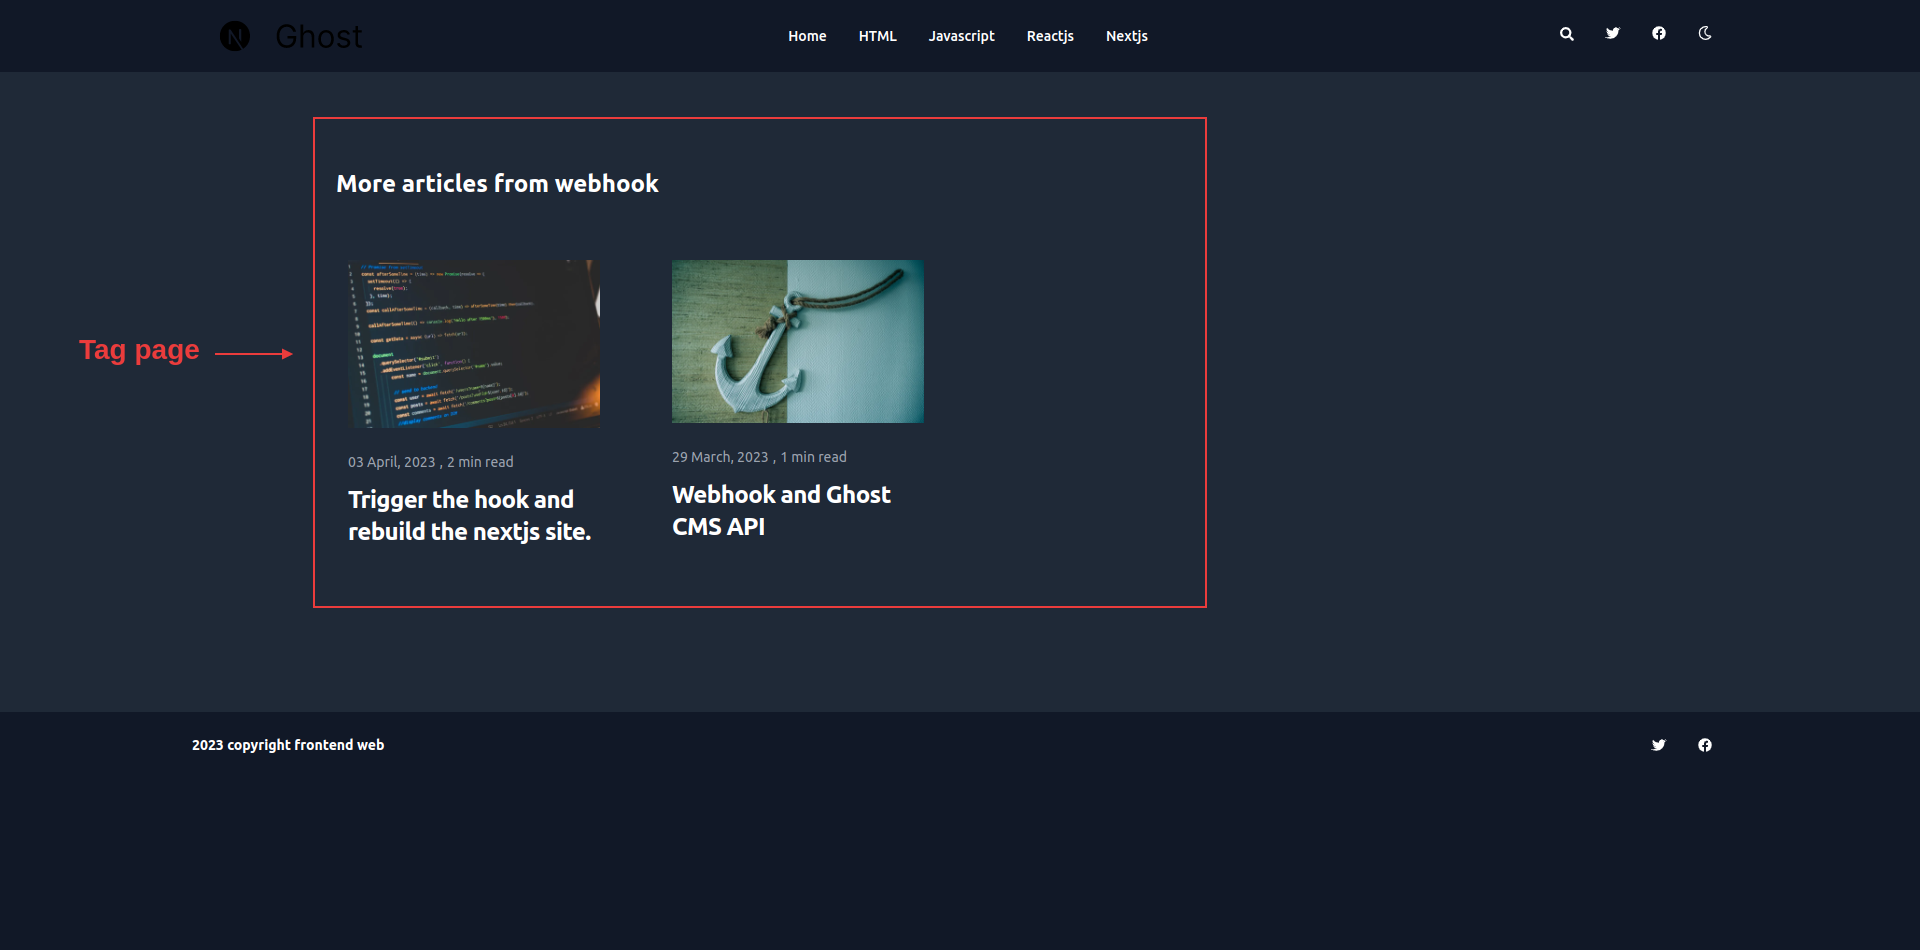 Tag page
Similar to the reading page, we'll get articles based on tags from the Ghost CMS API.
// ghost-client.ts


// return all posts realted to tag slug
export async function getTagPosts(tagSlug: string) {

  return await api.posts.browse({ filter: `tag:${tagSlug}`, include: 'count.posts' })
    .catch(err => {
      throw new Error(err)
    });
  ;

}

// return all the slugs to build static with generateStaticParams
export async function getAllTags() {
  return await api.tags.browse({
    limit: "all"
  }).catch(err => {
    console.log(err)
  })
}
The getTagPosts(<tag-slug>) function returns all the available posts related to a specific tag.
After receiving all posts with getTagPosts(), we render all posts with the help of the map() method.
// src/app/tag/[slug]/page.tsx

import React from 'react'
import Card from "../../Card"

import { getTagPosts, getAllTags } from "../../ghost-client"

import { notFound } from 'next/navigation';

import type { PostsOrPages } from "@tryghost/content-api";


export async function generateStaticParams() {

  const allTags: Tags = await getAllTags()

  let allTagsItem: { slug: string }[] = []

// genrate the slug for static site

  allTags?.map(item => {
    allTagsItem.push({
      slug: item.slug,
    })
  })

  return allTagsItem

}


async function Tag({ params }: { params: { slug: string }; }) {

  let tagPosts: PostsOrPages = await getTagPosts(params.slug)

// Handling 404 error

  if (tagPosts.length === 0) {
    notFound()
  }

  return (
    <aside aria-label="Related articles" className="py-8 lg:py-24 dark:bg-gray-800">

      <div className="px-4 mx-auto max-w-screen-xl">

        <h2 className="mb-8 text-2xl font-bold text-gray-900 dark:text-white">
          More articles from {params.slug.split("-").join(" ")}
        </h2>

        <div className="container my-12 mx-auto grid grid-cols-1 gap-12 md:gap-12 lg:gap-12  lg:grid-cols-3  md:grid-cols-2 xl:grid-cols-4 2xl:grid-cols-4 ">

          {
            tagPosts.map(
              item => <Card key={item.uuid} item={item} />
            )
          }

        </div>

      </div>

    </aside>
  )

}

export default Tag
Generate the static site with the generateStaticParams function. It helps to generate slugs of the static build.
// ghost-client.ts

export async function getAllTags() {
  return await api.tags.browse({
    limit: "all"
  }).catch(err => {
    console.log(err)
  })
}
How to Build the Author Page
The last and one of the most important pages for the blog site is the author page. This is where readers can learn more about the author.
For the demo blog, I designed a basic page for the author.
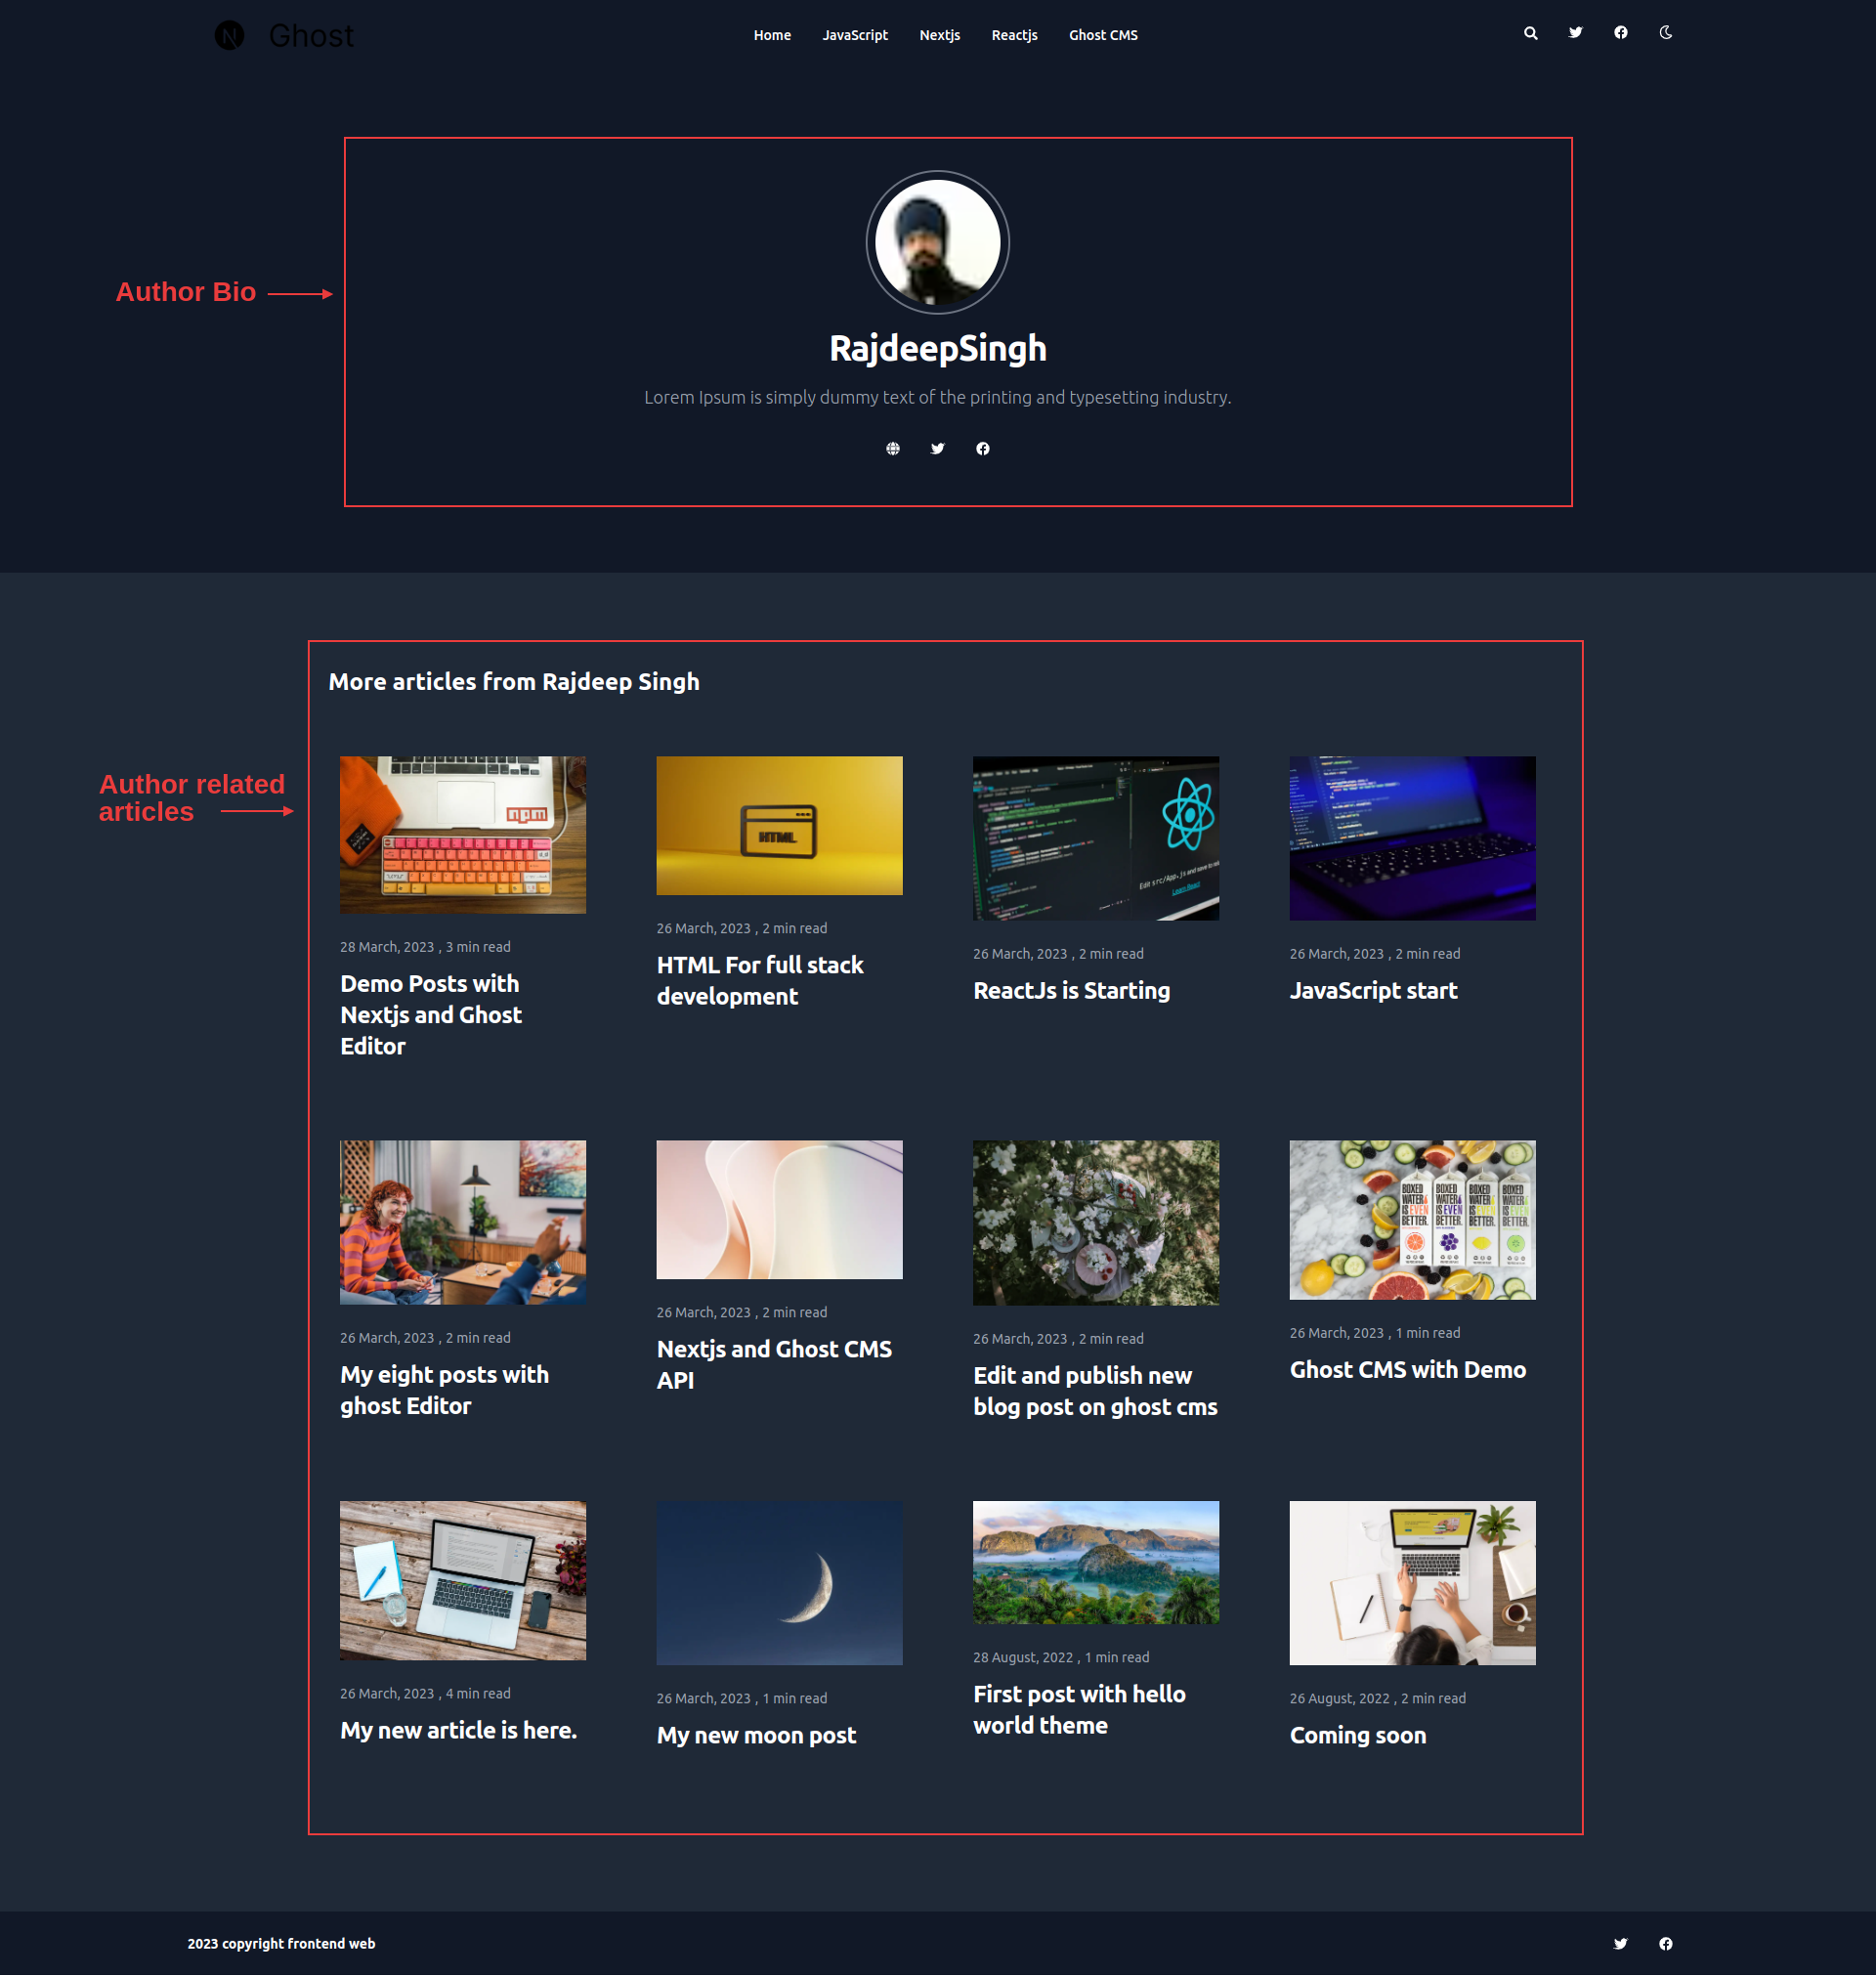 Author page
We'll build this in a similar way as we built the tag page. First, we get the author's metadata and author posts from the Ghost CMS API.
// ghost-client.ts


// get author meta Data

export async function getSingleAuthor(authorSlug: string) {
  return await api.authors
    .read({
      slug: authorSlug
    }, { include: ["count.posts"] })
    .catch(err => {
      console.log(err)
    });

}

// get author related posts

export async function getSingleAuthorPosts(authorSlug: string) {
  return await api.posts.browse({ filter: `authors:${authorSlug}` })
    .catch(err => {
      console.log(err)
    })
};

// get All author from Ghost CMS for generateStaticParams

export async function getAllAuthors() {

  return await api.authors
    .browse({
      limit: "all"
    })
    .catch(err => {
      throw new Error(err)
    });

}
The getSingleAuthor(<author-slug>) returns data about a single author based on the author slug, and the getSingleAuthorPosts(<author-slug>) function returns all posts related to the author.
We render the posts data with the help of the map() method.
// src/app/author/[slug]/page.tsx

import React from 'react';
import Link from "next/link";
import { FaFacebook, FaTwitter, FaGlobe } from "react-icons/fa";
import Card from "../../Card"

import { getSingleAuthor, getSingleAuthorPost, getAllAuthors } from "../../ghost-client"

import Image from 'next/image';
import { notFound } from 'next/navigation';

import type { Author, PostsOrPages } from "@tryghost/content-api";


export async function generateStaticParams() {

  const allAuthor: Author[] = await getAllAuthors()


  let allAuthorItem: { slug: string }[] = []

  allAuthor.map(item => {
    allAuthorItem.push({
      slug: item.slug,
    })
  })
  return allAuthorItem

}


async function AuthorPage({ params }: { params: { slug: string }; }) {

  const getAuthor: Author = await getSingleAuthor(params.slug)

  const allAuthor: PostsOrPages = await getSingleAuthorPost(params.slug)

// Handling 404 errors
  if (allAuthor?.length === 0) {
    notFound()
  }

  return (
    <>
      <section className="dark:bg-gray-900">
        <div className="py-8 px-4 mx-auto max-w-screen-xl lg:py-16 lg:px-6">

          <div className=" p-10 text-gray-500 sm:text-lg dark:text-gray-400">

            {
              getAuthor?.profile_image !== undefined ? <Image height={30} width={30} className="w-36 h-36 p-2 rounded-full mx-auto ring-2 ring-gray-300 dark:ring-gray-500" src={getAuthor?.profile_image} alt={getAuthor?.name} /> : ""
            }

            {
              getAuthor?.name ? <h2 className="mb-4 mt-4 text-4xl tracking-tight font-bold text-center text-gray-900 dark:text-white">
                {getAuthor?.name.split(" ")[0]}
                <span className="font-extrabold">
                  {getAuthor?.name?.split(" ")[1]}
                </span>
              </h2> : ""
            }

            <p className="mb-4 font-light text-center">{getAuthor?.bio} </p>


            <ul className="flex flex-wrap p-4 justify-center md:space-x-8 md:mt-0 md:text-sm md:font-medium">

              {
                (getAuthor?.website !== null) ? (<li>
                  <Link href={getAuthor?.website} className="block py-2 pl-3 pr-4 text-gray-700 hover:text-blue-700 dark:hover:text-blue-700 rounded md:p-0 dark:text-white" aria-current="page">
                    <FaGlobe />
                  </Link> </li>) : " "


              }

              {
                (getAuthor?.twitter !== null) ? (<li>
                  <Link href={getAuthor?.twitter} className="block py-2 pl-3 pr-4 text-gray-700 rounded hover:text-blue-700 dark:hover:text-blue-700 md:p-0 dark:text-white" aria-current="page">
                    <FaTwitter />
                  </Link>
                </li>) : " "
              }

              {
                (getAuthor?.facebook !== null && getAuthor.facebook !== undefined) ? (<li>
                  <Link href={getAuthor?.facebook}
                    className="block py-2 pl-3 pr-4 text-gray-700 rounded  hover:text-blue-700 dark:hover:text-blue-700 md:p-0 dark:text-white"> <FaFacebook />
                  </Link>
                </li>) : " "

              }

            </ul>

          </div>
        </div>
      </section>

      <aside aria-label="Related articles" className="py-8 lg:py-24 dark:bg-gray-800">
        <div className="px-4 mx-auto max-w-screen-xl">

          <h2 className="mb-8 text-2xl font-bold text-gray-900 dark:text-white">
            More articles from {getAuthor?.name}
          </h2>

          <div className="container my-12 mx-auto grid grid-cols-1 gap-12 md:gap-12 lg:gap-12  lg:grid-cols-3  md:grid-cols-2 xl:grid-cols-4 2xl:grid-cols-4 ">

            {
              allAuthor?.map(item => <Card key={item?.uuid} item={item} />)
            }

          </div>
        </div>
      </aside>


    </>
  )

}
export default AuthorPage
To generate the author slug for the static site, we need to use the generateStaticParams function. We do not need anything else to build the static site.
// ghost-client.ts


// Build Static Site

export async function generateStaticParams() {

  const allAuthor: Author[] = await getAllAuthors()


  let allAuthorItem: { slug: string }[] = []

  allAuthor.map(item => {
    allAuthorItem.push({
      slug: item.slug,
    })
  })
  return allAuthorItem

}
How to Build Single Pages
For single pages like About, Contact, Privacy Policy, and so on, you can also create them with the Ghost Content API.
Our single-page design looks like this:
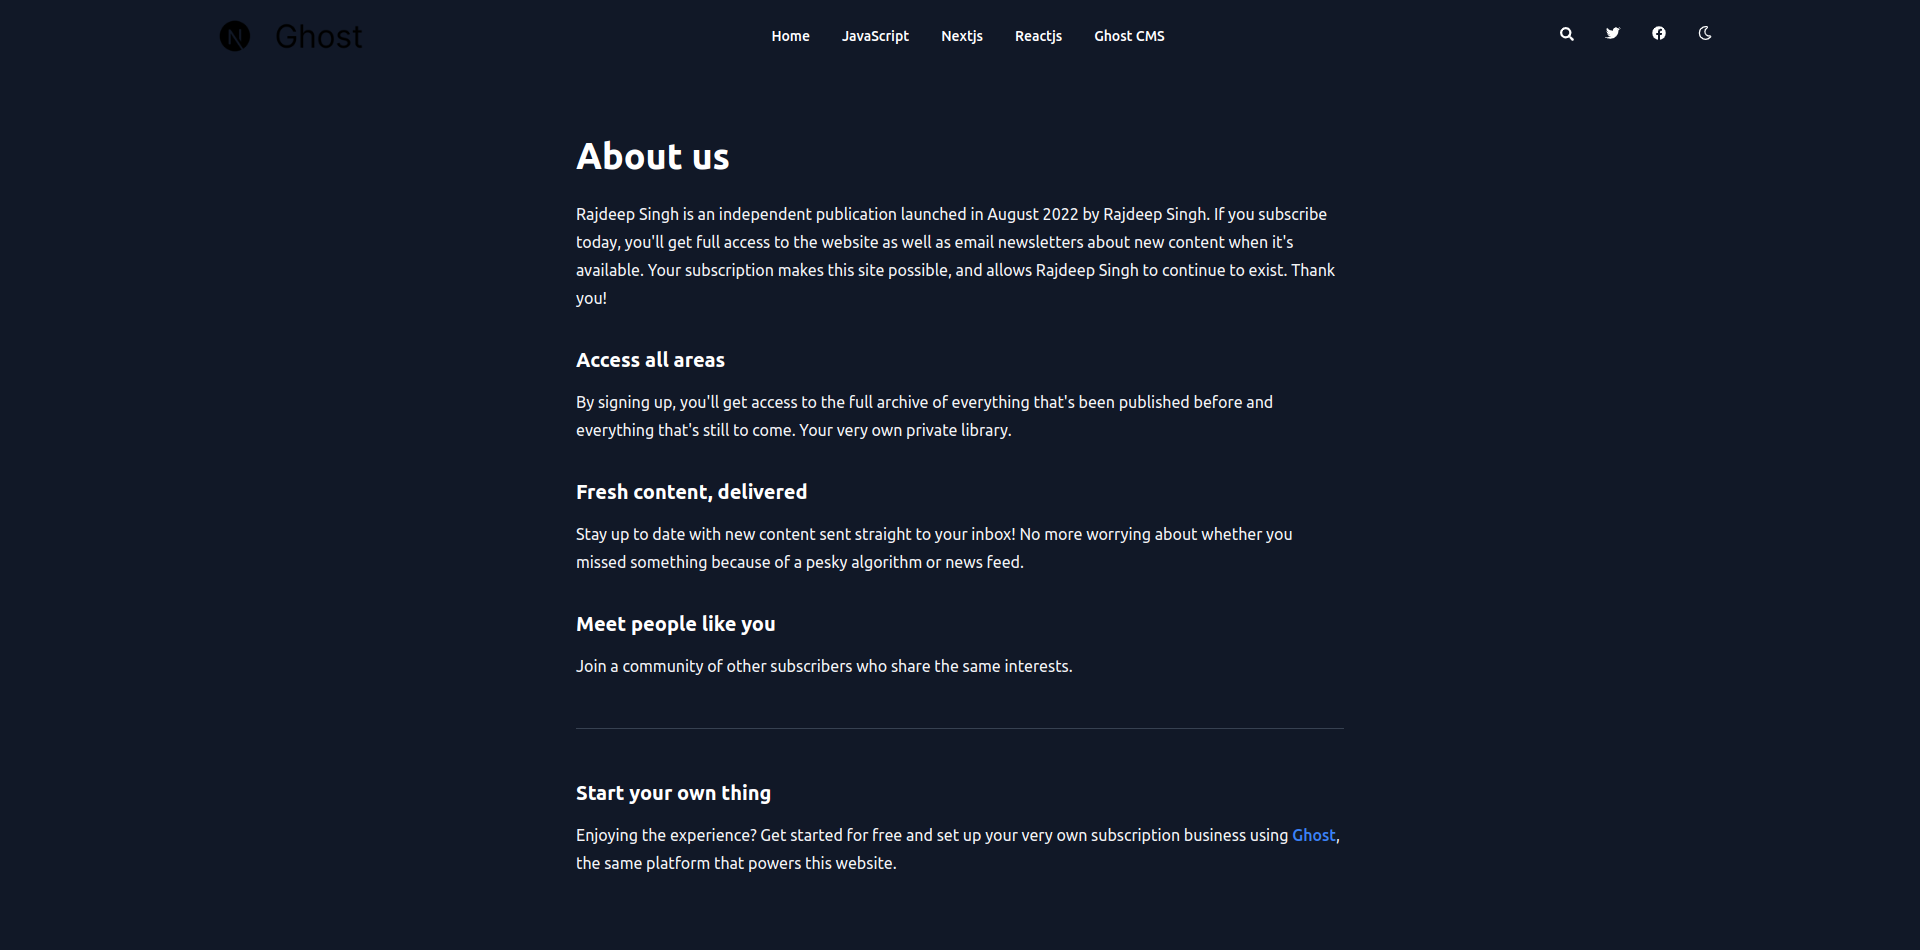 single blog page
Firstly, you need to fetch all pages and the single pages data from the Ghost Content API.
// ghost-client.tsx

// fetch all pages

export async function getSinglePage(pageSlug: string) {
  return await api.pages
    .read({
      slug: pageSlug
    })
    .catch(err => {
      console.error(err);
    });
}

// single page data

export async function getSinglePage(pageSlug: string) {
  return await api.pages
    .read({
      slug: pageSlug
    }, { include: ["tags"] })
    .catch(err => {
      console.error(err);
    });
}
The getSinglePage(page-slug) function returns the single page data based on the page slug, and the getAllPages() function returns all the available published page data to generate the dynamic params with the generateStaticParams() function.
// src/app/pages/[slug]/page.tsx

import { getSinglePage, getAllPages } from "../../ghost-client"
import { notFound } from 'next/navigation';
import type { PostOrPage } from "@tryghost/content-api";
import "../../cards.min.css"

// genrate Static slug or params for blog

export async function generateStaticParams() {
  const pages = await getAllPages()

  return pages.map((post) => ({
    slug: post.slug,
  }));
}

async function Pages({ params }: { params: { slug: string }; }) {

// fetch single page
  const getPage = await getSinglePage(params.slug)

  // handle 404 error
  if (!getPage) {
    notFound()
  }

  return (
    <>
      <main className="pt-8 pb-16 lg:pt-16 lg:pb-24 dark:bg-gray-900">
        <div className="flex justify-between px-4 mx-auto max-w-screen-xl ">

          <article className="mx-auto w-full max-w-3xl prose prose-xl prose-p:text-gray-800  dark:prose-p:text-gray-100 sm:prose-base prose-a:no-underline prose-blue dark:prose-invert">


            <h1 className="mb-14 text-3xl font-extrabold leading-tight text-gray-900 lg:mb-6 lg:text-4xl dark:text-white">
              {getPage.title}
            </h1>

            <div dangerouslySetInnerHTML={{ __html: getPage?.html }}></div>

          </article>
        </div>
      </main>
    </>
  )

}
export default Pages
How to Handle Pagination
Pagination helps speed up your site as well as divide your site into smaller parts, more digestible pages. You can link your posts with each other with prev and next.
meta:{
    pagination: { page: 1, limit: 10, pages: 2, total: 12, next: 2, prev: null }
 }
Firstly, we'll create a Pagination.tsx file as a React component.
// Pagination.tsx

import Link from "next/link"
import { Pagination } from "@tryghost/content-api"

function PaginationItem({ item }: { item: Pagination }) {

  let paginationItems = []

  for (let index = 1; index <= item?.pages; index++) {
    paginationItems.push(<li key={index * 2} ><Link href={index === 1 ? "/" : `/pagination/${index}`} className="px-3 py-2 leading-tight bg-blue-100 hover:bg-blue-200 border-transparent border rounded-lg text-black dark:bg-gray-800 dark:text-gray-400 mx-2 dark:hover:bg-gray-700 dark:hover:text-white">
      {index}
    </Link></li>)
  }

  return (

    <nav aria-label="pagination" className="mx-auto my-20 container">

      <ul className="mx-auto flex justify-center -space-x-px">

        <li>
          {
            item.prev ? <Link href={item.prev === 1 ? "/" : `/pagination/${item.prev}`} className="px-3 py-2 mr-2 border border-transparent rounded-md  leading-tight bg-white hover:text-blue-700 dark:bg-gray-800 dark:text-gray-400
              dark:hover:bg-gray-700 dark:hover:text-white">
              Prev
            </Link> : " "
          }
        </li>

        {paginationItems}

        <li>
          {
            item.next ? <Link href={`/pagination/${item.next}`} className="px-3 py-2 ml-2 border border-transparent rounded-md leading-tight bg-white hover:text-blue-700 dark:bg-gray-800 dark:text-gray-400
            dark:hover:bg-gray-700 dark:hover:text-white">
              Next
            </Link> : " "
          }
        </li>


      </ul>

    </nav>

  )

}


export default PaginationItem
When you call the api.posts.browse({ limit: 10 }) request, the API endpoint returns ten posts and a meta object with pagination.
The returned api.posts.browse({ limit: 10 }) data look like this:
 [
  {title: 'Demo Posts with Nextjs and Ghost Editor',... },
  {title: Trigger the hook and rebuild the nextjs site',... }

meta:{
    pagination: { page: 1, limit: 10, pages: 2, total: 12, next: 2, prev: null }
  }
]
Now based on meta, we can create pagination and pass meta.pagination as props to the Pagination component.
// src/app/page.tsx

import { getPosts } from "./ghost-client"
import Pagination from "./Pagination"

export default async function Home() {

  const getPost = await getPosts()

  const AllPostForSerach = await getSearchPosts()

  return (
    <>
     {/* rest of code  */}
      <Pagination item={getPost.meta.pagination} />
    </>
  )
}
To enable dynamic pagination, we'll create a src/app/pagination/[item]/page.tsx route in the blog. You can use whatever name you want for the pagination route.
// ghost-client.tsx

// return all posts for generateStaticParams

export async function getPosts() {
  return await api.posts
    .browse({
      include: ["tags", "authors"],
      limit: 10
    })
    .catch(err => {
      throw new Error(err)
    });
}

//
export async function getPaginationPosts(page: number) {
  return await api.posts
    .browse({
      include: ["tags", "authors"],
      limit: 10,
      page: page
    })
    .catch(err => {
      throw new Error(err)
    });
}
The getPosts is used to render the Pagination component on the pagination page. The important part is the getPaginationPosts(<pagination-page-number>) function, which returns posts based on the pagination page number.
// src/app/pagination/[item]/page.tsx

import { getPaginationPosts, getPosts } from "../../ghost-client"
import Card from '../../Card'
import PaginationItem from "../../Pagination"
import type { Metadata } from "next";
import type { PostsOrPages } from "@tryghost/content-api";


export async function generateStaticParams() {

  const posts:PostsOrPages = await getPosts()

  let paginationItem: { item: number }[] = []

  for (let index = 1; index <= posts?.meta.pagination.pages; index++) {
    paginationItem.push({
      item: index,
    })

  }

  return paginationItem

}


export default async function Pagination({ params }: { params: { item: string }; }) {

  let getParams: number = Number.parseInt(params.item)

  const getPost: PostsOrPages = await getPaginationPosts(getParams)

  return (
    <>

      <main className="container my-12 mx-auto grid grid-cols-1 gap-2 md:gap-3 lg:gap-4 lg:grid-cols-3 md:grid-cols-2 xl:grid-cols-4 2xl:grid-cols-4">

        {
          getPost?.map(
            item => {
              return <Card key={item.uuid} item={item} />
            })
        }
      </main>

      <PaginationItem item={getPost.meta.pagination} />

    </>
  )
}
Next.js SEO
If you are a blogger, you know how important SEO is in helping people find your blog and your articles. For SEO, Next.js provides a generateMetadata function to generate dynamic SEO metadata for your site. This means that you don't need any additional packages for SEO.
For the purpose of this example, I'll explain how to enable SEO for the blog only on the Homepage and the Reading page. You can use the same logic to enable it on any of your other pages.
First, let's see how to enable SEO on the Homepage:
// ghost-client.ts


// Get you settings meta data from Ghost CMS
export async function getNavigation() {
  return await api.settings.browse()
}
// src/app/page.tsx

import { getNavigation } from "./ghost-client"

export async function generateMetadata(): Promise<Metadata> {
  const Metadata = await getNavigation()
  return {
    title: Metadata.title,
    description: Metadata.description,
    keywords: ['Next.js', 'React', 'JavaScript'],
  }
}
Now we'll see how to enable SEO on the Reading page:
// ghost-client.ts


export async function getSinglePost(postSlug: string) {
  return await api.posts
    .read({
      slug: postSlug
    }, { include: ["tags", "authors"] })
    .catch(err => {
      console.error(err);
    });
}
The generateMetadata have params props, which help access the slug. Then, based on the slug, we get the data and return it.
export async function generateMetadata({ params }: { params: { slug: string }; }): Promise<Metadata> {

  const metaData: PostOrPage = await getSinglePost(params.slug)

  let tags = metaData?.tags.map(item => item.name)

  return {
    title: metaData.title,
    description: metaData.description,
    keywords: tags,
    openGraph: {
      title: metaData.title,
      description: metaData.excpet,
      url: metaData.url,
      keywords: tags,
      images: [
        {
          url: metaData.feature_image,
        },
      ],
      locale: metaData.locale,
      type: 'website',
    },
  }
}
How to Enable Search
Enabling search on a static blog is hard to do from scratch. Instead, you can use a third-party Node page like Orama or Flex search.
For our demo, we created a very simple search bar functionality without installing any additional packages.
Firstly, we get all posts from the Ghost CMS API.
// ghost-client.ts

export async function getSearchPosts() {
  return await api.posts.browse({ limit: "all"}).catch(err => {
    console.log(err)
  });
After we convert it into a string with the help of JSON.stringify(), we then create a new search.json file. On every request, it updates or rewrites our search.json file.
// src/app/page.tsx

import {  getSearchPosts } from "./ghost-client"
import * as fs from 'node:fs';


export default async function Home() {


// get All posts for search
  const AllPostForSerach = await getSearchPosts()

  // Enable getSearch

  try {

    const jsonString = JSON.stringify(AllPostForSerach)

    fs.writeFile('search.json', jsonString, 'utf8', err => {
      if (err) {
        console.log('Error writing file', err)
      } else {
        console.log('Successfully wrote file')
      }
    })

  } catch (error) {
    console.log('error : ', error)
  }


  return (
    <>
      <main className="container my-12 mx-auto grid grid-cols-1 gap-2 md:gap-3 lg:gap-4 lg:grid-cols-3 md:grid-cols-2 xl:grid-cols-4 2xl:grid-cols-4">
      {/* rest code... */}
      </main>
    </>
  )
}
When you enter the text in the search input, based on the text query, we compare the query or text in the serach.json file data. If it matches the article title with the query, then we store the searchPost variable, and finally we render the stored data in the searchPost variable page.
"use client"

import React, { useEffect, useState } from 'react';
import * as Popover from '@radix-ui/react-popover';
import { FaSearch } from "react-icons/fa";
import Link from 'next/link';
import searchData from '../../search.json'
import type { PostOrPage } from "@tryghost/content-api"


let searchPost: PostOrPage[] = []


function Search() {

  const [query, setQuery] = useState(null)

  useEffect(() => {

    searchPost.length = 0;

    searchData.map((item: PostOrPage) => {

      if (item?.title.trim().toLowerCase().includes(query?.trim().toLowerCase())) {
        searchPost.push(item)
      }

    })

  }, [query])


  return (
    <Popover.Root>
      <Popover.Trigger asChild>
        <button
          className="cursor-pointer outline-none"
          aria-label="Search"
        >
          <FaSearch />
        </button>
      </Popover.Trigger>

      <Popover.Portal>

        <Popover.Content
          className="rounded p-2 bg-white dark:bg-gray-800 w-[480px] will-change-[transform,opacity] data-[state=open]:data-[side=top]:animate-slideDownAndFade data-[state=open]:data-[side=right]:animate-slideLeftAndFade data-[state=open]:data-[side=bottom]:animate-slideUpAndFade data-[state=open]:data-[side=left]:animate-slideRightAndFade"
          sideOffset={5}
        >

          <div className='my-2'>
            <label htmlFor="default-search" className="mb-2 mt-5 text-sm font-medium text-gray-900 sr-only dark:text-white">Search bar </label>
            <div className="relative">
              <div className="absolute inset-y-0 left-0 flex items-center pl-3 pointer-events-none">
                <svg className="w-5 h-5 text-gray-500 dark:text-gray-400" fill="none" stroke="currentColor" viewBox="0 0 24 24" xmlns="http://www.w3.org/2000/svg"><path strokeLinecap="round" strokeLinejoin="round" strokeWidth="2" d="M21 21l-6-6m2-5a7 7 0 11-14 0 7 7 0 0114 0z"></path></svg>
              </div>
              <input type="search" id="default-search" onChange={(event) => setQuery(event?.target.value)} className="block w-full p-4 pl-10 text-sm text-gray-900 border border-gray-300 rounded-lg bg-gray-50 focus:ring-blue-500 focus:border-blue-500 dark:bg-gray-700 dark:border-gray-600 dark:placeholder-gray-400 dark:text-white dark:focus:ring-blue-500 dark:focus:border-blue-500" placeholder="Start searching here ..." required />

            </div>
          </div>


          {

            serachPost.length > 0 ? serachPost.map(item => {

              return (
                <div key={item.uuid} className='my-3'>
                  <div className="text-white my-2 py-2 bg-blue-400 dark:bg-gray-900 dark:hover:bg-blue-400 border-none rounded-md dark:text-white">
                    <Link href={`read/${item.slug}`} className="relative inline-flex items-center rounded-lg w-full px-4 py-2 text-sm font-medium">
                      {item.title}
                    </Link>
                  </div>
                </div>
              )
            }) : " "

          }

        </Popover.Content>

      </Popover.Portal>

    </Popover.Root >
  )
}

export default Search;
Error Handling
Next.js has two types of error handling. the first is layout-based, and the second is global error handling. For the demo here, we'll use layout-based error handling.
Next provides a special type of error.tsx file to handle errors on your site. It does not handle 404, 500, and so on – it handles only runtime errors.
'use client'; // Error components must be Client components
import React from 'react';
import { useEffect } from 'react';
import Link from 'next/link';
export default function Error({ error, reset }: { error: Error; reset: () => void; }) {

  useEffect(() => {
    console.error(error);
  }, [error]);

  return (
    <section className="dark:bg-gray-900 my-16">

      <div className="py-8 px-4 mx-auto max-w-screen-xl lg:py-16 lg:px-6">

        <div className="mx-auto max-w-screen-sm text-center">

          <h1 className="mb-4 text-7xl tracking-tight font-extrabold lg:text-9xl text-primary-600 dark:text-primary-500">Something wrong</h1>
          <p className="mb-4 text-lg p-2 font-light bg-red-500 text-white dark:bg-red-400 dark:text-white">{error.message}</p>

          <div className='flex justify-around mt-2'>

            <Link href="#" className="inline-flex bg-gray-600 text-white hover:bg-gray-700 focus:ring-4 font-medium rounded-lg text-sm p-2
                text-center">Back to Homepage</Link>

            <button className='bg-gray-600 text-white rounded-lg p-2' onClick={() => reset()}>
              Try again
            </button>


          </div>

        </div>

      </div>

    </section>
  );
}
How to handle 404 errors
To handle 404 errors in the Next.js app folder, you need to create a not-found.tsx file in your root level.
Our 404 file looks like this:
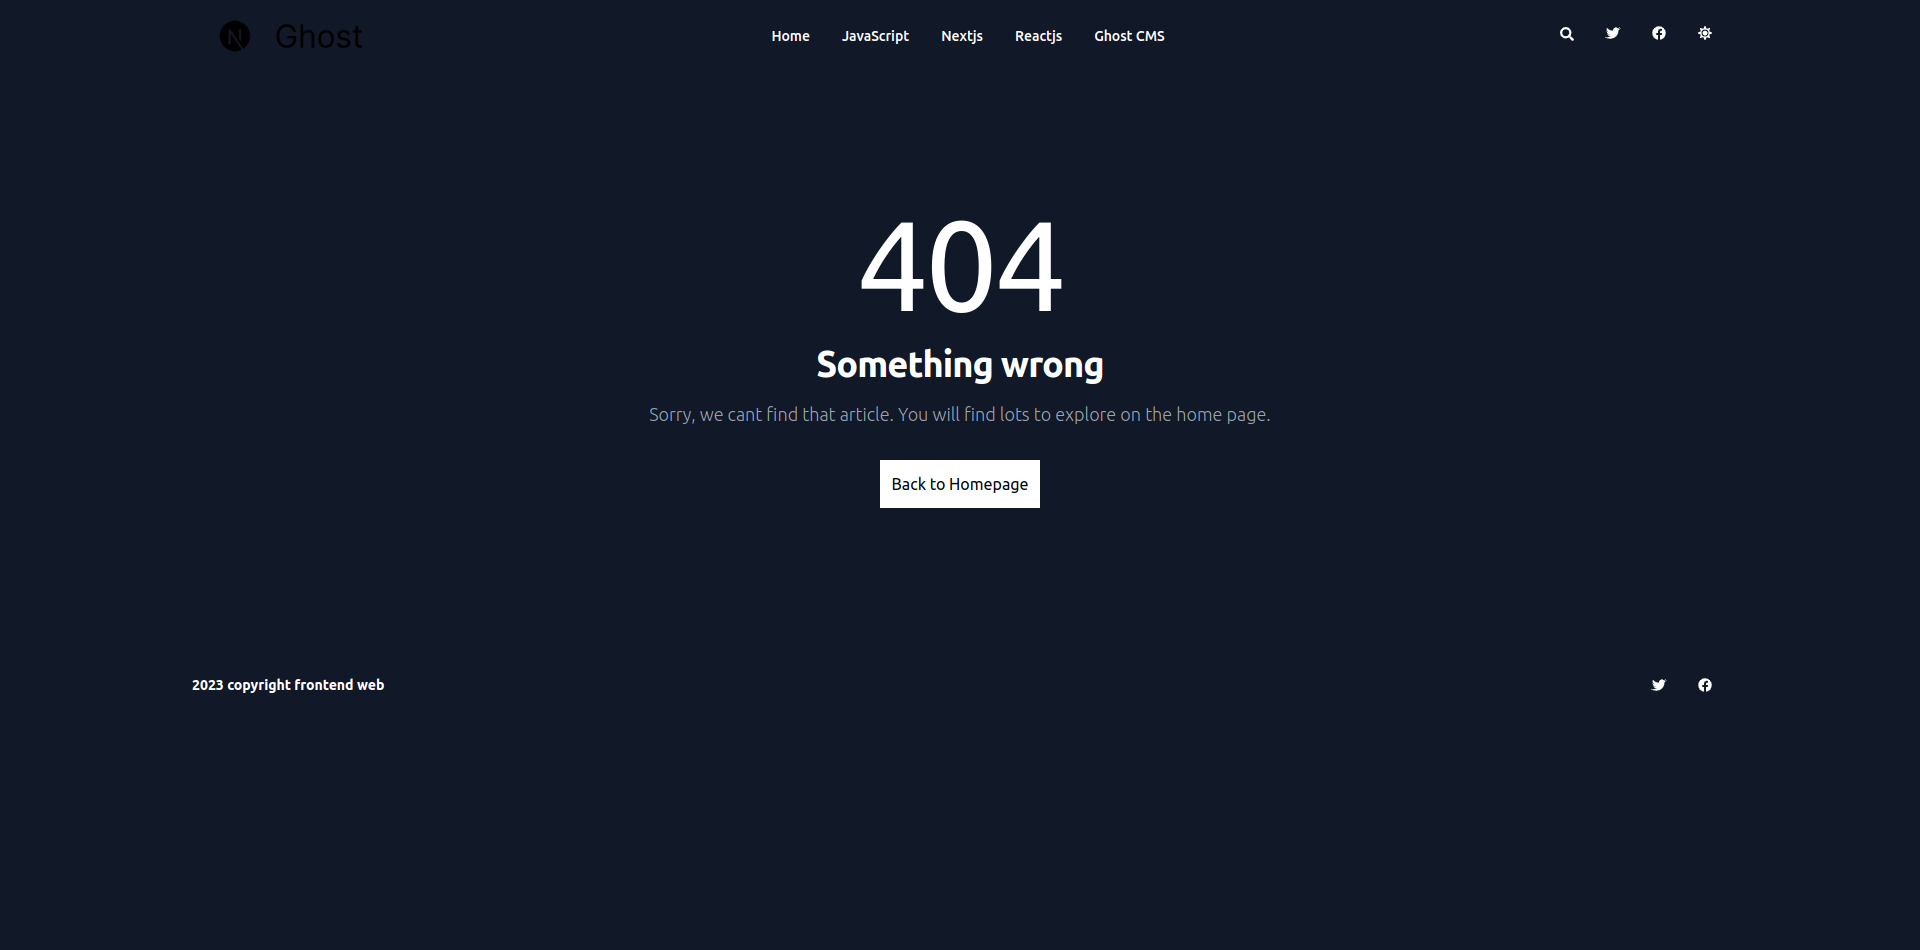 404 error
Here's the code for that:
import Link from "next/link"

function NotFound() {

  return (
    <section className="bg-white dark:bg-gray-900 my-16">
      <div className="py-8 px-4 mx-auto max-w-screen-xl lg:py-16 lg:px-6">
        <div className="mx-auto max-w-screen-sm text-center">
          <h1 className="mb-4 text-7xl tracking-tight lg:text-9xl text-primary-600 dark:text-primary-500">404</h1>
          <p className="mb-4 text-3xl tracking-tight font-bold text-gray-900 md:text-4xl dark:text-white"> Something wrong</p>
          <p className="mb-4 text-lg font-light text-gray-500 dark:text-gray-400">
            Sorry, we cant find that article. You will find lots to explore on the home page.
          </p>
          <Link href="/" className="inline-flex text-white bg-black dark:bg-white dark:text-black p-3 hover:bg-gray-800 my-4">Back to Homepage</Link>
        </div>
      </div>
    </section >
  )

}

export default NotFound
The big issue with the not-found.tsx error file is that it doesn't show automatically in Next (v13.3.0). To show a 404 error, you need to show the error manually. Here's how you do that:
import { notFound } from 'next/navigation';

async function Read({ params }: { params: { slug: string }; }) {

  const getPost = await getSinglePost(params.slug)

  // if not found getPost, then show 404 error

  if (!getPost) {
    notFound()
  }

  return (
      <main className="pt-8 pb-16 lg:pt-16 lg:pb-24 dark:bg-gray-900">

          rest of code ....

      </main>
      )
}
How to Rebuild Your Static Site with Webhooks
The biggest problem when you create a static site happens if somebody writes a new post or changes an existing post in Ghost. For a personal project, you can manually redeploy your site. But for a larger site, you won't be able to do that every time this happens.
The best solution is to use webhooks. Ghost provides webhook support. If you update an existing post or write a new one, it'll update in Ghost.
In the demo project, we're using Vercel webhooks to deploy our blog. When we create a new blog or update something on the site, Ghost triggers the Vercel webhook. Then Vercel rebuilds the site as needed.
You do not need to write the code for this – just follow along and copy-paste as you go.
How to get the webhook from Vercel
Firstly, go to the Vercel dashboard.
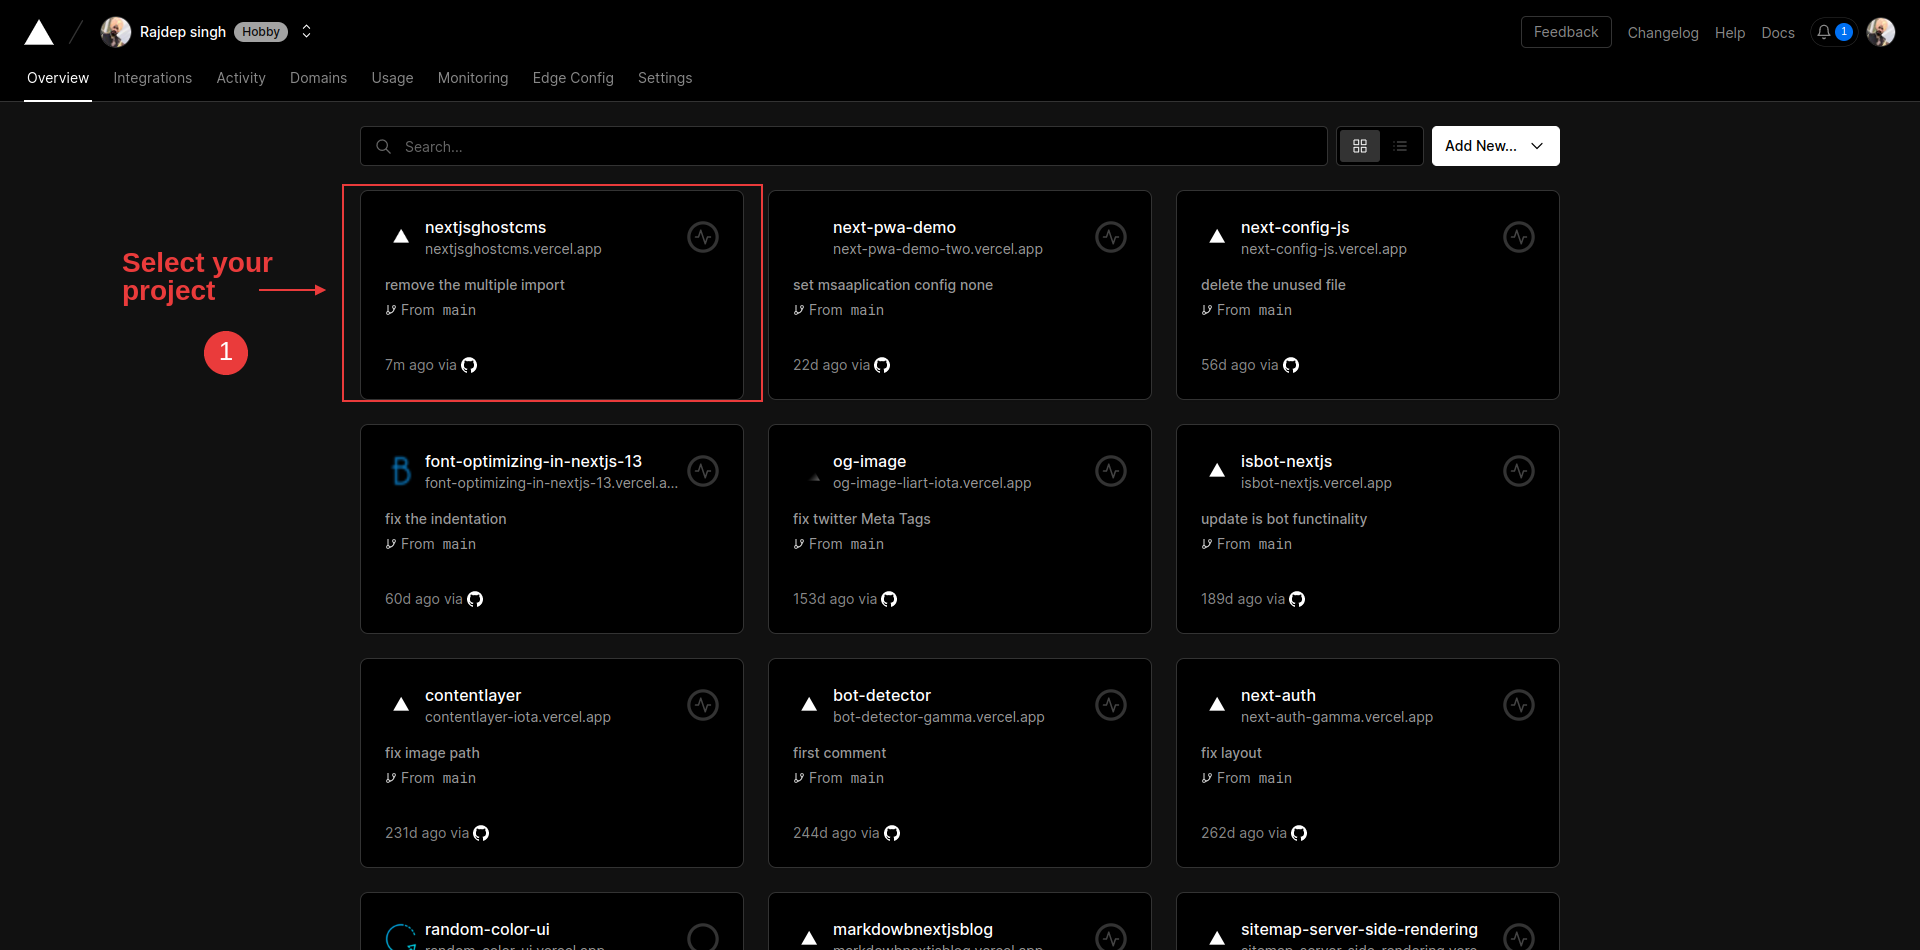 Vercel dashboard
Select your project, where you'll deploy your Ghost frontend.
 Select the project in your Vercel dashboard
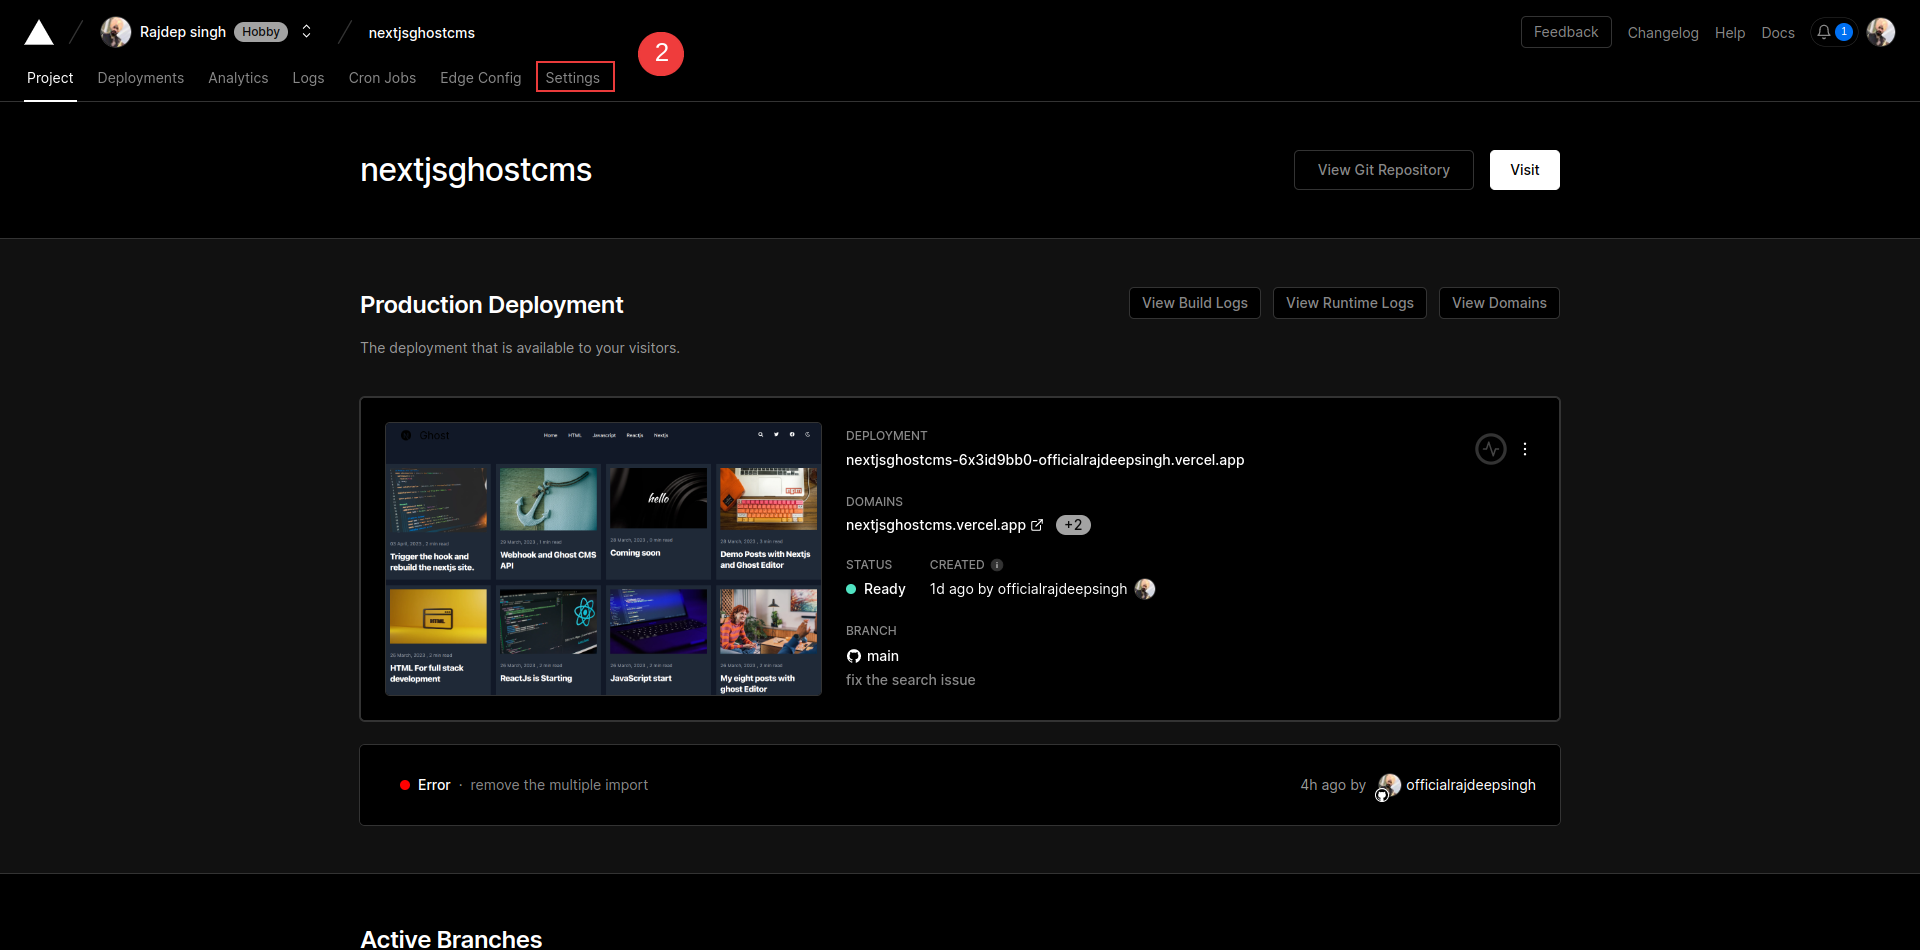
Click on the settings tab in your Vercel project.
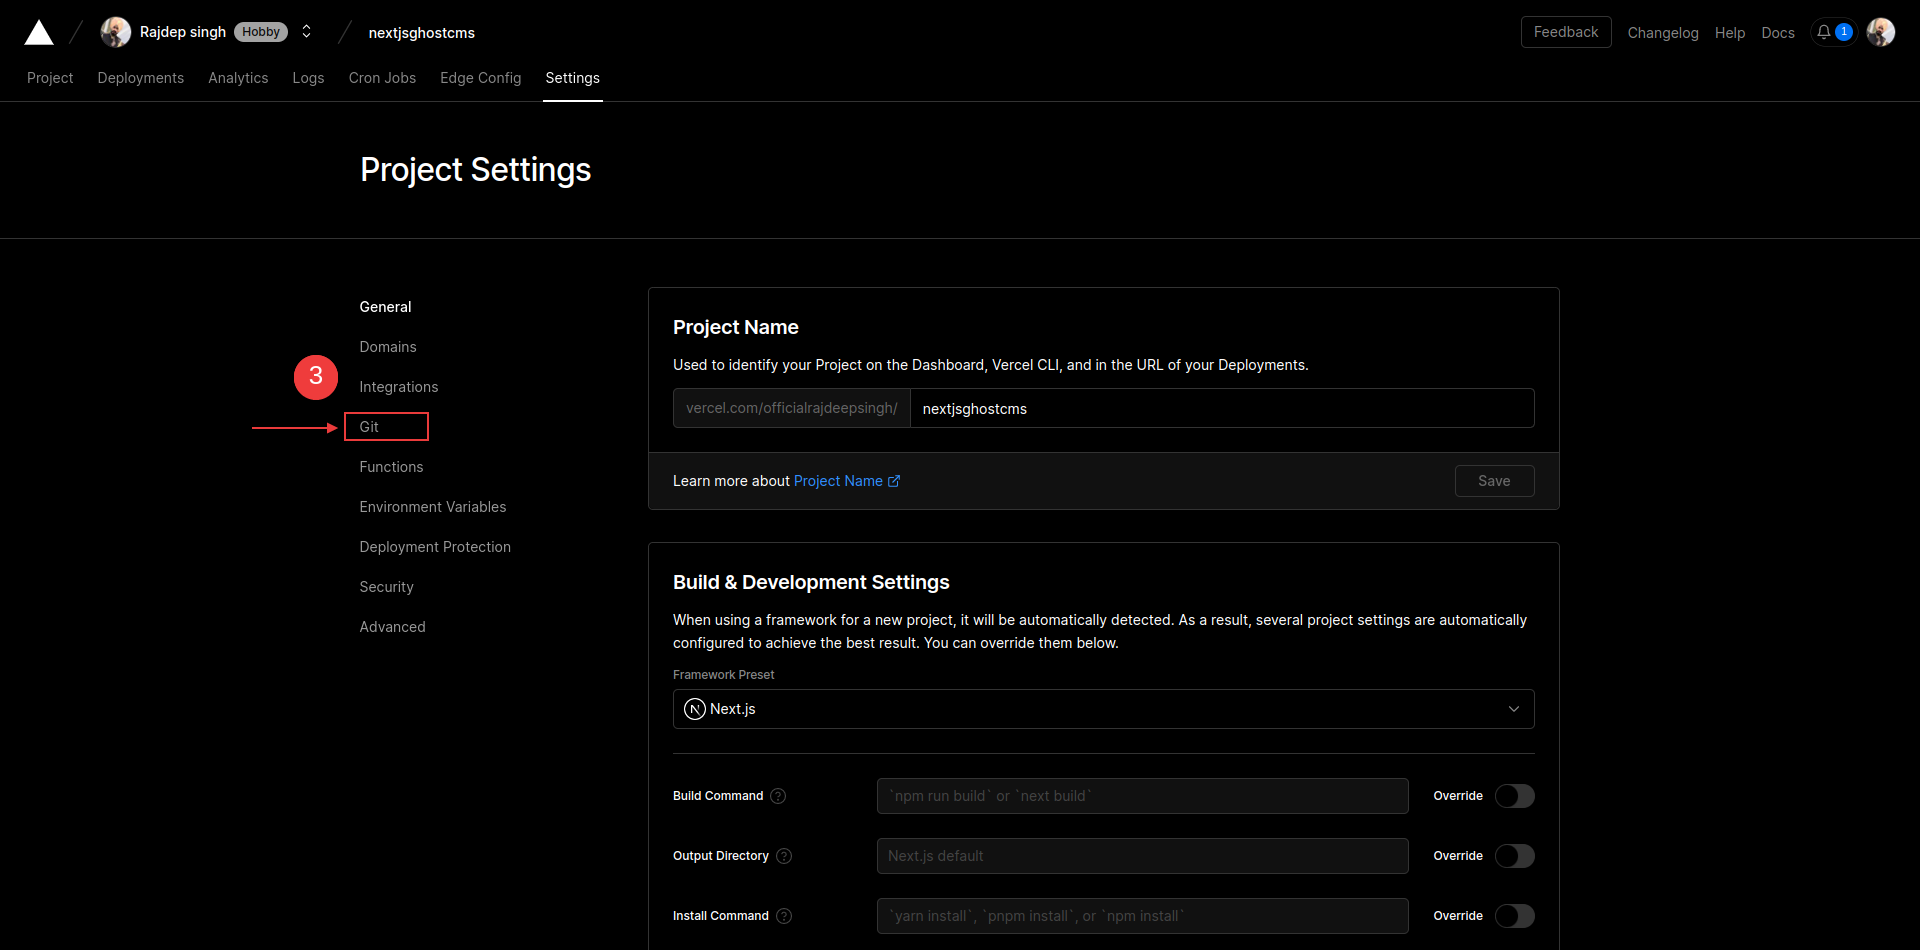 Click the Git tab
Then click on the Git tab. After scrolling down, you can see the deploy hook selection.
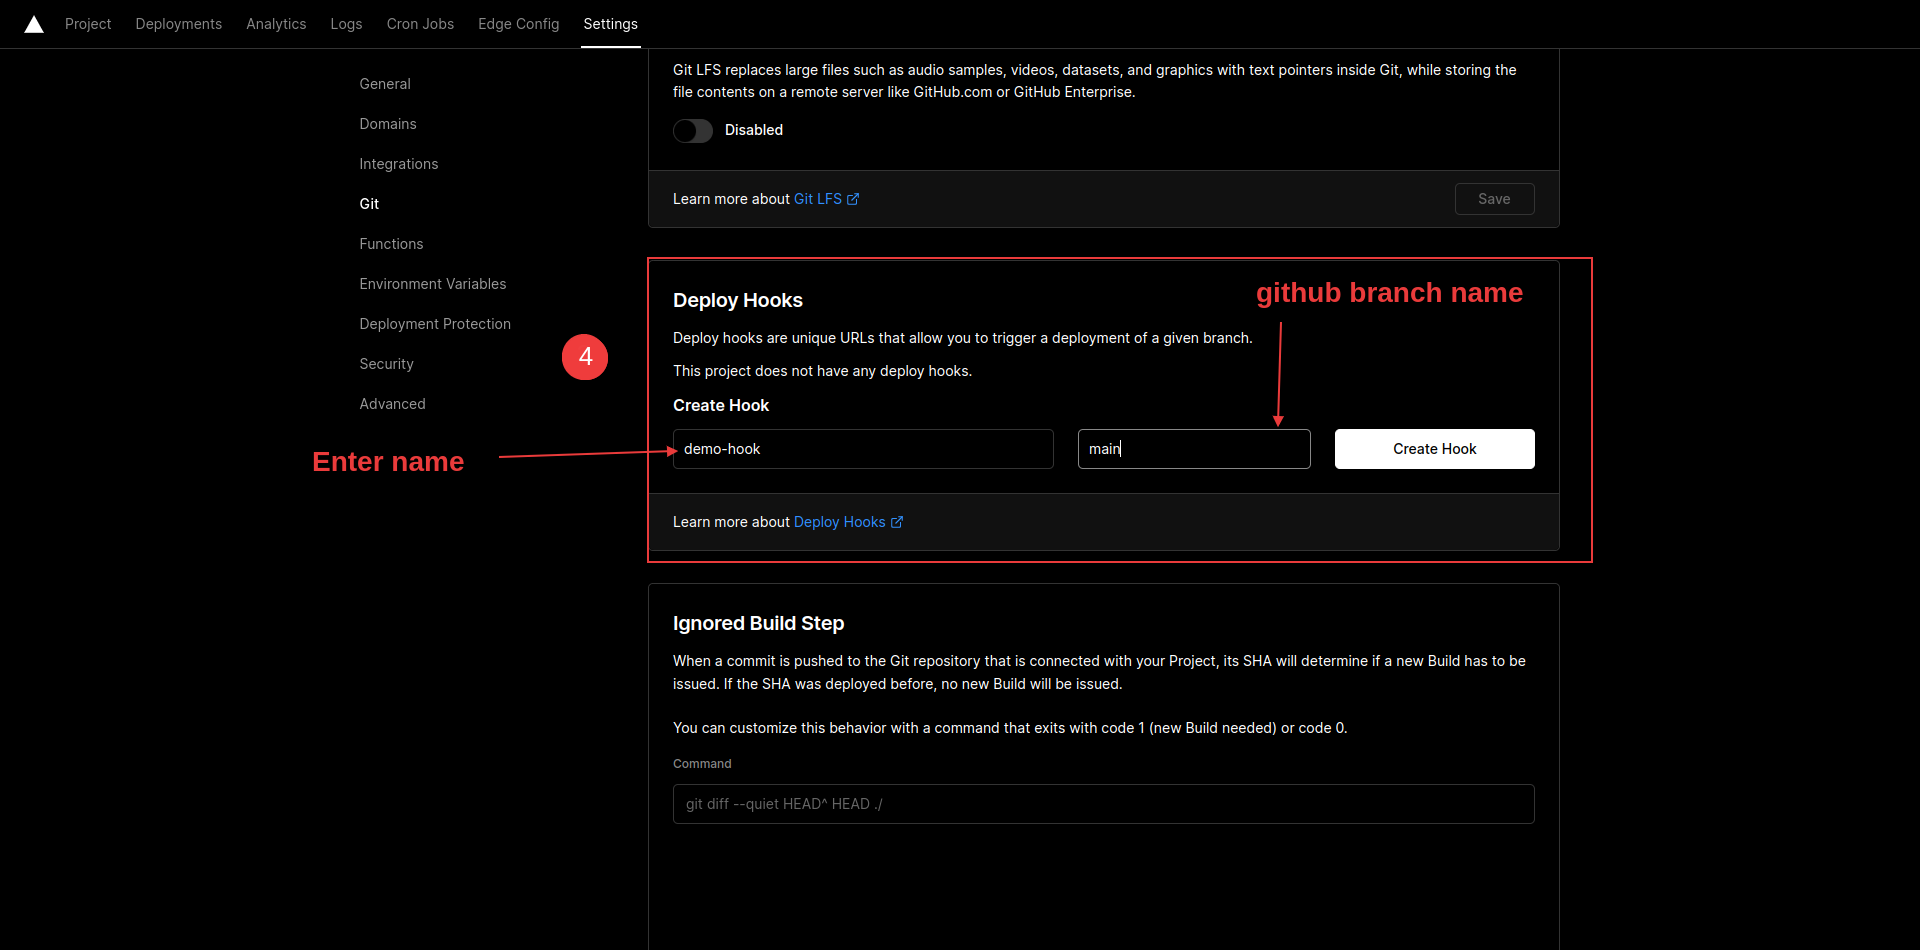 Go to Deploy hooks sections
Enter your webhook name and branch name and click on the "create hook" button.
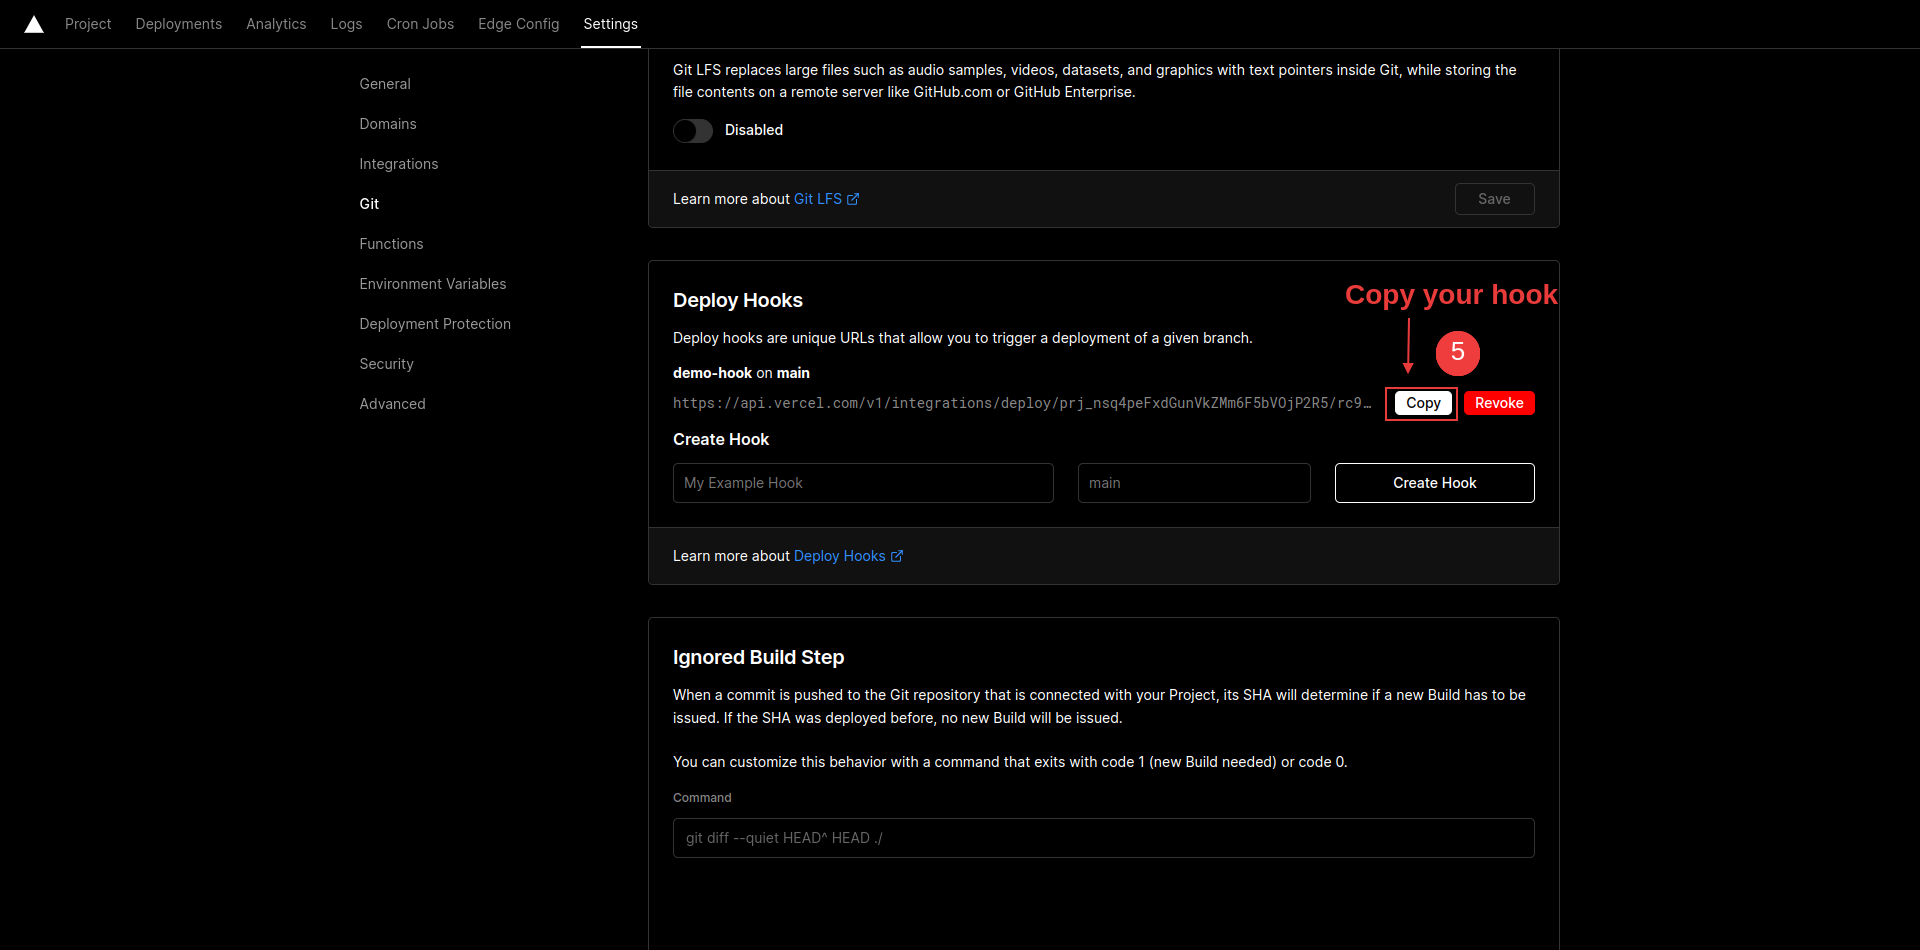 Copy your webhook url
Click on the copy button to copy your vercel webhook.
How to integrate Vercel webhooks in the Ghost dashboard
When something changes in Ghost, it triggers the Vercel webhook URL. Then Vercel redeploys the blog site.
To integrate the Vercel webhook with Ghost, just follow these steps:
Open the Ghost CMS dashboard.
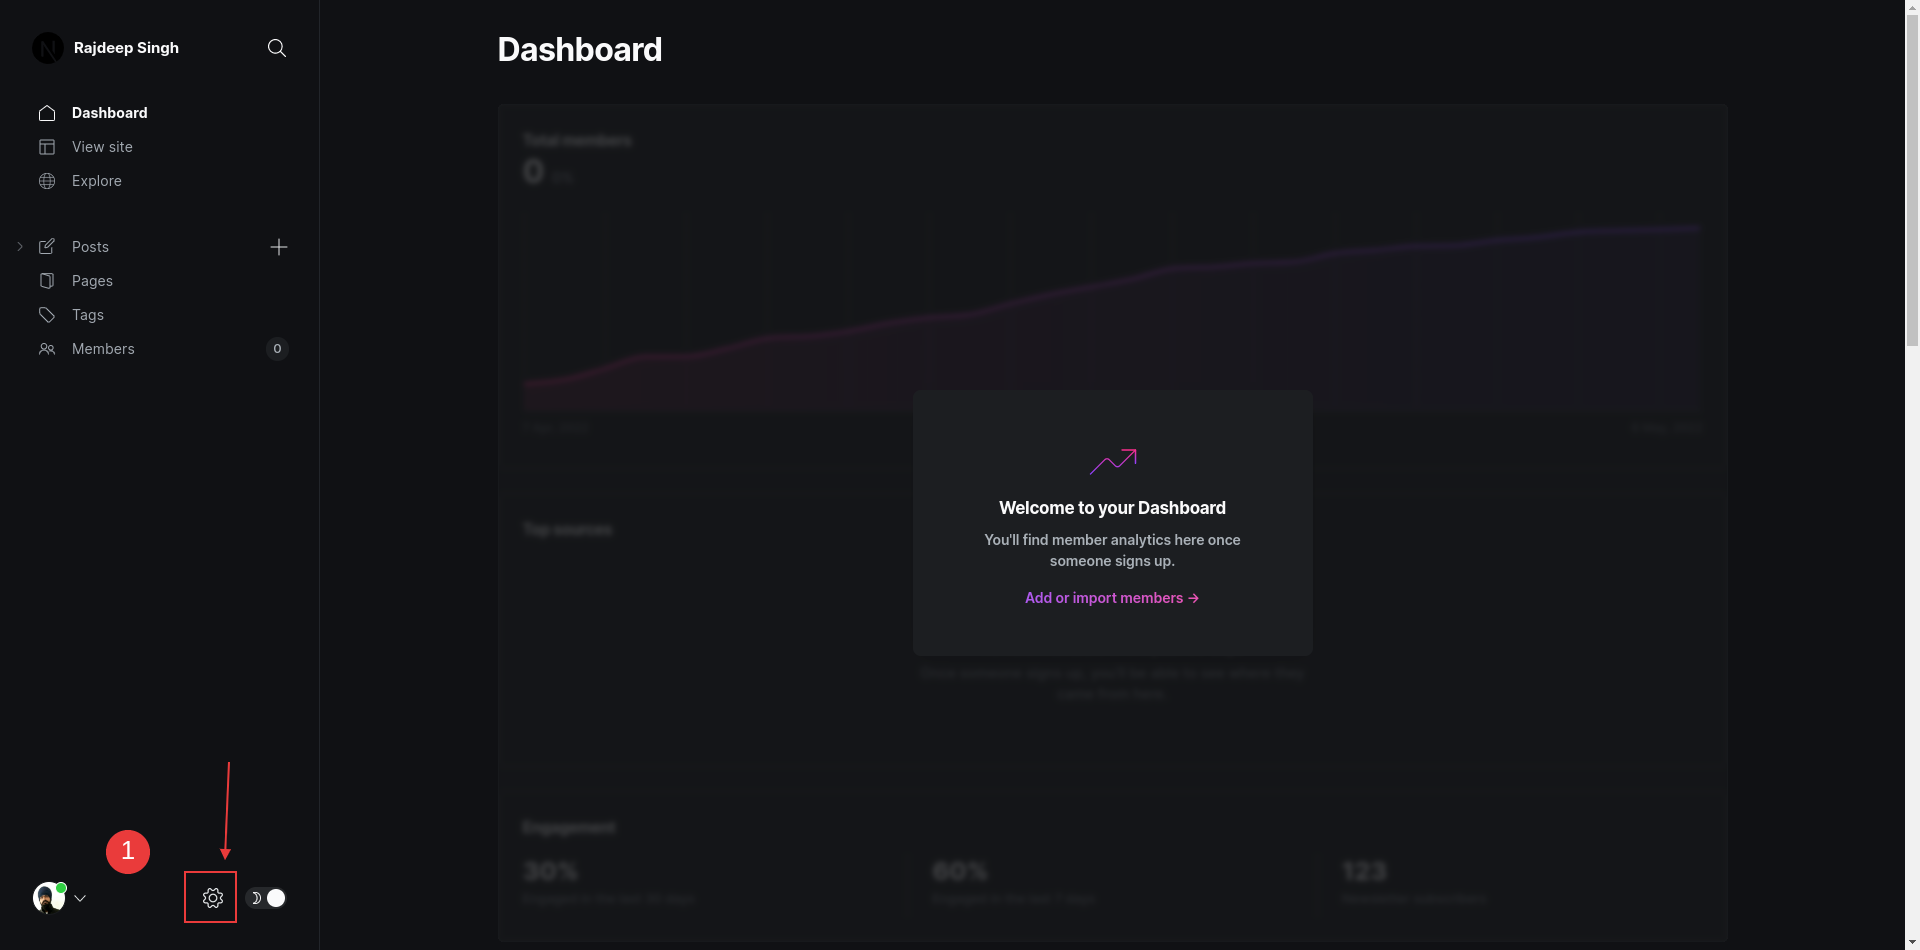 Ghost dashboard
Click on the setting icon.
 Ghost settings
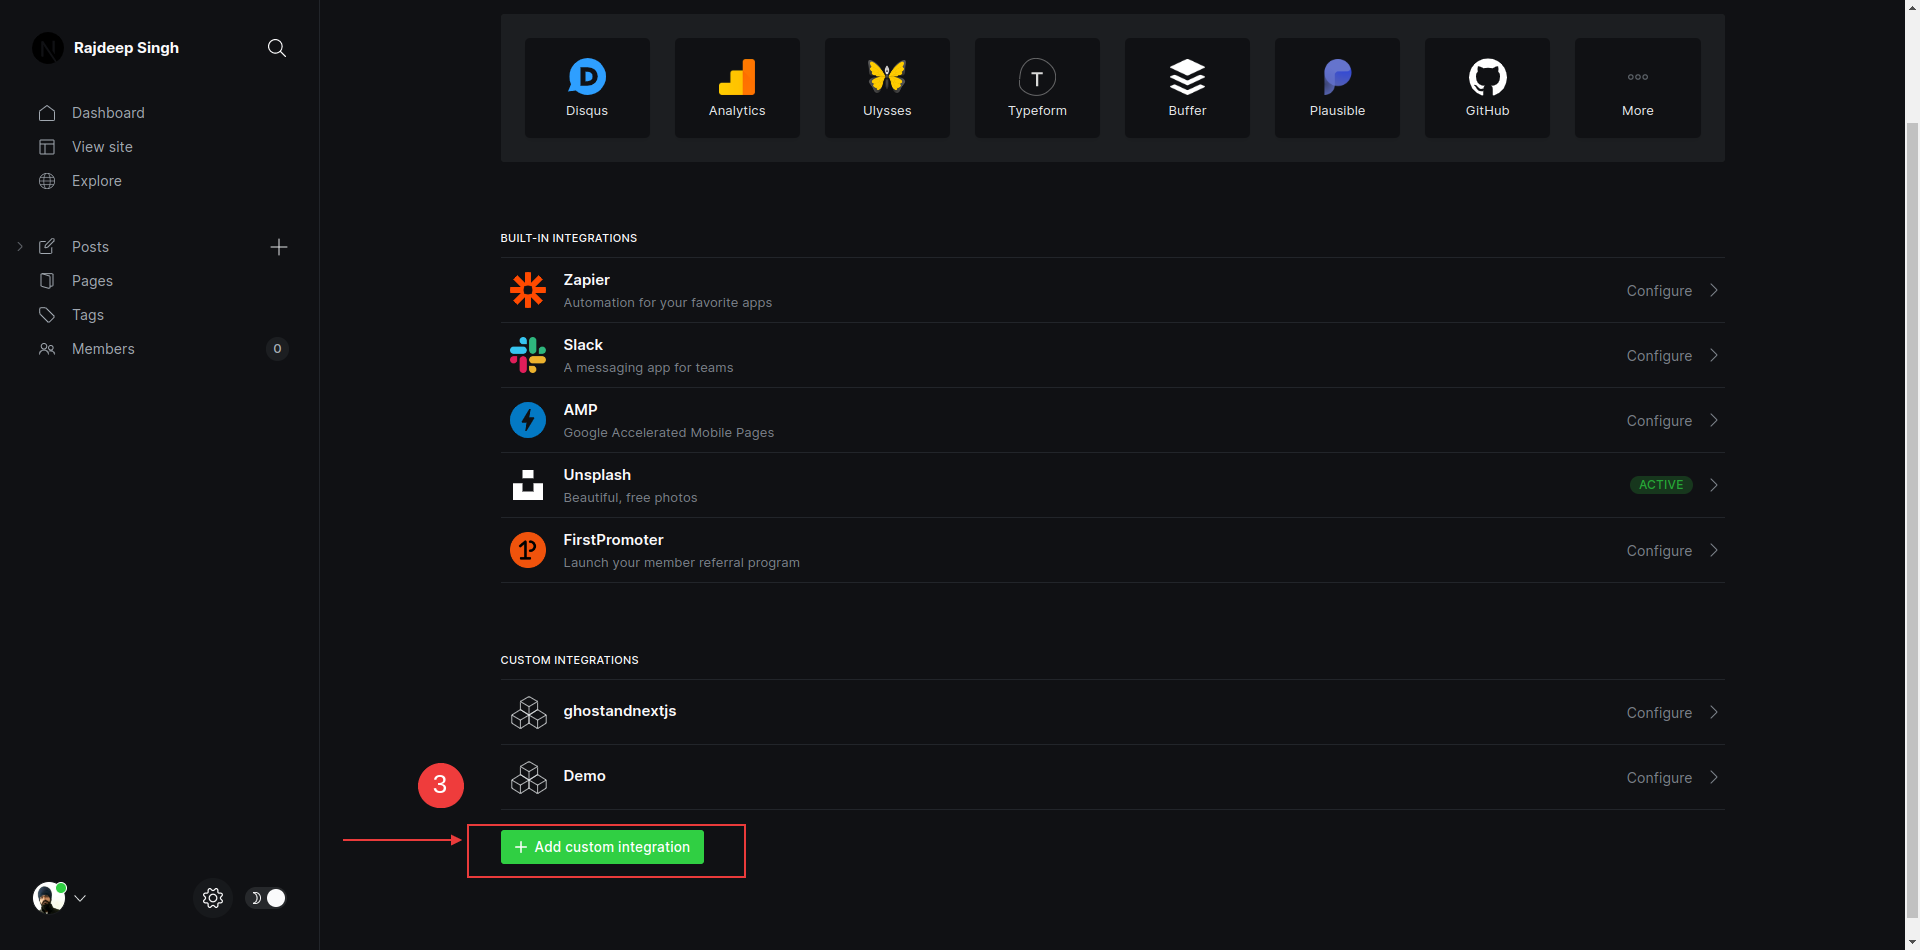
Click on the New custom integration button.
 Add a new custom integration
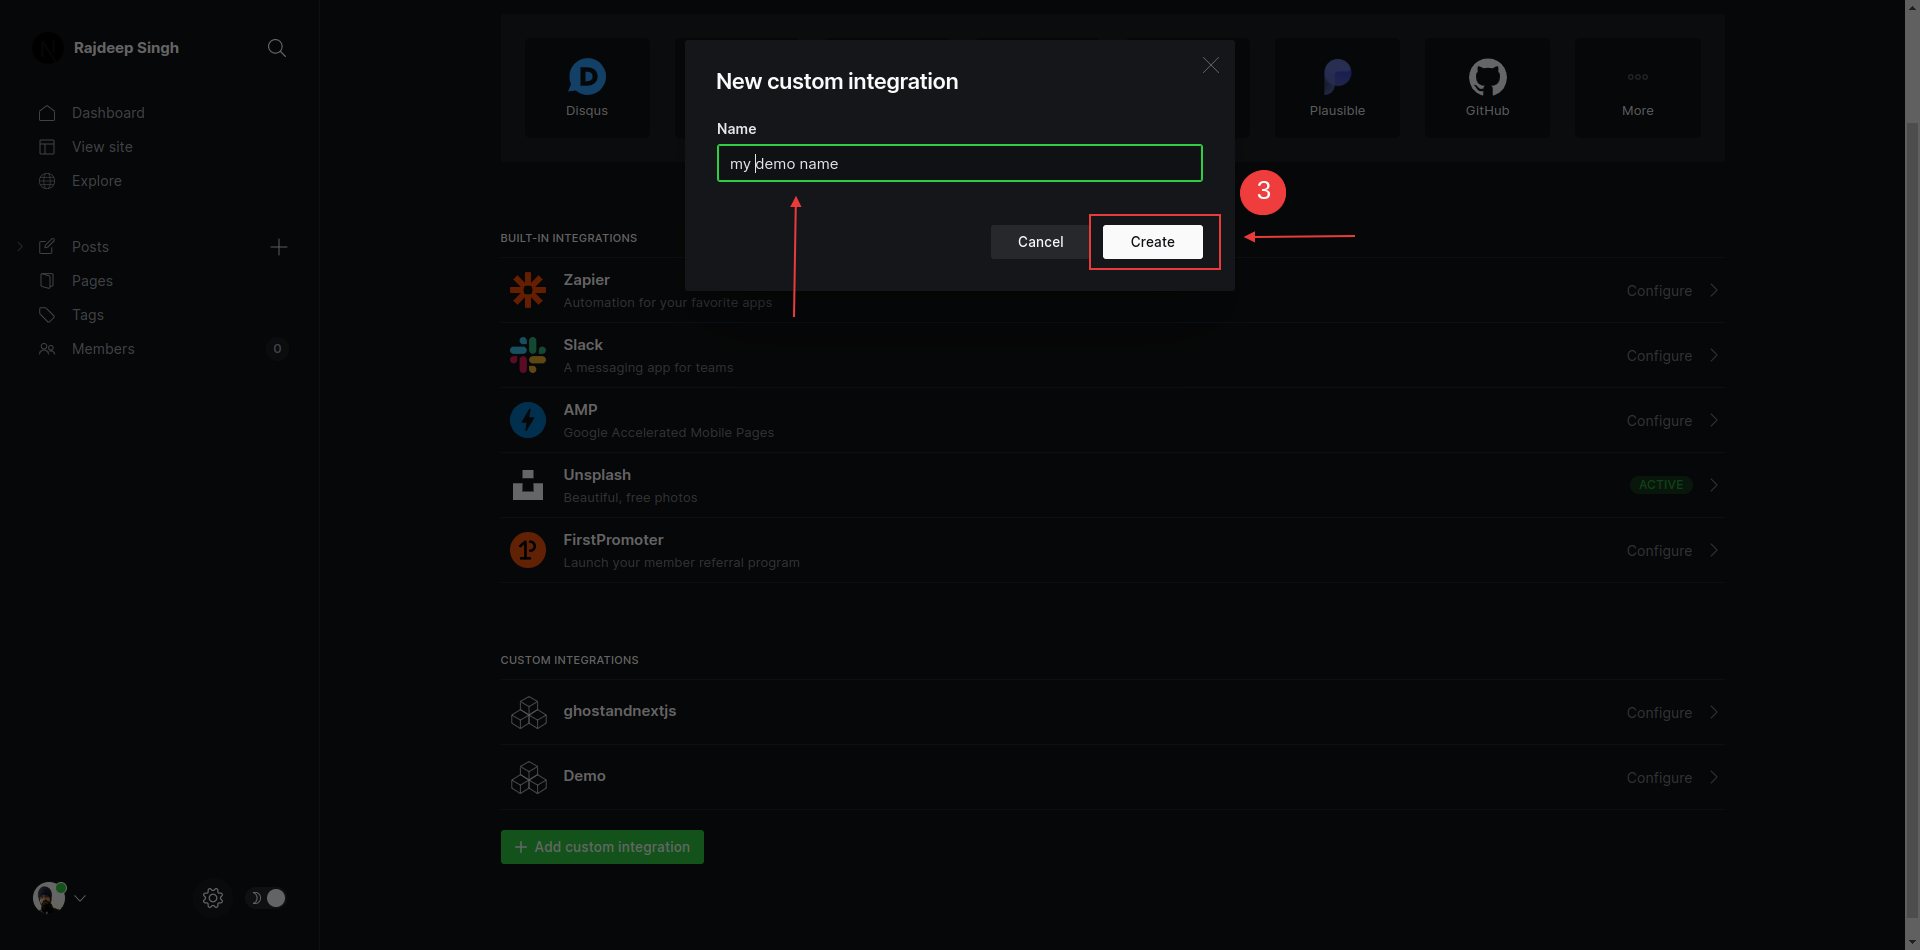
Enter the integration name.
 Add integration name
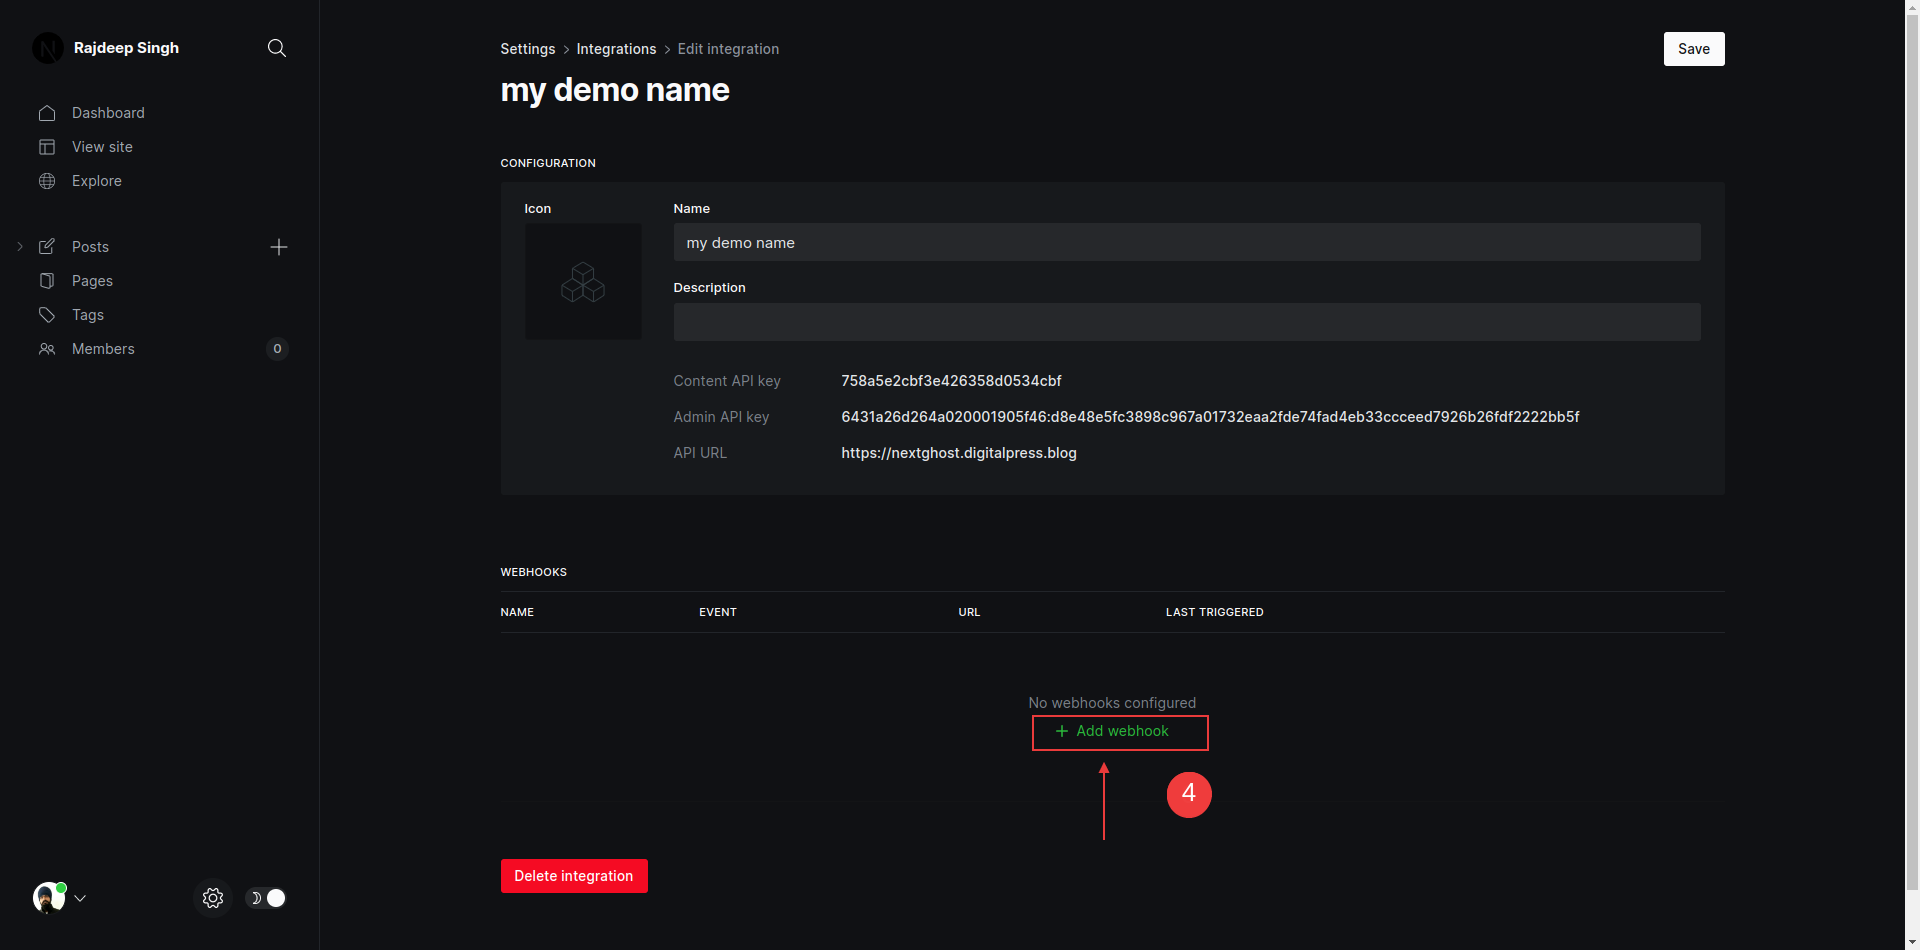
Click to add the webhook button.
 How to add the webhook
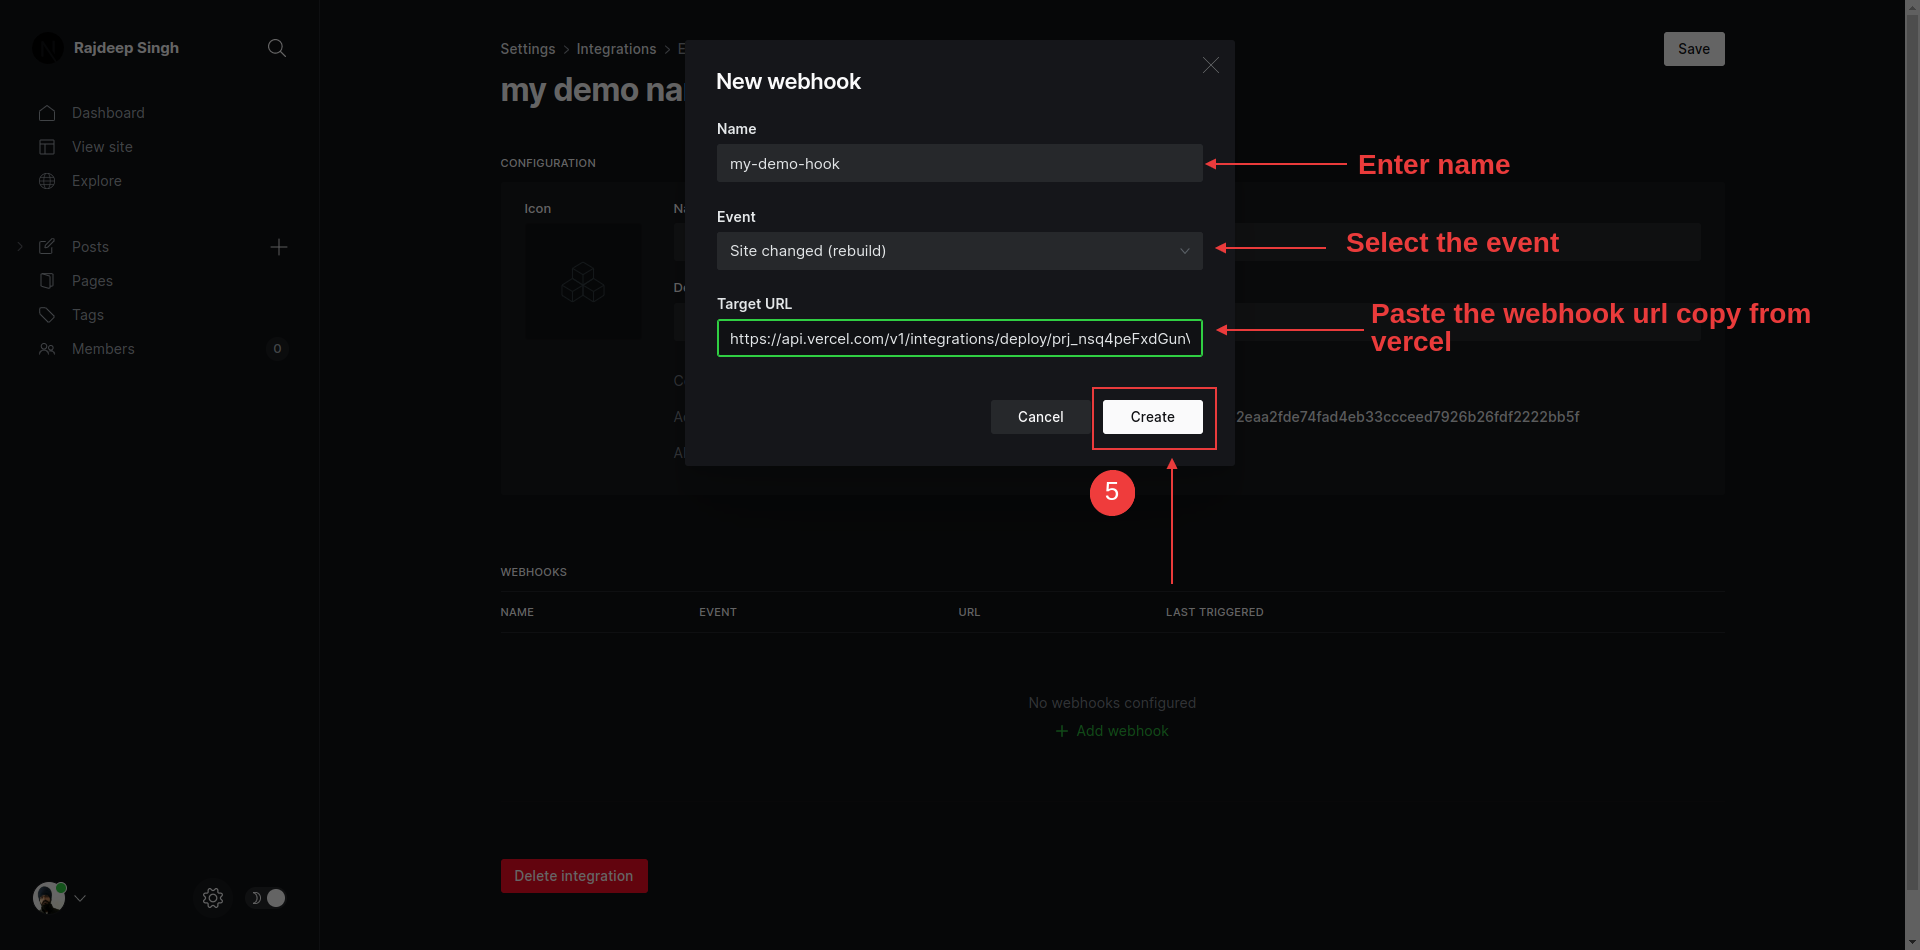
First, enter the name, then select Event and paste the URL which you copied from the Vercel dashboard.
Based on the event, Ghost will call the webhook, and your website will rebuild. Redeploys take time based on how big your site is, and so on.
Conclusion
Everything should work well using Next.js and the Ghost CMS as we've worked through in this tutorial.
But some of the Ghost editor components, like toggles, where you need JavaScript interaction, don't work. You can solve this by writing your own JavaScript or getting a JavaScript file for Ghost and adding it to the read/[slug]/page.tsx file.
You can save a lot of money on hosting by combining Next.js and the Ghost CMS API, but you lose some features like inbuilt signup, login, accounts, subscriptions, search bar, and member access levels.
You can share and follow me on Twitter and Linkedin. If you like my work, you can read more content on my blog, the officialrajdeepsingh.dev, frontend web, and Sign up for my free newsletter.
You can also check out awesome-next, a curated list of awesome Nextjs-based libraries that help build small and large-scale applications with Next.js.
Here are some additional resources you can use if you need more help or information while going through this tutorial:
I write tons of articles on Next. If you are interested in Next and related stuff, you can follow me on Medium and join the frontend web publication.